文章目录
论文信息
[v1] Going Deeper withConvolutions, 6.67% test error,2014.9
论文地址:http://arxiv.org/abs/1409.4842
[v2] Batch Normalization:Accelerating Deep Network Training by Reducing Internal Covariate Shift, 4.8% test error,2015.2
论文地址:http://arxiv.org/abs/1502.03167
[v3] Rethinking theInception Architecture for Computer Vision, 3.5%test error,2015.12
论文地址:http://arxiv.org/abs/1512.00567
[v4] Inception-v4,Inception-ResNet and the Impact of Residual Connections on Learning, 3.08% test error,2016.2
论文地址:http://arxiv.org/abs/1602.07261
Inception 架构动机
提高深度神经网络性能,最直接的方式是增加它们的尺寸:
-
不仅包括增加深度:网络层次的数目
-
也包括增加它的宽度:每一层的单元数目。
但是这个简单方案有两个主要的缺点:
-
更大的尺寸通常意味着更多的参数,这会使增大的网络更容易过拟合,尤其是在训练集的标注样本有限的情况下。
-
另一个缺点是计算资源使用的显著增加。例如,在一个深度视觉网络中,如果两个卷积层相连,它们的滤波器数目的任何均匀增加都会引起计算量平方式的增加。如果增加的能力使用时效率低下(例如,如果大多数权重结束时接近于0),那么会浪费大量的计算能力。
解决这两个问题的一个基本的方式就是引入稀疏性并将全连接层替换为稀疏的全连接层,甚至是卷积层。遗憾的是,切换到稀疏矩阵并不可行。当碰到在非均匀的稀疏数据结构上进行数值计算时,现在的计算架构效率非常低下。即使算法运算的数量减少100倍,查询和缓存丢失上的开销仍占主导地位。
Inception架构,尝试利用滤波器水平的稀疏性,通过密集矩阵计算来提高硬件计算效率。
Inception 架构细节
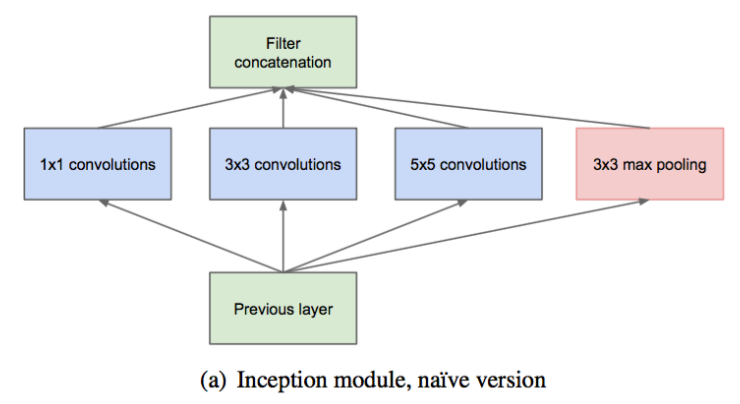
Inception 架构,使用不同尺寸的卷积核,在同一层提取不同的特征:
-
一个 block 就包含 卷积, 卷积, 卷积, 池化。 使用这样的尺寸不是必需的,可以根据需要进行调整。
-
这样,网络中每一层都能学习到“稀疏”( 、 )或“不稀疏”( )的特征,既增加了网络的宽度,也增加了网络对尺度的适应性。
-
通过deep concat 合成 block 的特征集合,获得非线性属性。
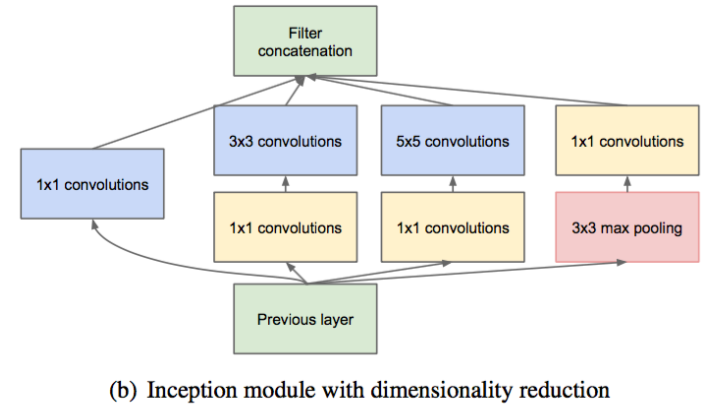
在具有大量滤波器的卷积层之上,即使适量的 卷积也可能是非常昂贵的。池化层输出和卷积层输出的合并,会导致输出数量不可避免的增加。虽然这种架构可能会覆盖最优稀疏结构,但它会非常低效,导致在几个阶段内计算量爆炸。
这导致了Inception架构的第二个想法:在昂贵的 和 卷积之前,用 卷积,在降维的同时,增加了ReLU(线性修正)单元。改进后的结构图如下:
通常,Inception网络是一个由上述类型的模块互相堆叠组成的网络,偶尔会有步长为2的最大池化层将网络分辨率减半。
GoogLeNet 网络结构 (Inception-v1)
GoogLeNet 网络层次结构:查看
-
所有的卷积都使用了ReLU(修正线性激活),包括Inception模块内部的卷积,网络有22个参数层。
-
作者将全连接层变为平均池化,提高了 top-1 大约 的准确率。即使移除了全连接层, 的使用仍是必须的。
-
作者通过在中间层中添加辅助分类器,在提供正则化的同时克服梯度消失问题。在训练期间,它们的损失以 的权重比例,加到网络的整个损失上。在预测时,不使用辅助分类器。作者后面的控制实验表明,辅助网络的影响相对较小(约 ),只需要其中一个就能取得同样的效果。
包括辅助分类器在内的附加网络的具体结构如下:
-
一个滤波器大小为 ,步长为 的平均池化层。
-
具有128个滤波器的 卷积,用于降维和修正线性激活。
-
一个全连接层,具有 个单元和修正线性激活。
-
丢弃70%输出的丢弃层。
-
使用带有 softmax 损失的线性层作为分类器(作为主分类器预测同样的1000类,但在预测时移除)。

GoogLeNet 与 VGG 对比
VGG 继承了 LeNet 以及 AlexNet 的一些框架结构,而 GoogLeNet 则做了更加大胆的网络结构尝试,虽然深度只有 层,但大小却比 AlexNet 和 VGG 小很多:
-
GoogLeNet 参数为 万个
-
AlexNet 参数个数是 GoogLeNet 的 倍
-
VGG 参数又是 AlexNet 的 倍
因此在内存或计算资源有限时,GoogLeNet 是比较好的选择;从模型结果来看,GoogLeNet 的性能却更加优越。
但 GoogLeNet 也有自身的问题:
-
GoogLeNet 为了防止梯度消失,在前面的层增加了两个损失函数,softmax0 和 softmax1,正是这两个损失函数导致了 GoogLeNet 的可拓展性没有 VGG 那么强
-
Inception 架构的复杂性使得更难以对网络进行更改。如果单纯地放大架构,大部分的计算收益可能会立即丢失。
但是即便如此,GoogLeNet 在分类领域还是非常好用的。
Inception-v2
Inception-v2 的结构,在 v1 的基础之上主要做了以下改进:
-
输入从 变为 。
-
使用 BN 层 (Batch-normalized),将每一层的输出都规范化到一个 的正态分布,这将有助于训练,因为下一层不必学习输入数据中的偏移,可以专注与如何更好地组合特征。
BN 层在 Inception-v2 中的优化效果,使其几乎成为深度网络的必备
-
使用 个 的卷积代替 的卷积,这样既可以获得相同的视野,在减少参数量的同时,还间接增加了网络的深度。网络结构如下:
-
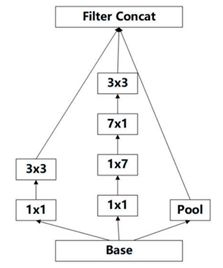
在理论上,可以通过非对称卷积( 卷积,后面接一个 卷积)来替换任何 的对称卷积。
-
在特征图大小为12~20的中间层,通过使用 卷积,后接 卷积可以获得非常好的结果。网络结构如下:

- 在特征图大小为 的高维特征上,可以增加多维滤波器输出,以此来产生高维的稀疏特征:

在 Imagenet 数据集上,Inception-v2 与 Inception-v1 相比,分类错误率由29%降为23.4%。
Inception-v3
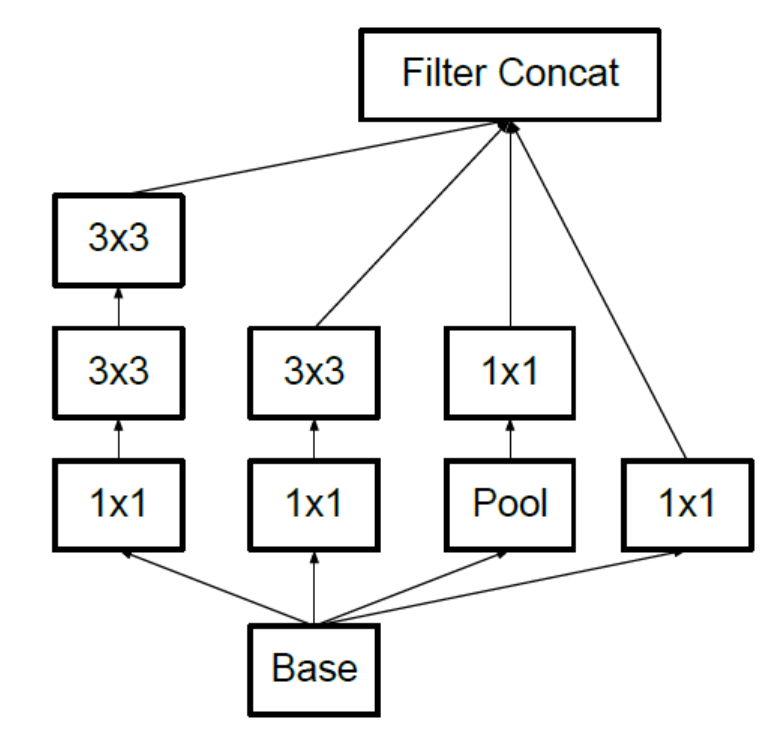
Inception 模块之间特征图的缩小,主要有下面两种方式:

-
Inception-v2 采用左图的方式,即在不同的 Inception 块之间(35/17/8的特征图大小)先用Pooling进行下采样,再进行 Inception 操作。
这种操作会造成表达瓶颈问题,也就是说特征图的大小不应该出现急剧的衰减(只经过一层就骤降)。如果出现急剧缩减,将会丢失大量的信息,对模型的训练造成困难。
-
右图是先进行 Inception 操作,再进行 Pooling 下采样,但是这样参数量明显多于左图。
-
因此,Inception-v3 采用一种并行的降维结构。35/17 之间的特征图尺寸减小方式:

- 17/8 之间的特征图尺寸缩小方式:
Inception-v3 微调
Inception-v3 权重文件下载: 地址
Inception-v3 微调:
import glob
import os.path
import random
import numpy as np
import tensorflow as tf
from tensorflow.python.platform import gfile

# 数据参数
MODEL_DIR = 'inception_dec_2015/'  # inception-v3模型的文件夹
MODEL_FILE = 'tensorflow_inception_graph.pb'  # inception-v3模型文件名
CACHE_DIR = 'tmp/bottleneck'  # 图像的特征向量保存地址
INPUT_DATA = './citySpace/outData/train'  # 图片数据文件夹
VALIDATION_PERCENTAGE = 10  # 验证数据的百分比
TEST_PERCENTAGE = 10  # 测试数据的百分比

# inception-v3模型参数
BOTTLENECK_TENSOR_SIZE = 2048  # inception-v3模型瓶颈层的节点个数
BOTTLENECK_TENSOR_NAME = 'pool_3/_reshape:0'  # inception-v3模型中代表瓶颈层结果的张量名称
JPEG_DATA_TENSOR_NAME = 'DecodeJpeg/contents:0'  # 图像输入张量对应的名称

# 神经网络的训练参数
LEARNING_RATE = 0.01
STEPS = 1000
BATCH = 100
CHECKPOINT_EVERY = 100
NUM_CHECKPOINTS = 5


# 从数据文件夹中读取所有的图片列表并按训练、验证、测试分开
def create_image_lists(validation_percentage, test_percentage):
    result = {}  # 保存所有图像。key为类别名称。value也是字典,存储了所有的图片名称
    sub_dirs = [x[0] for x in os.walk(INPUT_DATA)]  # 获取所有子目录
    is_root_dir = True  # 第一个目录为当前目录,需要忽略

    # 分别对每个子目录进行操作
    for sub_dir in sub_dirs:
        if is_root_dir:
            is_root_dir = False
            continue

        # 获取当前目录下的所有有效图片
        extensions = {'PNG', 'png'}
        file_list = []  # 存储所有图像
        dir_name = os.path.basename(sub_dir)  # 获取路径的最后一个目录名字
        for extension in extensions:
            file_glob = os.path.join(INPUT_DATA, dir_name, '*.' + extension)
            file_list.extend(glob.glob(file_glob))
        if not file_list:
            continue

        # 将当前类别的图片随机分为训练数据集、测试数据集、验证数据集
        label_name = dir_name.lower()  # 通过目录名获取类别的名称
        training_images = []
        testing_images = []
        validation_images = []
        for file_name in file_list:
            base_name = os.path.basename(file_name)  # 获取该图片的名称
            chance = np.random.randint(100)  # 随机产生100个数代表百分比
            if chance < validation_percentage:
                validation_images.append(base_name)
            elif chance < (validation_percentage + test_percentage):
                testing_images.append(base_name)
            else:
                training_images.append(base_name)

        # 将当前类别的数据集放入结果字典
        result[label_name] = {
            'dir': dir_name,
            'training': training_images,
            'testing': testing_images,
            'validation': validation_images
        }

    # 返回整理好的所有数据
    return result


# 通过类别名称、所属数据集、图片编号获取一张图片的地址
def get_image_path(image_lists, image_dir, label_name, index, category):
    label_lists = image_lists[label_name]  # 获取给定类别中的所有图片
    category_list = label_lists[category]  # 根据所属数据集的名称获取该集合中的全部图片
    mod_index = index % len(category_list)  # 规范图片的索引
    base_name = category_list[mod_index]  # 获取图片的文件名
    sub_dir = label_lists['dir']  # 获取当前类别的目录名
    full_path = os.path.join(image_dir, sub_dir, base_name)  # 图片的绝对路径
    return full_path


# 通过类别名称、所属数据集、图片编号获取特征向量值的地址
def get_bottleneck_path(image_lists, label_name, index, category):
    return get_image_path(image_lists, CACHE_DIR, label_name, index,
                          category) + '.txt'


# 使用inception-v3处理图片获取特征向量
def run_bottleneck_on_image(sess, image_data, image_data_tensor,
                            bottleneck_tensor):
    bottleneck_values = sess.run(bottleneck_tensor,
                                 {image_data_tensor: image_data})
    bottleneck_values = np.squeeze(bottleneck_values)  # 将四维数组压缩成一维数组
    return bottleneck_values


# 获取一张图片经过inception-v3模型处理后的特征向量
def get_or_create_bottleneck(sess, image_lists, label_name, index, category,
                             jpeg_data_tensor, bottleneck_tensor):
    # 获取一张图片对应的特征向量文件的路径
    label_lists = image_lists[label_name]
    sub_dir = label_lists['dir']
    sub_dir_path = os.path.join(CACHE_DIR, sub_dir)
    if not os.path.exists(sub_dir_path):
        os.makedirs(sub_dir_path)
    bottleneck_path = get_bottleneck_path(image_lists, label_name, index,
                                          category)

    # 如果该特征向量文件不存在,则通过inception-v3模型计算并保存
    if not os.path.exists(bottleneck_path):
        image_path = get_image_path(image_lists, INPUT_DATA, label_name, index,
                                    category)  # 获取图片原始路径
        image_data = gfile.FastGFile(image_path, 'rb').read()  # 获取图片内容
        bottleneck_values = run_bottleneck_on_image(
            sess, image_data, jpeg_data_tensor,
            bottleneck_tensor)  # 通过inception-v3计算特征向量

        # 将特征向量存入文件
        bottleneck_string = ','.join(str(x) for x in bottleneck_values)
        with open(bottleneck_path, 'w') as bottleneck_file:
            bottleneck_file.write(bottleneck_string)
    else:
        # 否则直接从文件中获取图片的特征向量
        with open(bottleneck_path, 'r') as bottleneck_file:
            bottleneck_string = bottleneck_file.read()
        bottleneck_values = [float(x) for x in bottleneck_string.split(',')]

    # 返回得到的特征向量
    return bottleneck_values


# 随机获取一个batch图片作为训练数据
def get_random_cached_bottlenecks(sess, n_classes, image_lists, how_many,
                                  category, jpeg_data_tensor,
                                  bottleneck_tensor):
    bottlenecks = []
    ground_truths = []
    for _ in range(how_many):
        # 随机一个类别和图片编号加入当前的训练数据
        label_index = random.randrange(n_classes)
        label_name = list(image_lists.keys())[label_index]
        image_index = random.randrange(65535)
        bottleneck = get_or_create_bottleneck(
            sess, image_lists, label_name, image_index, category,
            jpeg_data_tensor, bottleneck_tensor)
        ground_truth = np.zeros(n_classes, dtype=np.float32)
        ground_truth[label_index] = 1.0
        bottlenecks.append(bottleneck)
        ground_truths.append(ground_truth)
    return bottlenecks, ground_truths


# 获取全部的测试数据
def get_test_bottlenecks(sess, image_lists, n_classes, jpeg_data_tensor,
                         bottleneck_tensor):
    bottlenecks = []
    ground_truths = []
    label_name_list = list(image_lists.keys())
    # 枚举所有的类别和每个类别中的测试图片
    for label_index, label_name in enumerate(label_name_list):
        category = 'testing'
        for index, unused_base_name in enumerate(
                image_lists[label_name][category]):
            bottleneck = get_or_create_bottleneck(
                sess, image_lists, label_name, index, category,
                jpeg_data_tensor, bottleneck_tensor)
            ground_truth = np.zeros(n_classes, dtype=np.float32)
            ground_truth[label_index] = 1.0
            bottlenecks.append(bottleneck)
            ground_truths.append(ground_truth)
    return bottlenecks, ground_truths


def main(_):
    # 读取所有的图片
    image_lists = create_image_lists(VALIDATION_PERCENTAGE, TEST_PERCENTAGE)
    n_classes = len(image_lists.keys())

    with tf.Graph().as_default() as graph:
        # 读取训练好的inception-v3模型
        with gfile.FastGFile(os.path.join(MODEL_DIR, MODEL_FILE), 'rb') as f:
            graph_def = tf.GraphDef()
            graph_def.ParseFromString(f.read())
            # 加载inception-v3模型,并返回数据输入张量和瓶颈层输出张量
            bottleneck_tensor, jpeg_data_tensor = tf.import_graph_def(
                graph_def,
                return_elements=[
                    BOTTLENECK_TENSOR_NAME, JPEG_DATA_TENSOR_NAME
                ])

        # 定义新的神经网络输入
        bottleneck_input = tf.placeholder(
            tf.float32, [None, BOTTLENECK_TENSOR_SIZE],
            name='BottleneckInputPlaceholder')

        # 定义新的标准答案输入
        ground_truth_input = tf.placeholder(
            tf.float32, [None, n_classes], name='GroundTruthInput')

        # 定义一层全连接层解决新的图片分类问题
        with tf.name_scope('final_training_ops'):
            weights = tf.Variable(
                tf.truncated_normal(
                    [BOTTLENECK_TENSOR_SIZE, n_classes], stddev=0.1))
            biases = tf.Variable(tf.zeros([n_classes]))
            logits = tf.matmul(bottleneck_input, weights) + biases
            final_tensor = tf.nn.softmax(logits)

        # 定义交叉熵损失函数
        cross_entropy = tf.nn.softmax_cross_entropy_with_logits(
            logits=logits, labels=ground_truth_input)
        cross_entropy_mean = tf.reduce_mean(cross_entropy)
        train_step = tf.train.GradientDescentOptimizer(LEARNING_RATE).minimize(
            cross_entropy_mean)

        # 计算正确率
        with tf.name_scope('evaluation'):
            correct_prediction = tf.equal(
                tf.argmax(final_tensor, 1), tf.argmax(ground_truth_input, 1))
            evaluation_step = tf.reduce_mean(
                tf.cast(correct_prediction, tf.float32))

    # 训练过程
    with tf.Session(graph=graph) as sess:
        init = tf.global_variables_initializer().run()

        # 模型和摘要的保存目录
        import time
        timestamp = str(int(time.time()))
        out_dir = os.path.abspath(
            os.path.join(os.path.curdir, 'runs', timestamp))
        print('\nWriting to {}\n'.format(out_dir))
        # 损失值和正确率的摘要
        loss_summary = tf.summary.scalar('loss', cross_entropy_mean)
        acc_summary = tf.summary.scalar('accuracy', evaluation_step)
        # 训练摘要
        train_summary_op = tf.summary.merge([loss_summary, acc_summary])
        train_summary_dir = os.path.join(out_dir, 'summaries', 'train')
        train_summary_writer = tf.summary.FileWriter(train_summary_dir,
                                                     sess.graph)
        # 开发摘要
        dev_summary_op = tf.summary.merge([loss_summary, acc_summary])
        dev_summary_dir = os.path.join(out_dir, 'summaries', 'dev')
        dev_summary_writer = tf.summary.FileWriter(dev_summary_dir, sess.graph)
        # 保存检查点
        checkpoint_dir = os.path.abspath(os.path.join(out_dir, 'checkpoints'))
        checkpoint_prefix = os.path.join(checkpoint_dir, 'model')
        if not os.path.exists(checkpoint_dir):
            os.makedirs(checkpoint_dir)
            saver = tf.train.Saver(
                tf.global_variables(), max_to_keep=NUM_CHECKPOINTS)

        for i in range(STEPS):
            # 每次获取一个batch的训练数据
            train_bottlenecks, train_ground_truth = get_random_cached_bottlenecks(
                sess, n_classes, image_lists, BATCH, 'training',
                jpeg_data_tensor, bottleneck_tensor)
            _, train_summaries = sess.run(
                [train_step, train_summary_op],
                feed_dict={
                    bottleneck_input: train_bottlenecks,
                    ground_truth_input: train_ground_truth
                })

            # 保存每步的摘要
            train_summary_writer.add_summary(train_summaries, i)

            # 在验证集上测试正确率
            if i % 100 == 0 or i + 1 == STEPS:
                validation_bottlenecks, validation_ground_truth = get_random_cached_bottlenecks(
                    sess, n_classes, image_lists, BATCH, 'validation',
                    jpeg_data_tensor, bottleneck_tensor)
                validation_accuracy, dev_summaries = sess.run(
                    [evaluation_step, dev_summary_op],
                    feed_dict={
                        bottleneck_input: validation_bottlenecks,
                        ground_truth_input: validation_ground_truth
                    })
                print(
                    'Step %d : Validation accuracy on random sampled %d examples = %.1f%%'
                    % (i, BATCH, validation_accuracy * 100))

            # 每隔checkpoint_every保存一次模型和测试摘要
            if i % CHECKPOINT_EVERY == 0:
                dev_summary_writer.add_summary(dev_summaries, i)
                path = saver.save(sess, checkpoint_prefix, global_step=i)
                print('Saved model checkpoint to {}\n'.format(path))

        # 最后在测试集上测试正确率
        test_bottlenecks, test_ground_truth = get_test_bottlenecks(
            sess, image_lists, n_classes, jpeg_data_tensor, bottleneck_tensor)
        test_accuracy = sess.run(
            evaluation_step,
            feed_dict={
                bottleneck_input: test_bottlenecks,
                ground_truth_input: test_ground_truth
            })
        print('Final test accuracy = %.1f%%' % (test_accuracy * 100))

        # 保存标签
        output_labels = os.path.join(out_dir, 'labels.txt')
        with tf.gfile.FastGFile(output_labels, 'w') as f:
            keys = list(image_lists.keys())
            for i in range(len(keys)):
                keys[i] = '%2d -> %s' % (i, keys[i])
            f.write('\n'.join(keys) + '\n')


if __name__ == '__main__':
    tf.app.run()
Inception-v3 预测:
import tensorflow as tf
import numpy as np

# 模型目录
CHECKPOINT_DIR = './runs/1537964662/checkpoints'
INCEPTION_MODEL_FILE = 'inception_dec_2015/tensorflow_inception_graph.pb'

# inception-v3模型参数
BOTTLENECK_TENSOR_NAME = 'pool_3/_reshape:0'  # inception-v3模型中代表瓶颈层结果的张量名称
JPEG_DATA_TENSOR_NAME = 'DecodeJpeg/contents:0'  # 图像输入张量对应的名称

# 测试数据
file_path = './data/test.jpg'
y_test = [4]

# 读取数据
image_data = tf.gfile.FastGFile(file_path, 'rb').read()

# 评估
checkpoint_file = tf.train.latest_checkpoint(CHECKPOINT_DIR)
with tf.Graph().as_default() as graph:
    with tf.Session().as_default() as sess:
        # 读取训练好的inception-v3模型
        with tf.gfile.FastGFile(INCEPTION_MODEL_FILE, 'rb') as f:
            graph_def = tf.GraphDef()
            graph_def.ParseFromString(f.read())

        # 加载inception-v3模型,并返回数据输入张量和瓶颈层输出张量
        bottleneck_tensor, jpeg_data_tensor = tf.import_graph_def(
            graph_def,
            return_elements=[BOTTLENECK_TENSOR_NAME, JPEG_DATA_TENSOR_NAME])

        # 使用inception-v3处理图片获取特征向量
        bottleneck_values = sess.run(bottleneck_tensor,
                                     {jpeg_data_tensor: image_data})
        # 将四维数组压缩成一维数组,由于全连接层输入时有batch的维度,所以用列表作为输入
        bottleneck_values = [np.squeeze(bottleneck_values)]

        # 加载元图和变量
        saver = tf.train.import_meta_graph('{}.meta'.format(checkpoint_file))
        saver.restore(sess, checkpoint_file)

        # 通过名字从图中获取输入占位符
        input_x = graph.get_operation_by_name(
            'BottleneckInputPlaceholder').outputs[0]

        # 我们想要评估的tensors
        predictions = graph.get_operation_by_name('evaluation/ArgMax').outputs[
            0]

        # 收集预测值
        all_predictions = []
        all_predictions = sess.run(predictions, {input_x: bottleneck_values})

# 如果提供了标签则打印正确率
if y_test is not None:
    correct_predictions = float(sum(all_predictions == y_test))
    print('\nTotal number of test examples: {}'.format(len(y_test)))
    print('Accuracy: {:g}'.format(correct_predictions / float(len(y_test))))