目录
七、根据contours信息,构建外界矩形,并判断该轮廓是否合理
八、对合理矩形(区域),进行floodFill泛洪处理 & 综合后续
基于https://blog.csdn.net/jinshengtao/article/details/17883075该博客下的Python实现


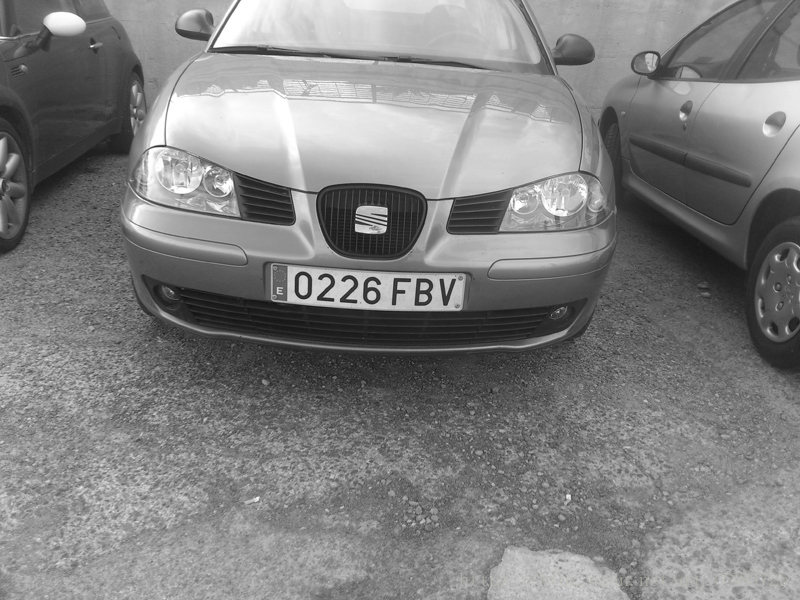
一、读入原始图片,灰度处理
# Step1  读入灰度图

initial_car = cv2.imread(r'F:\ml_summer\Opencv\Image\car.jpg')   #(600, 800, 3)  行,列,通道数


gray_car = cv2.cvtColor(initial_car,cv2.COLOR_BGR2GRAY)
原始图像

灰度图像
二、高斯模糊处理,去噪
采用5*5模版对图像进行高斯模糊来退出由照相机或其他环境噪声(如果不这么做,我们会得到很多垂直边缘,导致错误检测。)
# Step2  高斯模糊处理
blur_car = cv2.GaussianBlur(gray_car,(5,5),0)
关于
cv2.GaussianBlur(img,kernel_size,sigMax)函数的具体情况,参见https://blog.csdn.net/qq_37385726/article/details/82020214

三、Sobel滤波,边缘检测
为了识别出车牌这个信息,我们有效利用车牌矩形的特征,边缘信息明显,故我们使用Sobel边缘检测的方法进行边缘的识别
cv2.Sobel(img,dtype,dx,dy) 【dx是进行垂直边缘检测,dy是对于水平边缘检测】关于Sobel边缘检测,参见https://blog.csdn.net/qq_37385726/article/details/82020725
#Step3  Sobel计算水平导数
sobel_car = cv2.Sobel(blur_car,cv2.CV_16S,1,0)
sobel_car = cv2.convertScaleAbs(sobel_car)  #转回uint8
四、 Otsu大津算法自适应阈值二值化处理
为去除掉背景的噪声,单独的处理车牌这一目标对象,我们将原始的灰度图像进行二值化处理。
利用Otus算法进行二值处理,利用
cv2.threshold(img,threshold, maxval,type)实现,具体参见https://blog.csdn.net/qq_37385726/article/details/82015545 (固定阈值的二值化处理可以实现大津算法)
更多过于二值化处理(自适应阈值二值化处理)参见https://blog.csdn.net/qq_37385726/article/details/82017177
#Step4  Otsu大津算法自适应阈值二值化
_, otsu_car = cv2.threshold(sobel_car,0,255,cv2.THRESH_OTSU|cv2.THRESH_BINARY)
五、形态学操作,闭操作
利用形态学下的闭操作,将刚得到的二值化图像进行闭操作,消除黑色小块,填充闭合区域,将车牌区域连接起来,将车牌区域变成连通的区域,以便之后在轮廓提取的时候能将车牌作为一个区域提取出来
关于闭操作,参见https://blog.csdn.net/qq_37385726/article/details/82021970
#Step5  闭操作
kernel = cv2.getStructuringElement(cv2.MORPH_RECT,(8,8))
close_car = cv2.morphologyEx(otsu_car,cv2.MORPH_CLOSE,kernel)
六、轮廓提取
从闭操作得到的结果图像,提取图像中的轮廓信息(点集),该点集是有一个list包裹的,list中的每一个元素都是一个numpy.ndarray 点的集合。该点的集合就是我们提取到的一个区域的轮廓信息。
关于
cv2.findContours()
参见
#Step6  提取外部轮廓
img, contours, hierarchy = cv2.findContours(close_car,cv2.RETR_EXTERNAL, cv2.CHAIN_APPROX_NONE)
其中contours就是我们提取到的点集list
七、根据contours信息,构建外界矩形,并判断该轮廓是否合理
因为车牌是规则的矩形,有其长宽的信息,我们可以对构建的外接矩形的长宽信息进行处理来判断该外接矩形是否和车牌接近。
【阈值:长宽比为4.727272,允许误差范围正负40%,面积范围15*15至125*125】
故定义verifySizes函数
# 对minAreaRect获得的最小外接矩形,用纵横比进行判断
def verifySizes(RotatedRect):
    error = 0.4
    aspect = 4.7272
    min = 15 * aspect * 15
    max = 125 * aspect * 125
    rmin = aspect - aspect * error
    rmax = aspect + aspect * error
    height,width = RotatedRect[1]
    if height==0 or width==0:
        return False
    area = height * width
    r = width/height
    if r < 1:
        r = height/width
    if (area < min or area > max) or (r < rmin or r > rmax):
        return False
    else:
        return True
依据定义的验证函数,使用for循环一次遍历轮廓大点集中的点集集合
# 对minAreaRect获得的最小外接矩形,用纵横比进行判断
save = [] #存储合理轮廓
rectall = [] #存储对应的在最小面积矩形
for contour in contours:
rect = cv2.minAreaRect(contour)
if verifySizes(rect):
save.append(contour)
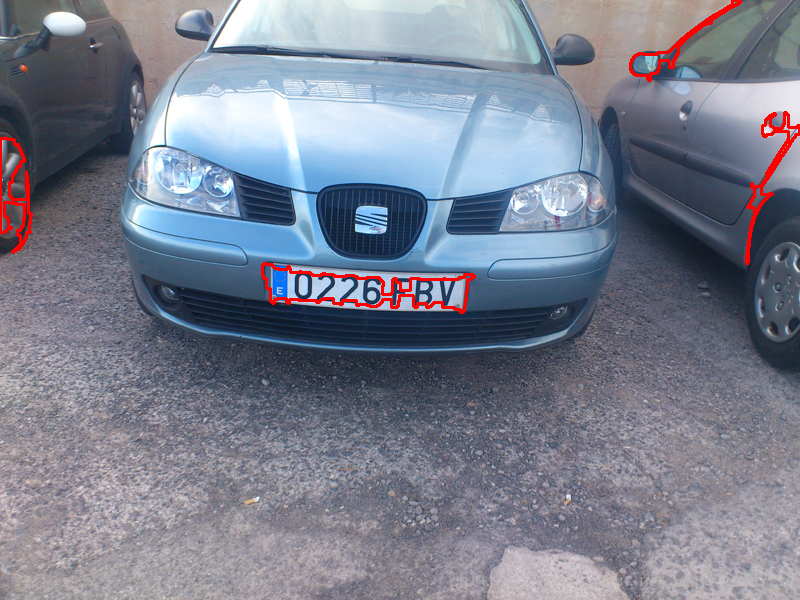
rectall.append(rect)下图为经过验证函数处理后得到的合理轮廓的点集,画成的轮廓图
cv2.drawContours(initial_car,save,-1,(0,0,255),2)
八、对合理矩形(区域),进行floodFill泛洪处理 & 综合后续
为了进一步提高效果,因为刚得到的合理的矩形所包括的车牌区域可能并不完整,所以我们使用泛洪处理来将得到的区域更为完整
step 1 : 利用合理矩形的中心点(rect[0])为中心,生成十个周围的随机种子点
Step 2:对生成的十个随机种子点,依次使用cv2.floodFill泛洪算法进行处理
生成的随机种子点图片(种子点:黄色,以矩形中心作圆:红色)

关于
cv2.floodFill(img,mask,(seed_x,seed_y),newvalue(b,g,r),(loDiff,loDiff,loDiff),(upDiff,upDiff,upDiff),flag)的详细信息,参见https://blog.csdn.net/qq_37385726/article/details/82313004
- 我们使用floodFill算法,对掩码层进行处理,则我们可以通过掩码层中被标记为255的像素点来判断是不是目标区域。
- 再将目标区域的点都保存成一个新点集,使用minAreaRect函数来提取最小面积矩形。
- 对最小面积矩形再次应用verifySize函数进行处理,得到合理的矩形
- 对得到的合理矩形的区域,在原图上进行图像切割
- 对切割后的图像,进行高斯模糊,去噪,直方图均衡化处理
- 保存
#Step7  得到矩形中心附近随机数点
for step,rect in enumerate(rectall):
    x,y = rect[0]   #x:列数,y:行数
    x = int(x)
    y = int(y)

    cv2.circle(initial_car,(x,y),3,(0,255,0),2)

    width, height = rect[1]
    minimum = width if width<height else height
    minimum = 0.5*minimum

    h,w=initial_car.shape[:2]  #600,


    mask = np.zeros((h + 2, w + 2), dtype=np.uint8)

    for i in range(10):
        seed_x = int(x+0.5*(np.random.random_integers(0,100000)%int(minimum)-(minimum/2)))
        seed_y = int(y+0.5*(np.random.random_integers(0,100000)%int(minimum)-(minimum/2)))

        cv2.circle(initial_car,(seed_x,seed_y),1,(0,255,255))

        loDiff = 7.95
        upDiff = 30
        Connectivity = 4
        flag = Connectivity + (255<<8) + cv2.FLOODFILL_MASK_ONLY
        cv2.floodFill(initial_car,mask,(seed_x,seed_y),(255,0,0),(loDiff,loDiff,loDiff),(upDiff,upDiff,upDiff),flag)

    # cv2.imshow(str(step),mask)

    points = []
    row,column = mask.shape

    for i in range(row):
        for j in range(column):
            if mask[i][j]==255:
                points.append((j,i))   #点应该输入点坐标(列,行)
    points = np.asarray(points)
    new_rect = cv2.minAreaRect(points)

    if verifySizes(new_rect):
        # 宽,高
        x,y = new_rect[0]
        new_width, new_height = new_rect[1]
        angel = new_rect[2]
        point1 = cv2.boxPoints(new_rect)[0]
        point2 = cv2.boxPoints(new_rect)[1]
        point3 = cv2.boxPoints(new_rect)[2]
        point4 = cv2.boxPoints(new_rect)[3]

        # cv2.line(initial_car,tuple(point1),tuple(point2),(255,255,255),2)
        # cv2.line(initial_car, tuple(point2), tuple(point3), (255, 255, 255), 2)
        # cv2.line(initial_car, tuple(point3), tuple(point4), (255, 255, 255), 2)
        # cv2.line(initial_car, tuple(point4), tuple(point1), (255, 255, 255), 2)  #width
        rotate = cv2.getRotationMatrix2D((x,y),90+angel,1)
        res = cv2.warpAffine(initial_car,rotate,initial_car.shape[:2])

        #img,(列,行),(中心)
        res = cv2.getRectSubPix(res,(int(new_height),int(new_width)),(x,y))

        #img,(列,行)
        res = cv2.resize(res,(105,25),interpolation=cv2.INTER_AREA)
        res = cv2.cvtColor(res,cv2.COLOR_BGR2GRAY)
        res = cv2.GaussianBlur(res,(3,3),0)
        res = cv2.equalizeHist(res)
        path = './Image/Sample/sample_'+str(step)+'.jpg'
        cv2.imwrite(path,res)
九、完整代码
import cv2
import numpy as np
from matplotlib import pyplot as plt


# Step1  读入灰度图

initial_car = cv2.imread(r'F:\ml_summer\Opencv\Image\car.jpg')   #(600, 800, 3)  行,列,通道数


gray_car = cv2.cvtColor(initial_car,cv2.COLOR_BGR2GRAY)

# Step2  高斯模糊处理
blur_car = cv2.GaussianBlur(gray_car,(5,5),0)


#Step3  Sobel计算水平导数
sobel_car = cv2.Sobel(blur_car,cv2.CV_16S,1,0)
sobel_car = cv2.convertScaleAbs(sobel_car)  #转回uint8

#Step4  Otsu大津算法自适应阈值二值化
_, otsu_car = cv2.threshold(sobel_car,0,255,cv2.THRESH_OTSU|cv2.THRESH_BINARY)


#Step5  闭操作
kernel = cv2.getStructuringElement(cv2.MORPH_RECT,(8,8))
close_car = cv2.morphologyEx(otsu_car,cv2.MORPH_CLOSE,kernel)
# cv2.imshow('sss',close_car)

#Step6  提取外部轮廓
img, contours, hierarchy = cv2.findContours(close_car,cv2.RETR_EXTERNAL, cv2.CHAIN_APPROX_NONE)


save = []  #存储合理轮廓
rectall = []  #存储对应的在最小面积矩形

# 对minAreaRect获得的最小外接矩形,用纵横比进行判断
def verifySizes(RotatedRect):
    error = 0.4
    aspect = 4.7272
    min = 15 * aspect * 15
    max = 125 * aspect * 125
    rmin = aspect - aspect * error
    rmax = aspect + aspect * error
    height,width = RotatedRect[1]
    if height==0 or width==0:
        return False
    area = height * width
    r = width/height
    if r < 1:
        r = height/width
    if (area < min or area > max) or (r < rmin or r > rmax):
        return False
    else:
        return True


for contour in contours:
    rect = cv2.minAreaRect(contour)
    if verifySizes(rect):
        save.append(contour)
        rectall.append(rect)

# cv2.drawContours(initial_car,save,-1,(0,0,255),2)


#Step7  得到矩形中心附近随机数点
for step,rect in enumerate(rectall):
    x,y = rect[0]   #x:列数,y:行数
    x = int(x)
    y = int(y)

    cv2.circle(initial_car,(x,y),3,(0,255,0),2)

    width, height = rect[1]
    minimum = width if width<height else height
    minimum = 0.5*minimum

    h,w=initial_car.shape[:2]  #600,


    mask = np.zeros((h + 2, w + 2), dtype=np.uint8)

    for i in range(10):
        seed_x = int(x+0.5*(np.random.random_integers(0,100000)%int(minimum)-(minimum/2)))
        seed_y = int(y+0.5*(np.random.random_integers(0,100000)%int(minimum)-(minimum/2)))

        cv2.circle(initial_car,(seed_x,seed_y),1,(0,255,255))

        loDiff = 7.95
        upDiff = 30
        Connectivity = 4
        flag = Connectivity + (255<<8) + cv2.FLOODFILL_MASK_ONLY
        cv2.floodFill(initial_car,mask,(seed_x,seed_y),(255,0,0),(loDiff,loDiff,loDiff),(upDiff,upDiff,upDiff),flag)

    # cv2.imshow(str(step),mask)

    points = []
    row,column = mask.shape

    for i in range(row):
        for j in range(column):
            if mask[i][j]==255:
                points.append((j,i))   #点应该输入点坐标(列,行)
    points = np.asarray(points)
    new_rect = cv2.minAreaRect(points)

    if verifySizes(new_rect):
        # 宽,高
        x,y = new_rect[0]
        new_width, new_height = new_rect[1]
        angel = new_rect[2]
        point1 = cv2.boxPoints(new_rect)[0]
        point2 = cv2.boxPoints(new_rect)[1]
        point3 = cv2.boxPoints(new_rect)[2]
        point4 = cv2.boxPoints(new_rect)[3]

        # cv2.line(initial_car,tuple(point1),tuple(point2),(255,255,255),2)
        # cv2.line(initial_car, tuple(point2), tuple(point3), (255, 255, 255), 2)
        # cv2.line(initial_car, tuple(point3), tuple(point4), (255, 255, 255), 2)
        # cv2.line(initial_car, tuple(point4), tuple(point1), (255, 255, 255), 2)  #width
        rotate = cv2.getRotationMatrix2D((x,y),90+angel,1)
        res = cv2.warpAffine(initial_car,rotate,initial_car.shape[:2])

        #img,(列,行),(中心)
        res = cv2.getRectSubPix(res,(int(new_height),int(new_width)),(x,y))

        #img,(列,行)
        res = cv2.resize(res,(105,25),interpolation=cv2.INTER_AREA)
        res = cv2.cvtColor(res,cv2.COLOR_BGR2GRAY)
        res = cv2.GaussianBlur(res,(3,3),0)
        res = cv2.equalizeHist(res)

        # 绘制直方图
        # hist = cv2.calcHist([res],[0],None,[256],[0,255])
        # plt.plot(hist,'r')
        # plt.hist(res.ravel(), 256, [0, 256],color='r')
        # plt.show()

        path = './Image/Sample/sample_'+str(step)+'.jpg'
        cv2.imwrite(path,res)

# cv2.imshow('now',initial_car)
cv2.waitKey(0)