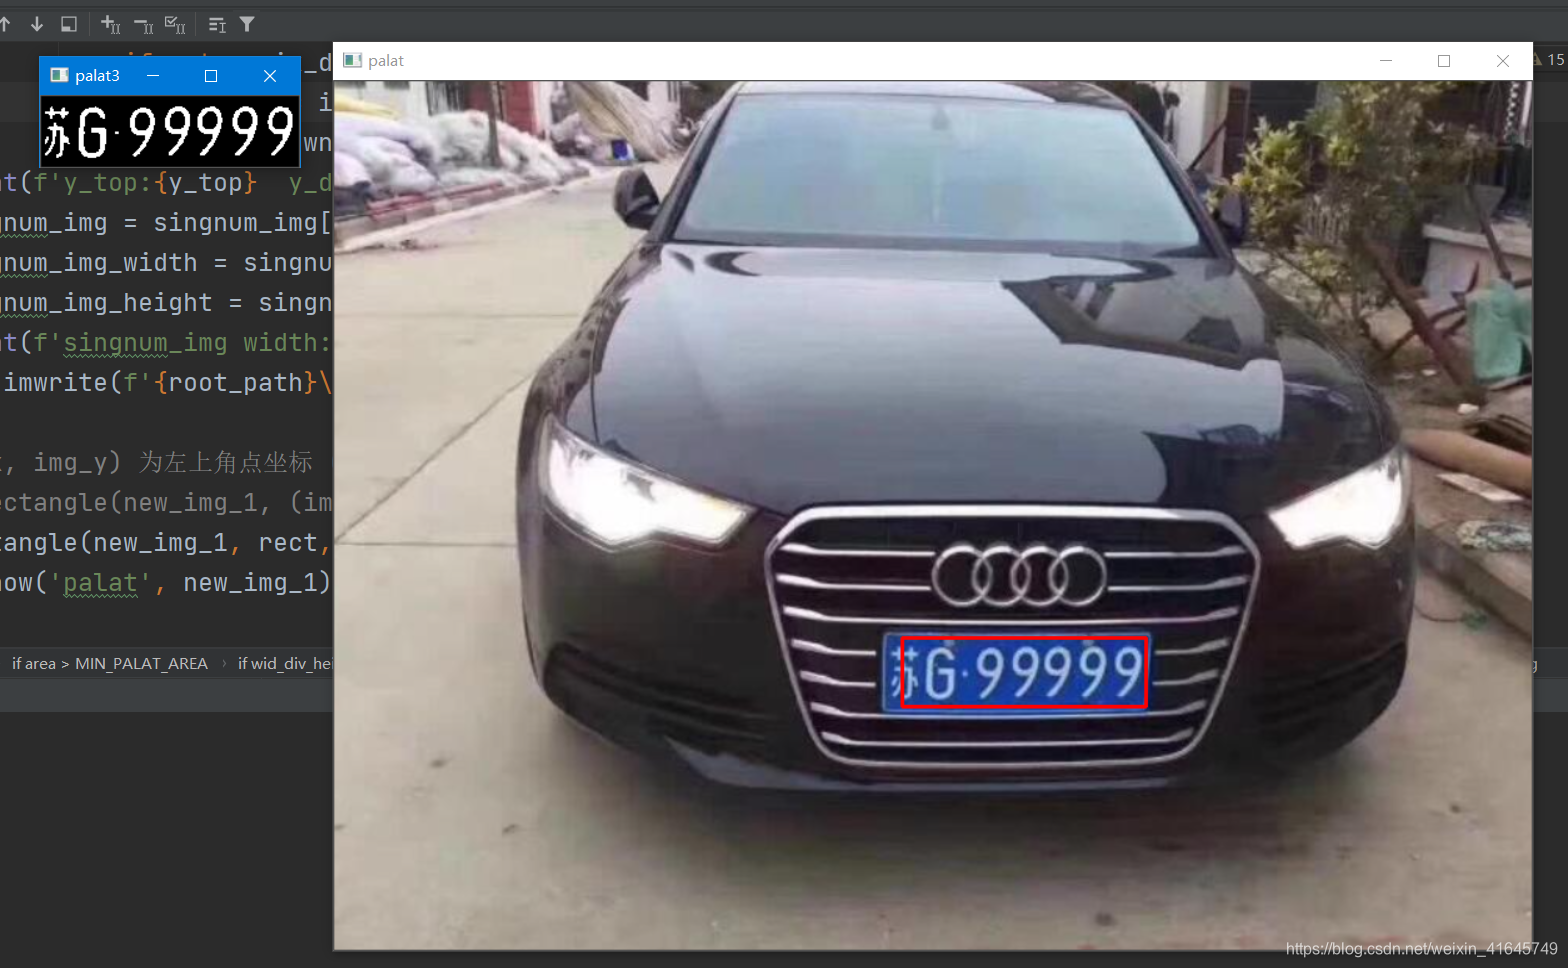
话不多说,先看最后成果图(如果想要全部工程,文章最后我会把github链接放上):


可以看到最终的识别车牌号码是:苏G99999。
其实前年冬天偶然想着用c++来做一个小项目,然后就用 c++ opencv 实现了车牌的提取和分割,然后找了一些博客自己跟着做,然后做出来了,但是效果并不是很好,用 c++ 的方法大概只能做到车牌提取和字符分割,但是最后的一步,切割出来的字符的识别,看了很多大佬的说法,都说用 CNN 来做效果最好,所以那个时候也就做到了分割,最后一步识别做不下去了。

上面就是用 c++ 跑出来的效果和当时这个小项目的日志,只做到车牌提取、分割。
然后去年的时候去学习了深度学习,用的框架的是 pytorch ,训练了很多 CNN 的模型,然后就想着,把之前没做完的车牌识别用 python + opencv + pytorch 搭建一个 CNN 模型来解决这个问题,目前这个模型我用自己收集的数据去跑,准确率在 90% 左右,然后用自己生成的车牌字符去跑一下,准确率还算可以。(如果需要训练的车牌字符数据集,可以帮忙点个赞,给我发个邮件)
我的思路分三步:
1、将车牌从图片里面抠出来
2、将车牌一个个字符分割开
3、将车牌 resize 成相应的尺寸
4、用 CNN 训练出车牌字符分类模型
5、用训练出来的模型去跑我们提取出的车牌字符得到车牌号
第一步:抠出车牌
这里主要是用到 opencv 里面的膨胀和腐蚀的一系列操作将车牌的矩形提取出来,然后根据提取出来的矩形来提取车牌。
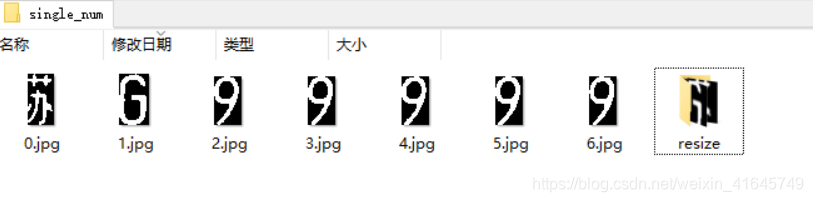
第二步:将抠出来的车牌分割成一个一个字符
这里先将车牌二值化之后,然后根据每个像素点在x轴上的投影来分割字符。(第一二步我写的方法效果还算可以,但是我感觉应该可以再优化一下,应为提取出的字符的图片噪声越小,CNN 的识别率越高,所以此处可不必参照我的方法来做,最主要是…这段代码写的太烂了,我自己都不堪回首)
def readjpg():

    img = cv2.imread(plate_path)
    # cv2.imshow('test', img)

    n = 1
    img_width = img.shape[0]
    img_height = img.shape[1]

    img_resize_width = round(n*img_width)
    img_resize_height = round(n*img_height)

    print(f'width:{img_width}, height:{img_height}')
    print(f'round_width:{img_resize_width}, rpund_height:{img_resize_height}')

    new_img_1 = cv2.resize(img, (img_resize_height, img_resize_width))
    # cv2.imshow('img2', new_img_1)
    # cv2.imshow('img', img)

    # 将输入的图像从一种颜色格式转化为另一种颜色格式(OpenCV中的默认颜色格式通常称为RGB,但实际上是BGR(字节是相反的)
    mark = cv2.cvtColor(new_img_1, cv2.COLOR_BGR2GRAY)
    # cv2.imshow('mark', mark)

    # 先做高斯模糊
    mark = cv2.GaussianBlur(mark, (3, 3), 3, 0)
    # cv2.imshow('guss', mark)

    # 边缘检测
    mark = cv2.Canny(mark, 300, 200, 3)
    # cv2.imshow('candy', mark)

    # 腐蚀和膨胀
    kernel_X = cv2.getStructuringElement(cv2.MORPH_RECT, (20, 1))           # 定义矩形卷积核
    mark = cv2.dilate(mark, kernel_X, (-1, -1),iterations=2)                # 膨胀操作
    mark = cv2.erode(mark, kernel_X, (-1, -1), iterations=4)                # 腐蚀操作

    kernel_Y = cv2.getStructuringElement(cv2.MORPH_RECT, (1, 15))           # 定义矩形卷积核
    mark = cv2.dilate(mark, kernel_X, (-1, -1), iterations=2)               # 膨胀操作
    mark = cv2.erode(mark, kernel_Y, (-1, -1), iterations=1)                # 腐蚀操作

    mark = cv2.dilate(mark, kernel_Y, (-1, -1), iterations=2)
    mark = cv2.medianBlur(mark, 15)
    mark = cv2.medianBlur(mark, 15)

    # cv2.imshow('erode', mark)

    conyours, h = cv2.findContours(mark, cv2.RETR_EXTERNAL, cv2.CHAIN_APPROX_SIMPLE)
    # print(len(conyours))
    find_palat_flag = False
    for index in range(len(conyours)):
        area = cv2.contourArea(conyours[index])
        print(area)
        if area > MIN_PALAT_AREA:
            rect = cv2.boundingRect(conyours[index])
            # print(rect)
            print(rect[0], rect[1], rect[2], rect[3])
            wid_div_height = rect[2]/rect[3]
            print(f'wid_div_height:{wid_div_height}')
            if wid_div_height > 3 and wid_div_height< 8:
                find_palat_flag = True
                print(rect)
                img_x = int(rect[0])
                img_y = int(rect[1])
                img_width = int(rect[2])
                img_height = int(rect[3])
                print(f'x:{img_x}, y:{img_y}, width:{img_width}, height:{img_height}')

                # imgx[110:130,50:70,2]表示一个范围:[高度起始点:高度结束点,宽度起始点:宽度结束点,哪个通道],起始点均以左上角
                plate_img = new_img_1[img_y:img_y + img_height, img_x-10:img_x + img_width]    # 分割出识别到的车牌的块 宽度两边加10
                # plate_img = cv2.cvtColor(plate_img, cv2.COLOR_BGR2HSV)
                plate_img = cv2.cvtColor(plate_img, cv2.COLOR_BGR2GRAY) # 转化为灰度图
                # plate_img = cv2.Canny(plate_img, 450, 120, 3)           # 边缘检测
                # 进行闭运算
                # kernel = np.ones((3, 3), np.uint8)
                # plate_img = cv2.morphologyEx(plate_img, cv2.MORPH_CLOSE, kernel)
                # cv2.imshow('palat2', plate_img)
                _, plate_img = cv2.threshold(plate_img, 140, 255, cv2.THRESH_BINARY)    # 二值化

                # 腐蚀和膨胀
                kernel_X = cv2.getStructuringElement(cv2.MORPH_RECT, (3, 3))  # 定义矩形卷积核
                plate_img = cv2.dilate(plate_img, kernel_X, (-1, -1), iterations=1)  # 膨胀操作
                plate_img = cv2.erode(plate_img, kernel_X, (-1, -1), iterations=1)  # 腐蚀操作

                cv2.imshow('palat3', plate_img) # 打印出被抠出来的车牌
                cv2.imwrite('palat.jpg', plate_img)

                # 分割车牌
                # 竖直方向上的投影
                plate_width = img_width + 10
                plate_height = img_height

                pix_list = []
                for i in range(plate_width):
                    num_pix = 0
                    for j in range(plate_height):
                        if plate_img[j][i] > 0:
                            num_pix += 1
                        # print(f'plate_img[{j}][{i}]:{plate_img[j][i]}')

                    num_pix = num_pix - 2
                    if num_pix <= 0:
                        num_pix = 0
                    print(f'num_pix:{num_pix}')

                    pix_list.append(num_pix)

                next_pix_len = 0
                index_start_list = []
                index_end_list = []
                flag_1 = True
                sum_len = 0
                sum_len_list = []
                print(f'pix_list_len:{len(pix_list)}')
                for i in range(len(pix_list)):
                    if pix_list[i] > 0:
                        sum_len += pix_list[i]
                        next_pix_len += 1
                        if flag_1:
                            index_start = i
                            index_start_list.append(index_start)
                            flag_1 = False
                    else:
                        if next_pix_len >=3:
                            sum_len_list.append(sum_len)
                            # print(f'sum_len = {sum_len}')
                            sum_len = 0
                            print(f'i:{i} next_pix_len:{next_pix_len}')
                            flag_1 = True
                            index_end_list.append(next_pix_len + index_start)
                        next_pix_len = 0
                    # print(f'index_start = {index_start}')
                # print(index_start_list)
                print(index_end_list)
                print(sum_len_list)
                sum_sort = []
                for index_o in range(len(sum_len_list)):
                    sum_sort.append(sum_len_list[index_o])
                print(f'sum_sort:[{sum_sort}]')

                # print(sorted(sum_len_list))
                print(f'len(index_end_list) = {len(index_end_list)}')
                sum_len_list_sort = sorted(sum_len_list)
                print(f'sum_len_list_sort:[{sum_len_list_sort}]')
                print(f'sum_sort:[{sum_sort}]')
                if len(sum_len_list_sort) > 7:
                    for index_m in range(0, len(sum_len_list_sort) - 7):
                        for index_p in range(len(sum_sort)):
                            if sum_sort[index_p] == sum_len_list_sort[index_m]:
                                print(f'{sum_sort[index_p]}=={sum_len_list_sort[index_m]}')
                                print(f'idx = {index_p}')
                                # print(f'index_start_list[index_p]={index_start_list[index_p]}')
                                del index_start_list[index_p]
                                del index_end_list[index_p]
                for index_i in range(len(index_end_list)):
                    print(f'[{index_start_list[index_i]}~{index_end_list[index_i]}]')
                    # cv2.imwrite(f'{index_i}.jpg', plate_img[0:plate_height, index_start_list[index_i]:index_end_list[index_i]+2])
                    singnum_img = plate_img[0:plate_height, index_start_list[index_i]:index_end_list[index_i]+2]
                    singnum_img_width = singnum_img.shape[1]
                    singnum_img_height = singnum_img.shape[0]
                    # print(f'singnum_img width:{singnum_img_width} singnum_img height:{singnum_img_height}')
                    y_top = 0
                    y_down = 0
                    y_pix_up_flag = True
                    y_pix_down_flag = True
                    for index_num_img_y in range(singnum_img_height):
                        for index_num_img_x in range(singnum_img_width):
                            if singnum_img[index_num_img_y][index_num_img_x] > 0:
                                y_pix_down_flag = False
                                if y_pix_up_flag:
                                    y_top = index_num_img_y
                                    y_pix_up_flag = False
                            else:
                                if not y_pix_down_flag:
                                    y_down = index_num_img_y
                                    y_pix_down_flag = True
                    print(f'y_top:{y_top}  y_down:{y_down}')
                    singnum_img = singnum_img[y_top:y_down+1, 0:singnum_img_width]
                    singnum_img_width = singnum_img.shape[1]
                    singnum_img_height = singnum_img.shape[0]
                    print(f'singnum_img width:{singnum_img_width} singnum_img height:{singnum_img_height}')
                    cv2.imwrite(f'{root_path}\\single_num\\{index_i}.jpg',singnum_img)

                # (img_x, img_y) 为左上角点坐标 (img_x+img_width, img_height+img_y) 为右下角点坐标,两个对角点确定一个矩形
                # cv2.rectangle(new_img_1, (img_x, img_y), (img_x+img_width, img_height+img_y),  (0, 0, 255), 2)
                cv2.rectangle(new_img_1, rect, (0, 0, 255), 2)                              # 将识别到的车牌在图像中框出来
                cv2.imshow('palat', new_img_1)

    if not find_palat_flag:
        print("Can't find palat!!!!")

    cv2.waitKey(0)
    return 0
这个接口是将第一步抠车牌和第二步车牌分割都封装了,写的比较烂…
第三步:将车牌 resize 成相应的尺寸
这里主要是为了后面将图片放到训练出的模型里面跑,将所有图片统一 size ,具体为将图片填充成 长:宽=4:5 的 size 然后 resize 成 32x40 ,这样可以保证提取出来的图片不会 resize 的时候拉伸变形。
def resize_image(image, height = IMAGE_HEIGHT, width = IMAGE_WIDTH):
    top, botton, left, right = 0, 0, 0, 0

    h, w, c = image.shape

    loggest_edge = max(h, w)

    # 计算短边需要多少增加多少宽度使之长宽相等
    if h < loggest_edge:
        dh = loggest_edge - h
        top = dh // 2
        botton = dh - top
    elif w < loggest_edge:
        dw = IMG_WIDTH - w
        left = dw // 2
        right = dw - left
    else:
        pass

    BLACK = [0, 0, 0]
    # 将图像转换为一个正方形的image,两边或者上下缺少的的用黑色矩形填充
    constant = cv2.copyMakeBorder(image, top, botton, left, right, cv2.BORDER_CONSTANT, value=BLACK)

    return cv2.resize(constant, (height, width))

def readpath(path_name):
    for dir_item in os.listdir(path_name):
        full_path = os.path.abspath(os.path.join(path_name, dir_item))  # 组合照片和路径的名字
        if os.path.isdir(full_path):    # 如果是文件夹,递归调用
            readpath(full_path)
        else:
            if dir_item.endswith('.jpg'):
                image = cv2.imread(full_path)
                image = resize_image(image, IMAGE_WIDTH, IMAGE_HEIGHT)

                images.append(image)
                # print('full_path:', full_path)
                # print('dir_item:', dir_item)
                labels.append(dir_item)
    return images, labels

def load_dataset(path_name):
    images, labels = readpath(path_name)

    resizedata_path = RESIZE_IMG_PATH
    # resizedata_path = 'D:\\DeapLearn Project\\Face_Recognition\\moreface\\7219face\\test\\resizeface\\'
    for i in range(len(images)):
        if not os.path.exists(resizedata_path):
            os.mkdir(resizedata_path)
        img_name = '%s//%s' % (resizedata_path, labels[i])
        cv2.imwrite(img_name, images[i])

第四步:用 CNN 训练出车牌字符分类模型
我找了一个车牌字符的数据集,总共有 0-9 的数字 还有 A-Z 除去‘I’和’‘O’的 24 个大写英文字母 还有 6个省的缩写:

每个分类的文件夹内有若干张二值化的字符图片,然后根据这个数据集来训练出模型。
# 数据集类
class MyDataSet(Dataset):
    def __init__(self, data_path:str, transform=None):  # 传入训练样本路径
        super(MyDataSet, self).__init__()
        self.data_path = data_path
        if transform is None:
            self.transform = transforms.Compose(
                [
                    transforms.Resize(size=(32, 40)), # 原本就是 32x40 不需要修改尺寸
                    transforms.ToTensor(),
                    transforms.Normalize((0.5, 0.5, 0.5), (0.5, 0.5, 0.5)),
                    # transforms.Normalize((0.485, 0.456, 0.406), (0.229, 0.224, 0.225)),
                ]
            )
        else:
            self.transform = transform
        self.path_list = os.listdir(data_path)

    def __getitem__(self, idx:int):
        img_path = self.path_list[idx]
        label = int(img_path.split('.')[1])
        label = torch.as_tensor(label, dtype=torch.int64)
        img_path = os.path.join(self.data_path, img_path)
        img = Image.open(img_path)
        img = self.transform(img)
        return img, label

    def __len__(self)->int:
        return len(self.path_list)


train_ds = MyDataSet(train_path)
test_data = MyDataSet(test_path)
# for i, item in enumerate(tqdm(train_ds)):
#     print(item)
#     break

# 数据加载
new_train_loader = DataLoader(train_ds, batch_size=32, shuffle=True, pin_memory=True, num_workers=0)
new_test_loader = DataLoader(test_data, batch_size=32, shuffle=False, pin_memory=True, num_workers=0)

# for i, item in enumerate(new_train_loader):
#     print(item[0].shape)
#     break
#
# img_PIL_Tensor = train_ds[1][0]
# new_img_PIL = transforms.ToPILImage()(img_PIL_Tensor).convert('RGB')
# plt.imshow(new_img_PIL)
# plt.show()


# 设置训练类
class Net(torch.nn.Module):
    def __init__(self):
        super(Net, self).__init__()
        self.conv1 = torch.nn.Conv2d(3, 64, kernel_size=3, padding=1)
        self.conv2 = torch.nn.Conv2d(64, 64, kernel_size=3, padding=1)
        self.conv3 = torch.nn.Conv2d(64, 128, kernel_size=3, padding=1)
        self.conv4 = torch.nn.Conv2d(128, 128, kernel_size=3, padding=1)
        self.conv5 = torch.nn.Conv2d(128, 256, kernel_size=3, padding=1)
        self.conv6 = torch.nn.Conv2d(256, 256, kernel_size=3, padding=1)
        self.maxpooling = torch.nn.MaxPool2d(2)
        self.avgpool = torch.nn.AvgPool2d(2)
        self.globalavgpool = torch.nn.AvgPool2d((8, 10))
        self.bn1 = torch.nn.BatchNorm2d(64)
        self.bn2 = torch.nn.BatchNorm2d(128)
        self.bn3 = torch.nn.BatchNorm2d(256)
        self.dropout50 = torch.nn.Dropout(0.5)
        self.dropout10 = torch.nn.Dropout(0.1)

        self.fc1 = torch.nn.Linear(256, 40)

    def forward(self, x):
        batch_size = x.size(0)
        x = self.bn1(F.relu(self.conv1(x)))
        x = self.bn1(F.relu(self.conv2(x)))
        x = self.maxpooling(x)
        x = self.dropout10(x)
        x = self.bn2(F.relu(self.conv3(x)))
        x = self.bn2(F.relu(self.conv4(x)))
        x = self.maxpooling(x)
        x = self.dropout10(x)
        x = self.bn3(F.relu(self.conv5(x)))
        x = self.bn3(F.relu(self.conv6(x)))
        x = self.globalavgpool(x)
        x = self.dropout50(x)

        x = x.view(batch_size, -1)

        x = self.fc1(x)
        return x

第五步:用训练出来的模型去跑我们提取出的车牌字符得到车牌号
这里直接加载上一步训练出的模型,然后将我们 resize 好车牌字符图片导入模型就能得到预测的车牌号。
def test():
    correct = 0
    total = 0
    with torch.no_grad():
        for _, data in enumerate(new_test_loader, 0):
            inputs, _ = data[0], data[1]
            inputs = inputs.to(device)
            outputs = model(inputs)
            # print(outputs.shape)
            _, prediction = torch.max(outputs.data, dim=1)
            print('-'*40)
            # print(target)
            # print(prediction)
            print(f'Predicted license plate number:'
                  f'{SINGLE_CHAR_LIST[prediction[0]]}'
                  f'{SINGLE_CHAR_LIST[prediction[1]]}'
                  f'{SINGLE_CHAR_LIST[prediction[2]]}'
                  f'{SINGLE_CHAR_LIST[prediction[3]]}'
                  f'{SINGLE_CHAR_LIST[prediction[4]]}'
                  f'{SINGLE_CHAR_LIST[prediction[5]]}'
                  f'{SINGLE_CHAR_LIST[prediction[6]]}')

可以看到预测的车牌号为:苏G99999
和我们输入的图片上车牌号一致。
以上就是整个车牌识别的过程,这里我只贴出了一些关键步骤的代码,如需要整个工程,可去GitHub取。
参考文章:
行歌er 大佬的c++实现车牌识别
B站刘老师的《PyTorch深度学习实践》课程
工程GitHub:Github链接(帮忙点个星,谢谢了)
想要数据集给我发个邮件[email protected]