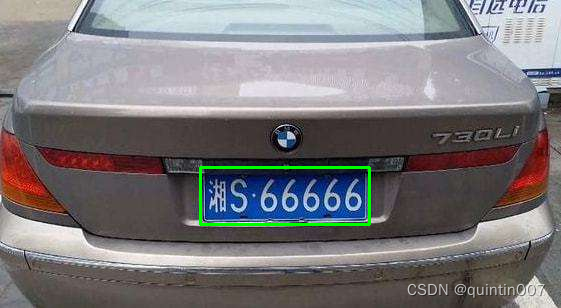
Opencv识别车牌
#encoding:utf8
import cv2
import numpy as np
Min_Area = 50
#定位车牌
def color_position(img,output_path):
colors = [#([26,43,46], [34,255,255]), # 黄色
([100,43,46], [124,255,255]), # 蓝色
([35, 43, 46], [77, 255, 255]) # 绿色
]
hsv =cv2.cvtColor(img, cv2.COLOR_BGR2HSV)
for (lower, upper) in colors:
lower = np.array(lower, dtype=“uint8”) # 颜色下限
upper = np.array(upper, dtype=“uint8”) # 颜色上限
    # 根据阈值找到对应的颜色
    mask = cv2.inRange(hsv, lowerb=lower, upperb=upper)
    cv2.imshow("mask", mask)
    cv2.waitKey(0)
    output = cv2.bitwise_and(img, img, mask=mask)
    cv2.imshow("output", output)
    cv2.waitKey(0)
    k = mark_zone_color(output,output_path)
    if k==1:
        return 1
    # 展示图片
    #cv2.imshow("image", img)
    #cv2.imshow("image-color", output)
    #cv2.waitKey(0)
return 0
def mark_zone_color(src_img,output_img):
#根据颜色在原始图像上标记
#转灰度
gray = cv2.cvtColor(src_img,cv2.COLOR_BGR2GRAY)
cv2.imshow(“gray”, gray)
cv2.waitKey(0)
#图像二值化
#ret,binary_OTSU = cv2.threshold(gray,0,255,cv2.THRESH_BINARY+cv2.THRESH_OTSU)
ret,binary = cv2.threshold(gray,0,255,cv2.THRESH_BINARY)
cv2.imshow(“binary”, binary)
cv2.waitKey(0)
#轮廓检测
contours,hierarchy = cv2.findContours(binary,cv2.RETR_TREE,cv2.CHAIN_APPROX_NONE)
drawing = img.copy()
if len(contours)>0:
    cv2.drawContours(drawing, contours, -1, (0, 0, 255), 3) # 填充轮廓颜色
    cv2.imshow('drawing', drawing)
    cv2.waitKey(0)
#print(contours)

temp_contours = [] # 存储合理的轮廓
car_plates=[]
if len(contours)>0:
    for contour in contours:
        if cv2.contourArea(contour) > Min_Area:
            temp_contours.append(contour)
        car_plates = []
        for temp_contour in temp_contours:
            rect_tupple = cv2.minAreaRect(temp_contour)
            rect_width, rect_height = rect_tupple[1]
            if rect_width < rect_height:
                rect_width, rect_height = rect_height, rect_width
            aspect_ratio = rect_width / rect_height
            # 车牌正常情况下宽高比在2 - 5.5之间
            if aspect_ratio > 2 and aspect_ratio < 5.5:
                car_plates.append(temp_contour)
                #rect_vertices = cv2.boxPoints(rect_tupple)
                #rect_vertices = np.int0(rect_vertices)
        if len(car_plates)==1:
            #oldimg = cv2.drawContours(img, [rect_vertices], -1, (0, 0, 255), 2)
            #cv2.imshow("che pai ding wei", oldimg)
            #print(rect_tupple)
            break

#把车牌号所在的位置截取出来
if len(car_plates)==1:
    # 方法1 利用轮廓的坐标点来获取左上角 右下角的坐标
    #for car_plate in car_plates:
        ## 左上角的坐标
        #row_min,col_min = np.min(car_plate[:,0,:],axis=0)
        ## 右下角的坐标
        #row_max,col_max = np.max(car_plate[:,0,:],axis=0)
        #cv2.rectangle(img,(row_min,col_min),(row_max,col_max),(0,255,0),2)
        #card_img = img[col_min:col_max,row_min:row_max,:]
        #cv2.imshow("img",img)
    # 方法2,利用外接矩形来定位
    x,y,w,h = cv2.boundingRect(car_plates[0])
    cv2.rectangle(img,(x,y),(x+w, y+h),(0,255,0),2)
    cv2.imshow("img",img)
    cv2.waitKey(0)
    card_img = img[y:y+h,x:x+w,:]
    cv2.imwrite('card_img.jpg',card_img)
    cv2.imshow("card_img.",card_img)
    cv2.waitKey(0)
    cv2.destroyAllWindows()
    return 1
return 0
if name == “main”:
img = cv2.imread(‘…\Opencv-6-datas\cartest.png’)
color_position(img, ‘’)
#encoding:utf8
import  cv2
import numpy as np
Min_Area = 50
#定位车牌
def color_position(img,output_path):
    colors = [#([26,43,46], [34,255,255]), # 黄色
           ([100,43,46], [124,255,255]), # 蓝色
    ([35, 43, 46], [77, 255, 255]) # 绿色
    ]
    hsv =cv2.cvtColor(img, cv2.COLOR_BGR2HSV)
    for (lower, upper) in colors:
        lower = np.array(lower, dtype="uint8") # 颜色下限
        upper = np.array(upper, dtype="uint8") # 颜色上限

        # 根据阈值找到对应的颜色
        mask = cv2.inRange(hsv, lowerb=lower, upperb=upper)
        cv2.imshow("mask", mask)
        cv2.waitKey(0)
        output = cv2.bitwise_and(img, img, mask=mask)
        cv2.imshow("output", output)
        cv2.waitKey(0)
        k = mark_zone_color(output,output_path)
        if k==1:
            return 1
        # 展示图片
        #cv2.imshow("image", img)
        #cv2.imshow("image-color", output)
        #cv2.waitKey(0)
    return 0
def mark_zone_color(src_img,output_img):
    #根据颜色在原始图像上标记
    #转灰度
    gray = cv2.cvtColor(src_img,cv2.COLOR_BGR2GRAY)
    cv2.imshow("gray", gray)
    cv2.waitKey(0)
    #图像二值化
    #ret,binary_OTSU = cv2.threshold(gray,0,255,cv2.THRESH_BINARY+cv2.THRESH_OTSU)
    ret,binary = cv2.threshold(gray,0,255,cv2.THRESH_BINARY)
    cv2.imshow("binary", binary)

    cv2.waitKey(0)
    #轮廓检测
    contours,hierarchy = cv2.findContours(binary,cv2.RETR_TREE,cv2.CHAIN_APPROX_NONE)
    drawing = img.copy()
    if len(contours)>0:
        cv2.drawContours(drawing, contours, -1, (0, 0, 255), 3) # 填充轮廓颜色
        cv2.imshow('drawing', drawing)
        cv2.waitKey(0)
    #print(contours)

    temp_contours = [] # 存储合理的轮廓
    car_plates=[]
    if len(contours)>0:
        for contour in contours:
            if cv2.contourArea(contour) > Min_Area:
                temp_contours.append(contour)
            car_plates = []
            for temp_contour in temp_contours:
                rect_tupple = cv2.minAreaRect(temp_contour)
                rect_width, rect_height = rect_tupple[1]
                if rect_width < rect_height:
                    rect_width, rect_height = rect_height, rect_width
                aspect_ratio = rect_width / rect_height
                # 车牌正常情况下宽高比在2 - 5.5之间
                if aspect_ratio > 2 and aspect_ratio < 5.5:
                    car_plates.append(temp_contour)
                    #rect_vertices = cv2.boxPoints(rect_tupple)
                    #rect_vertices = np.int0(rect_vertices)
            if len(car_plates)==1:
                #oldimg = cv2.drawContours(img, [rect_vertices], -1, (0, 0, 255), 2)
                #cv2.imshow("che pai ding wei", oldimg)
                #print(rect_tupple)
                break

    #把车牌号所在的位置截取出来
    if len(car_plates)==1:
        # 方法1 利用轮廓的坐标点来获取左上角 右下角的坐标
        #for car_plate in car_plates:
            ## 左上角的坐标
            #row_min,col_min = np.min(car_plate[:,0,:],axis=0)
            ## 右下角的坐标
            #row_max,col_max = np.max(car_plate[:,0,:],axis=0)
            #cv2.rectangle(img,(row_min,col_min),(row_max,col_max),(0,255,0),2)
            #card_img = img[col_min:col_max,row_min:row_max,:]
            #cv2.imshow("img",img)
        # 方法2,利用外接矩形来定位
        x,y,w,h = cv2.boundingRect(car_plates[0])
        cv2.rectangle(img,(x,y),(x+w, y+h),(0,255,0),2)
        cv2.imshow("img",img)
        cv2.waitKey(0)
        card_img = img[y:y+h,x:x+w,:]
        cv2.imwrite('card_img.jpg',card_img)
        cv2.imshow("card_img.",card_img)
        cv2.waitKey(0)
        cv2.destroyAllWindows()
        return 1
    return 0

if __name__ == "__main__":
    img = cv2.imread('..\Opencv-6-datas\cartest.png')
    color_position(img, '')