实验目标
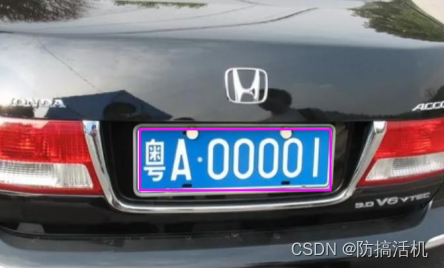
使用形态学处理,识别图片中车牌的位置,并识别每个字符的位置
实验原理
1.车牌识别:
(1)车牌的背景色是蓝色,所以先提取图中蓝色的部分,转化为二值图像(蓝色部分为1,其余为0)。
(2)再检测边缘,标出边缘的外接矩形,根据此矩形的长宽比和面积,就可以筛选出车牌的位置所在的矩形。
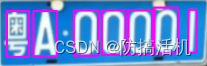
2.字符识别:
(1)使用连通域检测可以获得所有连通域及其外接矩形。
(2)通过约束外接矩形的长宽比和面积,可以过滤掉噪声。
(3)数字一般在一个连通域内,但汉字往往分多个连通域,所以在连通域检测前,需要使用膨胀,将汉字的间隙填充。
import cv2
import numpy as np

# 主函数区
if __name__ == '__main__':
    num = 5
    img = cv2.imread(str(num) + '.png', 1)
    oriimg = img.copy()
    # 进行中值滤波去噪或高斯滤波
    # img = cv2.medianBlur(img, 9)
    img = cv2.GaussianBlur(img, (5, 5), 0)
    oriimg2 = img.copy()

    # RGB转HSV
    hsv = cv2.cvtColor(img, cv2.COLOR_BGR2HSV)

    # 蓝色的范围
    lower = np.array([100, 100, 100])
    upper = np.array([140, 255, 255])

    # 根据阈值构建掩模,只留下蓝色
    mask = cv2.inRange(hsv, lower, upper)

    cv2.imshow('mask', mask)  # 车牌的矩形
    # cv2.waitKey(0)

    # 检测轮廓
    contours, hierarchy = cv2.findContours(mask, cv2.RETR_EXTERNAL, cv2.CHAIN_APPROX_SIMPLE)
    blocks = []
    for c in contours:
        x, y, w, h = cv2.boundingRect(c)  # 画出矩形

        # 根据轮廓形状特点,确定车牌的轮廓位置并截取图像
        if (w > (h * 2)) and (w < (h * 6)):
            # img=oriimg[y:y+h,x:x+w]
            # cv2.rectangle(oriimg, (x, y), (x+w, y+h), (0, 255, 0), 2)
            blocks.append([x, y, w, h, w * h])

    max_rec = max(blocks, key=lambda a: a[4])  # 找出面积最大的矩形

    # 画出车牌的矩形
    cv2.rectangle(oriimg, (max_rec[0], max_rec[1]), (max_rec[0] + max_rec[2], max_rec[1] + max_rec[3]), (255, 0, 255),
                  2)

    cv2.imshow('plate', oriimg)  # 车牌的矩形
    # cv2.waitKey(0)
    cv2.imwrite(str(num) + "plate.png", oriimg)


    """
    以上是车牌定位的代码,运行后会得到一个车牌的矩形框
    以下是车牌字符分割的代码,运行后会得到每个字符的矩形框
    """

    ROI = oriimg2[max_rec[1]:max_rec[1] + max_rec[3], max_rec[0]:max_rec[0] + max_rec[2], :]  # 截取车牌部分
    ROI_gray = cv2.cvtColor(ROI, cv2.COLOR_BGR2GRAY)

    ret, threshold = cv2.threshold(ROI_gray, 0, 255, cv2.THRESH_OTSU)  # 车牌部分二值化
    cv2.imshow('plate_bin', threshold)
    # cv2.waitKey(0)

    # 去掉最边缘的一部分
    margin_size = 10
    threshold[0:margin_size, :] = 0
    threshold[-margin_size:, :] = 0
    threshold[:, 0:margin_size] = 0
    threshold[:, -margin_size:] = 0

    # 膨胀,把汉字中孤立的部分连通起来
    kernel1 = np.ones((1, 3), dtype=np.uint8)  # 主要在横向方向膨胀
    dilate = cv2.dilate(threshold, kernel1, 1)
    kernel2 = np.ones((7, 1), dtype=np.uint8)  # 主要在纵向向方向膨胀
    dilate = cv2.dilate(dilate, kernel2, 1)
    erose=cv2.erode(dilate,kernel2,1) # 主要在横向方向腐蚀,防止数字连在一起

    cv2.imshow('dilate', erose)  # 膨胀后的车牌
    # cv2.waitKey(0)


    # 检测连通域
    num_labels, labels, stats, centroids = cv2.connectedComponentsWithStats(erose, connectivity=4)

    # 画出每个连通域的矩形框
    word_rect = []
    for r in stats:
        x, y, w, h, s = r.tolist()
        if w * 1.5 < h and w * 10 > h and h > threshold.shape[0] / 2:  # 约束长宽比和高度
            word_rect.append(r)
            cv2.rectangle(ROI, (x, y), (x + w, y + h), (255, 0, 255), 2)  # 画出每个字符的矩形框

    cv2.imshow('words', ROI)  # 框出车牌的每个字符
    cv2.waitKey(0)
    cv2.imwrite(str(num) + "words.png", ROI)
结果
此方法比较简单,具有局限性:
(1)如果遇到灰度图或者图片颜色不明显,就不能通过检测蓝色来识别车牌位置。
(2)如果图片质量很低,例如很模糊,则需要经过更多的预处理,例如去噪。否则连通域检测会出错。
(3)如果图片有扭曲,则过滤外接矩形的长宽比也要相应调整。
总体来说,仅仅使用形态学处理的车牌识别方法,对于质量好的图片是可以实现。但是实际中可能会遇到更复杂的情况,这时候往往需要深度学习的方法进行识别。