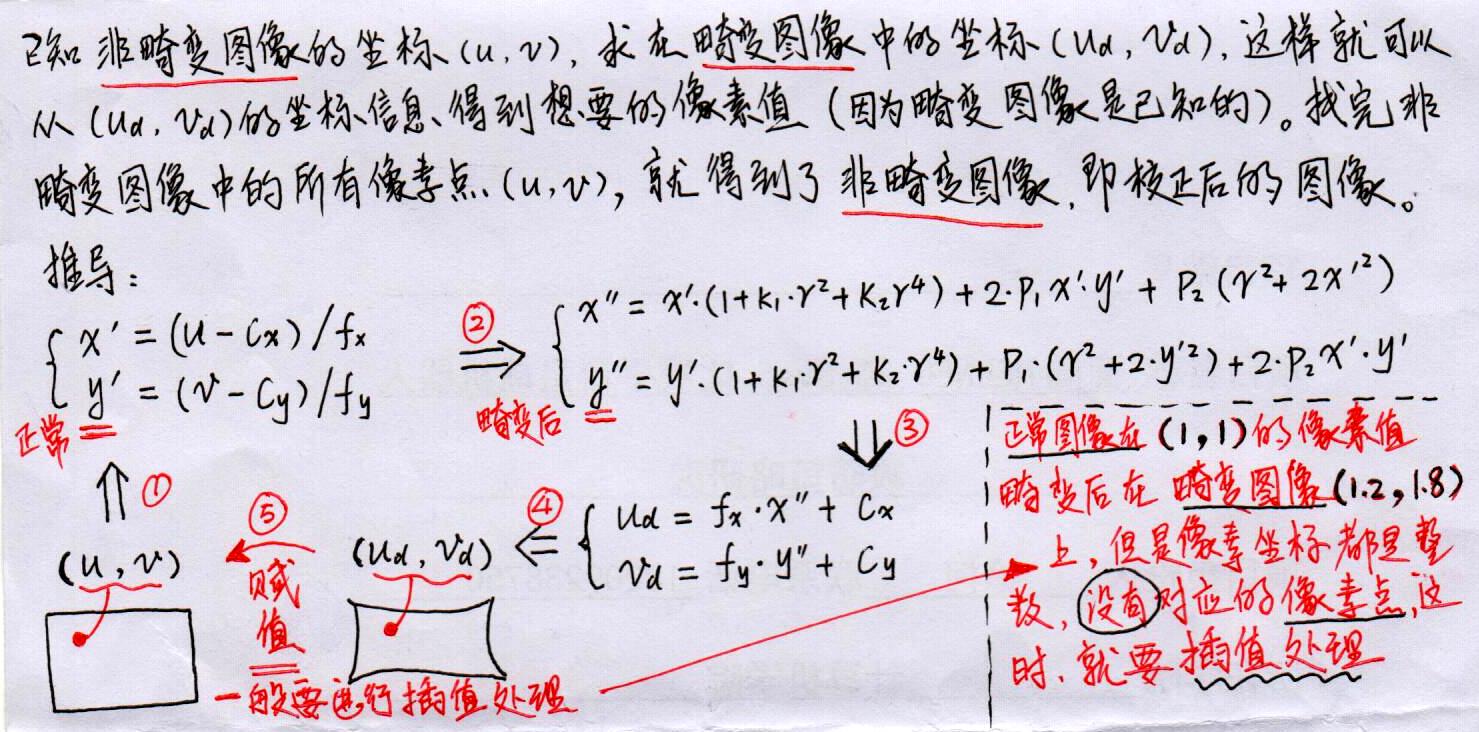
通过采集的图像我们可以得到畸变后的图像,要得到没有畸变的图像要通过畸变模型推导其映射关系。
真实图像 imgR 与 畸变图像 imgD 之间的关系为: imgR(U, V) = imgD(Ud, Vd) 。遍历所有(U,V)填充为映射对应的(Ud,Vd)即可实现图像去畸变处理。
前提条件是:已经得知相机内参K以及畸变参数k1,k2,k3,p1,p2,这部分可以由matlab工具箱实现。
代码:
#include <opencv2/opencv.hpp>
#include <string>
#include <math.h>
using namespace std;
string image_file = "1.png"; // 请确保路径正确
int main(int argc, char **argv) {
// 本程序需要你自己实现去畸变部分的代码。尽管我们可以调用OpenCV的去畸变,但自己实现一遍有助于理解。
// 畸变参数
double k1 = -0.3630, k2 = 0.1100, p1 = 0, p2 = 0;
// 内参
double fx = 1026, fy = 1019.2, cx = 922.9716, cy = 589.6080;
cv::Mat image = cv::imread(image_file, 0); // 图像是灰度图,CV_8UC1
int rows = image.rows, cols = image.cols;
cv::Mat image_undistort = cv::Mat(rows, cols, CV_8UC1); // 去畸变以后的图
// 计算去畸变后图像的内容
for (int v = 0; v < rows; v++)
for (int u = 0; u < cols; u++) {
double u_distorted = 0, v_distorted = 0;
// TODO 按照公式,计算点(u,v)对应到畸变图像中的坐标(u_distorted, v_distorted) (~6 lines)
//image_undistort中含有非畸变的图像坐标
//将image_undistort的坐标通过内参转换到归一化坐标系下,此时得到的归一化坐标是对的
//将得到的归一化坐标系进行畸变处理
//将畸变处理后的坐标通过内参转换为图像坐标系下的坐标
//这样就相当于是在非畸变图像的图像坐标和畸变图像的图像坐标之间建立了一个对应关系
//相当于是非畸变图像坐标在畸变图像中找到了映射
//对畸变图像进行遍历之后,然后赋值(一般需要线性插值,因为畸变后图像的坐标不一定是整数的),即可得到矫正之后的图像
double x1, y1, x2, y2;
//未畸变像素平面到成像平面
x1 = (u - cx) / fx;
y1 = (v - cy) / fy;
double r2;
//成像平面畸变后
r2 = pow(x1, 2) + pow(y1, 2);
x2 = x1*(1 + k1*r2 + k2*pow(r2, 2)) + 2 * p1*x1*y1 + p2*(r2 + 2 * x1*x1);
y2 = y1*(1 + k1*r2 + k2*pow(r2, 2)) + p1*(r2 + 2 * y1*y1) + 2 * p2*x1*y1;
//畸变的成像平面到像素平面
u_distorted = fx*x2 + cx;
v_distorted = fy*y2 + cy;
// 赋值 (最近邻插值)
if (u_distorted >= 0 && v_distorted >= 0 && u_distorted < cols && v_distorted < rows) {
image_undistort.at<uchar>(v, u) = image.at<uchar>((int)v_distorted, (int)u_distorted);
}
else {
image_undistort.at<uchar>(v, u) = 0;
}
}
// 画图去畸变后图像
cv::imshow("image undistorted", image_undistort);
cv::waitKey();
return 0;
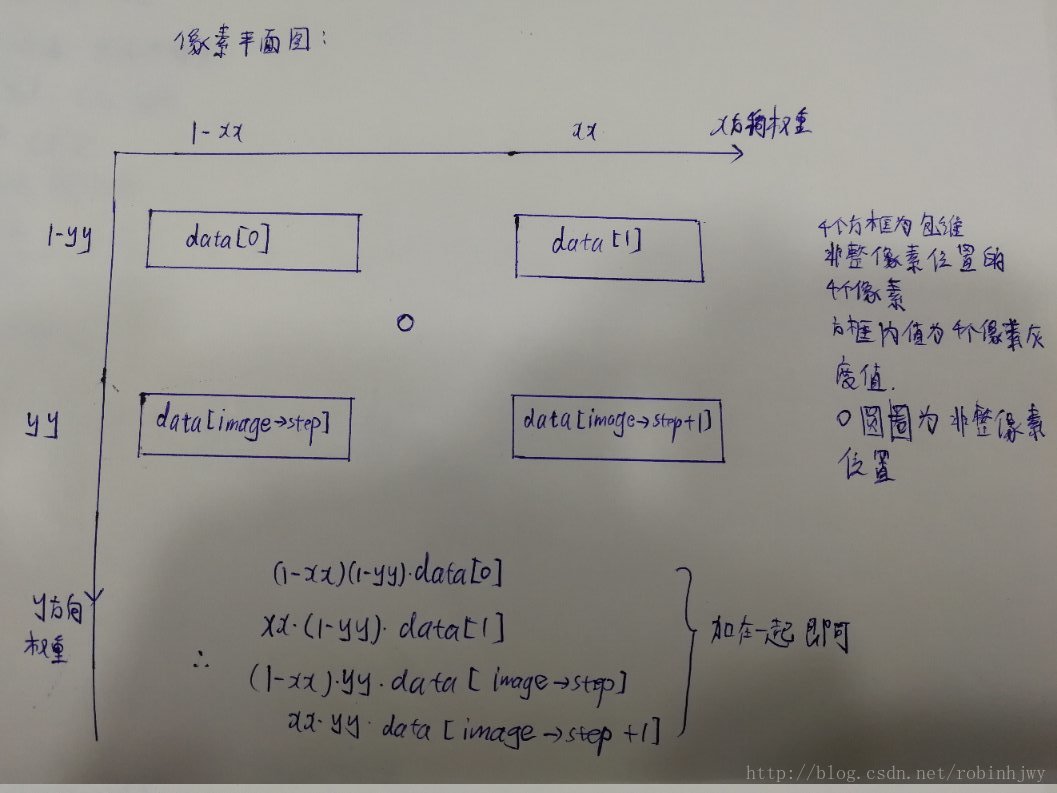
}双线性内插法利用待求像素四个相邻像素的灰度在两个方向上做线性内插,在光流法求取某像素位置的灰度值时同样用到了二维线性插值。
光流法这里返回的是某个像素位置的灰度值。
protected:
    // get a gray scale value from reference image (bilinear interpolated)
    //取得变换后的图中对应像素坐标处的灰度值,这里并不是返回一张图像的灰度值,而是就是写死了,就是类构造里传入的那张图
    inline float getPixelValue ( float x, float y )
    {
        //这里先说一下各个参数的类型:
        //image_为Mat*类型,图像指针,所以调用data时用->符号,
        //data为图像矩阵首地址,支持数组形式访问,data[]就是访问到像素的值了,此处为像素的灰度值,类型为uchar
        //关于step有点复杂,data[]中括号的式子有点复杂,总的意思就是y行乘上每行内存数,定位到行,然后在加上x,定位到像素
        //step具体解释在最后面有一些资料
        //image_->data[int(y)*image_->step + int(x)]这一步读到了x,y处的灰度值,类型为uchar,
        //但是后面由于线性插值,需要定位这个像素的位置,而不是他的灰度值,所以取其地址,赋值给data_ptr,记住它的位置,后面使用
        uchar* data_ptr = & image_->data[int(y)*image_->step + int(x)];

        //由于x,y这里有可能带小数,但是像素位置肯定是整数,所以,问题来了,(1.2, 4.5)像素坐标处的灰度值为多少呢?OK,线性插值!
        //说一下floor(),std中的cmath函数。向下取整,返回不大于x的整数。例floor(4.9)=4
        //xx和yy,就是取到小数部分。例:x=4.9的话,xx=x-floor(x)就为0.9。y同理
        float xx = x - floor ( x );
        float yy = y - floor ( y );

        //这整个return一个float值包含了线性插值,二维线性差值,这里后文有具体高清无码解释
        return float (
                   (1-xx) * ( 1-yy ) * data_ptr[0] +
                   xx* ( 1-yy ) * data_ptr[1] +
                   ( 1-xx ) *yy*data_ptr[ image_->step ] +
                   xx*yy*data_ptr[image_->step+1]
               );
    }