本篇文章主要介绍在windows下使用vmware虚拟机Hadoop高可用集群搭建配置
简要步骤:
①、克隆3台机器(可以从之前分布式的2台机器找一台即可)
②、设置静态IP
③、配置主机名、IP映射
④、新建hadoop用户
⑤、配置ssh免密登陆
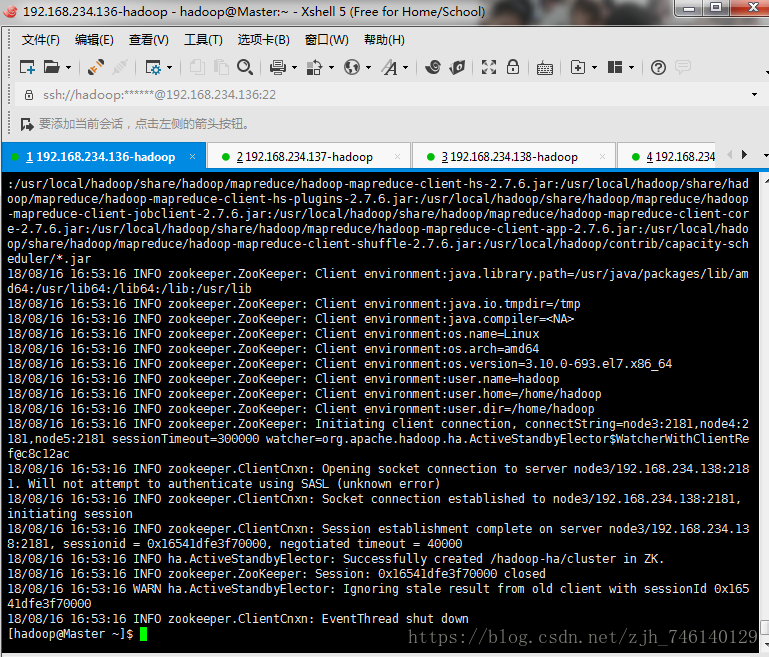
⑥、配置zookeeper
⑦、检查环境变量
⑧、修改配置文件
⑨、关闭防火墙、守护进程
⑩、启动(启动、关闭脚本)
详细步骤:
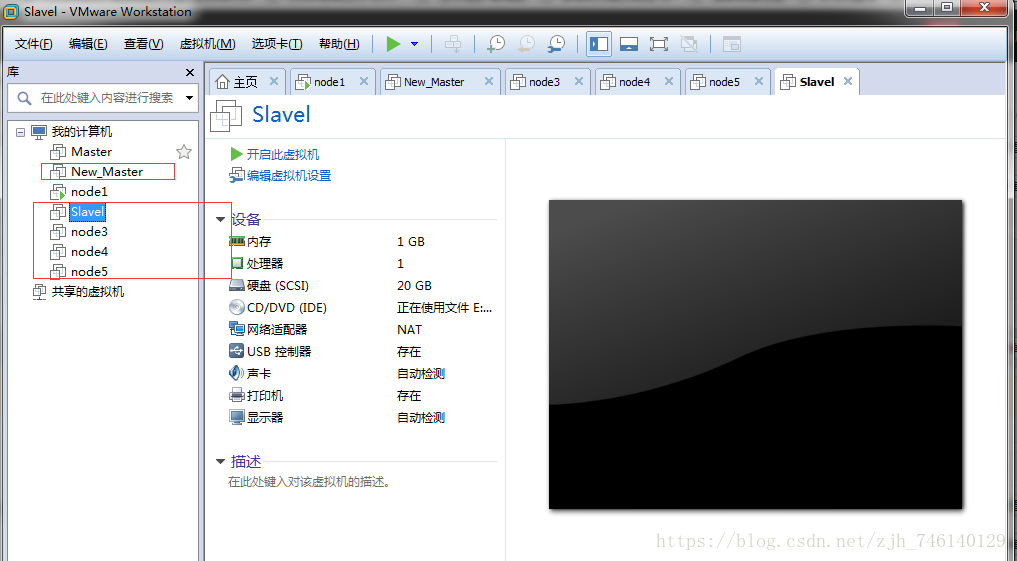
一、这里我选择了New_Master克隆,克隆后机器如图
二、设置静态IP(这里由于是克隆的里面会有克隆的机器的ip。我们需要进去改掉即可,演示修改一台,后续自己修改即可)
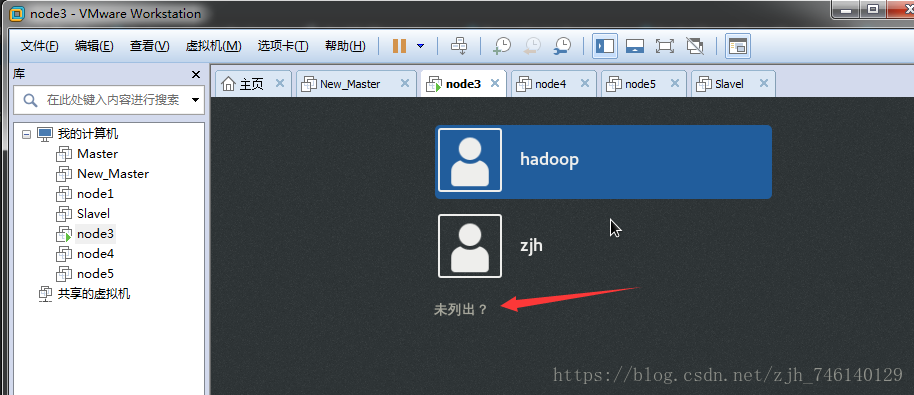
这里选择未列出用root用户登录,我安装的有桌面版,无桌面面直接登录修改即可。详细参考笔者博客
笔者博客:CentOS7设置静态IP以及windows下ping不通虚拟机、虚拟机ping不通外网解决方案
应用程序-终端

打开网卡
vi /etc/sysconfig/network-scripts/ifcfg-ens33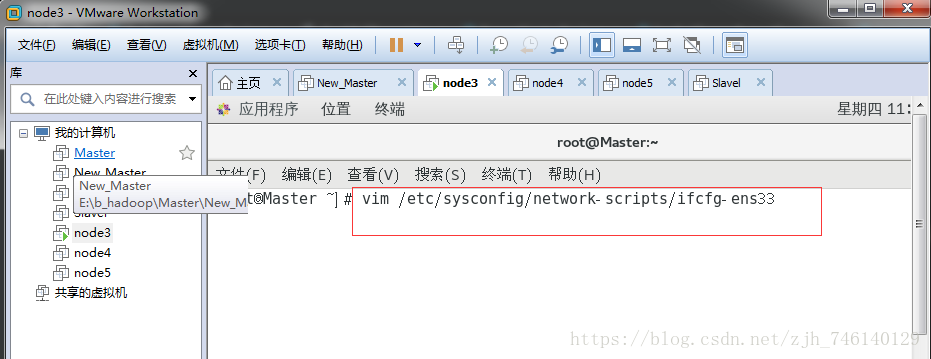

重启网卡
systemctl restart network
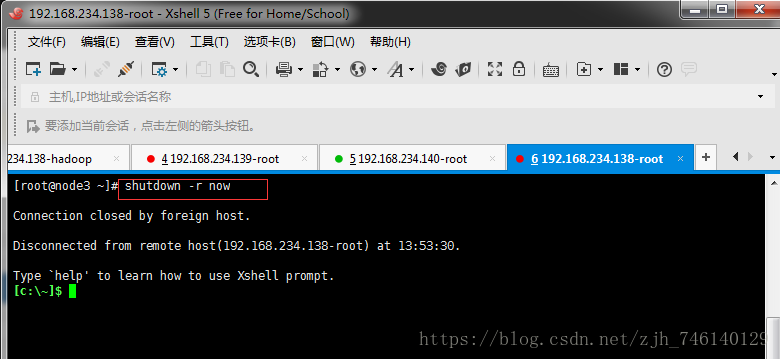
三、配置主机名、IP映射(配置好了静态IP后我们直接用xshell操作即可,方便,这里演示配置一台即可,其他几台一样)使用root用户操作,修改后重启下机器生效
笔者博客:Linux(CentOS7)设置主机名及IP映射(用于hadoop单机/伪分布式/分布式/集群配置)
重启命令 reboot shutdown -r now(后面有图)
vim /etc/hostname主机名:


ip映射:
vim /etc/hosts

192.168.234.136 Master

192.168.234.137 Slavel

192.168.234.138 node3

192.168.234.139 node4

192.168.234.140 node5

重启后:
配置好主机名、IP映射如图

四、新建hadoop用户
由于我们是拷贝的分布式的机器,已经新建好,这里就不描述了,linux下新建用户可参看笔者博客
笔者博客:大数据入门教程系列之Hadoop环境搭建--新建Hadoop用户
五、配置ssh免密登陆
笔者博客:linux下配置ssh免密(用于Hadoop高可用集群)
我们要实现的效果是
Master ssh 无密登录Slavel 、node3、node4、node5
Slavel ssh 无密登录Master 、node3、node4、node5
说明:
服务器A想要 ssh 无密登录服务器B,则需要在服务器A上面生成密钥,然后远程拷贝到服务器B的.ssh目录下(该目录在用户目录下)
Master 、Slavel 、node3、node4、node5 中分别执行如下命令
ssh localhost
exit
cd ~/.ssh/
ll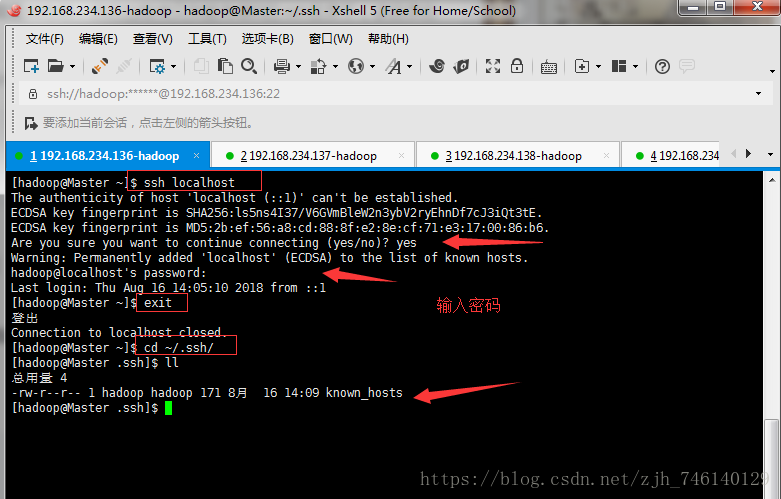
如果不事先在每台虚拟机中执行,在之后做 SSH 无密登录配置时,可能出现如下错误:
scp: /home/hadoop/.ssh/: Is a directory
Master 中执行如下命令
ssh-keygen -t rsa
ll
cat id_rsa.pub >> authorized_keys
chmod 600 authorized_keys
执行拷贝到另外4台机器(第一次每个都要输入密码)
scp authorized_keys hadoop@Slavel:~/.ssh/
scp authorized_keys hadoop@node3:~/.ssh/
scp authorized_keys hadoop@node4:~/.ssh/
scp authorized_keys hadoop@node5:~/.ssh/
测试ssh到另外4台机器
ssh Slavel
ssh node3
ssh node4
ssh node5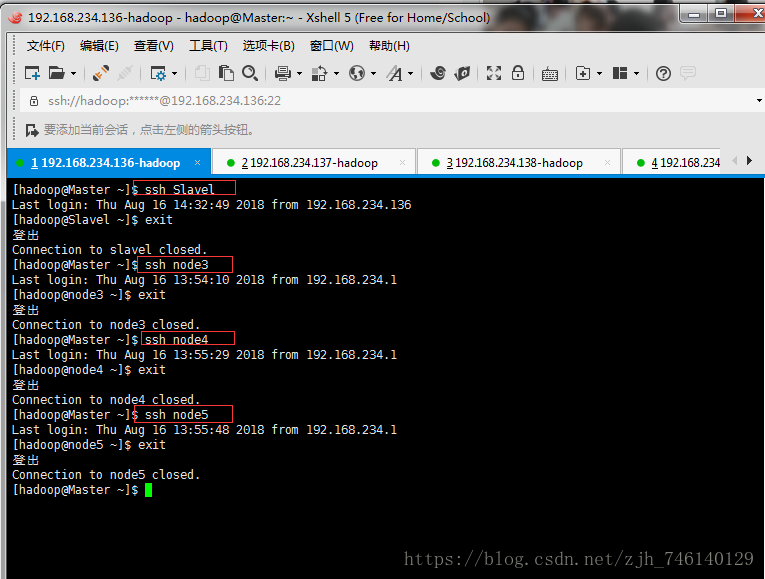
六、配置zookeeper
由于篇幅过长,单独写了一篇博客:Linux下zookeeper单机、伪分布式、分布式环境搭建(本篇主要介绍分布式用于Hadoop高可用集群)
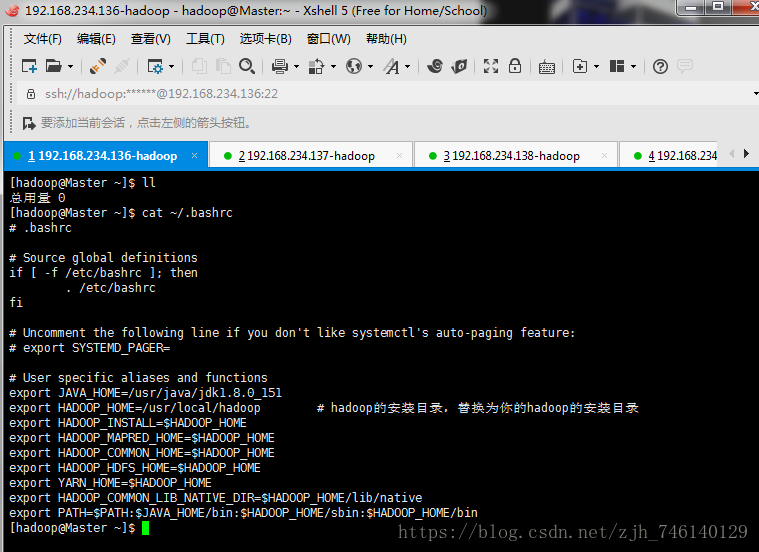
七、检查环境变量
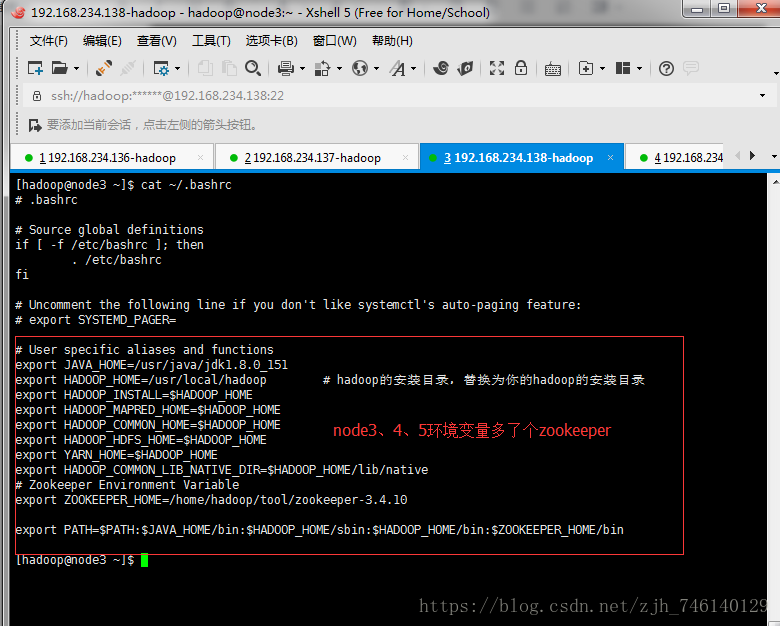
八、修改配置文件(core-site.xml、hdfs-site.xml、yarn-site.xml、mapred-site.xml、slaves)
①core-site.xml
<?xml version="1.0" encoding="UTF-8"?>
<?xml-stylesheet type="text/xsl" href="configuration.xsl"?>
<!--
  Licensed under the Apache License, Version 2.0 (the "License");
  you may not use this file except in compliance with the License.
  You may obtain a copy of the License at

    http://www.apache.org/licenses/LICENSE-2.0

  Unless required by applicable law or agreed to in writing, software
  distributed under the License is distributed on an "AS IS" BASIS,
  WITHOUT WARRANTIES OR CONDITIONS OF ANY KIND, either express or implied.
  See the License for the specific language governing permissions and
  limitations under the License. See accompanying LICENSE file.
-->

<!-- Put site-specific property overrides in this file. -->

<!-- hadoop 核心配置文件 -->
<configuration>
    <property>
        <name>fs.defaultFS</name>
        <value>hdfs://cluster</value>
        <description>hadoop ha 部署方式下namenode访问地址,cluster是名字可自定义,后面hdfs-site.xml会用到</description>
    </property>
    <property>
        <name>hadoop.tmp.dir</name>
        <value>/usr/local/hadoop/tmp</value>
        <description>指定hadoop临时目录</description>
    </property>
    <property>
        <name>ha.zookeeper.quorum</name>
        <value>node3:2181,node4:2181,node5:2181</value>
        <description>指定zookeeper地址</description>
    </property>
    <property>
        <name>ha.zookeeper.session-timeout.ms</name>
        <value>300000</value>
        <description>zk的超时时间,单位为毫秒,默认为5000,这个值比较小。建议设置得大一些,zk过于敏感,避免因为网路抖动等原因引起NameNode进行无所谓的主备切换</description>
    </property>
    <property>
        <name>fs.trash.interval</name>
        <value>1440</value>
        <description>开启垃圾回收站功能,防止误删除文件,HDFS文件删除后先放入回收站,单位为分,垃圾回收站最长保留数据时间为1天,超过一天后删除</description>
    </property>
    <property>
        <name>io.file.buffer.size</name>
        <value>131072</value>
        <description>设置SequenceFile中用到的读/写缓存大小,合理设置缓存大小有利于提高数据传输效率,单位为byte,默认为4KB,这里设置为128KB</description>
    </property>
</configuration>
②hdfs-site.xml
<?xml version="1.0" encoding="UTF-8"?>
<?xml-stylesheet type="text/xsl" href="configuration.xsl"?>
<!--
  Licensed under the Apache License, Version 2.0 (the "License");
  you may not use this file except in compliance with the License.
  You may obtain a copy of the License at

    http://www.apache.org/licenses/LICENSE-2.0

  Unless required by applicable law or agreed to in writing, software
  distributed under the License is distributed on an "AS IS" BASIS,
  WITHOUT WARRANTIES OR CONDITIONS OF ANY KIND, either express or implied.
  See the License for the specific language governing permissions and
  limitations under the License. See accompanying LICENSE file.
-->

<!-- Put site-specific property overrides in this file. -->

<!-- hadoop 分布式文件系统hdfs配置文件 -->
<configuration>
    <property>
        <name>dfs.nameservices</name>
        <value>cluster</value>
        <description>指定hdfs的nameservice为cluster,需要和core-site.xml文件中的保持一致</description>
    </property>
    <property>
        <name>dfs.ha.namenodes.cluster</name>
        <value>Master,Slavel</value>
        <description>cluster下有两个NameNode,分别为Master和Slavel</description>
    </property>

    <property>
        <name>dfs.namenode.rpc-address.cluster.Master</name>
        <value>Master:9000</value>
        <description>NameNode1的RPC通信地址,端口要和core-site.xml中fs.defaultFS的一致</description>
    </property>
    <property>
        <name>dfs.namenode.http-address.cluster.Master</name>
        <value>Master:50070</value>
        <description>NameNode1的HTTP通信地址</description>
    </property>

    <property>
        <name>dfs.namenode.rpc-address.cluster.Slavel</name>
        <value>Slavel:9000</value>
        <description>NameNode2的RPC通信地址,端口要和core-site.xml中fs.defaultFS的一致</description>
    </property>
    <property>
        <name>dfs.namenode.http-address.cluster.Slavel</name>
        <value>Slavel:50070</value>
        <description>NameNode2的HTTP通信地址</description>
    </property>

    <property>
        <name>dfs.namenode.shared.edits.dir</name>
        <value>qjournal://node3:8485;node4:8485;node5:8485/cluster</value>
        <description>指定NameNode的元数据在JournalNode上的存放位置</description>
    </property>
    <property>
        <name>dfs.journalnode.edits.dir</name>
        <value>/usr/local/hadoop/journaldata</value>
        <description>指定NameNode的元数据在JournalNode上的存放位置</description>
    </property>

    <property>
        <name>dfs.ha.automatic-failover.enabled</name>
        <value>true</value>
        <description>指定支持高可用自动切换机制</description>
    </property>
    <property>
        <name>dfs.client.failover.proxy.provider.cluster</name>
        <value>org.apache.hadoop.hdfs.server.namenode.ha.ConfiguredFailoverProxyProvider</value>
        <description>配置失败自动切换实现方式</description>
    </property>

    <property>
        <name>dfs.ha.fencing.methods</name>
        <value>
            sshfence
            shell(/bin/true)
        </value>
        <description>配置隔离机制,主要用于远程管理监听其他机器相关服务</description>
    </property>
    <property>
        <name>dfs.ha.fencing.ssh.private-key-files</name>
        <value>/home/hadoop/.ssh/id_rsa</value>
        <description>使用隔离机制时需要ssh免密码登陆,/home/hadoop/为用户目录</description>
    </property>
    <property>
        <name>dfs.ha.fencing.ssh.connect-timeout</name>
        <value>30000</value>
        <description>使用隔离机制时需要ssh免密码登陆时的超时时间,单位为毫秒</description>
    </property>

    <property>
        <name>dfs.namenode.name.dir</name>
        <value>file:/usr/local/hadoop/tmp/dfs/name</value>
        <description>NameNode结点存储hadoop文件系统信息的本地系统路径</description>
    </property>
    <property>
        <name>dfs.datanode.data.dir</name>
        <value>file:/usr/local/hadoop/tmp/dfs/data</value>
        <description>DataNode结点被指定要存储数据的本地文件系统路径,这个值只对NameNode有效,DataNode并不需要使用到它</description>
    </property>

    <property>
        <name>dfs.webhdfs.enabled</name>
        <value>true</value>
        <description>指定可以通过web访问hdfs目录</description>
    </property>
</configuration>
③yarn-site.xml
<?xml version="1.0"?>
<!--
  Licensed under the Apache License, Version 2.0 (the "License");
  you may not use this file except in compliance with the License.
  You may obtain a copy of the License at

    http://www.apache.org/licenses/LICENSE-2.0

  Unless required by applicable law or agreed to in writing, software
  distributed under the License is distributed on an "AS IS" BASIS,
  WITHOUT WARRANTIES OR CONDITIONS OF ANY KIND, either express or implied.
  See the License for the specific language governing permissions and
  limitations under the License. See accompanying LICENSE file.
-->
<!-- 分布式资源管理系统Yarn配置文件 -->
<configuration>
    <!-- 日志聚合功能yarn.log  start -->
    <property>
        <name>yarn.log-aggregation-enable</name>
        <value>true</value>
        <description>开启日志聚合功能,默认为false</description>
    </property>
    <property>
        <name>yarn.log-aggregation.retain-seconds</name>
        <value>259200</value>
        <description>在HDFS上聚合的日志最长保留多少秒,这里配置为3天</description>
    </property>
    <!-- 日志聚合功能yarn.log  end -->

    <!-- 配置resourcemanager  start
         在YARN中,ResourceManager负责集群中所有资源的统一管理和分配,
         它接收来自各个节点(NodeManager)的资源汇报信息,
         并把这些信息按照一定的策略分配给各个应用程序(实际上是ApplicationManager)
    -->
    <property>
       <name>yarn.resourcemanager.ha.enabled</name>
       <value>true</value>
       <description>开启resourcemanager ha,默认为false</description>
    </property>
    <property>
       <name>yarn.resourcemanager.cluster-id</name>
       <value>yrc</value>
       <description></description>
    </property>
    <property>
       <name>yarn.resourcemanager.ha.rm-ids</name>
       <value>rm1,rm2</value>
       <description></description>
    </property>
    <property>
       <name>yarn.resourcemanager.hostname.rm1</name>
       <value>Master</value>
       <description></description>
    </property>
    <property>
       <name>yarn.resourcemanager.hostname.rm2</name>
       <value>Slavel</value>
       <description></description>
    </property>
    <property>
       <name>yarn.resourcemanager.zk-address</name>
       <value>node3:2181,node4:2181,node5:2181</value>
       <description></description>
    </property>
    <!-- 配置resourcemanager  end -->

    <!-- 配置nodemanager  start
         NodeManager是运行在单个节点上的代理,它管理Hadoop集群中单个计算节点
    -->
    <property>
       <name>yarn.nodemanager.aux-services</name>
       <value>mapreduce_shuffle</value>
    </property>
    <property>
        <name>yarn.nodemanager.aux-services.mapreduce.shuffle.class</name>
        <value>org.apache.hadoop.mapred.ShuffleHandler</value>
    </property>
    <!-- 配置nodemanager  end -->
</configuration>
④mapred-site.xml
<?xml version="1.0"?>
<?xml-stylesheet type="text/xsl" href="configuration.xsl"?>
<!--
  Licensed under the Apache License, Version 2.0 (the "License");
  you may not use this file except in compliance with the License.
  You may obtain a copy of the License at

    http://www.apache.org/licenses/LICENSE-2.0

  Unless required by applicable law or agreed to in writing, software
  distributed under the License is distributed on an "AS IS" BASIS,
  WITHOUT WARRANTIES OR CONDITIONS OF ANY KIND, either express or implied.
  See the License for the specific language governing permissions and
  limitations under the License. See accompanying LICENSE file.
-->

<!-- Put site-specific property overrides in this file. -->

<configuration>

    <property>
        <name>mapreduce.framework.name</name>
        <value>yarn</value>
    </property>
    <property>
        <name>mapreduce.app-submission.cross-platform</name>
        <value>true</value>
    </property>

</configuration>
⑤slaves
node3
node4
node5
九、关闭防火墙、守护进程
在启动前我们需要把防火墙和selinux守护进程关闭使用root用户依次执行
systemctl status firewalld    # 查看防火墙状态
systemctl stop firewalld      # 关闭防火墙
systemctl disable firewalld   # 禁止防火墙开机自启动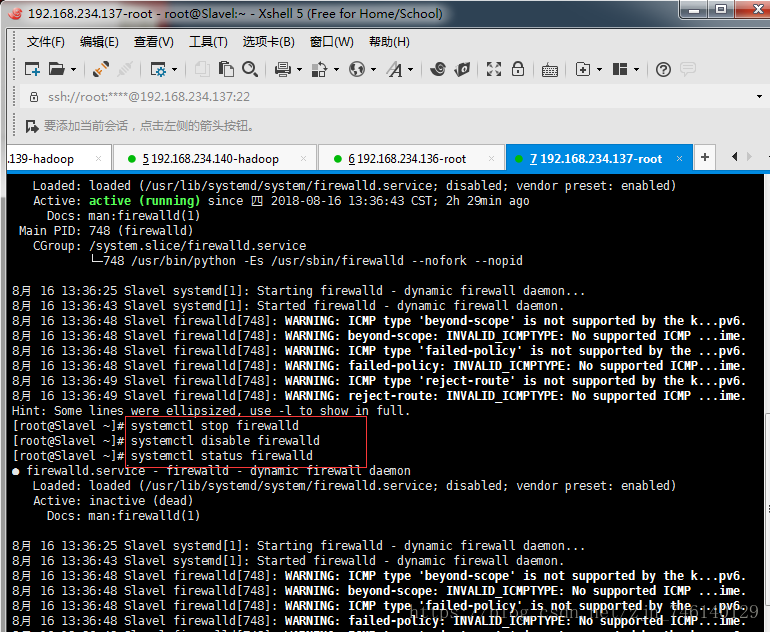
getenforce # 查看守护进程状态
setenforce 0 # 临时关闭守护进程
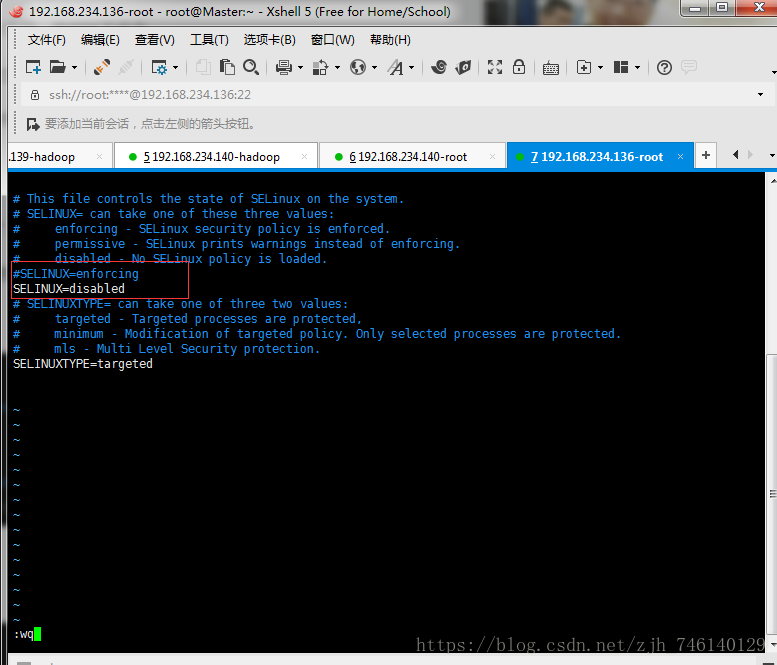
vim /etc/selinux/config # 永久关闭守护进程,笔者使用的此方法
SELINUX=disabled 即可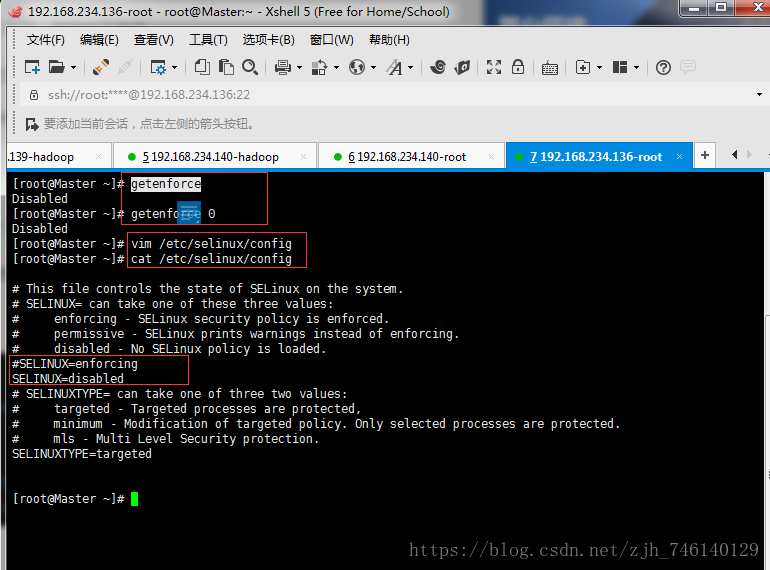
十、启动(启动、关闭脚本)
1.手动启动关闭集群
集群启动
启动zookeeper(node3、node4、node5)
zkServer.sh start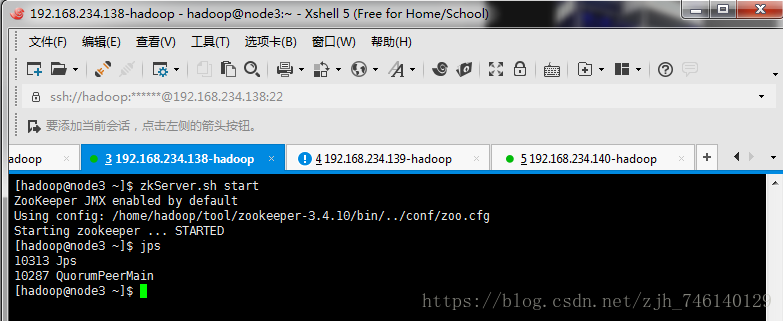
2、启动journalnode(node3、node4、node5)
hadoop-daemon.sh start journalnode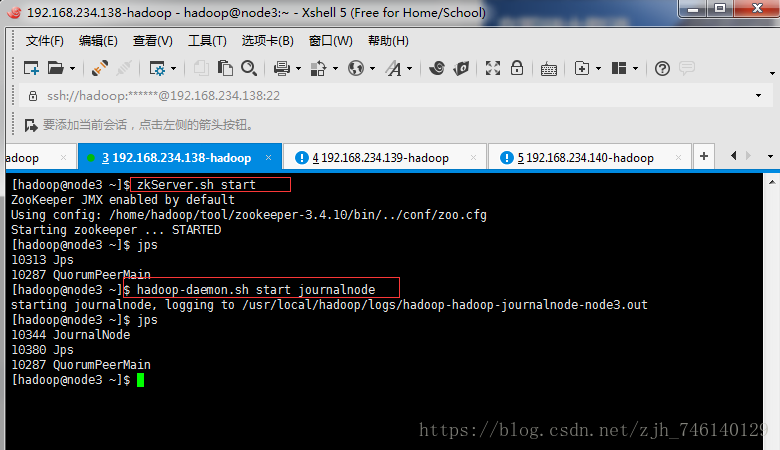
3、格式化HDFS(node1)
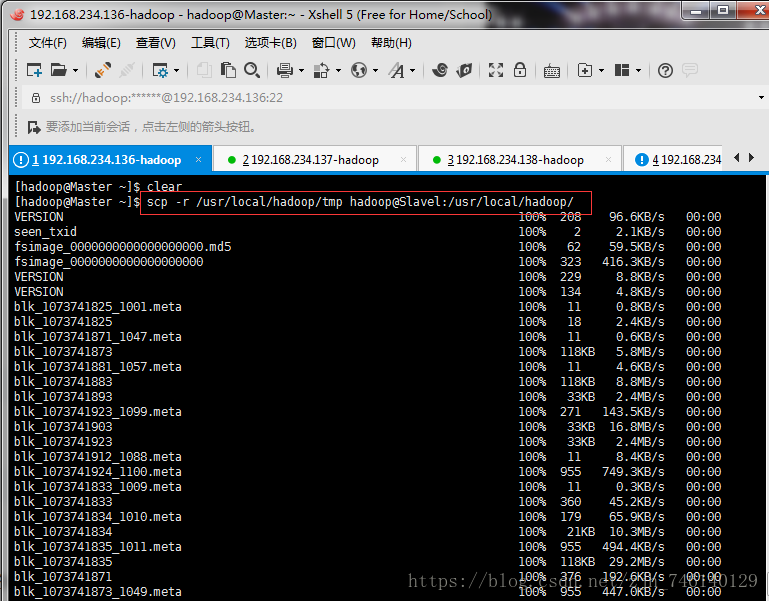
注意:格式化后需要把tmp目录拷贝给node2,不然node2的namenode启动不起来,第一次启动时需要格式化
hdfs namenode -format
scp -r /usr/local/hadoop/tmp hadoop@Slavel:/usr/local/hadoop/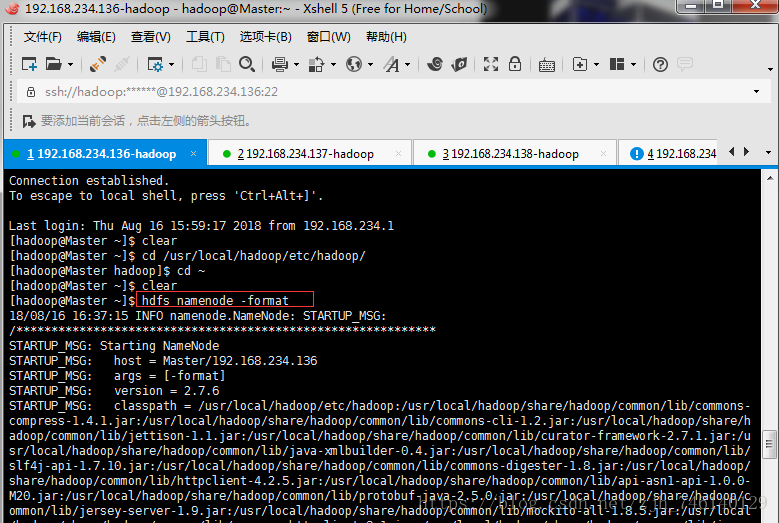

4、格式化ZKFC(node1)
注意:第一次启动时需要格式化
hdfs zkfc -formatZK
5、启动HDFS(node1)
start-dfs.sh6、启动YARN(node1)
start-yarn.sh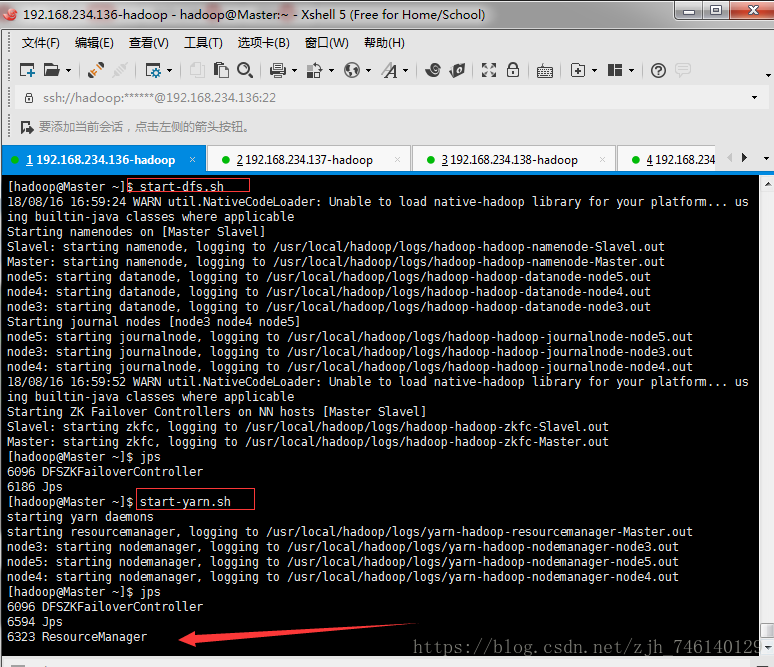
7、启动resourcemanager(node2)
node2的resourcemanager需要手动单独启动
yarn-daemon.sh start resourcemanager8、查看进程
jps # 如果集群启动后看到的进程和下图中一样表示成功,否则失败| 主机 | 进程 |
| Master、Slavel | NameNode、DFSZKFailoverController、ResourceManager |
| node3、node4、node5 | DataNode、NodeManager、JournalNode、QuorumPeerMain |
9、访问页面(注意看下是哪个namenode启动)

可以看到3个DataNode

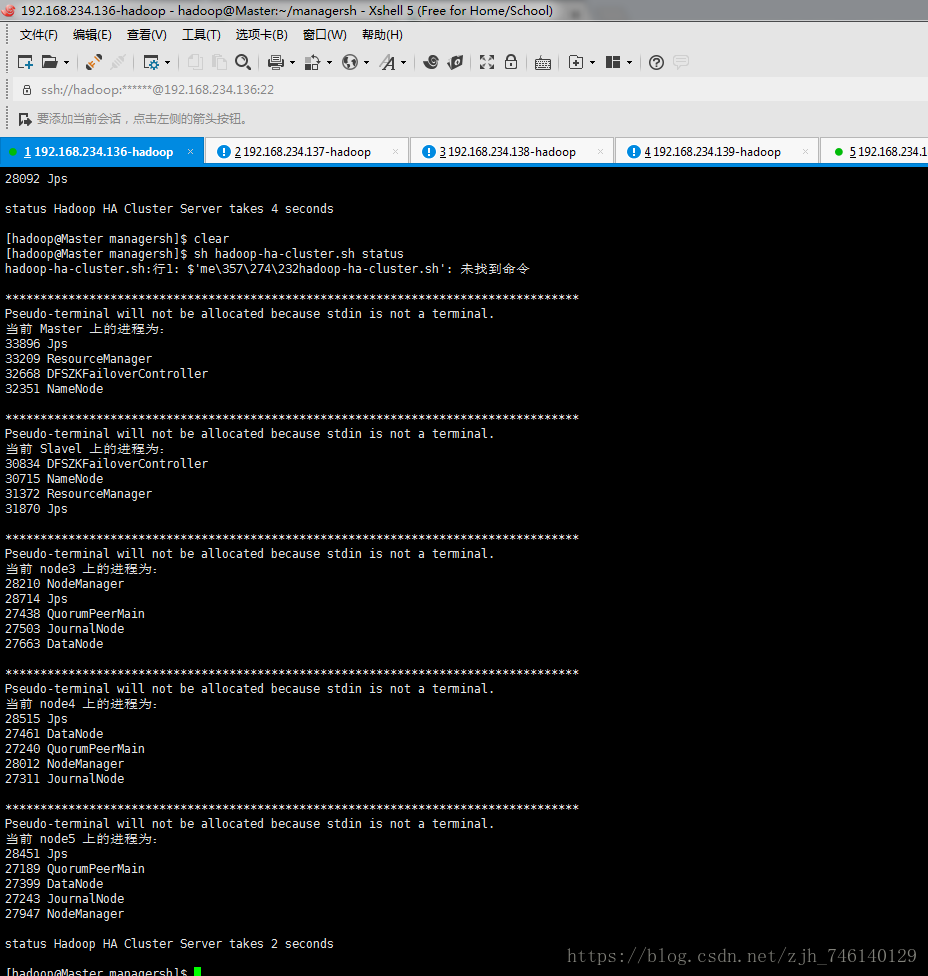
10、通过脚本查看每个机器启动的进程
集群关闭
1、停止HDFS(Master)
stop-dfs.sh2、停止YARN(Master)
stop-yarn.sh3、停止resourcemanager(Slavel)
yarn-daemon.sh stop resourcemanager4、停止zookeeper(node3、node4、node5)
zkServer.sh stop