新建任务列表任务–打印时间
任务列表
const AP_Scheduler::Task Copter::scheduler_tasks[] = {
    ......
    SCHED_TASK(my_loop,         2,     90),
    ......
}
函数
void Copter::my_loop()
{
    uint32_t timer = micros();
    printf("timer=%u",timer);
}
Copter.h声明
class Copter : public AP_HAL::HAL::Callbacks {
public:
    ...
private:
    ...
    void three_hz_loop();
    void my_loop();
    ...
}
serial5的打印结果
[init] card mounted at /fs/microsd
sercon: Registering CDC/ACM serial driver
sercon: Successfully registered the CDC/ACM serial driver
[init] USB interface connected
Running rc.APM
Mounting binfs
binfs mounted OK
nsh: rm: unlink failed: No such file or directory
uorb started OK
Starting ArduPilot
Starting ArduCopter uartA=/dev/ttyACM0 uartC=/dev/ttyS1 uartD=/dev/ttyS2 uartE=/dev/ttyS6 uartF=/dev/ttyS5
initialised /dev/ttyS3 OK 1024 5ArduPilot started OK
12
rc.APM finished
initialised /dev/ttyS1 OK 1024 5
12
NuttShell (NSH)
initialised /dev/ttyS2 OK 1024 5nsh> 12
[Kinitialised /dev/ttyS6 OK 1024 512
initialised /dev/ttyS5 OK 1024 512
Starting driver mtd start /fs/mtd
mtd: started OK
Starting driver mtd readtest /fs/mtd
reading /fs/mtd expecting 16384 bytes
readtest OK
mtd: readtest OK
initialised /dev/ttyACM0 OK 4096 1024
Failed to load defaults from /etc/defaults.parm
Starting driver adc start
adc init done
ADC started OK
Starting driver px4io start norc
px4io default PWM output device
px4io started OK
Starting driver px4io checkcrc /etc/px4io/px4io.bin
px4io: CRCs match
PX4IO CRC OK
Starting driver fmu mode_pwm4
fmu mode_pwm4 started OK
SPI device mpu6000_ext on 4:1 at speed 500000 mode 3
mpu6000_ext: reg 75 68 00
SPI device mpu6000_ext on 4:1 closed
SPI device mpu9250_ext on 4:1 at speed 1000000 mode 3
mpu9250_ext: reg 75 71 00
SPI device mpu9250_ext on 4:1 closed
SPI device icm20608_ext on 4:1 at speed 1000000 mode 3
icm20608_ext: reg 75 af 00
SPI device icm20608_ext on 4:1 closed
SPI device icm20608_ext on 4:1 at speed 1000000 mode 3
icm20608_ext: reg 75 12 00
SPI device icm20608_ext on 4:1 closed
SPI device icm20608-am on 1:2 at speed 500000 mode 3
icm20608-am: reg 75 af 00
SPI device icm20608-am on 1:2 closed
SPI device icm20608-am on 1:2 at speed 500000 mode 3
icm20608-am: reg 75 12 00
SPI device icm20608-am on 1:2 closed
SPI device lsm9ds0_am on 1:2 at speed 11000000 mode 3
lsm9ds0_am: reg 0f 49 49
SPI device lsm9ds0_am on 1:2 closed
SPI device mpu6000 on 1:4 at speed 500000 mode 3
mpu6000: reg 75 68 68
SPI device mpu6000 on 1:4 closed
AP_I2C_0 on I2C bus 1 at 0x55 (bus: 100 KHz, max: 100 KHz)
I2C device bus 1 address 0x55 closed
AP_I2C_1 on I2C bus 2 at 0x55 (bus: 100 KHz, max: 100 KHz)
SPI device ms5611 on 1:3 at speed 20000000 mode 3
MS5611 found on bus 1 address 0x03
Failed to load defaults from /etc/defaults.parm
disabling flow control on /dev/ttyS1 _total_written=17
disabling flow control on /dev/ttyS2 _total_written=17
AP_I2C_2 on I2C bus 1 at 0x1e (bus: 100 KHz, max: 100 KHz)
I2C device bus 1 address 0x1e closed
AP_I2C_3 on I2C bus 2 at 0x1e (bus: 100 KHz, max: 100 KHz)
I2C device bus 0 address 0x1e closed
SPI device hmc5843 on 1:5 at speed 11000000 mode 3
SPI device hmc5843 on 1:5 closed
SPI device lsm9ds0_am on 1:2 at speed 11000000 mode 3
SPI device mpu6000 on 1:4 at speed 500000 mode 3
SPI device lsm9ds0_g on 1:1 at speed 11000000 mode 3
SPI device lsm9ds0_am on 1:2 at speed 11000000 mode 3
SPI device mpu6000 on 1:4 at speed 500000 mode 3
SPI device lsm9ds0_g on 1:1 at speed 11000000 mode 3
SPI device lsm9ds0_am on 1:2 at speed 11000000 mode 3
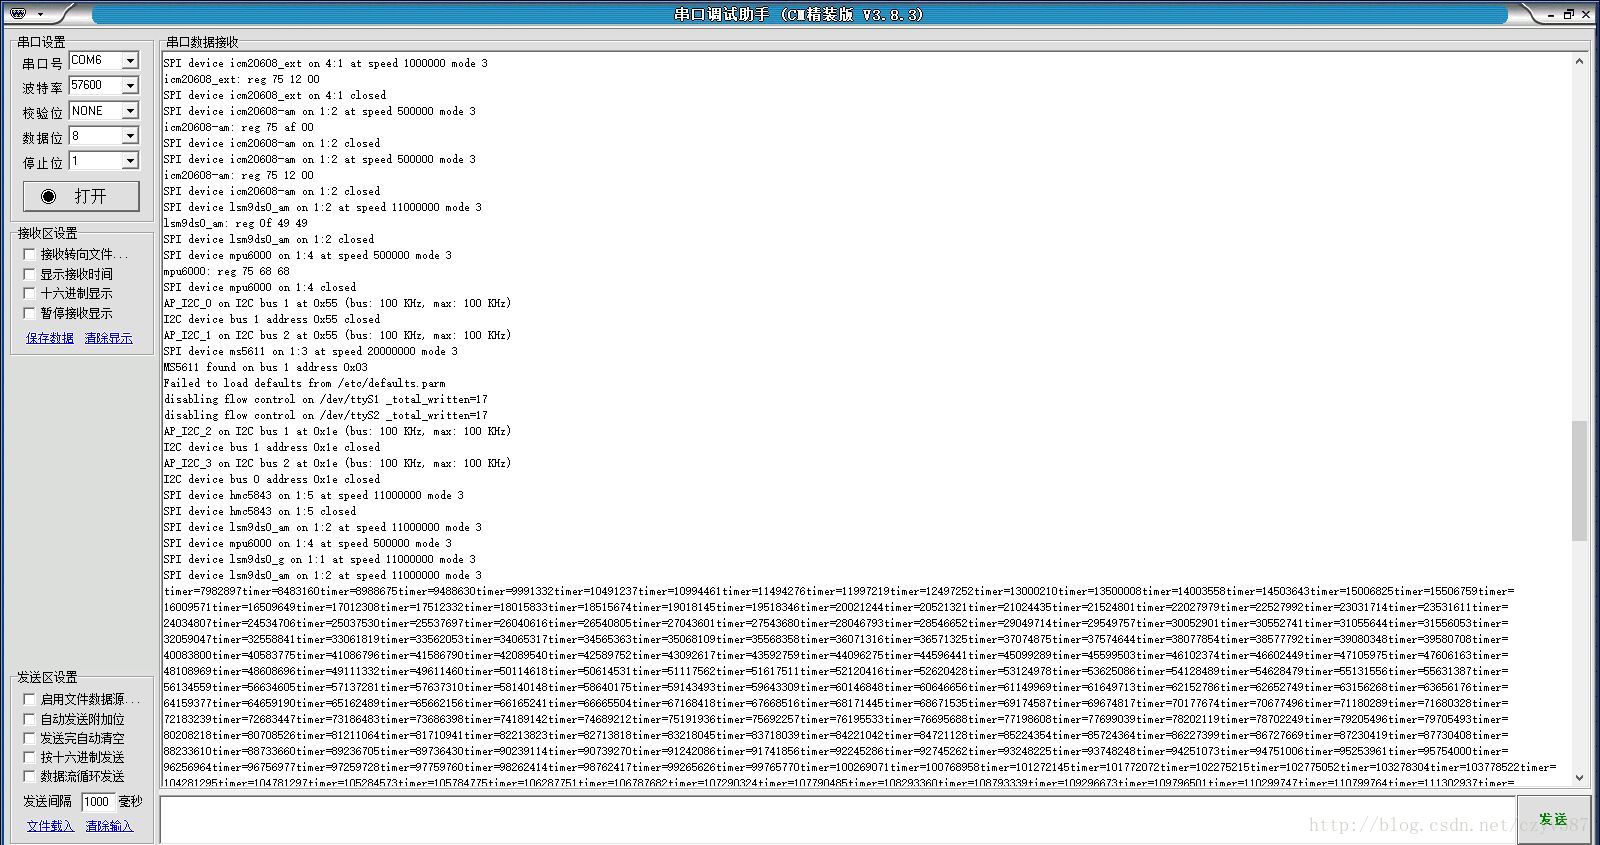
timer=7982897timer=8483160timer=8988675timer=9488630timer=9991332timer=10491237timer=10994461timer=11494276timer=11997219timer=12497252timer=13000210timer=13500008timer=14003558timer=14503643timer=15006825timer=15506759timer=16009571timer=16509649timer=17012308timer=17512332timer=18015833timer=18515674timer=19018145timer=19518346timer=20021244timer=20521321timer=21024435timer=21524801timer=22027979timer=22527992timer=23031714timer=23531611timer=24034807timer=24534706timer=25037530timer=25537697timer=26040616timer=26540805timer=27043601timer=27543680timer=28046793timer=28546652timer=29049714timer=29549757timer=30052901timer=30552741timer=31055644timer=31556053timer=32059047timer=32558841timer=33061819timer=33562053timer=34065317timer=34565363timer=35068109timer=35568358timer=36071316timer=36571325timer=37074875timer=37574644timer=38077854timer=38577792timer=39080348timer=39580708timer=40083800timer=40583775timer=41086796timer=41586790timer=42089540timer=42589752timer=43092617timer=43592759timer=44096275timer=44596441timer=45099289timer=45599503timer=46102374timer=46602449timer=47105975timer=47606163timer=48108969timer=48608696timer=49111332timer=49611460timer=50114618timer=50614531timer=51117562timer=51617511timer=52120416timer=52620428timer=53124978timer=53625086timer=54128489timer=54628479timer=55131556timer=55631387timer=56134559timer=56634605timer=57137281timer=57637310timer=58140148timer=58640175timer=59143493timer=59643309timer=60146848timer=60646656timer=61149969timer=61649713timer=62152786timer=62652749timer=63156268timer=63656176timer=64159377timer=64659190timer=65162489timer=65662156timer=66165241timer=66665504timer=67168418timer=67668516timer=68171445timer=68671535timer=69174587timer=69674817timer=70177674timer=70677496timer=71180289timer=71680328timer=72183239timer=72683447timer=73186483timer=73686398取出2个数73686398-73186483=499915,正好差不多500ms
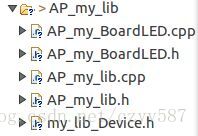
在libraries下新加自己的库文件
任务列表
const AP_Scheduler::Task Copter::scheduler_tasks[] = {
    ......
    SCHED_TASK(my_loop,         2,     90),
    SCHED_TASK(my_app,         2,     90),//也是2hz的运行该函数
    ......
}
ArduCopter文件夹中新建my_app.cpp文件
内容为:
#include "Copter.h"
void Copter::my_app()
{
    my_lib.update();
}
Copter.h声明
class Copter : public AP_HAL::HAL::Callbacks {
public:
    ...
private:
    ...
    AP_Notify notify;
    AP_my_lib my_lib;
    ...
    void three_hz_loop();
    void my_loop();
    ...
}
libraries下新建AP_my_lib文件夹,并建立如下目录结构:
AP_my_lib.cpp内容:
#include <stdio.h>
#include "AP_my_lib.h"
#include "AP_my_BoardLED.h"

AP_my_lib *AP_my_lib::_instance;
// Default constructor
AP_my_lib::AP_my_lib()
{
    _instance = this;
}


my_lib_Device *AP_my_lib::_devices[] = {nullptr, nullptr, nullptr, nullptr, nullptr};

// initialisation
void AP_my_lib::init(bool enable_external_leds)
{
        _devices[0] = new AP_my_BoardLED();
//        _devices[1] = new ToshibaLED_I2C();
//        _devices[2] = new ToneAlarm_PX4();
//        _devices[3] = new Display();

    // clear all flags and events
//    memset(&AP_Notify::flags, 0, sizeof(AP_Notify::flags));
//    memset(&AP_Notify::events, 0, sizeof(AP_Notify::events));

    for (uint8_t i = 0; i < 4; i++) {
        if (_devices[i] != nullptr) {
            _devices[i]->p_my_lib = this;
            _devices[i]->init();
        }
    }
}
//
// main update function, called at 50Hz
void AP_my_lib::update(void)
{
    printf("AP_my_lib::update");//打印该函数名,证明程序会运行到这里
    for (uint8_t i = 0; i < 4; i++) {
        if (_devices[i] != nullptr) {
            _devices[i]->update();
        }
    }
}
AP_my_lib.h内容:
#pragma once

#include <AP_Common/AP_Common.h>
#include <AP_Param/AP_Param.h>
#include <GCS_MAVLink/GCS_MAVLink.h>

#include "my_lib_Device.h"

class AP_my_lib
{
//    friend class RGBLed;            // RGBLed needs access to notify parameters
//    friend class Display;           // Display needs access to notify parameters
public:
    AP_my_lib();
    void update(void);
    void init(bool enable_external_leds);

private:
    static AP_my_lib *_instance;
    static my_lib_Device* _devices[];
};
my_lib_Device.h内容:
#pragma once

#include <AP_Common/AP_Common.h>
#include <GCS_MAVLink/GCS_MAVLink.h>

class AP_my_lib;

class my_lib_Device {
public:
    virtual ~my_lib_Device() {}
    // init - initialised the device
    virtual bool init(void) = 0;
    // update - updates device according to timed_updated.  Should be
    // called at 50Hz
    virtual void update() = 0;
    // this pointer is used to read the parameters relative to devices
    const AP_my_lib *p_my_lib;
};
AP_my_BoardLED.cpp内容:
 #include "AP_my_BoardLED.h"

 #include "AP_my_lib.h"

 #if (defined(HAL_GPIO_A_LED_PIN) && defined(HAL_GPIO_B_LED_PIN) && \
     defined(HAL_GPIO_C_LED_PIN))

extern const AP_HAL::HAL& hal;

bool AP_my_BoardLED::init(void)
{
    // setup the main LEDs as outputs
    hal.gpio->pinMode(HAL_GPIO_A_LED_PIN, HAL_GPIO_OUTPUT);
    hal.gpio->pinMode(HAL_GPIO_B_LED_PIN, HAL_GPIO_OUTPUT);
    hal.gpio->pinMode(HAL_GPIO_C_LED_PIN, HAL_GPIO_OUTPUT);

    // turn all lights off
    hal.gpio->write(HAL_GPIO_A_LED_PIN, HAL_GPIO_LED_OFF);
    hal.gpio->write(HAL_GPIO_B_LED_PIN, HAL_GPIO_LED_OFF);
    hal.gpio->write(HAL_GPIO_C_LED_PIN, HAL_GPIO_LED_OFF);
    return true;
}

/*
  main update function called at 50Hz
 */
void AP_my_BoardLED::update(void)
{

}
 #else
bool AP_BoardLED::init(void) {return true;}
void AP_BoardLED::update(void) {return;}
 #endif
AP_my_BoardLED.h内容:
#pragma once

#include <AP_Common/AP_Common.h>
#include <AP_HAL/AP_HAL.h>

#include "my_lib_Device.h"

#define HIGH 1
#define LOW 0

class AP_my_BoardLED: public my_lib_Device
{
public:
    // initialise the LED driver
    bool init(void);

    // should be called at 50Hz
    void update(void);

private:
    // counter incremented at 50Hz
    uint8_t _counter;
};
最重要的是在ArduCopter/make.inc中添加
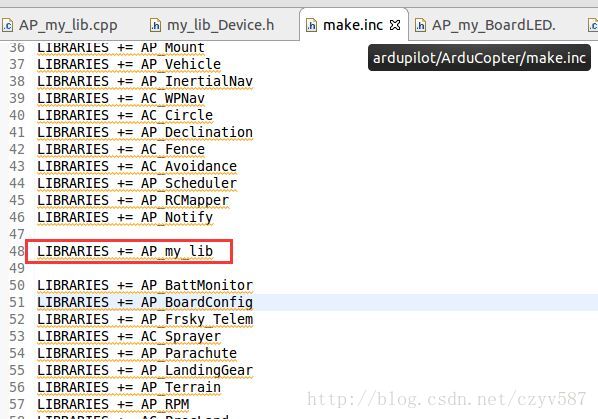
LIBRARIES += AP_my_lib只有添加了这个makefile才会编译之前写的库文件
至于原因:ardupilot/mk/sketch_source.mk中
# get list of libraries from make.inc
include $(MAKE_INC)
include $(GLOBAL_MAKE_INC)
LIBTOKENS := $(LIBRARIES)
将make.inc文件的库目录列表添加到LIBTOKENS中
主要是模仿AP_Notify文件的写法并且让语法通过。
实验验证:
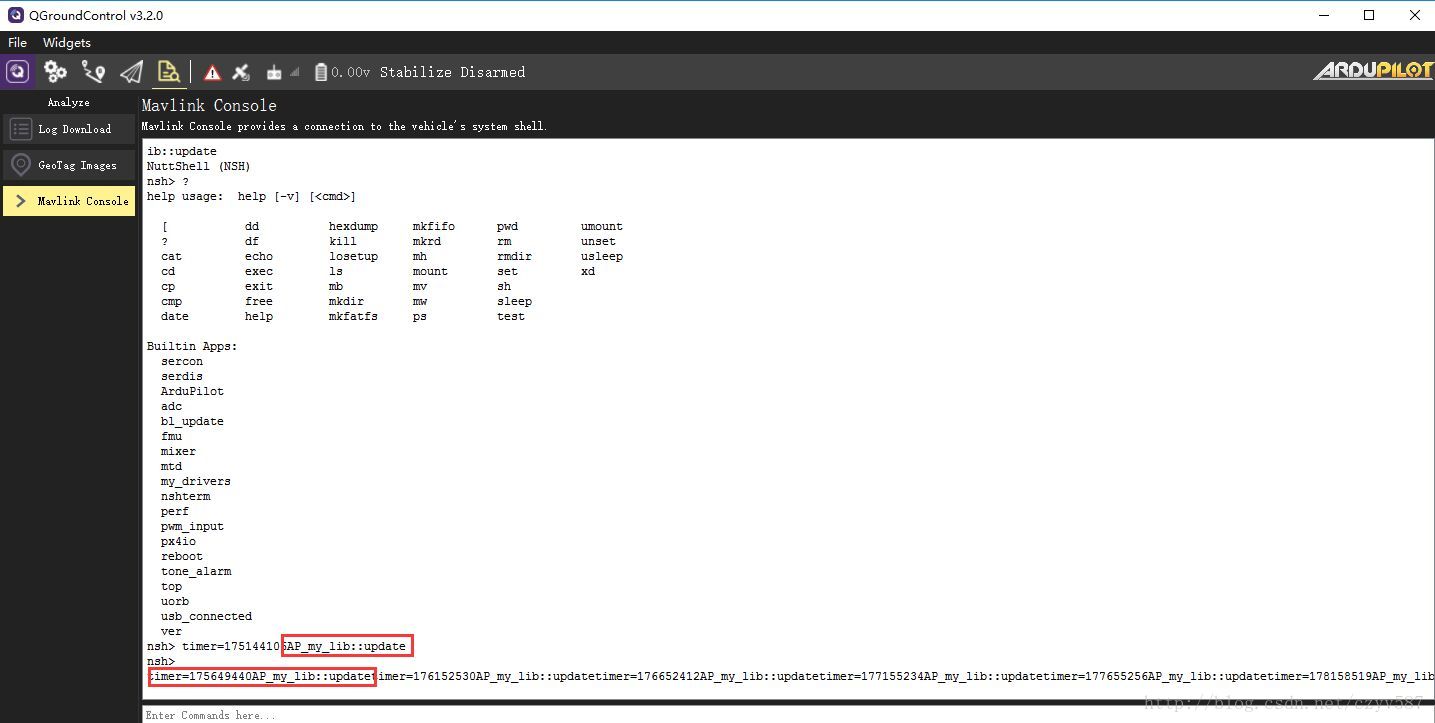
正好是一次“timers=xxxxxx”,一次“AP_my_lib::update”(因为都是2hz的运行)
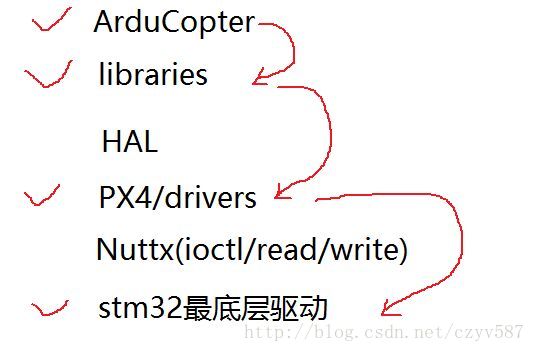
ArduCopter层调用px4/drivers
之前已经写好了
- ArduCopter的my_app
- libraries/AP_my_lib
- px4/src/divers/my_drivers
my_drivers请看http://blog.csdn.net/czyv587/article/details/77817314
现在要做的是libraries/AP_my_lib调用px4/src/divers/my_drivers
可以参考其他lib层如何调用底层驱动的写法,之前分析过ardupilot读取传感器的过程(http://blog.csdn.net/czyv587/article/details/77171608),可以参考下
先上程序
AP_my_lib.cpp
#include <drivers/drv_input_capture.h>
#include <drivers/drv_pwm_output.h>
#include <sys/types.h>
#include <sys/stat.h>
#include <fcntl.h>
#include <unistd.h>
#include <stdio.h>
#include "AP_my_lib.h"
#include "AP_my_BoardLED.h"
#include <AP_HAL/AP_HAL.h>
#include <AP_Common/AP_Common.h>
#include <AP_Param/AP_Param.h>
 #include <sys/ioctl.h>
 #include <sys/types.h>
 #include <sys/stat.h>
 #include <fcntl.h>
 #include <unistd.h>
 #include <drivers/drv_pwm_output.h>
 #include <drivers/drv_sbus.h>
 #include <nuttx/arch.h>
 #include <spawn.h>

extern const AP_HAL::HAL& hal;

extern "C" {
    int my_drivers_main(int, char **);
};


AP_my_lib *AP_my_lib::_instance;
// Default constructor
AP_my_lib::AP_my_lib()
{
    _instance = this;
}


my_lib_Device *AP_my_lib::_devices[] = {nullptr, nullptr, nullptr, nullptr, nullptr};

// initialisation
void AP_my_lib::init(bool enable_external_leds)
{
        _devices[0] = new AP_my_BoardLED();
//        _devices[1] = new ToshibaLED_I2C();
//        _devices[2] = new ToneAlarm_PX4();
//        _devices[3] = new Display();

    // clear all flags and events
//    memset(&AP_Notify::flags, 0, sizeof(AP_Notify::flags));
//    memset(&AP_Notify::events, 0, sizeof(AP_Notify::events));

    for (uint8_t i = 0; i < 4; i++) {
        if (_devices[i] != nullptr) {
            _devices[i]->p_my_lib = this;
            _devices[i]->init();
        }
    }
}
bool AP_my_lib::px4_start_driver(main_fn_t main_function, const char *name, const char *arguments)
{
    char *s = strdup(arguments);
    char *args[10];
    uint8_t nargs = 0;
    char *saveptr = nullptr;

    // parse into separate arguments
    for (char *tok=strtok_r(s, " ", &saveptr); tok; tok=strtok_r(nullptr, " ", &saveptr)) {
        args[nargs++] = tok;
        if (nargs == ARRAY_SIZE(args)-1) {
            break;
        }
    }
    args[nargs++] = nullptr;

    printf("Starting driver %s %s\n", name, arguments);
    pid_t pid;
//task_spawn开启线程
    if (task_spawn(&pid, name, main_function, nullptr, nullptr,
                   args, nullptr) != 0) {
        free(s);
        printf("Failed to spawn %s\n", name);
        return false;
    }

    // wait for task to exit and gather status
    int status = -1;
//    if (waitpid(pid, &status, 0) != pid) {
//        printf("waitpid failed for %s\n", name);
//        free(s);
//        return false;
//    }
    free(s);
    return (status >> 8) == 0;
}
//
// main update function, called at 50Hz
void AP_my_lib::update(void)
{
    printf("AP_my_lib::update");
    px4_start_driver(my_drivers_main, "my_drivers", "sensor_reset 20");//跳到divers层运行my_drivers_main
    for (uint8_t i = 0; i < 4; i++) {
        if (_devices[i] != nullptr) {
            _devices[i]->update();
        }
    }
}
AP_my_lib.h
#pragma once

#include <AP_Common/AP_Common.h>
#include <AP_Param/AP_Param.h>
#include <GCS_MAVLink/GCS_MAVLink.h>

#include "my_lib_Device.h"

extern "C" typedef int (*main_fn_t)(int argc, char **);//用于声明divers的main函数

class AP_my_lib
{
//    friend class RGBLed;            // RGBLed needs access to notify parameters
//    friend class Display;           // Display needs access to notify parameters
public:
    AP_my_lib();
    void update(void);
    static bool px4_start_driver(main_fn_t main_function, const char *name, const char *arguments);
    void init(bool enable_external_leds);

private:
    static AP_my_lib *_instance;
    static my_lib_Device* _devices[];
};
以上主要是利用px4_start_driver()跳转到px4/src/drivers层中运行相应的驱动程序
本程序实现的原理是
实验验证

本来应该直接看闪灯的现象,但是这里只好看my_drivers里打印的东西
int my_drivers_main(int argc, char *argv[])
{
    if(l_i==0)
    {
//      led_on(1);
        led_toggle(1);
        l_i=1;
        printf("czy");
    }
    else if(l_i==1)
    {
//      led_off(1);
        led_toggle(1);
        l_i=0;
        printf("v587!!!");
    }
    return 0;
}
点亮RBG_led
RBG_led是I2C驱动的,所以正好可以看下如何使用I2C驱动。在此之前需要理清notify里关于RBG_led的程序结构。
ArduCopter.cpp            init_ardupilot()
ArduCopter.cpp    任务列表SCHED_TASK(update_notify,50,90)
                                |
lib/system.cpp            notify.init()
lib/led.cpp               notify.update()                         /
                                |                                | init()//需要寻找class NotifyDevice纯虚函数的实现,在class RGBLed中实现
                                |                                | update()//需要寻找class NotifyDevice纯虚函数的实现,在class RGBLed中实现
AP_Notify.cpp       _devices[1] = new ToshibaLED_I2C();    对象--| handle_led_control()
                                |                                | handle_play_tune()
                                |                                 \
                                |                                /
                                |                                |hw_init()   <------------|---------|
                        class ToshibaLED_I2C                类---|hw_set_rgb()         |(调用)        |
                                |                                |_timer()//点亮灯 2000us--|        |
                                |                                \                                   |
                                |                                                                    |(实现)
                         class ToshibaLED           类                                               |
                                |                                                                    |
                                |                                                                    |
                                |                                /                                   |
                          class RGBLed                      类--|virtual init()-->hw_init()----------|
                                |                               |update()--->update_colours()//逻辑上应该显示什么颜色
                                |                               |    --->set_rgb()颜色传递给_red_curr、_green_curr、_blue_curr
                                |                                \
                        class NotifyDevice                  类
需要说明的是,如果找到一个没实现的虚函数或者纯虚函数,不要怕,需要找到他的子类或者友元类,去找该虚函数的实现。感觉写一个RGB_led需要这么多类,完全是为了好封装,我的类只管自己的,给其他提供一个简单的接口,找函数实现就从最基的基类往前找。
逻辑理清后,就会发现只需要
AP_HAL::OwnPtr<AP_HAL::I2CDevice> _dev;就可以直接调用I2C的接口了
void my_LED_I2C::_timer(void)
{
    ...
    _dev->transfer(val, sizeof(val), nullptr, 0);
}
那么传代码
ArduCopter/system.cpp
void Copter::init_ardupilot()
{
//    notify.init(true);//注释掉原来的RGB_led初始化
    my_lib.init(true);//用自己的RGB_led初始化
}
ArduCopter/my_app.cpp不变
lib/AP_my_lib.cpp
#include <drivers/drv_input_capture.h>
#include <drivers/drv_pwm_output.h>
#include <sys/types.h>
#include <sys/stat.h>
#include <fcntl.h>
#include <unistd.h>
#include <stdio.h>
#include "AP_my_lib.h"
#include "AP_my_BoardLED.h"
#include <AP_HAL/AP_HAL.h>
#include <AP_Common/AP_Common.h>
#include <AP_Param/AP_Param.h>
#include <sys/ioctl.h>
#include <sys/types.h>
#include <sys/stat.h>
#include <fcntl.h>
#include <unistd.h>
#include <drivers/drv_pwm_output.h>
#include <drivers/drv_sbus.h>
#include <nuttx/arch.h>
#include <spawn.h>

#include "my_LED_I2C.h"

extern const AP_HAL::HAL& hal;

extern "C" {
    int my_drivers_main(int, char **);
};

AP_my_lib *AP_my_lib::_instance;
// Default constructor
AP_my_lib::AP_my_lib()
{
    _instance = this;
}

my_lib_Device *AP_my_lib::_devices[] = {nullptr, nullptr, nullptr, nullptr, nullptr};
// initialisation
void AP_my_lib::init(bool enable_external_leds)
{
    _devices[0] = new my_LED_I2C();//新建一个my_LED_I2C对象
    _devices[0]->init();//调用my_LED_I2C对象的初始化
}

bool AP_my_lib::px4_start_driver(main_fn_t main_function, const char *name, const char *arguments)
{
    char *s = strdup(arguments);
    char *args[10];
    uint8_t nargs = 0;
    char *saveptr = nullptr;

    // parse into separate arguments
    for (char *tok=strtok_r(s, " ", &saveptr); tok; tok=strtok_r(nullptr, " ", &saveptr)) {
        args[nargs++] = tok;
        if (nargs == ARRAY_SIZE(args)-1) {
            break;
        }
    }
    args[nargs++] = nullptr;

//    printf("Starting driver %s %s\n", name, arguments);
    pid_t pid;

    if (task_spawn(&pid, name, main_function, nullptr, nullptr,
                   args, nullptr) != 0) {
        free(s);
        printf("Failed to spawn %s\n", name);
        return false;
    }

    // wait for task to exit and gather status
    int status = -1;
//    if (waitpid(pid, &status, 0) != pid) {
//        printf("waitpid failed for %s\n", name);
//        free(s);
//        return false;
//    }
    free(s);
    return (status >> 8) == 0;
}
void AP_my_lib::update(void)
{
    px4_start_driver(my_drivers_main, "my_drivers", "sensor_reset 20");
    _devices[0]->update();//调用my_LED_I2C对象的update
}
AP_my_lib.h添加了一些逻辑处理的变量和宏定义
#pragma once

#include <AP_Common/AP_Common.h>
#include <AP_Param/AP_Param.h>
#include <GCS_MAVLink/GCS_MAVLink.h>

#include "my_lib_Device.h"

extern "C" typedef int (*main_fn_t)(int argc, char **);

#define RGB_LED_OFF     0
#define RGB_LED_LOW     1
#define RGB_LED_MEDIUM  2
#define RGB_LED_HIGH    3
#define BUZZER_ON       1
#define BUZZER_OFF      0

class AP_my_lib
{
    friend class my_RGBLed;            // RGBLed needs access to notify parameters
//    friend class Display;           // Display needs access to notify parameters
public:
    AP_my_lib();
    void update(void);
    static bool px4_start_driver(main_fn_t main_function, const char *name, const char *arguments);
    void init(bool enable_external_leds);

private:
    AP_Int8 _rgb_led_brightness;
    AP_Int8 _rgb_led_override;
    AP_Int8 _buzzer_enable;
    AP_Int8 _display_type;
    AP_Int8 _oreo_theme;
    void px4_drivers_start(void);
    static AP_my_lib *_instance;
    static my_lib_Device* _devices[];
};
my_LED_I2C.cpp对应于ToshibaLED_I2C.cpp
只需要替换成自己的文件名字
#include "my_LED_I2C.h"
#include <utility>
#include <AP_HAL/AP_HAL.h>

extern const AP_HAL::HAL& hal;

#define TOSHIBA_LED_I2C_ADDR 0x55    // default I2C bus address
#define TOSHIBA_LED_I2C_BUS_INTERNAL    0
#define TOSHIBA_LED_I2C_BUS_EXTERNAL    1

#define TOSHIBA_LED_PWM0    0x01    // pwm0 register
#define TOSHIBA_LED_PWM1    0x02    // pwm1 register
#define TOSHIBA_LED_PWM2    0x03    // pwm2 register
#define TOSHIBA_LED_ENABLE  0x04    // enable register

bool my_LED_I2C::hw_init()
{
    // first look for led on external bus
    _dev = std::move(hal.i2c_mgr->get_device(TOSHIBA_LED_I2C_BUS_EXTERNAL, TOSHIBA_LED_I2C_ADDR));
    if (!_dev || !_dev->get_semaphore()->take(HAL_SEMAPHORE_BLOCK_FOREVER)) {
        return false;
    }

    // enable the led
    bool ret = _dev->write_register(TOSHIBA_LED_ENABLE, 0x03);

    // on failure try the internal bus
    if (!ret) {
        // give back external bus semaphore
        _dev->get_semaphore()->give();
        // get internal I2C bus driver
        _dev = std::move(hal.i2c_mgr->get_device(TOSHIBA_LED_I2C_BUS_INTERNAL, TOSHIBA_LED_I2C_ADDR));
        if (!_dev || !_dev->get_semaphore()->take(HAL_SEMAPHORE_BLOCK_FOREVER)) {
            return false;
        }
        ret = _dev->write_register(TOSHIBA_LED_ENABLE, 0x03);
    }

    // update the red, green and blue values to zero
    uint8_t val[4] = { TOSHIBA_LED_PWM0, _led_off, _led_off, _led_off };
    ret &= _dev->transfer(val, sizeof(val), nullptr, 0);

    // give back i2c semaphore
    _dev->get_semaphore()->give();

    _dev->register_periodic_callback(20000, FUNCTOR_BIND_MEMBER(&my_LED_I2C::_timer, void));//_timer被周期调用  周期为2000us

    return ret;
}

// set_rgb - set color as a combination of red, green and blue values
bool my_LED_I2C::hw_set_rgb(uint8_t red, uint8_t green, uint8_t blue)
{
    rgb = {red, green, blue};
    _need_update = true;
    return true;
}

void my_LED_I2C::_timer(void)//用I2C驱动控制RGB_led
{
    if (!_need_update) {
        return;
    }
    _need_update = false;

    /* 4-bit for each color */
    uint8_t val[4] = { TOSHIBA_LED_PWM0, (uint8_t)(rgb.b >> 4),
                       (uint8_t)(rgb.g / 16), (uint8_t)(rgb.r / 16) };

    _dev->transfer(val, sizeof(val), nullptr, 0);
}
my_LED_I2C.h对应于ToshibaLED_I2C.h
也是只需要改名字
#pragma once

#include <AP_HAL/I2CDevice.h>
#include "my_LED.h"

class my_LED_I2C : public my_LED
{
protected:
    bool hw_init(void) override;
    bool hw_set_rgb(uint8_t r, uint8_t g, uint8_t b) override;

private:
    AP_HAL::OwnPtr<AP_HAL::I2CDevice> _dev;
    void _timer(void);
    bool _need_update;
    struct {
        uint8_t r, g, b;
    } rgb;
};
my_LED.cpp对应于ToshibaLED.cpp
只需要改名字
#include "my_LED.h"

#define TOSHIBA_LED_BRIGHT  0xFF    // full brightness
#define TOSHIBA_LED_MEDIUM  0x80    // medium brightness
#define TOSHIBA_LED_DIM     0x11    // dim
#define TOSHIBA_LED_OFF     0x00    // off

my_LED::my_LED():
    my_RGBLed(TOSHIBA_LED_OFF, TOSHIBA_LED_BRIGHT, TOSHIBA_LED_MEDIUM, TOSHIBA_LED_DIM)
{
}
my_LED.h对应于ToshibaLED.h
只需要改名字
#pragma once
#include "my_RGBLed.h"
class my_LED: public my_RGBLed {
public:
    my_LED();
};
my_lib_Device.h不用改
my_RGBLed.cpp对应于RGBLed.cpp,相当于是点亮RGB_led的应用层(处理逻辑)
#include "my_RGBLed.h"

#include <AP_HAL/AP_HAL.h>
#include <AP_GPS/AP_GPS.h>
#include "AP_my_lib.h"

extern const AP_HAL::HAL& hal;

my_RGBLed::my_RGBLed(uint8_t led_off, uint8_t led_bright, uint8_t led_medium, uint8_t led_dim):
    counter(0),
    step(0),
    _healthy(false),
    _red_des(0),
    _green_des(0),
    _blue_des(0),
    _red_curr(0),
    _green_curr(0),
    _blue_curr(0),
    _led_off(led_off),
    _led_bright(led_bright),
    _led_medium(led_medium),
    _led_dim(led_dim)
{

}

bool my_RGBLed::init()
{
    _healthy = hw_init();
    printf("_healthy=%u",_healthy);
    return _healthy;
}

// set_rgb - set color as a combination of red, green and blue values
void my_RGBLed::_set_rgb(uint8_t red, uint8_t green, uint8_t blue)
{
    if (red != _red_curr ||
        green != _green_curr ||
        blue != _blue_curr) {
        // call the hardware update routine
        if (hw_set_rgb(red, green, blue)) {
            _red_curr = red;
            _green_curr = green;
            _blue_curr = blue;
        }
    }
}

// set_rgb - set color as a combination of red, green and blue values
void my_RGBLed::set_rgb(uint8_t red, uint8_t green, uint8_t blue)
{
    _set_rgb(red, green, blue);
}
// _scheduled_update - updates _red, _green, _blue according to notify flags
int l_j=0;
void my_RGBLed::update_colours(void)
{
    uint8_t brightness = _led_bright;
    if(l_j==0)//三色依次交替
    {
        _red_des = brightness;
        _blue_des = _led_off;
        _green_des = _led_off;
        l_j=1;
    }
    else if(l_j==1)
    {
        _red_des = _led_off;
        _blue_des = brightness;
        _green_des = _led_off;
        l_j=2;
    }
    else if(l_j==2)
    {
        _red_des = _led_off;
        _blue_des = _led_off;
        _green_des = brightness;
        l_j=0;
    }

}

void my_RGBLed::update()
{
    update_colours();
    set_rgb(_red_des, _green_des, _blue_des);
}

/*
  update LED when in override mode
 */
void my_RGBLed::update_override(void)
{
    if (_led_override.rate_hz == 0) {
        // solid colour
        _set_rgb(_led_override.r, _led_override.g, _led_override.b);
        return;
    }
    // blinking
    uint32_t ms_per_cycle = 1000 / _led_override.rate_hz;
    uint32_t cycle = (AP_HAL::millis() - _led_override.start_ms) % ms_per_cycle;
    if (cycle > ms_per_cycle / 2) {
        // on
        _set_rgb(_led_override.r, _led_override.g, _led_override.b);
    } else {
        _set_rgb(0, 0, 0);
    }
}
my_RGBLed.h
#pragma once
#include <AP_HAL/AP_HAL.h>
#include "my_lib_Device.h"

class my_RGBLed: public my_lib_Device {
public:
    my_RGBLed(uint8_t led_off, uint8_t led_bright, uint8_t led_medium, uint8_t led_dim);
    // init - initialised the LED
    virtual bool init(void);
    // healthy - returns true if the LED is operating properly
    virtual bool healthy() { return _healthy; }
    // set_rgb - set color as a combination of red, green and blue levels from 0 ~ 15
    virtual void set_rgb(uint8_t red, uint8_t green, uint8_t blue);
    // update - updates led according to timed_updated.  Should be
    // called at 50Hz
    virtual void update();
protected:
    // methods implemented in hardware specific classes
    virtual bool hw_init(void) = 0;
    virtual bool hw_set_rgb(uint8_t red, uint8_t green, uint8_t blue) = 0;
    // set_rgb - set color as a combination of red, green and blue levels from 0 ~ 15
    virtual void _set_rgb(uint8_t red, uint8_t green, uint8_t blue);
    virtual void update_override();
    // meta-data common to all hw devices
    uint8_t counter;
    uint8_t step;
    bool _healthy;                               // true if the LED is operating properly
    uint8_t _red_des, _green_des, _blue_des;     // color requested by timed update
    uint8_t _red_curr, _green_curr, _blue_curr;  // current colours displayed by the led
    uint8_t _led_off;
    uint8_t _led_bright;
    uint8_t _led_medium;
    uint8_t _led_dim;
    struct {
        uint8_t r, g, b;
        uint8_t rate_hz;
        uint32_t start_ms;
    } _led_override;
private:
    virtual void update_colours();
};您的鼓励将是笔者书写高质量文章的最大动力^_^!!