背景:公司开发的小程序要实现将产品免费给用户试用的功能,用户登录小程序后在产品页可以将产品以二维码海报的方式分享给微信好友,好友扫码后跳转公众号,关注后公众号推送小程序,点击小程序后跳转到小程序中的相应产品页面。
如下图:
这里涉及到两个重要的环节:
1.生成带参数(产品id,产品缩略图、分享人openid,小程序跳转路径等)的二维码;
2.扫码后的事件推送,将小程序推送给好友。
一、微信公众平台申请服务号并通过认证

获得 生成带参数的二维码、接收事件推送、客服接口 接口权限。
二、验证请求来自微信
登录公众号在 开发-基本配置中配置开发人员服务器信息:
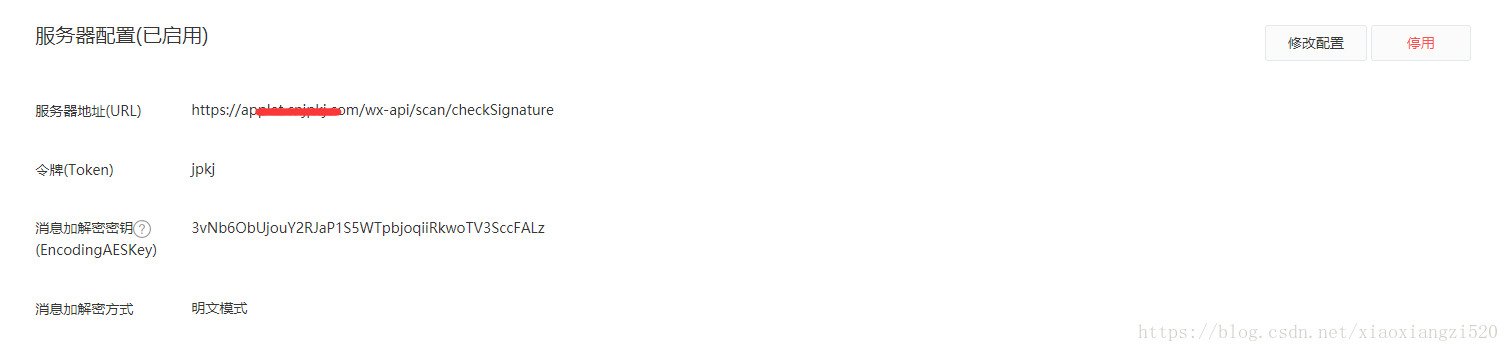
该该服务器url作为开发者验证接口调用者来自微信服务器,也作为扫码关注微信公众号后的事件推送接口url。
 /**
     * 验证微信服务器
     * @param signature
     * @param timestamp
     * @param nonce
     * @param echostr
     * @return
     */

    @RequestMapping(value = "/checkSignature", method = {RequestMethod.GET})
    public Object validate(String signature, String timestamp, String nonce, String echostr) {
        LOG.info("signature:" + signature + " timestamp:" + timestamp + " nonce:" + nonce + " echostr:" + echostr);
        if (StringUtils.isNotBlank(echostr)) {
            LOG.info("********************************");
            String signatureRet = SignUtil.getSignature(timestamp, nonce, "jpkj");
            LOG.info("signatureRet:" + signatureRet);
            if (StringUtils.isNotBlank(signatureRet) && signatureRet.equals(signature)) {
                return echostr;
            }
        }
        return "";
    }
三、事件推送接口
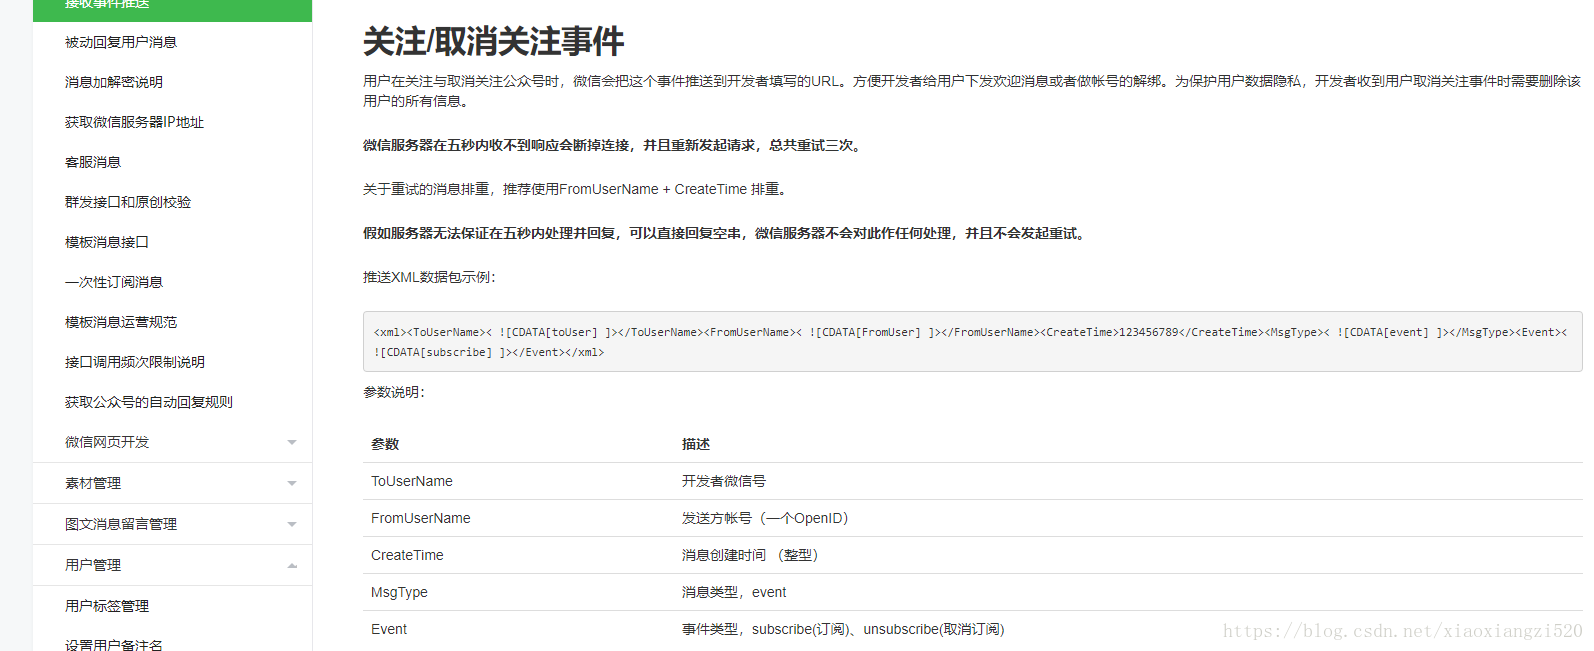
用于接收扫码后关注公众号,微信服务器将xml数据推送给此接口,接收xml数据后推送小程序。
注意:接口要与上面的服务器url路径一致,请求的路径是一样的,但是提交的数据方式不同,验证的http是GET提交,推送则是POST方式。
 /**
     * 微信扫码后事件推送方法
     *
     * @param msg 事件输入xml数据封装
     * @return
     * @throws Exception
     */
    @RequestMapping(value = "/checkSignature", method = {RequestMethod.POST}, produces = {MediaType.TEXT_XML_VALUE})
    public Object pushEvent(@RequestBody InMsgEntity msg) throws Exception {
        LOG.info("进入方法***************************");
        LOG.info("msg:" + msg.toString());
        String accessToken = redisService.getValue("access_token");
        if (StringUtils.isEmpty(accessToken)) {
            return ServiceResultHelper.genResultWithFaild(Constant.ErrorCode.INVALID_PARAM_MSG, Constant.ErrorCode.INVALID_PARAM_CODE);
        }
        String PUSH_APPLET_URL = "https://api.weixin.qq.com/cgi-bin/message/custom/send?access_token=" + accessToken;
        if (null != msg) {
            LOG.info("*************推送*************");
            if (msg.getMsgType().equals("event")) {
                LOG.info("*************推送小程序开始*************");
                Map<String, Object> params = new HashMap<>();
                params.put("touser", msg.getFromUserName());
                params.put("msgtype", "miniprogrampage");
                Map<String, Object> miniprogrampageMap = new HashMap<>();
                miniprogrampageMap.put("title", "小程序");
                miniprogrampageMap.put("appid", "wx5c5e9ffc305b66d2111");
                miniprogrampageMap.put("thumb_media_id", "tByjOrKtvK71V0XZUJ9RMCPyYSbkp2A8CyZCo6W6bK8s");
                params.put("miniprogrampage", miniprogrampageMap);
                String result = HttpClientUtil.postJson(PUSH_APPLET_URL, JSON.toJSONString(params), "UTF-8");
                LOG.info("*************推送小程序结束result:" + result);
            }
        }
        return null;
    }
注:appid为要推送的小程序的appid,thumb_media_id为推送时小程序附带的缩略图,可调用微信提供的上传素材接口获取id。
InMsgEntity类: 对微信推送的xml格式的数据进行封装
package com.jp.tech.applet.ms.scancode.domain;

import javax.xml.bind.annotation.XmlAccessType;
import javax.xml.bind.annotation.XmlAccessorType;
import javax.xml.bind.annotation.XmlElement;
import javax.xml.bind.annotation.XmlRootElement;

/**
 * 微信推送XML数据包实体
 */

@XmlRootElement(name="xml")
@XmlAccessorType(XmlAccessType.FIELD)
public class InMsgEntity {

    // 开发者微信号
    @XmlElement(name="FromUserName")
    protected String FromUserName;

    // 发送方帐号(一个OpenID)
    @XmlElement(name="ToUserName")
    protected String ToUserName;

    // 消息创建时间
    @XmlElement(name="CreateTime")
    protected Long CreateTime;
    /**
     * 消息类型
     * text 文本消息 * image 图片消息 * voice 语音消息 * video 视频消息 * music 音乐消息
     */
    @XmlElement(name="MsgType")
    protected String MsgType;

    //事件类型,subscribe
    @XmlElement(name="Event")
    protected Long Event;

    // 事件KEY值,qrscene_为前缀,后面为二维码的参数值
    @XmlElement(name="EventKey")
    private String EventKey;

    // 二维码的ticket,可用来换取二维码图片
    @XmlElement(name="Ticket")
    private String Ticket;

    //消息id
    @XmlElement(name="MsgId ")
    private String MsgId ;

    //文本内容
    @XmlElement(name="Content  ")
    private String Content  ;


    public String getFromUserName() {
        return FromUserName;
    }

    public void setFromUserName(String fromUserName) {
        FromUserName = fromUserName;
    }

    public String getToUserName() {
        return ToUserName;
    }

    public void setToUserName(String toUserName) {
        ToUserName = toUserName;
    }

    public Long getCreateTime() {
        return CreateTime;
    }

    public void setCreateTime(Long createTime) {
        CreateTime = createTime;
    }

    public String getMsgType() {
        return MsgType;
    }

    public void setMsgType(String msgType) {
        MsgType = msgType;
    }

    public Long getEvent() {
        return Event;
    }

    public void setEvent(Long event) {
        Event = event;
    }

    public String getEventKey() {
        return EventKey;
    }

    public void setEventKey(String eventKey) {
        EventKey = eventKey;
    }

    public String getTicket() {
        return Ticket;
    }

    public void setTicket(String ticket) {
        Ticket = ticket;
    }

    public String getMsgId() {
        return MsgId;
    }

    public void setMsgId(String msgId) {
        MsgId = msgId;
    }

    public String getContent() {
        return Content;
    }

    public void setContent(String content) {
        Content = content;
    }

    @Override
    public String toString() {
        return "InMsgEntity{" +
                "FromUserName='" + FromUserName + '\'' +
                ", ToUserName='" + ToUserName + '\'' +
                ", CreateTime=" + CreateTime +
                ", MsgType='" + MsgType + '\'' +
                ", Event=" + Event +
                ", EventKey='" + EventKey + '\'' +
                ", Ticket='" + Ticket + '\'' +
                ", MsgId='" + MsgId + '\'' +
                ", Content='" + Content + '\'' +
                '}';
    }
}
获取事件推送的xml数据后,提取所需数据,调用客服服务接口推送小程序
详见:客服接口-发消息
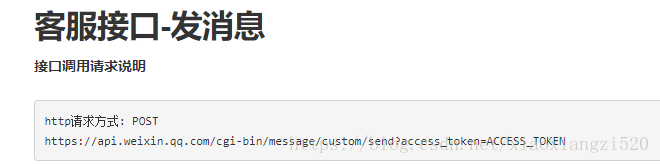
发送小程序卡片(要求小程序与公众号已关联)
接口调用示例:
{
    "touser":"OPENID",
    "msgtype":"miniprogrampage",
    "miniprogrampage":
    {
        "title":"title",
        "appid":"appid",
        "pagepath":"pagepath",
        "thumb_media_id":"thumb_media_id"
    }
} 通过下面的命令将阿里云上的图片上传至微信服务器作为永久素材。详见:新增其他类型永久素
材
curl -F media=@/data/applet/Artboard.png "https://api.weixin.qq.com/cgi-bin/material/add_material?access_token=13_4cy2_RiVPjHELyZdITK8_2hpb8_0Xjr8gxZI7I7EUf7lGsuRgtPmbvQ6af-QM6XbTsVYXA8wIHi9ON8ouzDqMNJclHEM9YuDxSEjDlrdCLrnf0t1VviHrhFeK__xOM9ZFQhOH0tRJwtU0rGnBDDfAGAKMM&type=thumb"返回说明:
{
  "media_id":MEDIA_ID,
  "url":URL
}
返回参数说明
| 参数 | 描述 |
|---|---|
| media_id | 新增的永久素材的media_id |
| url | 新增的图片素材的图片URL(仅新增图片素材时会返回该字段) |
media_id可以作为推送小程序时的缩略图使用。代码中的thumb_media_id使用此命令上传后返回的media_id即可。
四、获取微信公众号access_token,存入redis
获取带参数的二维码首先要获取access_token,放到redis中缓存。由于access_token的有效期是两个小时,所以这里我用的定时任务是quartz,与springboot整合(不知道怎么整合的请参见springboot整合Quartz实现定时任务、springboot整合redis实现发送短信验证码)后获取access_token。
代码如下:
application.properties中加入微信公众号的appid和secret:
#微信公众号
wx.gzh.appid=wx6e3199c6254e43b3huh1
wx.gzh.appsecret=713966cacd2a5da74fa8024a4958bac0dsdq
定时任务获取access_token:
package com.jp.tech.applet.web.schedule;

import com.jp.tech.applet.ms.scancode.util.AccessTokenUtil;
import com.jp.zpzc.service.IRedisService;
import org.apache.commons.lang3.StringUtils;
import org.quartz.Job;
import org.quartz.JobExecutionContext;
import org.quartz.JobExecutionException;
import org.slf4j.Logger;
import org.slf4j.LoggerFactory;
import org.springframework.beans.factory.annotation.Value;

import javax.annotation.Resource;

/**
 * @author yangfeng
 * @desciption 获取微信公众号access_token任务
 * @date 2018/9/10
 */
public class GetAccessTokenTask implements Job {

    private static Logger LOG = LoggerFactory.getLogger(GetAccessTokenTask.class);

    @Resource
    private IRedisService redisService;
    @Value("${wx.gzh.appid}")
    String appid;
    @Value("${wx.gzh.appsecret}")
    String secret;

    @Override
    public void execute(JobExecutionContext jobExecutionContext) throws JobExecutionException {
        try {
            String accessToken = AccessTokenUtil.getAccessToken(appid, secret);
            LOG.info("****access_token:******"+accessToken);
            if (StringUtils.isNotBlank(accessToken)) {
                redisService.setKeyNoExpire("access_token", accessToken);
            }
        } catch (Exception e) {
            LOG.error(e.getMessage());
        }
    }
}
获取token工具类:
package com.jp.tech.applet.ms.scancode.util;

import com.alibaba.fastjson.JSONObject;
import com.jp.tech.applet.common.http.HttpClientUtil;
import org.apache.commons.lang3.StringUtils;

/**
 * 获取公众号access_token
 */
public class AccessTokenUtil {

    private static String ACCESSTOKENURL = "https://api.weixin.qq.com/cgi-bin/token?grant_type=client_credential&appid={appId}&secret={appSecret}";

    /**
     * 获取access_Token
     *
     * @return
     */
    public static String getAccessToken(String appId, String appSecret) throws Exception {
        ACCESSTOKENURL = ACCESSTOKENURL.replace("{appId}", appId).replace("{appSecret}", appSecret);
        String result = HttpClientUtil.post(ACCESSTOKENURL, null, "UTF-8");
        if (StringUtils.isNotBlank(result)) {
            return JSONObject.parseObject(result).getString("access_token");
        }
        return null;
    }
}
redis接口:
public interface IRedisService {
    void setKeyNoExpire(String var1, String var2);
}
redis实现类:
@Service
public class RedisService implements IRedisService {
    @Resource
    private RedisTemplate redisTemplate;

    public RedisService() {
    }

    public void setKeyNoExpire(String key, String value) {
        ValueOperations<String, String> ops = this.redisTemplate.opsForValue();
        ops.set(key, value);
    }
}
五、根据access_token生成ticket
/**
     * 创建二维码ticket
     *
     * @param accessToken  微信access_token
     * @param objectId     项目id
     * @param openId       微信用户openid
     * @param path         扫码后小程序跳转的页面路径
     * @param thumbMediaId 小程序展示的缩略图id
     * @param picId        海报图片id
     * @return
     * @throws Exception
     */
    public String generateTicket(String accessToken, String objectId, String openId, String path, String thumbMediaId, String picId) throws Exception {
        LOG.info("************* 创建二维码ticket*************");
        String TICKET_URL = "https://api.weixin.qq.com/cgi-bin/qrcode/create?access_token=" + accessToken;
        Map<String, Object> params = new HashMap<>();
        params.put("expire_seconds", 604800);
        params.put("action_name", "QR_STR_SCENE");
        Map<String, Object> actionInfoMap = new HashMap<>();
        Map<String, Object> sceneMap = new HashMap<>();
        Map<String, Object> sceneValMap = new HashMap<>();
        sceneValMap.put("objectId", objectId);
        sceneValMap.put("openId", openId);
        sceneValMap.put("path", path);
        sceneValMap.put("thumbMediaId", thumbMediaId);
        sceneValMap.put("picId", picId);
        sceneMap.put("scene_str", JSON.toJSONString(sceneValMap));
        LOG.info("*********scene_str:*************" + JSON.toJSONString(sceneValMap));
        actionInfoMap.put("scene", sceneMap);
        params.put("action_info", actionInfoMap);
        LOG.info("*********json参数:*************" + JSON.toJSONString(params));
        return HttpClientUtil.postJson(TICKET_URL, JSON.toJSONString(params), "UTF-8");
    }
* @param objectId 项目id
* @param openId 微信用户openid
* @param path 扫码后小程序跳转的页面路径
* @param thumbMediaId 小程序展示的缩略图id
* @param picId 海报图片id
这些参数在生成ticket的时候放入scene_str中,根据ticket来生成二维码,扫码的时候可以从推送事件中获取这些参数。
详见:生成带参数的二维码
六、根据ticket获取二维码
 /**
     * 根据ticket生成二维码
     *
     * @param ticketResult 票据生成结果
     * @param picId
     * @param response
     */
    public static Object generateQRcodeByTicket(String ticketResult, String picId, HttpServletResponse response) {
        String ticket = JSONObject.parseObject(ticketResult).getString("ticket");
        LOG.info("*********ticket:********" + ticket);
        //生成带参数二维码
        if (StringUtils.isNotBlank(ticket)) {
            String GET_QRCORE_URL = "https://mp.weixin.qq.com/cgi-bin/showqrcode?ticket=" + ticket;
            //生成二维码,和海报背景合成新的图片
            createPicture(picId, GET_QRCORE_URL, response);
        } else {
            return ServiceResultHelper.genResultWithFaild("生成二维码失败", -1);
        }
        return null;
    }
七、二维码和海报背景合成新的图片
/**
     * 二维码和海报背景合成新的图片
     *
     * @param picId    海报背景图在mongodb上的id
     * @param url      生成带参数二维码接口路径
     * @param response
     * @return
     */
    public static void createPicture(String picId, String url, HttpServletResponse response) {
        BufferedImage img = new BufferedImage(550, 978, BufferedImage.TYPE_INT_RGB);//创建图片
        BufferedImage bg;//读取海报图
        try {
            bg = ImageIO.read(new URL("http://112.74.186.131:8080/zpzc_ms/file/downloadFile?file_id=" + picId));
            //读取微信生成的带参数二维码
            BufferedImage qRCodeImg = ImageIO.read(new URL(url));
            Graphics g = img.getGraphics();//开启画图
            g.drawImage(bg.getScaledInstance(550, 978, Image.SCALE_DEFAULT), 0, 0, null); // 绘制缩小后的图
            g.drawImage(qRCodeImg.getScaledInstance(126, 126, Image.SCALE_DEFAULT), 47, 817, null); // 绘制缩小后的图
            g.setColor(Color.black);
            g.dispose();
            ImageIO.write(img, "JPEG", response.getOutputStream());
        } catch (IOException e) {
            LOG.error(e.getMessage());
        }
    }
八、生成带参数二维码接口
  /**
     * 生成带参数二维码
     *
     * @param objectId     项目id
     * @param openId       微信用户openid
     * @param path         扫码后小程序跳转的页面路径
     * @param thumbMediaId 小程序展示的缩略图id
     * @param picId        海报背景图在mongodb上的id
     * @return
     * @throws Exception
     */
    @RequestMapping(value = "/generateQRCodeWithParams", method = {RequestMethod.POST, RequestMethod.GET})
    public Object generateQRCodeWithParams(String objectId, String openId, String path, String thumbMediaId, String picId, HttpServletResponse response) throws Exception {
        String accessToken = redisService.getValue("access_token");
        //如果token不存在则生成
        if (StringUtils.isEmpty(accessToken)) {
            accessToken = saveToken2Redis();
        }
        LOG.info("*********生成带参数二维码方法generateQRCodeWithParams********");
        LOG.info("objectId:" + objectId + "  openId:" + openId + "  path:" + path + "  thumbMediaId:" + thumbMediaId + "  picId:" + picId);
        //创建二维码ticket
        String ticketResult = generateTicket(accessToken, objectId, openId, path, thumbMediaId, picId);
        LOG.info("*********ticketResult:*******" + ticketResult);
        String errcode = StringUtils.isNotBlank(ticketResult) ? JSONObject.parseObject(ticketResult).getString("errcode") : null;
        if (StringUtils.isNotBlank(errcode) && String.valueOf(40001).equals(errcode)) {
            //如果token不是最新的,重新获取
            accessToken = saveToken2Redis();
            LOG.info("*********token不是最新的,重新获取********");
            ticketResult = generateTicket(accessToken, objectId, openId, path, thumbMediaId, picId);
            generateQRcodeByTicket(ticketResult, picId, response);
        } else {
            generateQRcodeByTicket(ticketResult, picId, response);
        }
        return null;
    }

    /**
     * 生成token并保存到redis
     *
     * @return
     * @throws Exception
     */
    public String saveToken2Redis() throws Exception {
        String accessToken = AccessTokenUtil.getAccessToken(appid, secret);
        LOG.info("****access_token:******" + accessToken);
        if (StringUtils.isNotBlank(accessToken)) {
            redisService.setKeyNoExpire("access_token", accessToken);
        }
        return accessToken;
    }
最终在用户关注公众号后推送的小程序如下:
