版权声明:本文为博主原创文章,未经博主允许不得转载。 https://blog.csdn.net/antgan/article/details/51304255
最近跟舍友@小疯一起研究爬虫
他写了个小应用-CSDN博客爬虫 有兴趣的朋友可以点进去看看哦~
一起学习。
一起进步。
想要源代码的朋友点击这里下载哦~
听到“爬虫”,是不是第一时间想到python/php ? 多少想玩爬虫的java学习者就因为语言不通而止步。Java是真的不能做爬虫吗?
当然不是。
只不过python的3行代码能解决的问题,而Java要30行。
这里推荐大家一个大牛做的java爬虫框架 【WebMagic】
文档简单易懂!java爬虫开发的福利啊!
一起来动手做一个小应用吧!
爬虫小应用–知乎用户信息
爬虫思想有3步
1. 抽取目标链接
2. 抽取需要的信息
3. 处理数据
一、 抽取目标链接 (确定入口地址,这里的入口是https://www.zhihu.com/search?type=people&q=java)
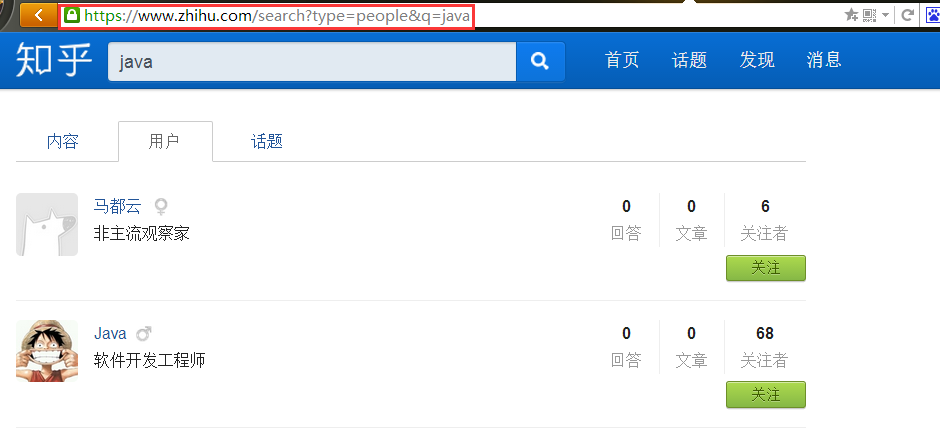
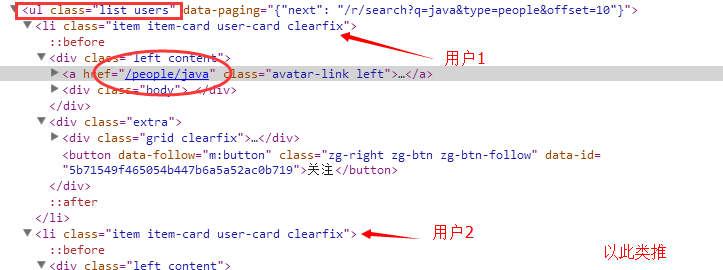
接下来查看html结构,确定待爬取的目标链接。(这里我的目标链接是【前10个用户的详细信息页面的url】)
二、抽取需要的信息(webmagic提供了3种方式,xpath,css选择,正则表达式。具体可以查看下[WebMagic文档](http://webmagic.io/docs/zh/))
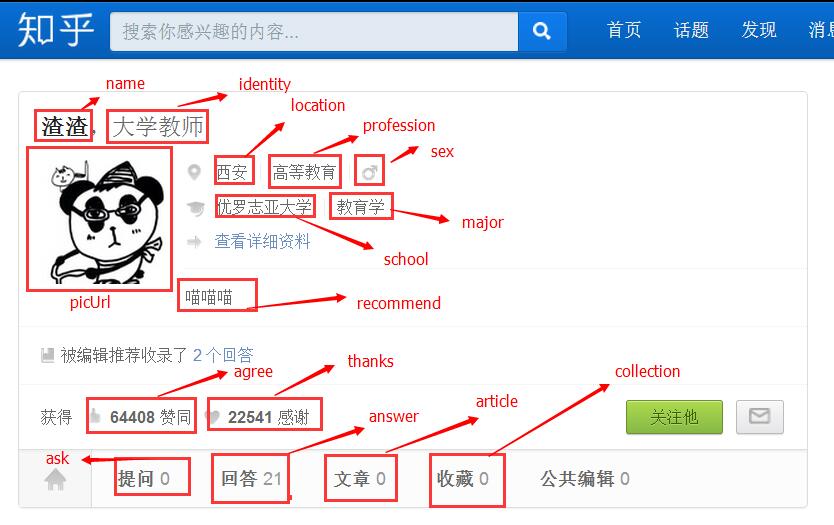
确定好【目标的信息】,如下图。
创建对应的实体对象
package entity;

/**
 * 知乎用户信息
 * @author antgan
 *
 */
public class ZhihuUser {
    private String key;//keyword
    private String name;//用户名
    private String identity;//身份
    private String location;//所在地
    private String profession;//行业
    private int sex;//性别
    private String school;//学校
    private String major;//专业
    private String recommend;//个人简介
    private String picUrl;//头像url
    private int agree;//赞同
    private int thanks;//感谢
    private int ask;//提问数
    private int answer;//回答数
    private int article;//文章数
    private int collection;//收藏数


    public String getKey() {
        return key;
    }
    public void setKey(String key) {
        this.key = key;
    }
    public String getName() {
        return name;
    }
    public void setName(String name) {
        this.name = name;
    }
    public String getIdentity() {
        return identity;
    }
    public void setIdentity(String identity) {
        this.identity = identity;
    }
    public String getLocation() {
        return location;
    }
    public void setLocation(String location) {
        this.location = location;
    }
    public String getProfession() {
        return profession;
    }
    public void setProfession(String profession) {
        this.profession = profession;
    }
    public int getSex() {
        return sex;
    }
    public void setSex(int sex) {
        this.sex = sex;
    }
    public String getSchool() {
        return school;
    }
    public void setSchool(String school) {
        this.school = school;
    }
    public String getMajor() {
        return major;
    }
    public void setMajor(String major) {
        this.major = major;
    }
    public String getRecommend() {
        return recommend;
    }
    public void setRecommend(String recommend) {
        this.recommend = recommend;
    }
    public String getPicUrl() {
        return picUrl;
    }
    public void setPicUrl(String picUrl) {
        this.picUrl = picUrl;
    }
    public int getAgree() {
        return agree;
    }
    public void setAgree(int agree) {
        this.agree = agree;
    }
    public int getThanks() {
        return thanks;
    }
    public void setThanks(int thanks) {
        this.thanks = thanks;
    }
    public int getAsk() {
        return ask;
    }
    public void setAsk(int ask) {
        this.ask = ask;
    }
    public int getAnswer() {
        return answer;
    }
    public void setAnswer(int answer) {
        this.answer = answer;
    }
    public int getArticle() {
        return article;
    }
    public void setArticle(int article) {
        this.article = article;
    }
    public int getCollection() {
        return collection;
    }
    public void setCollection(int collection) {
        this.collection = collection;
    }
    @Override
    public String toString() {
        return "ZhihuUser [name=" + name + ", identity=" + identity + ", location=" + location + ", profession="
                + profession + ", sex=" + sex + ", school=" + school + ", major=" + major + ", recommend=" + recommend
                + ", picUrl=" + picUrl + ", agree=" + agree + ", thanks=" + thanks + ", ask=" + ask + ", answer="
                + answer + ", article=" + article + ", collection=" + collection + "]";
    }
}
编写PageProcessor(Processor中的process方法是webmagic的核心,负责抽取目标url的逻辑)
package repo;
import dao.ZhihuDao;
import dao.impl.ZhihuDaoImpl;
import entity.ZhihuUser;
import us.codecraft.webmagic.Page;
import us.codecraft.webmagic.Site;
import us.codecraft.webmagic.Spider;
import us.codecraft.webmagic.processor.PageProcessor;

/**
 * 知乎用户小爬虫<br>
 * 输入搜索用户关键词(keyword),并把搜出来的用户信息爬出来<br>

 * @date 2016-5-3
 * @website ghb.soecode.com
 * @csdn blog.csdn.net/antgan
 * @author antgan
 *
 */
public class ZhiHuUserPageProcessor implements PageProcessor{
    //抓取网站的相关配置,包括:编码、抓取间隔、重试次数等
    private Site site = Site.me().setRetryTimes(10).setSleepTime(1000);
    //用户数量
    private static int num = 0;
    //搜索关键词
    private static String keyword = "JAVA";
    //数据库持久化对象,用于将用户信息存入数据库
    private ZhihuDao zhihuDao = new ZhihuDaoImpl();


    /**
     * process 方法是webmagic爬虫的核心<br>
     * 编写抽取【待爬取目标链接】的逻辑代码在html中。
     */
    @Override
    public void process(Page page) {

        //1. 如果是用户列表页面 【入口页面】,将所有用户的详细页面的url放入target集合中。
        if(page.getUrl().regex("https://www\\.zhihu\\.com/search\\?type=people&q=[\\s\\S]+").match()){
            page.addTargetRequests(page.getHtml().xpath("//ul[@class='list users']/li/div/div[@class='body']/div[@class='line']").links().all());
        }
        //2. 如果是用户详细页面
        else{
            num++;//用户数++
            /*实例化ZhihuUser,方便持久化存储。*/
            ZhihuUser user = new ZhihuUser();
            /*从下载到的用户详细页面中抽取想要的信息,这里使用xpath居多*/
            /*为了方便理解,抽取到的信息先用变量存储,下面再赋值给对象*/
            String name = page.getHtml().xpath("//div[@class='title-section ellipsis']/span[@class='name']/text()").get();
            String identity = page.getHtml().xpath("//div[@class='title-section ellipsis']/span[@class='bio']/@title").get();
            String location = page.getHtml().xpath("//div[@class='item editable-group']/span[@class='info-wrap']/span[@class='location item']/@title").get();
            String profession = page.getHtml().xpath("//div[@class='item editable-group']/span[@class='info-wrap']/span[@class='business item']/@title").get();
            boolean isMale = page.getHtml().xpath("//span[@class='item gender']/i[@class='icon icon-profile-male']").match();
            boolean isFemale = page.getHtml().xpath("//span[@class='item gender']/i[@class='icon icon-profile-female']").match();
            int sex = -1;
            /*因为知乎有一部分人不设置性别 或者 不显示性别。所以需要判断一下。*/
            if(isMale&&!isFemale) sex=1;//1代表男性
            else if(!isMale&&isFemale) sex=0;//0代表女性
            else sex=2;//2代表未知
            String school =  page.getHtml().xpath("//span[@class='education item']/@title").get();
            String major = page.getHtml().xpath("//span[@class='education-extra item']/@title").get();
            String recommend =  page.getHtml().xpath("//span[@class='fold-item']/span[@class='content']/@title").get();
            String picUrl = page.getHtml().xpath("//div[@class='body clearfix']/img[@class='Avatar Avatar--l']/@src").get();
            int agree = Integer.parseInt(page.getHtml().xpath("//span[@class='zm-profile-header-user-agree']/strong/text()").get());
            int thanks = Integer.parseInt(page.getHtml().xpath("//span[@class='zm-profile-header-user-thanks']/strong/text()").get());
            int ask = Integer.parseInt(page.getHtml().xpath("//div[@class='profile-navbar clearfix']/a[2]/span[@class='num']/text()").get());
            int answer = Integer.parseInt(page.getHtml().xpath("//div[@class='profile-navbar clearfix']/a[3]/span[@class='num']/text()").get());
            int article = Integer.parseInt(page.getHtml().xpath("//div[@class='profile-navbar clearfix']/a[4]/span[@class='num']/text()").get());
            int collection = Integer.parseInt(page.getHtml().xpath("//div[@class='profile-navbar clearfix']/a[5]/span[@class='num']/text()").get());

            //对象赋值
            user.setKey(keyword);
            user.setName(name);
            user.setIdentity(identity);
            user.setLocation(location);
            user.setProfession(profession);
            user.setSex(sex);
            user.setSchool(school);
            user.setMajor(major);
            user.setRecommend(recommend);
            user.setPicUrl(picUrl);
            user.setAgree(agree);
            user.setThanks(thanks);
            user.setAsk(ask);
            user.setAnswer(answer);
            user.setArticle(article);
            user.setCollection(collection);

            System.out.println("num:"+num +" " + user.toString());//输出对象
            zhihuDao.saveUser(user);//保存用户信息到数据库
        }
    }

    @Override
    public Site getSite() {
        return this.site;
    }

    public static void main(String[] args) {
        long startTime ,endTime;
        System.out.println("========知乎用户信息小爬虫【启动】喽!=========");
        startTime = new Date().getTime();
        //入口为:【https://www.zhihu.com/search?type=people&q=xxx 】,其中xxx 是搜索关键词
        Spider.create(new ZhiHuUserPageProcessor()).addUrl("https://www.zhihu.com/search?type=people&q="+keyword).thread(5).run();
        endTime = new Date().getTime();
        System.out.println("========知乎用户信息小爬虫【结束】喽!=========");
        System.out.println("一共爬到"+num+"个用户信息!用时为:"+(endTime-startTime)/1000+"s");
    }
}
三、处理数据 (这里我存储在本地数据库中)
Dao层接口
package dao;

import entity.ZhihuUser;

/**
 * 知乎 数据持久化 接口
 * @author 甘海彬
 *
 */
public interface ZhihuDao {
    /**
     * 保存用户信息
     * @param user
     * @return
     */
    public int saveUser(ZhihuUser user);
}
Dao实现类
package dao.impl;

import java.util.ArrayList;
import java.util.List;

import dao.ZhihuDao;
import entity.ZhihuUser;
import util.DBHelper;

/**
 * 知乎 数据库持久化接口 实现
 * @author 甘海彬
 *
 */
public class ZhihuDaoImpl implements ZhihuDao{
    @Override
    public int saveUser(ZhihuUser user) {
        DBHelper dbhelper = new DBHelper();
        StringBuffer sql = new StringBuffer();
        sql.append("INSERT INTO spider_zhihu_user ( `key`,`name`,identity,location,profession,sex,school,major,recommend,picUrl,agree,thanks,ask,answer,article,collection)")
        //`key`,`name`,identity,location,profession,sex,school,major,recommend,picUrl,agree,thanks,ask,answer,article,collection
        .append("VALUES (? , ? , ? , ? , ? , ? , ? , ? , ? , ? , ? , ? , ? , ? , ? , ? ) ");
        //设置 sql values 的值
        List<String> sqlValues = new ArrayList<>();
        sqlValues.add(user.getKey());
        sqlValues.add(user.getName());
        sqlValues.add(user.getIdentity());
        sqlValues.add(user.getLocation());
        sqlValues.add(user.getProfession());
        sqlValues.add(""+user.getSex());
        sqlValues.add(user.getSchool());
        sqlValues.add(user.getMajor());
        sqlValues.add(user.getRecommend());
        sqlValues.add(user.getPicUrl());
        sqlValues.add(""+user.getAgree());
        sqlValues.add(""+user.getThanks());
        sqlValues.add(""+user.getAsk());
        sqlValues.add(""+user.getAnswer());
        sqlValues.add(""+user.getArticle());
        sqlValues.add(""+user.getCollection());
        try{
            int result = dbhelper.executeUpdate(sql.toString(),sqlValues);
        }catch(Exception e){
        }finally{
            dbhelper.close();
        }
        return result;
    }
}
这里我封装了个DbHelpler类,方便进行持久化操作,使用单例模式,并线程同步。
package util;
import java.sql.Connection;
import java.sql.DriverManager;
import java.sql.PreparedStatement;
import java.sql.ResultSet;
import java.sql.SQLException;
import java.util.List;

/**
 * JDBC通用类
 * @author GANAB
 *
 */
public class DBHelper {
    public static final String driver_class = "oracle.jdbc.OracleDriver";
    public static final String driver_url = "jdbc:oracle:thin:@ita-031-w7:1521:xe";
    public static final String user = "abel";
    public static final String password = "123";

    private static Connection conn = null;
    private PreparedStatement pst = null;
    private ResultSet rst = null;

    public DBHelper() {
        try {
            conn = getConnInstance();
        } catch (Exception e) {
            e.printStackTrace();
        }
    }

    private Connection getConnInstance() {
        if(conn == null){
            try {
                Class.forName(driver_class);
                conn = DriverManager.getConnection(driver_url, user, password);
            } catch (ClassNotFoundException e) {
                e.printStackTrace();
            } catch (SQLException e) {
                e.printStackTrace();
            }
            System.out.println("Connect success.");
        }
        return conn;
    }

    public void close() {
        try {
            if (pst != null) {
                this.pst.close();
            }
            if (rst != null) {
                this.rst.close();
            }
            if (conn != null) {
                conn.close();
            }
            System.out.println("Close connection success.");
        } catch (SQLException e) {
            e.printStackTrace();
        }
    }

    /**
     * query
     *
     * @param sql
     * @param sqlValues
     * @return ResultSet
     */
    public ResultSet executeQuery(String sql, List<String> sqlValues) {
        try {
            pst = conn.prepareStatement(sql);
            if (sqlValues != null && sqlValues.size() > 0) {
                setSqlValues(pst, sqlValues);
            }
            rst = pst.executeQuery();
        } catch (SQLException e) {
            e.printStackTrace();
        }
        return rst;
    }

    /**
     * update
     *
     * @param sql
     * @param sqlValues
     * @return result
     */
    public int executeUpdate(String sql, List<String> sqlValues) {
        int result = -1;
        try {
            pst = conn.prepareStatement(sql);
            if (sqlValues != null && sqlValues.size() > 0) {
                setSqlValues(pst, sqlValues);
            }
            result = pst.executeUpdate();
        } catch (SQLException e) {
            e.printStackTrace();
        }

        return result;
    }

    /**
     * sql set value
     *
     * @param pst
     * @param sqlValues
     */
    private void setSqlValues(PreparedStatement pst, List<String> sqlValues) {
        for (int i = 0; i < sqlValues.size(); i++) {
            try {
                pst.setObject(i + 1, sqlValues.get(i));
            } catch (SQLException e) {
                e.printStackTrace();
            }
        }
    }
}
噢!对了!表的创建sql也提供一下!
CREATE TABLE `spider_zhihu_user` (
  `id` int(11) NOT NULL AUTO_INCREMENT,
  `key` varchar(30) DEFAULT NULL,
  `name` varchar(30) DEFAULT NULL,
  `identity` varchar(100) DEFAULT NULL,
  `location` varchar(20) DEFAULT NULL,
  `profession` varchar(30) DEFAULT NULL,
  `sex` int(2) DEFAULT NULL,
  `school` varchar(30) DEFAULT NULL,
  `major` varchar(30) DEFAULT NULL,
  `recommend` varchar(100) DEFAULT NULL,
  `picUrl` varchar(255) DEFAULT NULL,
  `agree` int(11) DEFAULT NULL,
  `thanks` int(11) DEFAULT NULL,
  `ask` int(11) DEFAULT NULL,
  `answer` int(11) DEFAULT NULL,
  `article` int(11) DEFAULT NULL,
  `collection` int(11) DEFAULT NULL,
  PRIMARY KEY (`id`)
) ENGINE=InnoDB AUTO_INCREMENT=104 DEFAULT CHARSET=utf8;
以上就是全部代码。
进行测试。
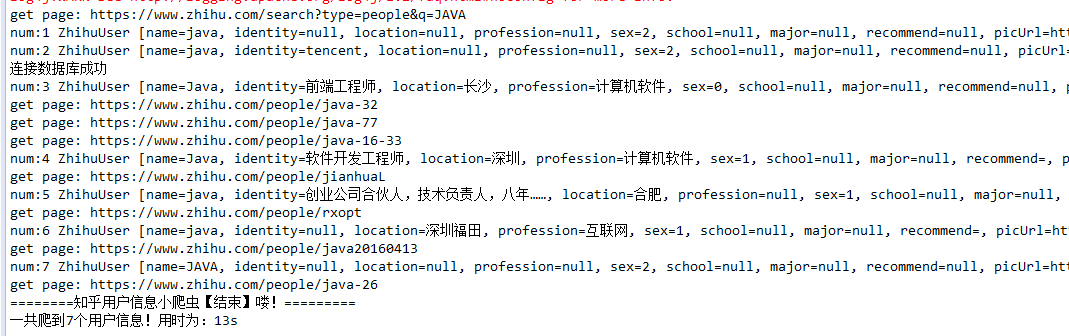
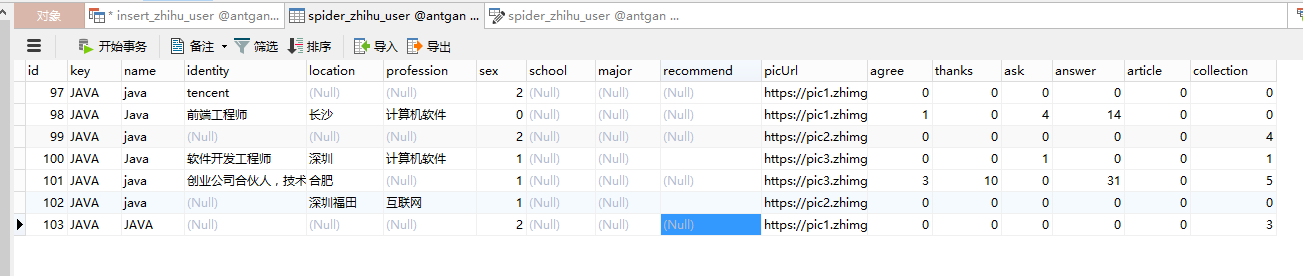
完美~
你知道可以拿这些数据做什么呢?
科科,我也不知道。