版权声明:本文为博主原创文章,转载须注明出处。 https://blog.csdn.net/aptx704610875/article/details/49585241
上一节讲述了搭环境时遇到的挫折,这一节我们来讲讲如何使用XtionProLive(XtionPro没有彩色摄像头,Live版才有)获取彩色图和数度图,以及彩色图的放大与水平镜像。(PS: 对比两代OpenNI,2真的比1要简洁得多,使用OpenNI2编程序,代码简单易懂。)
首先初始化环境:
OpenNI::initialize();创建状态:
Status rc = STATUS_OK;Device xtion;
const char * deviceURL = openni::ANY_DEVICE; //设备名
rc = xtion.open(deviceURL);创建深度数据流和彩色数据流:
VideoStream streamDepth;
VideoStream streamColor;打开数据流并对齐彩色/深度图像:
rc = streamDepth.start();
rc = streamColor.start();
// 图像模式注册,彩色图与深度图对齐
if (xtion.isImageRegistrationModeSupported(
<span style="white-space:pre"> </span>IMAGE_REGISTRATION_DEPTH_TO_COLOR))
{
xtion.setImageRegistrationMode(IMAGE_REGISTRATION_DEPTH_TO_COLOR);
}while (true)
{
// 读取数据流
rc = streamDepth.readFrame(&frameDepth);
if (rc == STATUS_OK)
{
// 将深度数据转换成OpenCV格式
const Mat mImageDepth(frameDepth.getHeight(), frameDepth.getWidth(), CV_16UC1, (void*)frameDepth.getData());
Mat mScaledDepth, hScaledDepth;
mImageDepth.convertTo(mScaledDepth, CV_8U, 255.0 / iMaxDepth);
// 显示出深度图像
<span style="white-space:pre"> </span>imshow("Depth Image", hScaledDepth);
}
rc = streamColor.readFrame(&frameColor);
if (rc == STATUS_OK)
{
// 同样的将彩色图像数据转化成OpenCV格式
const Mat mImageRGB(frameColor.getHeight(), frameColor.getWidth(), CV_8UC3, (void*)frameColor.getData());
// 首先将RGB格式转换为BGR格式
Mat cImageBGR,bImageBGR,hImageBGR;
cvtColor(mImageRGB, cImageBGR, CV_RGB2BGR);
// 然后显示彩色图像
imshow("Color Image", hImageBGR);
}
// 终止快捷键
if (waitKey(1) == 27)
break;
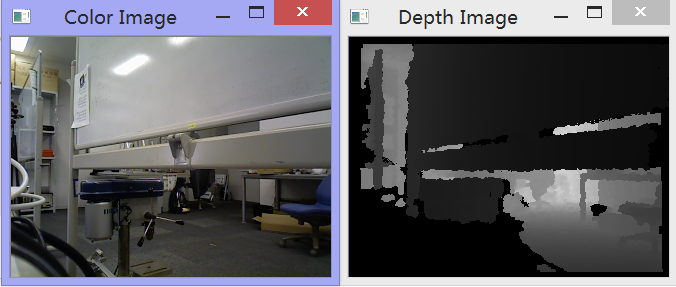
}如图所示,彩色图和深度图默认都是320*240:
接着我们对彩色流和深度流做一些格式设置:
// 设置深度图像视频模式
VideoMode mModeDepth;
// 分辨率大小
mModeDepth.setResolution(640, 480);
// 每秒30帧
mModeDepth.setFps(30);
// 像素格式
mModeDepth.setPixelFormat(PIXEL_FORMAT_DEPTH_1_MM);
streamDepth.setVideoMode(mModeDepth);// 同样的设置彩色图像视频模式
VideoMode mModeColor;
mModeColor.setResolution(320, 240);
mModeColor.setFps(30);
mModeColor.setPixelFormat(PIXEL_FORMAT_RGB888);
streamColor.setVideoMode(mModeColor);

经过尝试,发现对于深度图来说,320*240/640*480都可以,而彩色图像只能320*240。所以我们使用resize()把彩色的320*240强制转化为640*480,默认采用最近邻差值来补充缺失的像素点,结果如图:
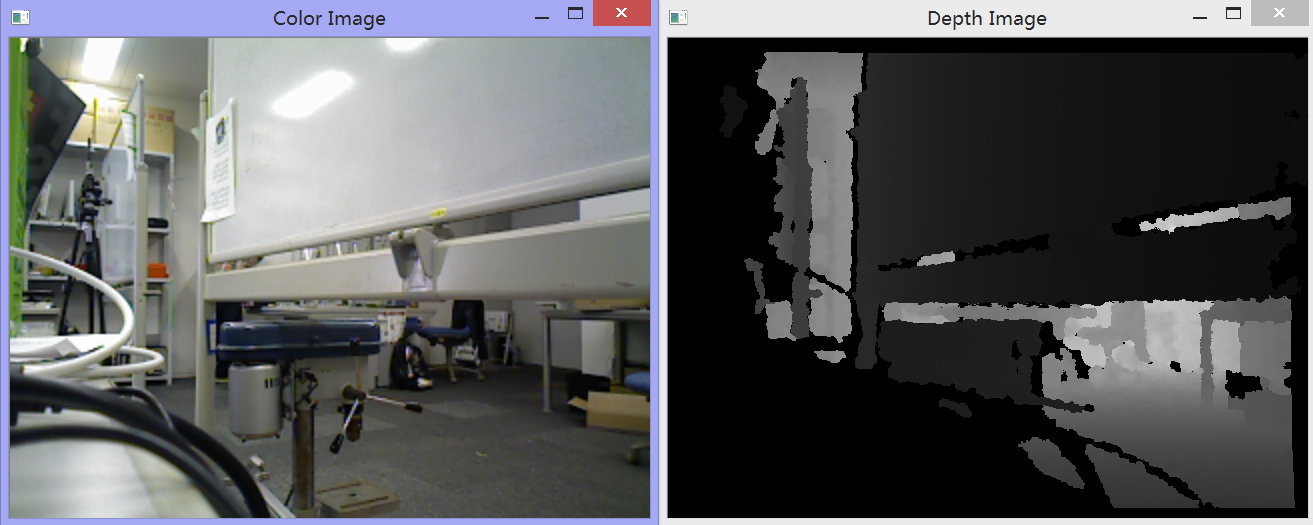
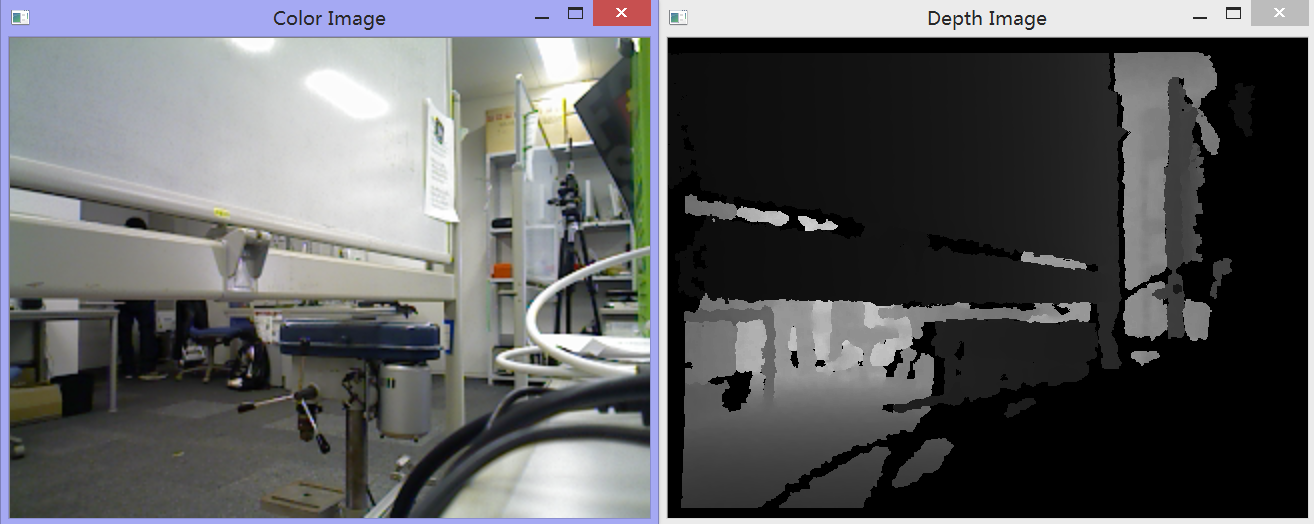
这时候我们发现图像左右相反,这是因为体感RGBD相机一般是捕捉人体的,所以是面向人体的捕捉图像。而此时我们把相机面向了我们的前方,用于以后捕捉环境图像三维重建,所以我们还需要对彩色图和深度图进行水平镜像处理,函数如下:
void hMirrorTrans(const Mat &src, Mat &dst)
{
dst.create(src.rows, src.cols, src.type());
int rows = src.rows;
int cols = src.cols;
switch (src.channels())
{
case 1: //1通道比如深度图像
const uchar *origal;
uchar *p;
for (int i = 0; i < rows; i++){
origal = src.ptr<uchar>(i);
p = dst.ptr<uchar>(i);
for (int j = 0; j < cols; j++){
p[j] = origal[cols - 1 - j];
}
}
break;
case 3: //3通道比如彩色图像
const Vec3b *origal3;
Vec3b *p3;
for (int i = 0; i < rows; i++) {
origal3 = src.ptr<Vec3b>(i);
p3 = dst.ptr<Vec3b>(i);
for (int j = 0; j < cols; j++){
p3[j] = origal3[cols - 1 - j];
}
}
break;
default:
break;
}
}
完整代码如下:
#include <iostream>
#include <OpenNI.h>
#include <opencv2/core/core.hpp>
#include <opencv2/highgui/highgui.hpp>
#include <opencv2/imgproc/imgproc.hpp>
using namespace std;
using namespace openni;
using namespace cv;
void showdevice(){
// 获取设备信息
Array<DeviceInfo> aDeviceList;
OpenNI::enumerateDevices(&aDeviceList);
cout << "电脑上连接着 " << aDeviceList.getSize() << " 个体感设备." << endl;
for (int i = 0; i < aDeviceList.getSize(); ++i)
{
cout << "设备 " << i << endl;
const DeviceInfo& rDevInfo = aDeviceList[i];
cout << "设备名: " << rDevInfo.getName() << endl;
cout << "设备Id: " << rDevInfo.getUsbProductId() << endl;
cout << "供应商名: " << rDevInfo.getVendor() << endl;
cout << "供应商Id: " << rDevInfo.getUsbVendorId() << endl;
cout << "设备URI: " << rDevInfo.getUri() << endl;
}
}
void hMirrorTrans(const Mat &src, Mat &dst)
{
dst.create(src.rows, src.cols, src.type());
int rows = src.rows;
int cols = src.cols;
switch (src.channels())
{
case 1: //1通道比如深度图像
const uchar *origal;
uchar *p;
for (int i = 0; i < rows; i++){
origal = src.ptr<uchar>(i);
p = dst.ptr<uchar>(i);
for (int j = 0; j < cols; j++){
p[j] = origal[cols - 1 - j];
}
}
break;
case 3: //3通道比如彩色图像
const Vec3b *origal3;
Vec3b *p3;
for (int i = 0; i < rows; i++) {
origal3 = src.ptr<Vec3b>(i);
p3 = dst.ptr<Vec3b>(i);
for (int j = 0; j < cols; j++){
p3[j] = origal3[cols - 1 - j];
}
}
break;
default:
break;
}
}
int main()
{
Status rc = STATUS_OK;
// 初始化OpenNI环境
OpenNI::initialize();
showdevice();
// 声明并打开Device设备。
Device xtion;
const char * deviceURL = openni::ANY_DEVICE;  //设备名
rc = xtion.open(deviceURL);
// 创建深度数据流
VideoStream streamDepth;
rc = streamDepth.create(xtion, SENSOR_DEPTH);
if (rc == STATUS_OK)
{
// 设置深度图像视频模式
VideoMode mModeDepth;
// 分辨率大小
mModeDepth.setResolution(640, 480);
// 每秒30帧
mModeDepth.setFps(30);
// 像素格式
mModeDepth.setPixelFormat(PIXEL_FORMAT_DEPTH_1_MM);

streamDepth.setVideoMode(mModeDepth);
// 打开深度数据流
rc = streamDepth.start();
if (rc != STATUS_OK)
{
cerr << "无法打开深度数据流:" << OpenNI::getExtendedError() << endl;
streamDepth.destroy();
}
}
else
{
cerr << "无法创建深度数据流:" << OpenNI::getExtendedError() << endl;
}
// 创建彩色图像数据流
VideoStream streamColor;
rc = streamColor.create(xtion, SENSOR_COLOR);
if (rc == STATUS_OK)
{
// 同样的设置彩色图像视频模式
VideoMode mModeColor;
mModeColor.setResolution(320, 240);
mModeColor.setFps(30);
mModeColor.setPixelFormat(PIXEL_FORMAT_RGB888);
streamColor.setVideoMode(mModeColor);
// 打开彩色图像数据流
rc = streamColor.start();
if (rc != STATUS_OK)
{
cerr << "无法打开彩色图像数据流:" << OpenNI::getExtendedError() << endl;
streamColor.destroy();
}
}
else
{
cerr << "无法创建彩色图像数据流:" << OpenNI::getExtendedError() << endl;
}
if (!streamColor.isValid() || !streamDepth.isValid())
{
cerr << "彩色或深度数据流不合法" << endl;
OpenNI::shutdown();
return 1;
}
// 图像模式注册,彩色图与深度图对齐
if (xtion.isImageRegistrationModeSupported(
IMAGE_REGISTRATION_DEPTH_TO_COLOR))
{
xtion.setImageRegistrationMode(IMAGE_REGISTRATION_DEPTH_TO_COLOR);
}
// 创建OpenCV图像窗口
namedWindow("Depth Image", CV_WINDOW_AUTOSIZE);
namedWindow("Color Image", CV_WINDOW_AUTOSIZE);
// 获得最大深度值
int iMaxDepth = streamDepth.getMaxPixelValue();
// 循环读取数据流信息并保存在VideoFrameRef中
VideoFrameRef frameDepth;
VideoFrameRef frameColor;
while (true)
{
// 读取数据流
rc = streamDepth.readFrame(&frameDepth);
if (rc == STATUS_OK)
{
// 将深度数据转换成OpenCV格式
const Mat mImageDepth(frameDepth.getHeight(), frameDepth.getWidth(), CV_16UC1, (void*)frameDepth.getData());
// 为了让深度图像显示的更加明显一些,将CV_16UC1 ==> CV_8U格式
Mat mScaledDepth, hScaledDepth;
mImageDepth.convertTo(mScaledDepth, CV_8U, 255.0 / iMaxDepth);
//水平镜像深度图
hMirrorTrans(mScaledDepth, hScaledDepth);
// 显示出深度图像
imshow("Depth Image", hScaledDepth);
}
rc = streamColor.readFrame(&frameColor);
if (rc == STATUS_OK)
{
// 同样的将彩色图像数据转化成OpenCV格式
const Mat mImageRGB(frameColor.getHeight(), frameColor.getWidth(), CV_8UC3, (void*)frameColor.getData());
// 首先将RGB格式转换为BGR格式
Mat cImageBGR,bImageBGR,hImageBGR;
cvtColor(mImageRGB, cImageBGR, CV_RGB2BGR);
//水平镜像深度图
hMirrorTrans(cImageBGR, hImageBGR);
resize(hImageBGR, hImageBGR, Size(640, 480));
// 然后显示彩色图像
imshow("Color Image", hImageBGR);
}
// 终止快捷键
if (waitKey(1) == 27)
break;
}
// 关闭数据流
streamDepth.destroy();
streamColor.destroy();
// 关闭设备
xtion.close();
// 最后关闭OpenNI
OpenNI::shutdown();
return 0;
}今天到此为止,接下来研究如果用深度图和彩色图生成三维点云。欢迎使用xtion的小伙伴或者使用openni2的小伙伴和我讨论相关问题~
======================================================================================================
2015/11/3号补充:
关于解决镜像(左右相反)问题,我们还可以直接使用videostream的函数:setMirroringEnabled(false) 例如如下:
// 同样的设置彩色图像视频模式
VideoMode mModeColor;
mModeColor.setResolution(320, 240);
mModeColor.setFps(30);
mModeColor.setPixelFormat(PIXEL_FORMAT_RGB888);

streamColor.setVideoMode(mModeColor);
// 解决镜像问题
streamColor.setMirroringEnabled(false);
// 打开彩色图像数据流
rc = streamColor.start();