Generative Image Inpainting with Contextual Attention
今天介绍CVPR 2018的Generative Image Inpainting with Contextual Attention
paper: https://arxiv.org/abs/1801.07892, demo http://jiahuiyu.com/deepfill
github:https://github.com/JiahuiYu/generative_inpainting
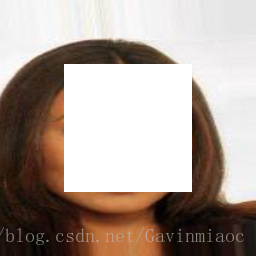
先看效果:
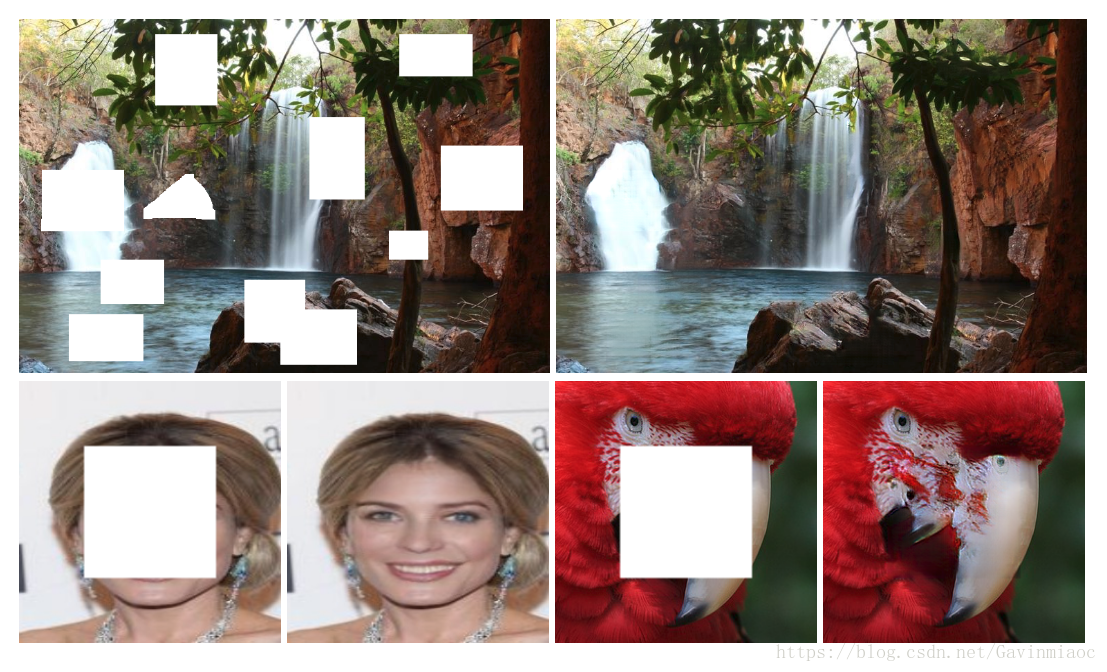
上述是作者修复的结果,我自己训练后修复的如下:


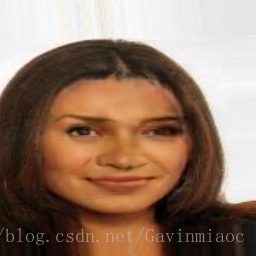
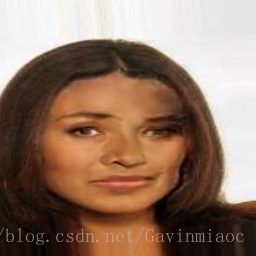
这里生成了两个不同情况的图,因为使用了两个不同的pre-train Model
下面介绍如何使用:
- Requirements:
- Install python3.
- Install tensorflow (tested on Release 1.3.0, 1.4.0, 1.5.0, 1.6.0, 1.7.0).
- Install tensorflow toolkit neuralgym (run
pip install git+https://github.com/JiahuiYu/neuralgym).
- Training:
- Prepare training images filelist and shuffle it (example).
- Modify inpaint.yml to set DATA_FLIST, LOG_DIR, IMG_SHAPES and other parameters.
- Run
python3 train.py.
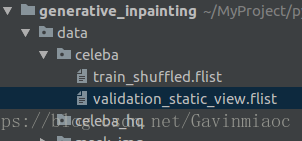
这里重点介绍如何准备自己的训练集,直接写了个python脚本自动处理即可。gen_flist.py自动将源数据集划分为训练集和验证集。并生成项目需要的格式。
# 将原数据集分为training ,validation  by gavin
import os
import random

import argparse

#划分验证集训练集
_NUM_TEST = 20000

parser = argparse.ArgumentParser()
parser.add_argument('--folder_path', default='/home/gavin/Dataset/celeba', type=str,
                    help='The folder path')
parser.add_argument('--train_filename', default='./data/celeba/train_shuffled.flist', type=str,
                    help='The train filename.')
parser.add_argument('--validation_filename', default='./data/celeba/validation_static_view.flist', type=str,
                    help='The validation filename.')


def _get_filenames(dataset_dir):
    photo_filenames = []
    image_list = os.listdir(dataset_dir)
    photo_filenames = [os.path.join(dataset_dir, _) for _ in image_list]
    return photo_filenames


if __name__ == "__main__":

    args = parser.parse_args()

    data_dir = args.folder_path

    # get all file names
    photo_filenames = _get_filenames(data_dir)
    print("size of celeba is %d" % (len(photo_filenames)))

    # 切分数据为测试训练集
    random.seed(0)
    random.shuffle(photo_filenames)
    training_file_names = photo_filenames[_NUM_TEST:]
    validation_file_names = photo_filenames[:_NUM_TEST]

    print("training file size:",len(training_file_names))
    print("validation file size:", len(validation_file_names))

    # make output file if not existed
    if not os.path.exists(args.train_filename):
        os.mknod(args.train_filename)

    if not os.path.exists(args.validation_filename):
        os.mknod(args.validation_filename)

    # write to file
    fo = open(args.train_filename, "w")
    fo.write("\n".join(training_file_names))
    fo.close()

    fo = open(args.validation_filename, "w")
    fo.write("\n".join(validation_file_names))
    fo.close()

    # print process
    print("Written file is: ", args.train_filename)
最终生成的格式如下图:

- Resume training:
- Modify MODEL_RESTORE flag in inpaint.yml. E.g., MODEL_RESTORE: 20180115220926508503_places2_model.
- Run
python3 train.py.
- Testing:
- Run
python test.py --image examples/input.png --mask examples/mask.png --output examples/output.png --checkpoint model_logs/your_model_dir.
- Run
大概就是以上操作,后面贴上我实际训练和测试的脚本。
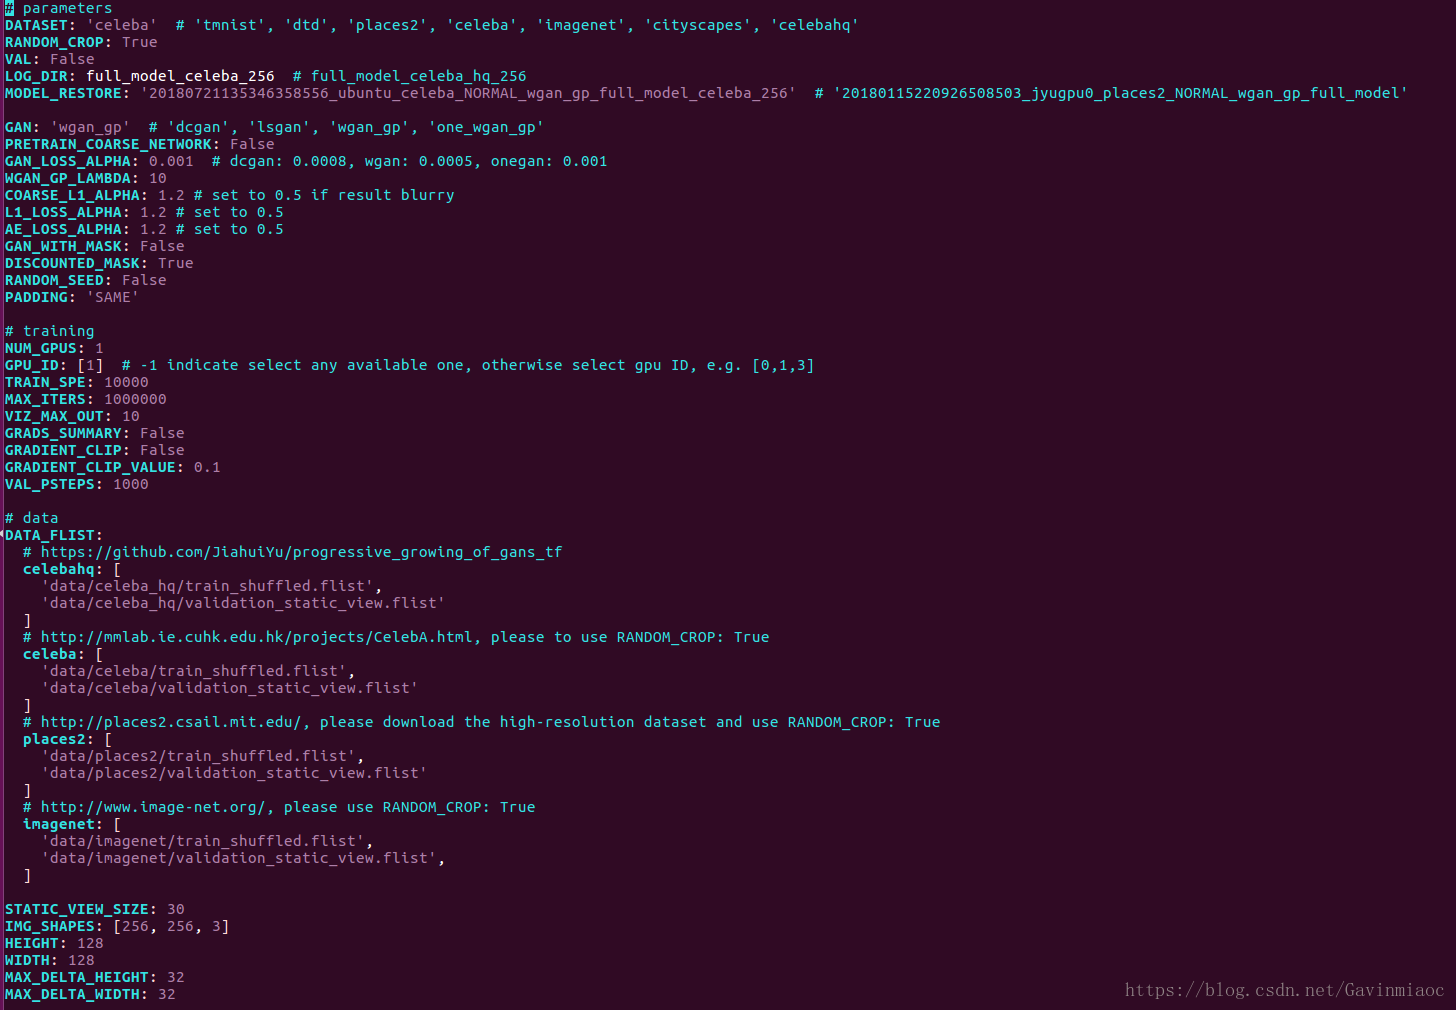
配置文件
其中inpaint.yml中要注意的是,在恢复训练模型的时候,MODEL_RESTORE的值:
多GPU模式训练
如果使用多个GPU训练,需要改三处地方,分别是inpaint.yml中两处,如下
# training
NUM_GPUS: 2
GPU_ID: [0,1]  # -1 indicate select any available one, otherwise select gpu ID, e.g. [0,1,3]
分别指定将gpu使用的个数及各自的id,第三处,也是最重要而且特别容易忽略的,在train.py中修改这里
# train generator with primary trainer ,MultiGPUTrainer. for multi gpu,and add num_gpus=config.NUM_GPUS

    trainer = ng.train.Trainer(
        optimizer=g_optimizer,
        var_list=g_vars,
        max_iters=config.MAX_ITERS,
        graph_def=multigpu_graph_def,
        grads_summary=config.GRADS_SUMMARY,
        gradient_processor=gradient_processor,
        graph_def_kwargs={
            'model': model, 'data': data, 'config': config, 'loss_type': 'g'},
        spe=config.TRAIN_SPE,
        log_dir=log_prefix,
    )
    '''

    trainer = ng.train.MultiGPUTrainer(
        optimizer=g_optimizer,
        var_list=g_vars,
        max_iters=config.MAX_ITERS,
        graph_def=multigpu_graph_def,
        grads_summary=config.GRADS_SUMMARY,
        gradient_processor=gradient_processor,
        graph_def_kwargs={
            'model': model, 'data': data, 'config': config, 'loss_type': 'g'},
        spe=config.TRAIN_SPE,
        log_dir=log_prefix,
        num_gpus = config.NUM_GPUS,
    )
    '''
即有两种调用方式,一种单GPU跑,一种多GPU模式,而多GPU模式下需要加上参数
num_gpus = config.NUM_GPUS,脚本:
# training
python3 train.py

# Resume training:
Modify MODEL_RESTORE flag in inpaint.yml. E.g., MODEL_RESTORE: 20180115220926508503_places2_model.
Run python3 train.py.

#Testing:

python3 test.py --image examples/input.png --mask examples/mask.png --output examples/output.png --checkpoint model_logs/your_model_dir.

python3 test.py --image examples/celeba/celebahr_patches_164787_input.png --mask examples/center_mask_256.png
--output examples/output_celeba.png --checkpoint_dir model_logs/celebA_model/snap-60000


# for any other image,you can generate mask and masked image first ,then predict

1. python3 generate_mask.py --img ./examples/celeba/000035.jpg --HEIGHT 64 --WIDTH 64

2. python3 test.py --image ./data/mask_img/masked/000035.jpg --mask ./data/mask_img/mask/000035.jpg \
--output examples/output_000035.png --checkpoint_dir model_logs/celebA_model/snap-90000
测试
实际测试过程中,对于任一张图,需要输入mask,和input,这里需要我们自己生成,为了便于随机生成mask,我写了如下代码,可以随机生成规则及不规则的mask
'''
利用opencv随机给图像生成带mask区域的图
author:gavin
'''

# import itertools
# import matplotlib
# import matplotlib.pyplot as plt
from copy import deepcopy
from random import randint
import numpy as np
import cv2
import os
import sys
import tensorflow as tf

import argparse

parser = argparse.ArgumentParser()
parser.add_argument('--img', default='./examples/celeba/000042.jpg', type=str,
                    help='The input img for single image ')

parser.add_argument('--input_dirimg', default='./data/mask_img/src_img/', type=str,
                    help='The input folder path for multi-images')
parser.add_argument('--output_dirmask', default='./data/mask_img/mask/', type=str,
                    help='The output file path of mask.')
parser.add_argument('--output_dirmasked', default='./data/mask_img/masked/', type=str,
                    help='The output file path of masked.')
parser.add_argument('--MAX_MASK_NUMS', default='16', type=int,
                    help='max numbers of masks')

parser.add_argument('--MAX_DELTA_HEIGHT', default='32', type=int,
                    help='max height of delta')
parser.add_argument('--MAX_DELTA_WIDTH', default='32', type=int,
                    help='max width of delta')

parser.add_argument('--HEIGHT', default='128', type=int,
                    help='max height of delta')
parser.add_argument('--WIDTH', default='128', type=int,
                    help='max width of delta')

parser.add_argument('--IMG_SHAPES', type=eval, default=(256, 256, 3))


# 随机生成不规则掩膜
def random_mask(height, width, config,channels=3):
    """Generates a random irregular mask with lines, circles and elipses"""
    img = np.zeros((height, width, channels), np.uint8)

    # Set size scale
    size = int((width + height) * 0.02)
    if width < 64 or height < 64:
        raise Exception("Width and Height of mask must be at least 64!")

    # Draw random lines
    for _ in range(randint(1, config.MAX_MASK_NUMS)):
        x1, x2 = randint(1, width), randint(1, width)
        y1, y2 = randint(1, height), randint(1, height)
        thickness = randint(3, size)
        cv2.line(img, (x1, y1), (x2, y2), (1, 1, 1), thickness)


    # Draw random circles
    for _ in range(randint(1, config.MAX_MASK_NUMS)):
        x1, y1 = randint(1, width), randint(1, height)
        radius = randint(3, size)
        cv2.circle(img, (x1, y1), radius, (1, 1, 1), -1)

    # Draw random ellipses
    for _ in range(randint(1, config.MAX_MASK_NUMS)):
        x1, y1 = randint(1, width), randint(1, height)
        s1, s2 = randint(1, width), randint(1, height)
        a1, a2, a3 = randint(3, 180), randint(3, 180), randint(3, 180)
        thickness = randint(3, size)
        cv2.ellipse(img, (x1, y1), (s1, s2), a1, a2, a3, (1, 1, 1), thickness)

    return 1 - img


'''
# this for test
#  %matplotlib inline   ==> plt.show()
# Plot the results
_, axes = plt.subplots(5, 5, figsize=(20, 20))
axes = list(itertools.chain.from_iterable(axes))

for i in range(len(axes)):
    # Generate image
    img = random_mask(500, 500)

    # Plot image on axis
    axes[i].imshow(img * 255)

plt.show()

'''


def random_bbox(config):
    """Generate a random tlhw with configuration.

    Args:
        config: Config should have configuration including IMG_SHAPES,
            VERTICAL_MARGIN, HEIGHT, HORIZONTAL_MARGIN, WIDTH.

    Returns:
        tuple: (top, left, height, width)

    """
    img_shape = config.IMG_SHAPES
    img_height = img_shape[0]
    img_width = img_shape[1]
    maxt = img_height  - config.HEIGHT
    maxl = img_width  - config.WIDTH
    t = tf.random_uniform(
        [], minval=0, maxval=maxt, dtype=tf.int32)
    l = tf.random_uniform(
        [], minval=0, maxval=maxl, dtype=tf.int32)
    h = tf.constant(config.HEIGHT)
    w = tf.constant(config.WIDTH)
    return (t, l, h, w)

def bbox2mask(bbox, config, name='mask'):
    """Generate mask tensor from bbox.

    Args:
        bbox: configuration tuple, (top, left, height, width)
        config: Config should have configuration including IMG_SHAPES,
            MAX_DELTA_HEIGHT, MAX_DELTA_WIDTH.

    Returns:
        tf.Tensor: output with shape [1, H, W, 1]

    """
    def npmask(bbox, height, width, delta_h, delta_w):
        mask = np.zeros((1, height, width, 1), np.float32)
        h = np.random.randint(delta_h//2+1)
        w = np.random.randint(delta_w//2+1)
        mask[:, bbox[0]+h:bbox[0]+bbox[2]-h,
             bbox[1]+w:bbox[1]+bbox[3]-w, :] = 1.
        return mask
    with tf.variable_scope(name), tf.device('/cpu:0'):
        img_shape = config.IMG_SHAPES
        height = img_shape[0]
        width = img_shape[1]
        mask = tf.py_func(
            npmask,
            [bbox, height, width,
             config.MAX_DELTA_HEIGHT, config.MAX_DELTA_WIDTH],
            tf.float32, stateful=False)
        mask.set_shape([1] + [height, width] + [1])
    return mask

# 对于矩形mask随机生成
def random_mask_rect(img_path,config,bsave=True):

    # Load image
    img_data = cv2.imread(img_path)
    #img_data = cv2.cvtColor(img_data, cv2.COLOR_BGR2RGB)


    '''
    # generate mask, 1 represents masked point
    bbox = random_bbox(config)
    mask = bbox2mask(bbox, config, name='mask_c')
    img_pos = img_data / 127.5 - 1.
    masked_img = img_pos * (1. - mask)
    '''

    # 创建矩形区域,填充白色255
    img_shape = config.IMG_SHAPES
    img_height = img_shape[0]
    img_width = img_shape[1]

    image = cv2.resize(img_data, (img_width, img_height))
    rectangle = np.zeros(image.shape[0:2], dtype=np.uint8)

    maxt = img_height - config.HEIGHT
    maxl = img_width - config.WIDTH

    h = config.HEIGHT
    w = config.WIDTH

    x = randint(0, maxt - 1)
    y = randint(0, maxl - 1)

    mask = cv2.rectangle(rectangle,(x, y), (x+w, y+h) , 255, -1)  # 修改这里 (78, 30), (98, 46)

    masked_img = deepcopy(image)
    masked_img[mask == 255] = 255


    print("shape of mask:",mask.shape)
    print("shape of masked_img:",masked_img.shape)

    if bsave:
        save_name_mask = os.path.join(config.output_dirmask, img_path.split('/')[-1])
        cv2.imwrite(save_name_mask,mask)

        save_name_masked = os.path.join(config.output_dirmasked, img_path.split('/')[-1])
        cv2.imwrite(save_name_masked, masked_img)

    return masked_img,mask


def get_path(config):
    if not os.path.exists(config.input_dirimg):
        os.mkdir(config.input_dirimg)
    if not os.path.exists(config.output_dirmask):
        os.mkdir(config.output_dirmask)
    if not os.path.exists(config.output_dirmasked):
        os.mkdir(config.output_dirmasked)


# 给单个图像生成带mask区域的图
def load_mask(img_path,config,bsave=False):

    # Load image
    img = cv2.imread(img_path)
    img = cv2.cvtColor(img, cv2.COLOR_BGR2RGB)
    shape = img.shape
    print("Shape of image is: ",shape)
    # Load mask
    mask = random_mask(shape[0], shape[1],config)

    # Image + mask
    masked_img = deepcopy(img)
    masked_img[mask == 0] = 255

    mask = mask * 255

    if bsave:
        save_name_mask = os.path.join(config.output_dirmask, img_path.split('/')[-1])
        cv2.imwrite(save_name_mask,mask)

        save_name_masked = os.path.join(config.output_dirmasked, img_path.split('/')[-1])
        cv2.imwrite(save_name_masked, masked_img)

    return masked_img,mask


# 批量生成带mask区域的图像
def img2maskedImg(dataset_dir):
    files = []
    image_list = os.listdir(dataset_dir)
    files = [os.path.join(dataset_dir, _) for _ in image_list]
    length = len(files)
    for index,jpg in enumerate(files):
        try:
            sys.stdout.write('\r>>Converting image %d/%d ' % (index,length))
            sys.stdout.flush()
            load_mask(jpg,config,True)
            # 将已经转换的图片移动到指定位置
            #shutil.move(png, output_dirHR)
        except IOError as e:
            print('could not read:',jpg)
            print('error:',e)
            print('skip it\n')

    sys.stdout.write('Convert Over!\n')
    sys.stdout.flush()

# python3 generate_mask.py --img ./examples/celeba/000042.jpg --HEIGHT 64 --WIDTH 64

if __name__ == '__main__':
    config = parser.parse_args()
    get_path(config)
    # 单张图像生成mask
    #img = './data/test.jpg'
    #masked_img,mask = load_mask(img,config,True)

    # 批量图像处理==>圆形,椭圆,直线
    #img2maskedImg(config.input_dirimg)

    # 矩形特殊处理 处理同样shape的图片(256,256,3) fix me
    #img = './examples/celeba/000042.jpg'
    img = config.img
    masked_img, mask = random_mask_rect(img,config)

    '''
    # Show side by side
    _, axes = plt.subplots(1, 3, figsize=(20, 5))
    axes[0].imshow(img)
    axes[1].imshow(mask*255)
    axes[2].imshow(masked_img)
    plt.show()
    '''
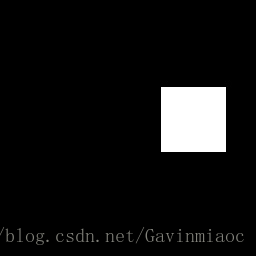
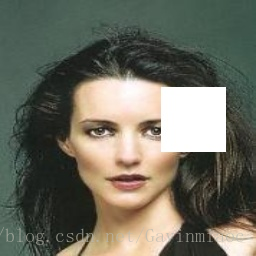
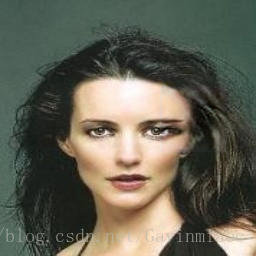
效果:
mask,masked,output