深度学习第四课是 卷积神经网络 ,共四周内容:
- 第一周 卷积神经网络(卷积的含义,各个层的功能,如何计算数据在不同层的大小(shape))
- 第二周 深度卷积网络:实例探究(LeNet5、ResNet50等经典神经网络,迁移学习,数据扩充)
- 第三周 目标检测(目标检测,衡量指标,YOLO算法)
- 第四周 特殊应用:人脸识别和神经风格转换(。。。还没看)
上面链接有作业及答案,这里主要总结一下第二周的作业内容,把学到的知识做个笔记。
keras框架
这里先送上keras框架的中文文档,Keras中文文档,有不会的内容查官方文档还是最有效的。
keras简介
之前有tensorflow、caffe、theano等诸多深度学习框架,这里keras的出现是为了进一步简化初学者构建神经网络的步骤。如果是只对深度学习有概念上的认识,而不清楚tensorflow里面的tensor(张量)等概念的同学,可以使用keras快速搭建自己的网络,这也符合NG快速搭建自己网络的理念。
网络层的使用
keras里面的网络层的使用都很简单,将keras.layers导入即可,这里以2D卷积层为例:
from keras import layers
from keras.layers import Conv2D

# 这里最后输出是X,输入是最后括号里面的X。8个3*3的2D卷积层
X = Conv2D(8,kernel_size=(3,3),strides=(1,1))(X)
keras.layers.convolutional.Conv2D(filters, kernel_size, strides=(1, 1), padding=’valid’, data_format=None, dilation_rate=(1, 1), activation=None, use_bias=True, kernel_initializer=’glorot_uniform’, bias_initializer=’zeros’, kernel_regularizer=None, bias_regularizer=None, activity_regularizer=None, kernel_constraint=None, bias_constraint=None)
参数
- filters:卷积核的数目(即输出的维度)
- kernel_size:单个整数或由两个整数构成的list/tuple,卷积核的宽度和长度。如为单个整数,则表示在各个空间维度的相同长度。
- strides:单个整数或由两个整数构成的list/tuple,为卷积的步长。如为单个整数,则表示在各个空间维度的相同步长。任何不为1的strides均与任何不为1的dilation_rate均不兼容
- padding:补0策略,为“valid”, “same” 。“valid”代表只进行有效的卷积,即对边界数据不处理。“same”代表保留边界处的卷积结果,通常会导致输出shape与输入shape相同。
- activation:激活函数,为预定义的激活函数名(参考激活函数),或逐元素(element-wise)的Theano函数。如果不指定该参数,将不会使用任何激活函数(即使用线性激活函数:a(x)=x)
- dilation_rate:单个整数或由两个个整数构成的list/tuple,指定dilated convolution中的膨胀比例。任何不为1的dilation_rate均与任何不为1的strides均不兼容。
- data_format:字符串,“channels_first”或“channels_last”之一,代表图像的通道维的位置。该参数是Keras 1.x中的image_dim_ordering,“channels_last”对应原本的“tf”,“channels_first”对应原本的“th”。以128x128的RGB图像为例,“channels_first”应将数据组织为(3,128,128),而“channels_last”应将数据组织为(128,128,3)。该参数的默认值是~/.keras/keras.json中设置的值,若从未设置过,则为“channels_last”。
- use_bias:布尔值,是否使用偏置项
- kernel_initializer:权值初始化方法,为预定义初始化方法名的字符串,或用于初始化权重的初始化器。参考initializers
- bias_initializer:权值初始化方法,为预定义初始化方法名的字符串,或用于初始化权重的初始化器。参考initializers
- kernel_regularizer:施加在权重上的正则项,为Regularizer对象
- bias_regularizer:施加在偏置向量上的正则项,为Regularizer对象
- activity_regularizer:施加在输出上的正则项,为Regularizer对象
- kernel_constraints:施加在权重上的约束项,为Constraints对象
- bias_constraints:施加在偏置上的约束项,为Constraints对象
可视化
keras.utils.vis_utils模块提供了画出Keras模型的函数(利用graphviz)
这里首先要安装两个依赖包(按照顺序安装):
graphviz
sudo apt-get install graphviz
如果提示有依赖无法安装,则先安装依赖,然后再装graphviz:sudo apt-get -f installsudo apt-get install graphviz- pydot-ng
sudo pip3 install pydot-ng
安装好之后可以在程序中画出自己网络模型图,这里以第一个作业的happyModel为例:
### keras visualization
from keras.utils import plot_model

plot_model(happyModel, to_file='happymodel.png', show_shapes = True)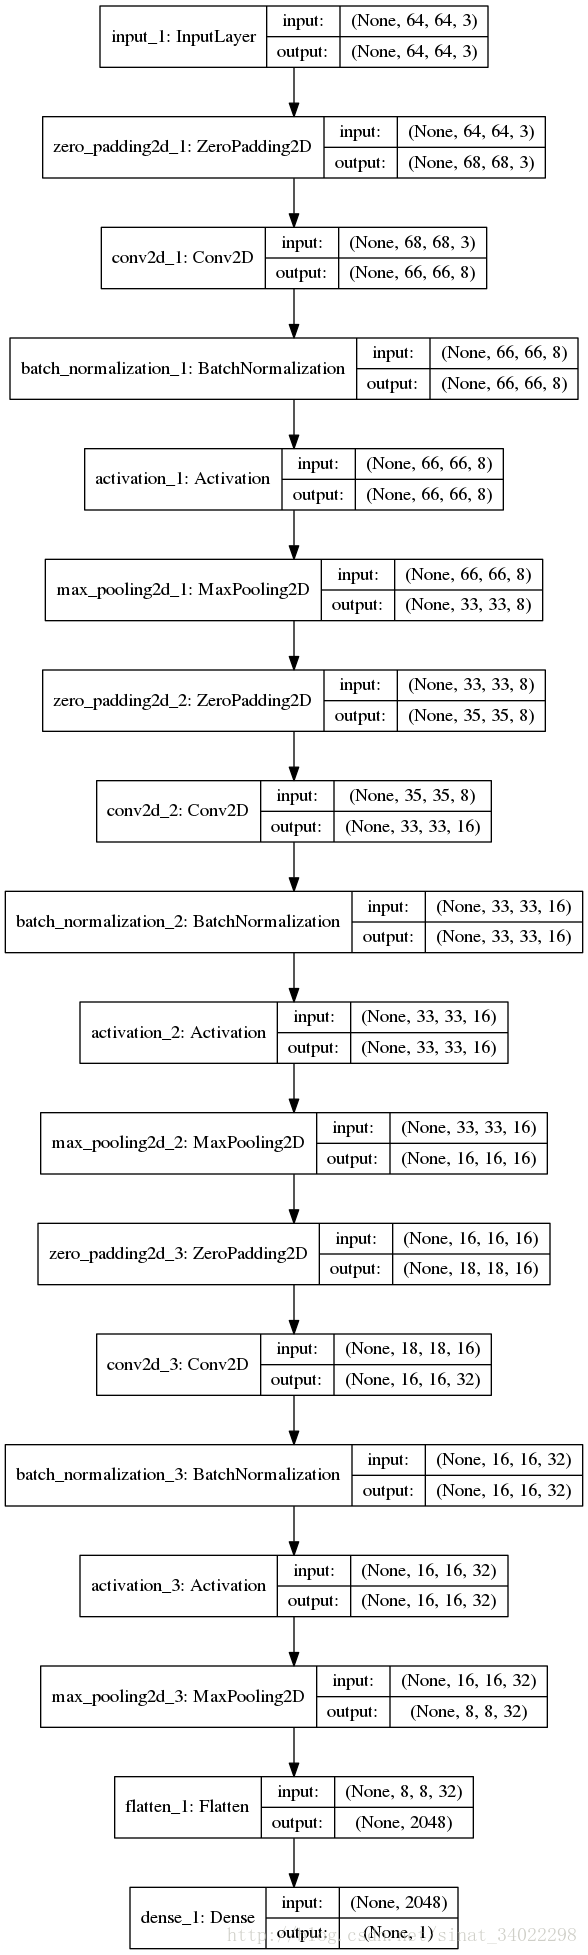
ResNet50
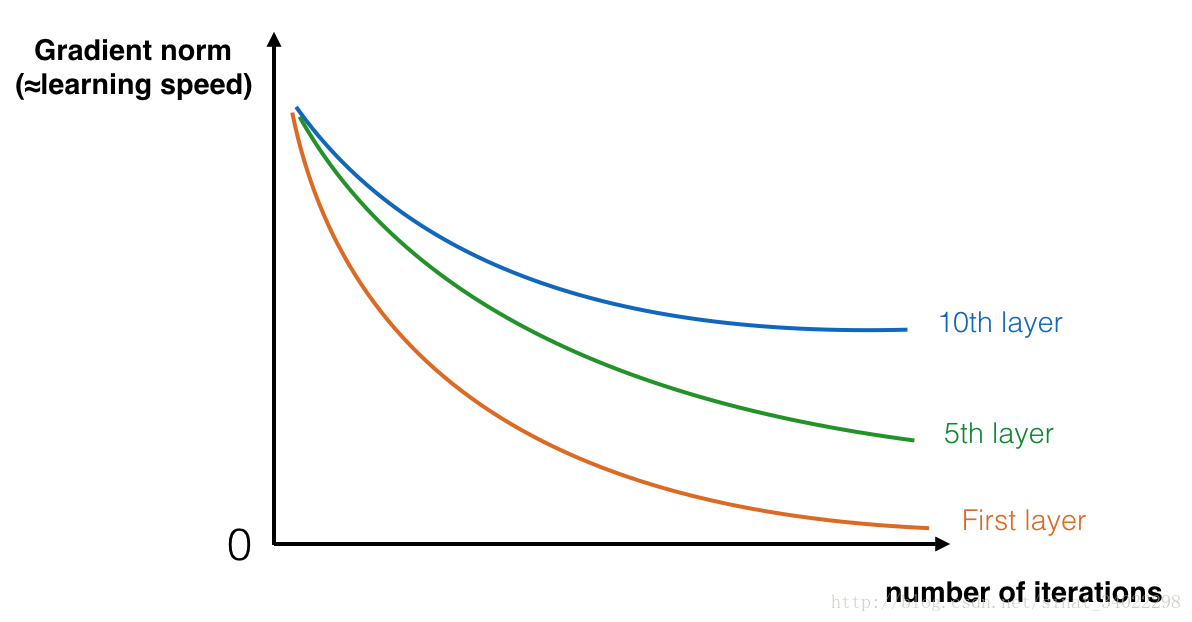
残差神经网络是 kaiming大神的论文提出来的,Deep Residual Learning for Image Recognition
主要用来解决神经网络随着深度的增加,梯度消失(学习速率降低)的问题。
残差网络的原理网上有很多解释,这里在直觉上,我感觉是将网络前面层的数据输送给后面,从而将中间层做个“假屏蔽”,这样就可以将深度网络做一个简化。(个人愚见,有待日后再学习理解)
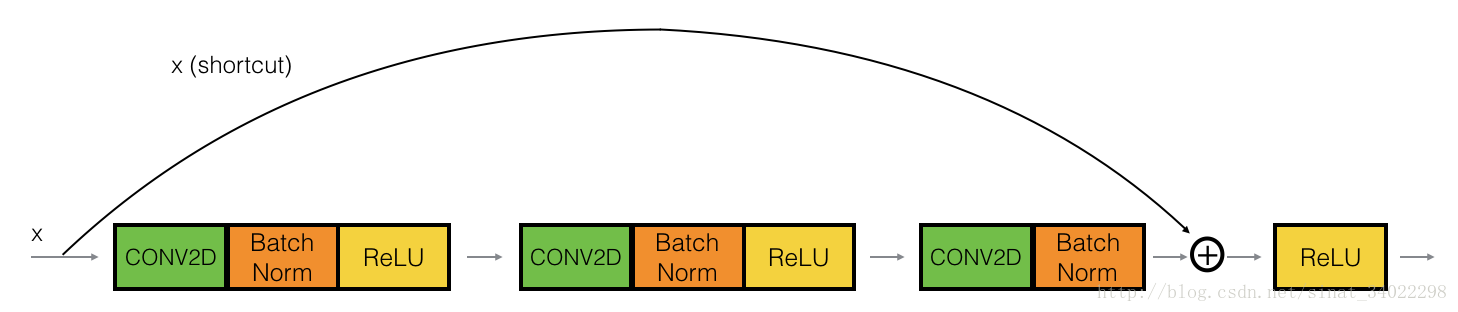
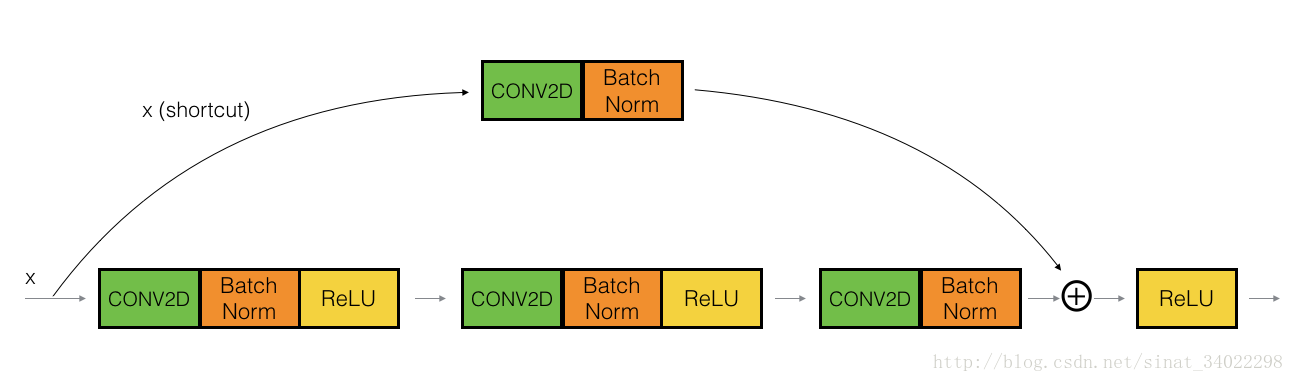
残差网络结构图:
Keras实现ResNet50
这里贴出几个主要函数,都是使用Keras,将需要的网络层写出了,连接实现。
block identity
################# block identity #################
def identity_block(X, f, filters, stage, block):
    """
    Implementation of the identity block as defined in Figure 4

    Arguments:
    X -- input tensor of shape (m, n_H_prev, n_W_prev, n_C_prev)
    f -- integer, specifying the shape of the middle CONV's window for the main path
    filters -- python list of integers, defining the number of filters in the CONV layers of the main path
    stage -- integer, used to name the layers, depending on their position in the network
    block -- string/character, used to name the layers, depending on their position in the network

    Returns:
    X -- output of the identity block, tensor of shape (n_H, n_W, n_C)
    """

    # defining name basis
    conv_name_base = 'res' + str(stage) + block + '_branch'
    bn_name_base = 'bn' + str(stage) + block + '_branch'

    # retrieve filters
    F1, F2, F3 = filters

    # Save the input value. You'll need this later to add back to the main path.
    X_shortcut = X

    # First component of main path
    X = Conv2D(filters = F1, kernel_size=(1,1), strides=(1,1), padding='valid',name=conv_name_base + '2a',
               kernel_initializer=glorot_uniform(seed=0))(X)
    X = BatchNormalization(axis=3, name=bn_name_base + '2a')(X)
    X = Activation('relu')(X)

    # Second component of main path
    X = Conv2D(filters= F2, kernel_size=(f,f), strides=(1,1), padding=('same'), name=conv_name_base + '2b',
               kernel_initializer=glorot_uniform(seed=0))(X)
    X = BatchNormalization(axis=3,name=bn_name_base + '2b')(X)
    X = Activation('relu')(X)

    # Third component of main path
    X = Conv2D(filters=F3, kernel_size=(1, 1), strides=(1, 1), padding=('valid'), name=conv_name_base + '2c',
               kernel_initializer=glorot_uniform(seed=0))(X)
    X = BatchNormalization(axis=3, name=bn_name_base + '2c')(X)

    # Final step: Add shortcut value to main path, and pass it through a RELU activation
    X = layers.add([X, X_shortcut])
    X = Activation('relu')(X)

    return  X
block convolutional
################# block convolutional #################
# GRADED FUNCTION: convolutional_block

def convolutional_block(X, f, filters, stage, block, s=2):
    """
    Implementation of the convolutional block as defined in Figure 4

    Arguments:
    X -- input tensor of shape (m, n_H_prev, n_W_prev, n_C_prev)
    f -- integer, specifying the shape of the middle CONV's window for the main path
    filters -- python list of integers, defining the number of filters in the CONV layers of the main path
    stage -- integer, used to name the layers, depending on their position in the network
    block -- string/character, used to name the layers, depending on their position in the network
    s -- Integer, specifying the stride to be used

    Returns:
    X -- output of the convolutional block, tensor of shape (n_H, n_W, n_C)
    """

    # defining name basis
    conv_name_base = 'res' + str(stage) + block + '_branch'
    bn_name_base = 'bn' + str(stage) + block + '_branch'

    # Retrieve Filters
    F1, F2, F3 = filters

    # Save the input value
    X_shortcut = X

    ##### MAIN PATH #####
    # First component of main path
    X = Conv2D(F1, (1, 1), strides=(s, s), name=conv_name_base + '2a', padding='valid',
               kernel_initializer=glorot_uniform(seed=0))(X)
    X = BatchNormalization(axis=3, name=bn_name_base + '2a')(X)
    X = Activation('relu')(X)

    ### START CODE HERE ###

    # Second component of main path (≈3 lines)
    X = Conv2D(F2, (f, f), strides=(1, 1), name=conv_name_base + '2b', padding='same',
               kernel_initializer=glorot_uniform(seed=0))(X)
    X = BatchNormalization(axis=3, name=bn_name_base + '2b')(X)
    X = Activation('relu')(X)

    # Third component of main path (≈2 lines)
    X = Conv2D(F3, (1, 1), strides=(1, 1), name=conv_name_base + '2c', padding='valid',
               kernel_initializer=glorot_uniform(seed=0))(X)
    X = BatchNormalization(axis=3, name=bn_name_base + '2c')(X)

    ##### SHORTCUT PATH #### (≈2 lines)
    X_shortcut = Conv2D(F3, (1, 1), strides=(s, s), name=conv_name_base + '1', padding='valid',
                        kernel_initializer=glorot_uniform(seed=0))(X_shortcut)
    X_shortcut = BatchNormalization(axis=3, name=bn_name_base + '1')(X_shortcut)

    # Final step: Add shortcut value to main path, and pass it through a RELU activation (≈2 lines)
    X = layers.add([X, X_shortcut])
    X = Activation('relu')(X)

    ### END CODE HERE ###

    return X
由identity block和convolutional block组成ResNet50
################# ResNet50 #################
# ResNet50
def ResNet50(input_shape=(64,64,3), classes = 6):
    """
     Implementation of the popular ResNet50 the following architecture:
     CONV2D -> BATCHNORM -> RELU -> MAXPOOL -> CONVBLOCK -> IDBLOCK*2 -> CONVBLOCK -> IDBLOCK*3
     -> CONVBLOCK -> IDBLOCK*5 -> CONVBLOCK -> IDBLOCK*2 -> AVGPOOL -> TOPLAYER

     Arguments:
     input_shape -- shape of the images of the dataset
     classes -- integer, number of classes

     Returns:
     model -- a Model() instance in Keras
     """
    # Define the input as a tensor with shape input_shape
    X_input = Input(input_shape)

    # Zero-padding
    X = ZeroPadding2D((3,3))(X_input)

    # Stage 1
    X = Conv2D(64, (7,7), strides=(2,2), name='conv1', kernel_initializer=glorot_uniform(seed=0))(X)
    X = BatchNormalization(axis=3,name='bn_conv1')(X)
    X = Activation('relu')(X)
    X = MaxPooling2D((3,3), strides=(2,2))(X)

    # Stage2
    X = convolutional_block(X, f=3, filters=[64,64,256], stage=2, block='a', s=1)
    X = identity_block(X, 3, [64,64,256], stage=2, block='b')
    X = identity_block(X, 3, [64,64,256], stage=2, block='c')

    # Stage3
    X = convolutional_block(X, f=3, filters=[128,128,512], stage=3, block='a',s=2)
    X = identity_block(X, f=3, filters=[128,128,512], stage=3, block='b')
    X = identity_block(X, f=3, filters=[128,128,512], stage=3, block='c')
    X = identity_block(X, f=3, filters=[128,128,512], stage=3, block='d')

    # Stage4
    X = convolutional_block(X, f=3, filters=[256, 256, 1024], block='a', stage=4, s=2)
    X = identity_block(X, f=3, filters=[256, 256, 1024], block='b', stage=4)
    X = identity_block(X, f=3, filters=[256, 256, 1024], block='c', stage=4)
    X = identity_block(X, f=3, filters=[256, 256, 1024], block='d', stage=4)
    X = identity_block(X, f=3, filters=[256, 256, 1024], block='e', stage=4)
    X = identity_block(X, f=3, filters=[256, 256, 1024], block='f', stage=4)

    # Stage 5 (≈3 lines)
    # The convolutional block uses three set of filters of size [512, 512, 2048], "f" is 3, "s" is 2 and the block is "a".
    # The 2 identity blocks use three set of filters of size [256, 256, 2048], "f" is 3 and the blocks are "b" and "c".
    X = convolutional_block(X, f = 3, filters=[512, 512, 2048], stage=5, block='a', s = 2)
    X = identity_block(X, f = 3, filters=[256, 256, 2048], stage=5, block='b')
    X = identity_block(X, f = 3, filters=[256, 256, 2048], stage=5, block='c')

    # Avgpool
    X = AveragePooling2D(pool_size=(2,2))(X)

    # output layer
    X = Flatten()(X)
    X = Dense(classes,activation='softmax', name='fc'+str(classes), kernel_initializer=glorot_uniform(seed=0))(X)

    # create model
    model = Model(inputs=X_input, outputs=X, name='ResNet50')
    return model