一、将VGG16卷积基实例化
该例子采用:保存数据在conv_base中的输出,然后把这些输出作为输入用于新模型。
from keras.applications import VGG16
conv_base = VGG16(weights='imagenet',include_top=False,input_shape=(150,150,3))
二、不使用数据增强的快速特征提取
1、使用预训练的卷积基提取特征
import os
import numpy as np
from keras.preprocessing.image import ImageDataGenerator
base_dir = "/kaggle/input/cats-and-dogs-small"
train_dir = os.path.join(base_dir,'train')
validation_dir = os.path.join(base_dir,'validation')
test_dir = os.path.join(base_dir,'test')
datagen = ImageDataGenerator(rescale=1.0/255)
batch_size = 20
def extract_features(directory,sample_count):
    features = np.zeros(shape=(sample_count,4,4,512))
    labels = np.zeros(shape=(sample_count))
    generator = datagen.flow_from_directory(directory,target_size=(150,150),batch_size=batch_size,class_mode='binary')
    i = 0
    for input_batch,labels_batch in generator:
    	#使用predict方法来从这些图像中提取特征
        features_batch = conv_base.predict(input_batch)
        features[i*batch_size:(i+1)*batch_size] = features_batch
        labels[i*batch_size:(i+1)*batch_size] = labels_batch
        i+=1
        if i*batch_size >= sample_count:
            break
    return features,labels

train_features,train_labels = extract_features(train_dir,2000)
validation_features,validation_labels = extract_features(validation_dir,1000)
test_features,test_labels = extract_features(test_dir,1000)
train_features = np.reshape(train_features,(2000,4*4*512))
validation_features = np.reshape(validation_features,(1000,4*4*512))
test_features = np.reshape(test_features,(1000,4*4*512))
2、定义并训练密集连接分类器
from keras import models
from keras import layers
from keras import optimizers
model = models.Sequential()
model.add(layers.Dense(256,activation='relu',input_dim=4 *4 * 512))
model.add(layers.Dropout(0.5))
model.add(layers.Dense(1,activation='sigmoid'))
model.compile(optimizer=optimizers.RMSprop(lr=2e-5),loss='binary_crossentropy',metrics=['acc'])
history = model.fit(train_features,train_labels,epochs=50,batch_size=20,validation_data=(validation_features,validation_labels))
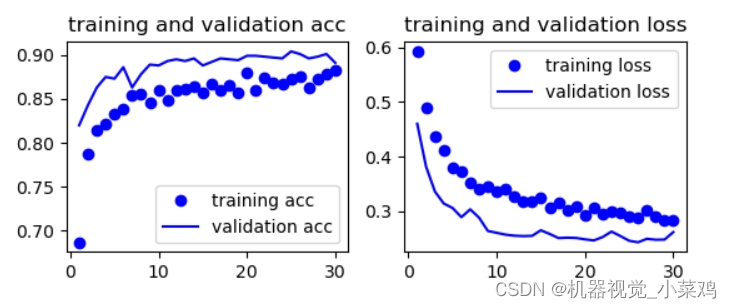
3、绘制结果
import matplotlib.pyplot as plt
acc = history.history['acc']
val_acc = history.history['val_acc']
loss = history.history['loss']
val_loss = history.history['val_loss']
epochs = range(1,len(acc)+1)
plt.subplot(221)
plt.plot(epochs,acc,'bo',label='training acc')
plt.plot(epochs,val_acc,'b',label='validation acc')
plt.title('training and validation acc')
plt.legend()
plt.subplot(222)
plt.plot(epochs,loss,'bo',label='training loss')
plt.plot(epochs,val_loss,'b',label='validation loss')
plt.title('training and validation loss')
plt.legend()
plt.show()

三、使用数据增强的特征提取
1、在卷积基上添加一个密集连接分类器
from keras import models
from keras import layers
model = models.Sequential()
model.add(conv_base)
model.add(layers.Flatten())
model.add(layers.Dense(256,activation='relu'))
model.add(layers.Dense(1,activation='sigmoid'))
在编译和训练模型之前,一定要"冻结“卷积基。冻结一个或多个层是指在训练过程中保持其权重不变。如果不这么做,那么卷积基之前学到的表示将会在训练过程中被修改。因为其上添加的Dense层是随机初始化的,那么非常大的权重更新将会在网络中传播,对之前学到的表示造成很大的破坏。
在keras中,冻结网络的方法是将其trainable属性设置为False。
conv_base.trainable = False
2、利用冻结的卷积基端到端地训练模型
from keras.preprocessing.image import ImageDataGenerator
from keras import optimizers
train_datagen = ImageDataGenerator(rescale=1.0/255,rotation_range=40,width_shift_range=0.2,height_shift_range=0.2,shear_range=0.2,zoom_range=0.2,horizontal_flip=True,fill_mode='nearest')
from keras.preprocessing.image import ImageDataGenerator
from keras import optimizers
train_datagen = ImageDataGenerator(rescale=1.0/255,rotation_range=40,width_shift_range=0.2,height_shift_range=0.2,shear_range=0.2,zoom_range=0.2,horizontal_flip=True,fill_mode='nearest')
test_datagen = ImageDataGenerator(rescale=1.0/255)
train_generator = train_datagen.flow_from_directory(train_dir,target_size=(150,150),batch_size=20,class_mode='binary')
validation_generator = test_datagen.flow_from_directory(validation_dir,target_size=(150,150),batch_size=20,class_mode='binary')
model.compile(loss='binary_crossentropy',optimizer=optimizers.RMSprop(lr=2e-5),metrics=['acc'])
history=model.fit_generator(train_generator,steps_per_epoch=100,epochs=30,validation_data=validation_generator,validation_steps=50)
3、绘制结果
import matplotlib.pyplot as plt
acc = history.history['acc']
val_acc = history.history['val_acc']
loss = history.history['loss']
val_loss = history.history['val_loss']
epochs = range(1,len(acc)+1)
plt.subplot(221)
plt.plot(epochs,acc,'bo',label='training acc')
plt.plot(epochs,val_acc,'b',label='validation acc')
plt.title('training and validation acc')
plt.legend()
plt.subplot(222)
plt.plot(epochs,loss,'bo',label='training loss')
plt.plot(epochs,val_loss,'b',label='validation loss')
plt.title('training and validation loss')
plt.legend()
plt.show()