前言
在做某任务的时候,需要对人物图片进行预处理。
预处理的要求就是要将图片中的人物各部件分割出来,标识为各种不同颜色,比如脸部为蓝色,脖颈部位绿色,其他地方为红色
最初任务使用的PaddleSeg中基于CelebAMask-HQ数据集的BiSeNet-v2和PP_LiteSeg模型,以及同样基于该数据集的BiSeNet模型,效果呢,人脸部分分割得确实还可以,但是遇到复杂的头发、头饰、服装的时候,效果就一言难尽了。
基于此情况,又调研了ACE2P和M2FP,分别是大厂百度和阿里的,其分割效果还是很好,基本满足我的预处理需求。
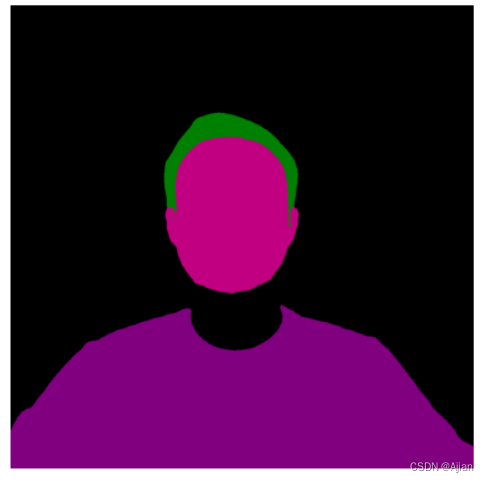
ACE2P虽然优秀,但是在效果图来看其竟然没有脖子!他实际上是把下巴下部的皮肤统一纳入脸部范畴,但是其分割的时候又把这部分信息丢失了!

为了解决没脖子的问题,又引入了M2FP模型,思路是将M2FP解析出来的脖子部分的给填充到ACE2P的结果图中。
另外,ACE2P默认的解析部件的着色不是我们期望的颜色,这里还要对其渲染颜色进行修改。
思路拟定,开干:
ACE2P
百度原介绍:
人体解析(Human Parsing)是细粒度的语义分割任务,其旨在识别像素级别的人类图像的组成部分(例如,身体部位和服装)。
ACE2P通过融合底层特征,全局上下文信息和边缘细节,端到端地训练学习人体解析任务。该结构针对Intersection over Union指标进行针对性的优化学习,提升准确率。
以ACE2P单人人体解析网络为基础的解决方案在CVPR2019第三届LIP挑战赛中赢得了全部三个人体解析任务的第一名。该PaddleHub Module采用ResNet101作为骨干网络,接受输入图片大小为473x473x3。
地址:Paddle Hub
安装ACE2P依赖
!pip install paddlepaddle -i https://mirror.baidu.com/pypi/simple
!pip install paddlehub -i https://mirror.baidu.com/pypi/simple
!pip install matplotlib
!pip install Pillow

#为了解决colab中libssl.os报错的问题
%cd /content/drive/MyDrive
!wget http://nz2.archive.ubuntu.com/ubuntu/pool/main/o/openssl/libssl1.1_1.1.1f-1ubuntu2.19_amd64.deb
!sudo dpkg -i libssl1.1_1.1.1f-1ubuntu2.19_amd64.deb
ACE2P效果
import matplotlib.image as mpimg
from matplotlib.pylab import plt

# 解析前展示原图
test_img_path = "/content/155.jpg"
img = mpimg.imread(test_img_path)
plt.imshow(img)
plt.axis('off')
plt.show()

#--------------------------------------
import paddlehub as hub
import matplotlib.pyplot as plt

image=mpimg.imread(test_img_path)
module = hub.Module(name="ace2p")
results = module.segmentation(images = [image],
                output_dir = '/content/ace2p_output/',
                visualization = True)
print(f'解析结果:{results}')
path = results[0]['path'][:-3]
print(path+'png')


img = mpimg.imread('/content/ace2p_output/'+path+'png')
plt.imshow(img)
plt.axis('off')
plt.show()
效果图:
ACE2P修改解析图颜色
- 源码在modules/image/semantic_segmentation/ace2p/module.py中
- 进行解析的核心方法在PaddleHub/modules/image/semantic_segmentation/ace2p
/processor.py中postprocess()方法 - postprocess方法最后一个参数palette指明各个部位的颜色数值,该参数默认是在实例化ACE2P类的调用的processor.py的get_palette方法
- 方法入参num_cls是读取的label_list.txt中行的个数,也就是为每行数据构建一个颜色值,返回。
get_palette方法源码:
def get_palette(num_cls):
    """
    Returns the color map for visualizing the segmentation mask.

    Args:
        num_cls: Number of classes

    Returns:
        The color map
    """
    n = num_cls
    palette = [0] * (n * 3)
    for j in range(0, n):
        lab = j
        palette[j * 3 + 0] = 0
        palette[j * 3 + 1] = 0
        palette[j * 3 + 2] = 0
        i = 0
        while lab:
            palette[j * 3 + 0] |= (((lab >> 0) & 1) << (7 - i))
            palette[j * 3 + 1] |= (((lab >> 1) & 1) << (7 - i))
            palette[j * 3 + 2] |= (((lab >> 2) & 1) << (7 - i))
            i += 1
            lab >>= 3
    return palette
modules/image/semantic_segmentation/ace2p/label_list.txt原始内容:
background
Hat
Hair
Glove
Sunglasses
UpperClothes
Dress
Coat
Socks
Pants
Jumpsuits
Scarf
Skirt
Face
Left-arm
Right-arm
Left-leg
Right-leg
Left-shoe
Right-shoe
- 所以,替换颜色的方法就是替换module.palette的值即可。
import paddlehub as hub
import matplotlib.pyplot as plt
image=mpimg.imread("/content/155.jpg")
#ace2p 模型
module = hub.Module(name="ace2p")
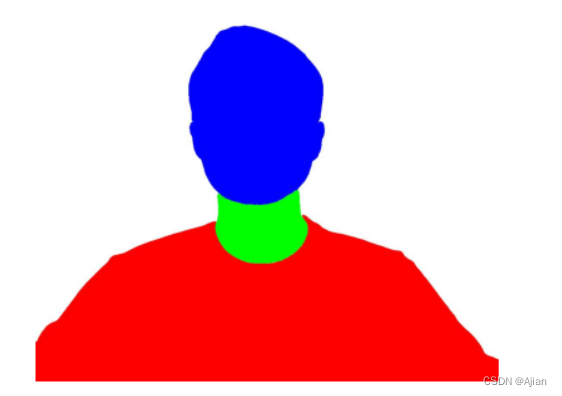
#替换绘制颜色为自己需要的颜色,背景:白色,头发+脸+耳朵:蓝色,脖子:绿色,衣服:红色
new_palette_dic = {
"background": [255,255,255],#白色
"Hat": [0,0,255], #蓝色
"Hair": [0,0,255],
"Glove": [255,0,0], #红色
"Sunglasses": [0,0,255],
"UpperClothes": [255,0,0],
"Dress": [255,0,0],
"Coat": [255,0,0],
"Socks": [255,0,0],
"Pants": [255,0,0],
"Jumpsuits": [255,0,0],
"Scarf": [0,255,0],#绿色
"Skirt": [255,0,0],
"Face": [0,0,255],
"Left-arm": [255,0,0],
"Right-arm": [255,0,0],
"Left-leg": [255,0,0],
"Right-leg": [255,0,0],
"Left-shoe": [255,0,0],
"Right-shoe": [255,0,0],
}
new_palette=[]
for v in new_palette_dic.values():
new_palette.append(v[0])
new_palette.append(v[1])
new_palette.append(v[2])
module.palette=new_palette
results = module.segmentation(images = [image],
output_dir = '/content/ace2p_output/',
visualization = True)
print(f'results:{results}')
print('---------------')
path = results[0]['path'][:-3]
print('文件名:'+path+'png')
img = mpimg.imread('/content/ace2p_output/'+path+'png')
plt.imshow(img)
plt.axis('off')
plt.show()
效果图:

M2FP
介绍:
M2FP(Mask2Former for Parsing,官方代码)基于 Mask2Former 架构,并进行了一些改进以适应人体解析。 M2FP 可以适应几乎所有人体解析任务并产生惊人的性能。
M2FP多人人体解析模型
注意:这里使用的是M2FP多人人体解析模型。
安装依赖
#先安装必要库
%cd /content/drive/MyDrive
!pip install /content/drive/MyDrive/torch_scatter-2.1.2+pt20cu118-cp310-cp310-linux_x86_64.whl
!pip install -U openmim
!mim install mmcv
#再安装依赖
!pip install antlr4-python3-runtime
!pip install modelscope
!pip install "modelscope[cv]" -f https://modelscope.oss-cn-beijing.aliyuncs.com/releases/repo.html
运行效果
from modelscope.outputs import OutputKeys
from modelscope.pipelines import pipeline
from modelscope.utils.constant import Tasks
import imageio
from PIL import Image
import numpy as np
import matplotlib.image as mpimg
import matplotlib.pyplot as plt
input_img = r'/content/155.jpg'
segmentation_pipeline = pipeline(Tasks.image_segmentation, 'damo/cv_resnet101_image-multiple-human-parsing')
result = segmentation_pipeline(input_img)
#print(f'结果:{result}')
#print(result[OutputKeys.LABELS])
labels = result[OutputKeys.LABELS]
masks=result['masks']
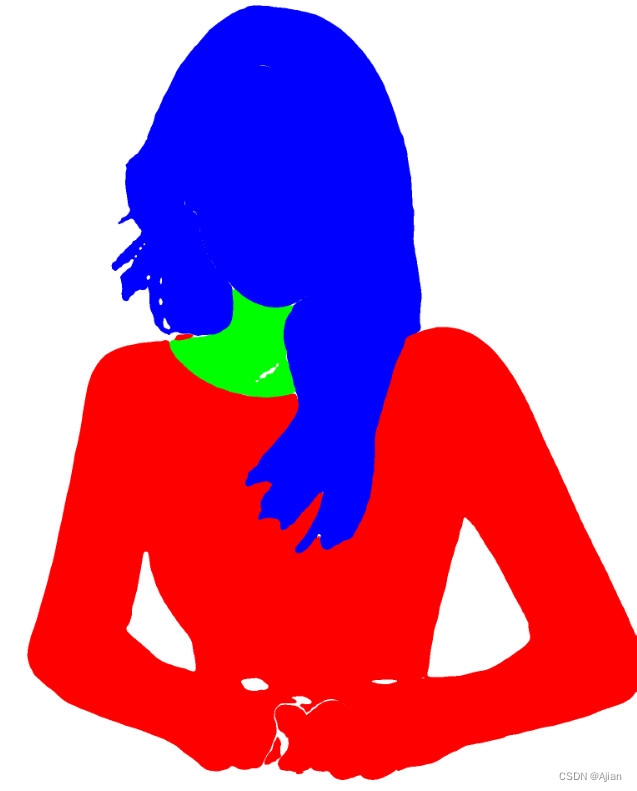
#获取人脸
face = Image.fromarray(masks[labels.index('Face')]*255).convert("RGB")
face.save('/content/face-1.jpg')
w = face.width
h = face.height
#创建画布底图,白色底
img = Image.new("RGB",(w,h),(255,255,255))
#获取头发
hair=Image.fromarray(masks[labels.index('Hair')]*255).convert("RGB")
#获取脖子
neck=Image.fromarray(masks[labels.index('Torso-skin')]*255).convert("RGB")
#获取衣服
clothes=Image.fromarray(masks[labels.index('UpperClothes')]*255).convert("RGB")
def is_target(target,x,y):
r, g, b = target.getpixel((x, y))
#如果是白色,则说明是目标区域
if (r>0 and r<255) or (g>0 and g<255) or (b>0 and b<255):
print(f'该位置不是纯白色:{x},{y},color:({r},{b},{b})')
return r==255 and g==255 and b==255
def change_bg_color(x,y,colors):
img.putpixel((x,y),(colors[0],colors[1],colors[2]))
#迭代每一个像素点,在底图上绘制出对应的人脸部位
for x in range(w):
for y in range(h):
#判断是否为头发或者脸部区域
if is_target(hair,x,y) or is_target(face,x,y):
#底图上要绘制为蓝色
change_bg_color(x,y,[0,0,255])
#判断是否为脖子区域
elif is_target(neck,x,y):
#底图要绘制为绿色
change_bg_color(x,y,[0,255,0])
#判断是否为衣服区域
elif is_target(clothes,x,y):
#底图要绘制为绿色
change_bg_color(x,y,[255,0,0])
img.save('/content/m2fp-test3.jpg')
img2 = mpimg.imread('/content/m2fp-test3.jpg')
plt.imshow(img2)
plt.axis('off')
plt.show()
效果如图:
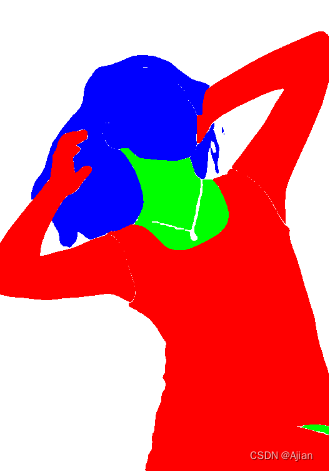
M2FP多图测试
from modelscope.outputs import OutputKeys
from modelscope.pipelines import pipeline
from modelscope.utils.constant import Tasks

import imageio
from PIL import Image
import numpy as np
import os


segmentation_pipeline = pipeline(Tasks.image_segmentation, 'damo/cv_resnet101_image-multiple-human-parsing')

def is_target(target,x,y):
    r, g, b = target.getpixel((x, y))
    #如果是白色,则说明是目标区域
    return r==255 and g==255 and b==255

def change_bg_color(img,x,y,colors):
    img.putpixel((x,y),(colors[0],colors[1],colors[2]))

def get_item(masks,labels,label):
    if label in labels:
        iis=[i for i, x in enumerate(labels) if x==label]
        imgs=[None]*len(iis)
        for i,v in enumerate(iis):
            imgs[i]=Image.fromarray(masks[v]*255).convert("RGB")
        return imgs
    else:
        return []


for t in os.listdir('./test-jpg/'):
    if not t.endswith('.jpg'):
        continue
    result = segmentation_pipeline(os.path.join('./test-jpg/',t))

    labels = result[OutputKeys.LABELS]
    print(f'{t}--->{labels}')
    masks=result['masks']

    #获取人脸
    face = Image.fromarray(masks[labels.index('Face')]*255).convert("RGB")
    w = face.width
    h = face.height
    print(f'底图宽{w},高{h}')
    #创建画布底图,白色底
    img = Image.new("RGB",(w,h),(255,255,255))


    #获取头发
    hairs=get_item(masks,labels,'Hair')
    #获取脖子
    neck=Image.fromarray(masks[labels.index('Torso-skin')]*255).convert("RGB")
    #获取衣服
    clothes=get_item(masks,labels,'UpperClothes')
    #手臂,不一定有
    LeftArm=get_item(masks,labels,'Left-arm')
    RightArm=get_item(masks,labels,'Right-arm')
    #外套,不一定有
    Coats=get_item(masks,labels,'Coat')
    #太阳镜,不一定有
    Sunglasses = get_item(masks,labels,'Sunglasses')
    #围巾,不一定有
    Scarf=get_item(masks,labels,'Scarf')
    #裙子,不一定有
    Skirt=get_item(masks,labels,'Skirt')
    #裤子,不一定有
    Pants=get_item(masks,labels,'Pants')
    #连衣裙,不一定有
    Dress=get_item(masks,labels,'Dress')


    #迭代每一个像素点,在底图上绘制出对应的人脸部位
    print(f'2底图宽{w},高{h}')
    for x in range(w):
        for y in range(h):
            #判断是否为头发或者脸部区域
            for ha in hairs:
                if is_target(ha,x,y):
                    #底图上要绘制为蓝色
                    change_bg_color(img,x,y,[0,0,255])
            if is_target(face,x,y):
                change_bg_color(img,x,y,[0,0,255])
            #判断是否为脖子区域
            if is_target(neck,x,y):
                #底图要绘制为绿色
                change_bg_color(img,x,y,[0,255,0])
            #判断是否为衣服区域
            for c in clothes:
                if is_target(c,x,y):
                    #底图要绘制为红色
                    change_bg_color(img,x,y,[255,0,0])
            #不一定有的其他部分
            for i in LeftArm:
                if is_target(i,x,y):
                    change_bg_color(img,x,y,[255,0,0])
            for i in RightArm:
                if is_target(i,x,y):
                    change_bg_color(img,x,y,[255,0,0])
            for i in Coats:
                if is_target(i,x,y):
                    change_bg_color(img,x,y,[255,0,0])
            for i in Sunglasses:
                if is_target(i,x,y):
                    change_bg_color(img,x,y,[0,0,255])
            for i in Scarf:
                if is_target(i,x,y):
                    change_bg_color(img,x,y,[255,0,0])
            for i in Skirt:
                if is_target(i,x,y):
                    change_bg_color(img,x,y,[255,0,0])
            for i in Pants:
                if is_target(i,x,y):
                    change_bg_color(img,x,y,[255,0,0])
            for i in Dress:
                if is_target(i,x,y):
                    change_bg_color(img,x,y,[255,0,0])


    img.show()
    #存储为高质量的、无压缩的jpg
    img.save('./test-jpg/results/'+t,quality=100,subsampling=0)


结论
在多图综合比较之下,ACE2P虽然速度占优,但是精确度不及M2FP。
所以最终任务直接使用M2FP模型进行处理。
不过由于要进行每个像素的检查,代码运行确实够慢的!
最终渲染图部件与部件之间还存在空白问题需要优化!
速度优化
m2fp解析出来之后,对解析的结果按背景图的长和宽进行了每个像素的迭代判断操作,实际运行下来速度超慢!
所以这里就对这部分逻辑进行速度优化
基本思路为:解析结果是一个二维array,每种子array的值只可能为[0,0,0]或[255,255,255],所以我们构建一个和背景一样长和宽的二维数组,填充[255,255,255],依次寻找各个人体组件中所有值不为[0,0,0]的元素,将这些元素替换为对应的RGB值,再将背景中同样下标的元素的值替换为该值,这样就相当于把背景中的需要调整的像素点的RGB都调整到位了,然后再输出为图片即可。
上代码:
import math
import os

import configargparse
import numpy as np
from PIL import Image
from modelscope.outputs import OutputKeys
from modelscope.pipelines import pipeline
from modelscope.utils.constant import Tasks
from tqdm import tqdm


def partition_list(arr, m):
    """split the list 'arr' into m pieces"""
    n = int(math.ceil(len(arr) / float(m)))
    return [arr[i:i + n] for i in range(0, len(arr), n)]


def is_target(target, x, y):
    r, g, b = target.getpixel((x, y))
    # 如果是白色,则说明是目标区域
    return r == 255 and g == 255 and b == 255


def change_bg_color(img, x, y, colors):
    img.putpixel((x, y), (colors[0], colors[1], colors[2]))


def get_item(masks, labels, label):
    if label in labels:
        iis = [i for i, x in enumerate(labels) if x == label]
        arrs = [None] * len(iis)
        for i, v in enumerate(iis):
            arrs[i] = masks[v] * 255
        return arrs
    else:
        return []


def replace_bgArray_item(bgArray, targets, newArray):
    '''将指定的背景二维数组中寻找到的值不为0的位置的子数组,替换为newArray数组'''
    for tar in targets:
        indexs = np.where(tar != 0)
        for index in zip(*indexs):  # index的值为(1,1,1),表示第一行第一列的第一个元素
            bgArray[(index[0], index[1])] = newArray
    return bgArray


def predict(input_dir, save_dir):
    '''使用达摩M2FP多人人体解析模型进行人体语义解析'''

    img_lists = os.listdir(input_dir)

    segmentation_pipeline = pipeline(Tasks.image_segmentation, 'damo/cv_resnet101_image-multiple-human-parsing')
    print("M2FP模型开始人体解析...")
    bgImg = None
    for t in tqdm(img_lists, desc='解析进度'):
        if not t.endswith('.jpg') and not t.endswith('.png'):
            continue
        # 读取一张图片,根据其宽高创建背景图
        if bgImg is None:
            w, h = Image.open(os.path.join(input_dir, t)).size
            # 构建一个w行h列有3个值的二维数组,每个子数组的值为(255, 255, 255),即填充白色,作为背景图
            bgImg = np.full((w, h, 3), (255, 255, 255))
        # copy一份背景,作为本次解析的背景图
        myBgArray = bgImg.copy()

        # 进行语义分割
        result = segmentation_pipeline(os.path.join(input_dir, t))
        # 得到语义结果
        labels = result[OutputKeys.LABELS]
        masks = result['masks']
        # 获取人脸
        face = masks[labels.index('Face')] * 255
        # 获取头发
        hairs = get_item(masks, labels, 'Hair')
        # 获取脖子
        neck = masks[labels.index('Torso-skin')] * 255
        # 获取衣服
        clothes = get_item(masks, labels, 'UpperClothes')
        # 手臂,不一定有
        LeftArm = get_item(masks, labels, 'Left-arm')
        RightArm = get_item(masks, labels, 'Right-arm')
        # 外套,不一定有
        Coats = get_item(masks, labels, 'Coat')
        # 太阳镜,不一定有
        Sunglasses = get_item(masks, labels, 'Sunglasses')
        # 围巾,不一定有
        Scarf = get_item(masks, labels, 'Scarf')
        # 裙子,不一定有
        Skirt = get_item(masks, labels, 'Skirt')
        # 裤子,不一定有
        Pants = get_item(masks, labels, 'Pants')
        # 连衣裙,不一定有
        Dress = get_item(masks, labels, 'Dress')

        # 在背景上绘制蓝色人脸
        myBgArray = replace_bgArray_item(myBgArray, [face], [0, 0, 255])
        # 头发 蓝色
        myBgArray = replace_bgArray_item(myBgArray, hairs, [0, 0, 255])
        # 脖子 绿色
        myBgArray = replace_bgArray_item(myBgArray, [neck], [0, 255, 0])
        # 获取衣服等等 以下均为红色
        myBgArray = replace_bgArray_item(myBgArray, clothes, [255, 0, 0])
        myBgArray = replace_bgArray_item(myBgArray, LeftArm, [255, 0, 0])
        myBgArray = replace_bgArray_item(myBgArray, RightArm, [255, 0, 0])
        myBgArray = replace_bgArray_item(myBgArray, Coats, [255, 0, 0])
        myBgArray = replace_bgArray_item(myBgArray, Sunglasses, [255, 0, 0])
        myBgArray = replace_bgArray_item(myBgArray, Scarf, [255, 0, 0])
        myBgArray = replace_bgArray_item(myBgArray, Skirt, [255, 0, 0])
        myBgArray = replace_bgArray_item(myBgArray, Pants, [255, 0, 0])
        myBgArray = replace_bgArray_item(myBgArray, Dress, [255, 0, 0])

        # 将背景数组myBgArray存储为高质量的、无压缩的jpg
        bg = Image.fromarray(myBgArray.astype(np.uint8))
        bg.save(os.path.join(save_dir, t), quality=100, subsampling=0)
    print(f"解析完成,结果存储于:{save_dir}")


if __name__ == "__main__":
    parser = configargparse.ArgumentParser()
    parser.add_argument('--input_dir', type=str, default='./inputImgs', help='待解析的图片目录路径')
    parser.add_argument('--save_dir', type=str, default='./outputImgs/', help='解析完成后的图片目录存储路径')
    args = parser.parse_args()
    predict(input_dir=args.input_dir, save_dir=args.save_dir)
实际跑了一下,速度还满意!
