概要
空间滤波器是数字图像处理中的基本工具之一。它通过在图像的每个像素位置上应用一个特定的滤波模板,根据该位置周围的相邻像素值进行加权操作,从而修改该像素的值。这种加权操作能够突出或模糊图像的特定特征,实现多种图像处理任务。
在降噪任务中,空间滤波器可以平均化局部像素值,减少图像中的噪声,使图像看起来更清晰。在边缘检测中,滤波器可以强调图像中的边缘,使其更加显著,便于后续分析。而在图像平滑任务中,空间滤波器则可以平滑图像中的过渡区域,使图像看起来更加连续和自然。
通过在不同的图像处理场景中灵活应用空间滤波器,可以有效改善图像质量,满足各种视觉需求。这些滤波器的设计和选择是图像处理领域的重要课题,能够帮助人们更好地理解和分析图像信息。
导入库
为了进行图像处理,我们通常需要导入一些必要的库
import numpy as np
import matplotlib.pyplot as plt
from fractions import Fraction
from skimage.io import imread, imshow
from scipy.signal import convolve2d
from skimage.color import rgb2gray, gray2rgb
空间过滤器模板
空间滤波器模板是用于修改像素值的核心工具。在以下代码中,我们定义了五种常见的空间滤波器模板,分别是Horizontal Sobel Filter、Vertical Sobel Filter、Edge Detection、Sharpen和Box Blur。
def get_filters():
    # 定义滤波器模板
    kernel_hsf = np.array([[1, 2, 1],
                           [0, 0, 0],
                           [-1, -2, -1]])

    kernel_vsf = np.array([[1, 0, -1],
                           [2, 0, -2],
                           [1, 0, -1]])

    kernel_edge = np.array([[-1, -1, -1],
                            [-1, 8, -1],
                            [-1, -1, -1]])

    kernel_sharpen = np.array([[0, -1, 0],
                               [-1, 5, -1],
                               [0, -1, 0]])

    kernel_bblur = (1 / 9.0) * np.array([[1., 1., 1.],
                                         [1., 1., 1.],
                                         [1., 1., 1.]])

    kernels = {


        'Box Blur': kernel_bblur,
        'Sharpen': kernel_sharpen,
        'Horizontal Sobel Filter': kernel_hsf,
        'Vertical Sobel Filter': kernel_vsf,
        'Edge Detection': kernel_edge,
    }
    return kernels
展示效果
通过以上定义的滤波器模板,我们可以将它们应用于真实图像上,以获得不同的视觉效果。
将display_filters('dorm_lobby.png') 换成自己的图片即可
def display_filters(image_path):
    # 读取图像
    image = imread(image_path)[:,:,:3]
    kernels = get_filters()
    # 创建包含子图的图像窗口
    fig, ax = plt.subplots(2, 3, figsize=(20, 15))

    ax[0, 0].imshow(rgb2gray(image[:,:,:3]), cmap='gray')
    ax[0, 0].set_title('Original Image', fontsize=20)
    ax[0, 0].set_xticks([])
    ax[0, 0].set_yticks([])

    for i, (name, kernel) in enumerate(kernels.items(), 1):
        row = i // 3
        col = i % 3
        ax[row, col].imshow(kernel, cmap='gray')
        ax[row, col].set_title(name, fontsize=30)

        for (j, k), val in np.ndenumerate(kernel):
            if val < 1:
                ax[row, col].text(k, j,
                                  str(Fraction(val).limit_denominator()),
                                  ha='center', va='center',
                                  color='red', fontsize=30)
            else:
                ax[row, col].text(k, j, str(val),
                                  ha='center', va='center',
                                  color='red', fontsize=30)
    plt.tight_layout()
    plt.show()

# 展示滤波器效果
display_filters('dorm_lobby.png')
结果:
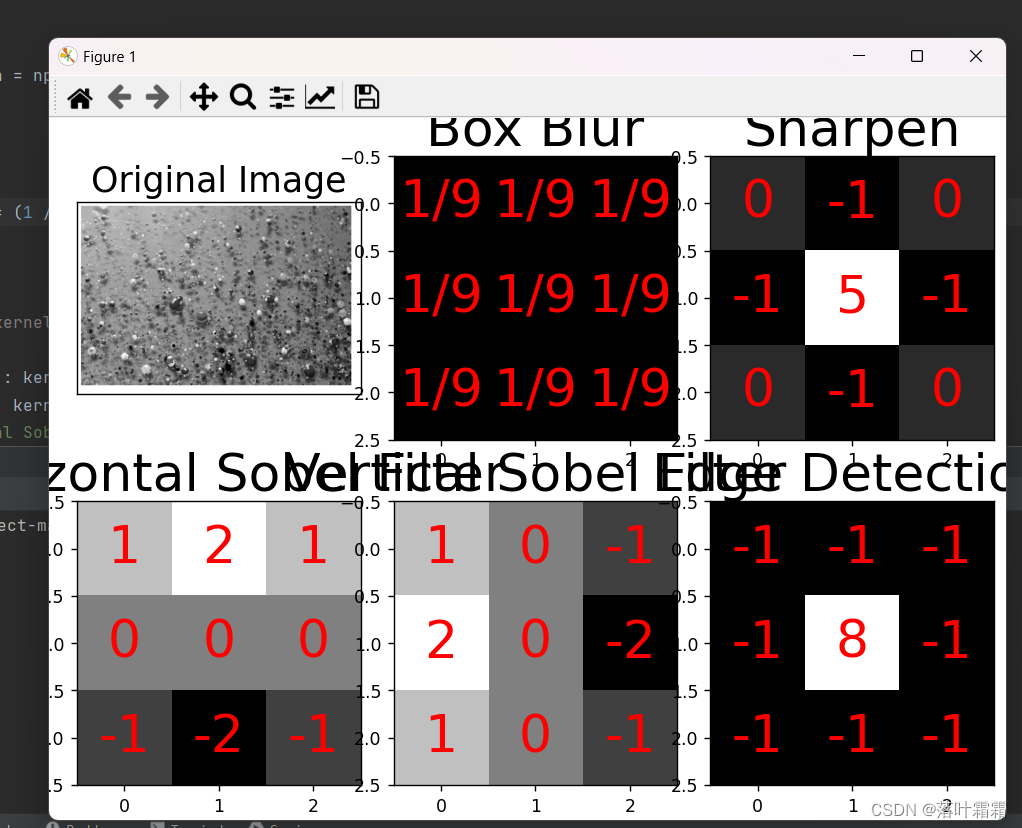
述代码中,通过函数get_filters(),我们定义了五种常见的空间滤波器模板,分别为Horizontal Sobel Filter, Vertical Sobel Filter, Edge Detection, Sharpen以及 Box Blur 。接着我们可以将这些滤波器应用于真实图像。
import numpy as np
import matplotlib.pyplot as plt
from fractions import Fraction
from skimage.io import imread, imshow
# For Spatial Filters
from scipy.signal import convolve2d
from skimage.color import rgb2gray, gray2rgb
def get_filters():
# Define Filters
# Horizontal Sobel Filter
kernel_hsf = np.array([[1, 2, 1],
[0, 0, 0],
[-1, -2, -1]])
# Vertical Sobel Filter
kernel_vsf = np.array([[1, 0, -1],
[2, 0, -2],
[1, 0, -1]])
# Edge Detection
kernel_edge = np.array([[-1, -1, -1],
[-1, 8, -1],
[-1, -1, -1]])
# Sharpen
kernel_sharpen = np.array([[0, -1, 0],
[-1, 5, -1],
[0, -1, 0]])
# Box Blur
kernel_bblur = (1 / 9.0) * np.array([[1., 1., 1.],
[1., 1., 1.],
[1., 1., 1.]])
# Define the kernels
kernels = {
'Box Blur': kernel_bblur,
'Sharpen': kernel_sharpen,
'Horizontal Sobel Filter': kernel_hsf,
'Vertical Sobel Filter': kernel_vsf,
'Edge Detection': kernel_edge,
}
return kernels
def display_filters(image_path):
# Read the image
image = imread(image_path)[:, :, :3]
kernels = get_filters()
# Create a figure with subplots for each kernel
fig, ax = plt.subplots(2, 3, figsize=(20, 15))
ax[0, 0].imshow(rgb2gray(image[:, :, :3]), cmap='gray')
ax[0, 0].set_title('Original Image', fontsize=20)
ax[0, 0].set_xticks([])
ax[0, 0].set_yticks([])
# Loop over the keys and values in the kernels dictionary
for i, (name, kernel) in enumerate(kernels.items(), 1):
# Determine the subplot index
row = i // 3
col = i % 3
# Plot the kernel on the appropriate subplot
ax[row, col].imshow(kernel, cmap='gray')
ax[row, col].set_title(name, fontsize=30)
# Loop over the cells in the kernel
for (j, k), val in np.ndenumerate(kernel):
if val < 1:
ax[row, col].text(k, j,
str(Fraction(val).limit_denominator()),
ha='center', va='center',
color='red', fontsize=30)
else:
ax[row, col].text(k, j, str(val),
ha='center', va='center',
color='red', fontsize=30)
# Show the plot
plt.tight_layout()
plt.show()
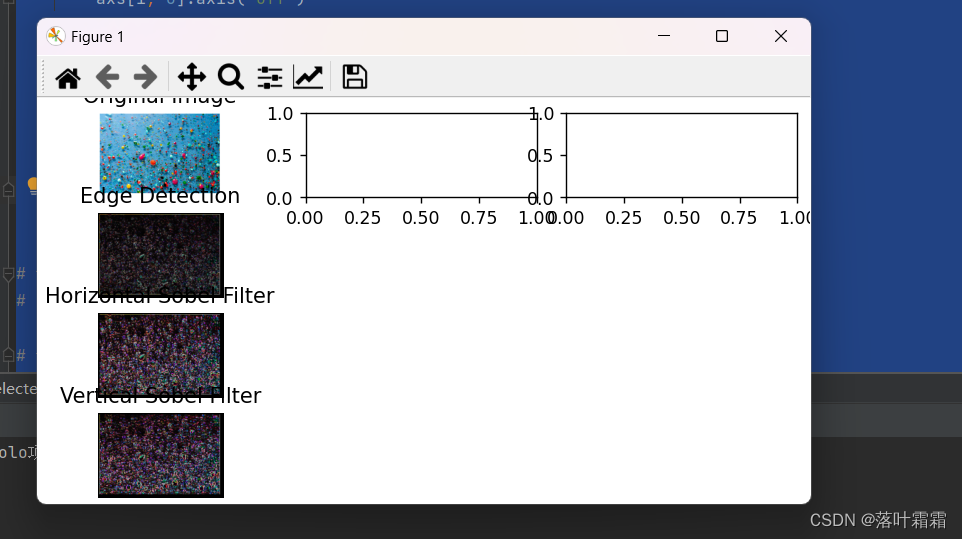
def apply_selected_kernels(image_path, selected_kernels, plot_cols=3):
# Define the kernels
kernels = get_filters()
# Check if the selected kernels are defined, if not raise an exception
for k in selected_kernels:
if k not in kernels:
raise ValueError(f"Kernel '{k}' not defined.")
# Read the image
image = imread(image_path)[:, :, :3]
# Apply selected kernels to each color channel of the image
conv_rgb_images = {
}
for kernel_name in selected_kernels:
kernel = kernels[kernel_name]
transformed_channels = []
for i in range(3):
conv_image = convolve2d(image[:, :, i], kernel, 'valid')
transformed_channels.append(abs(conv_image))
conv_rgb_image = np.dstack(transformed_channels)
conv_rgb_image = np.clip(conv_rgb_image, 0, 255).astype(np.uint8)
conv_rgb_images[kernel_name] = conv_rgb_image
# Display the original and convolved images
fig, axs = plt.subplots(len(selected_kernels) + 1, plot_cols, figsize=(15, 10))
axs[0, 0].imshow(image)
axs[0, 0].set_title('Original Image')
axs[0, 0].axis('off')
for i, kernel_name in enumerate(selected_kernels, 1):
axs[i, 0].imshow(conv_rgb_images[kernel_name])
axs[i, 0].set_title(kernel_name)
axs[i, 0].axis('off')
# Hide remaining empty subplots, if any
for i in range(len(selected_kernels) + 1, len(axs.flat)):
axs.flatten()[i].axis('off')
plt.tight_layout()
plt.show()
# 调用display_filters()函数来获取滤波器矩阵
# display_filters('dorm_lobby.png')
# 调用apply_selected_kernels()函数,传入图像路径和希望应用的滤波器名称列表
apply_selected_kernels('dorm_lobby.png',
['Edge Detection',
'Horizontal Sobel Filter',
'Vertical Sobel Filter'])
结果:
当然,我们可以通过以下代码查看其他几种模板的对应效果,代码如下:
# Visualize Edge Detection, Sharpen, and Box Blur
apply_selected_kernels('dog.png',
                       ['Edge Detection',
                        'Sharpen',
                        'Box Blur'],
                       plot_cols=2)
分析与总结
在图像处理中,空间滤波器的作用非常强大。不同的滤波器模板可以用于实现各种图像处理任务,例如边缘检测、图像锐化和模糊等。通过深入了解每种滤波器的特点和应用场景,我们可以更好地运用它们,释放创造力,探索图像处理的无限可能性。通过本文的介绍,希望读者对空间滤波器有了更加清晰的认识,能够在实际应用中灵活运用这些知识,创造出更加引人注目的图像效果。