1. 引言
欢迎回来,我的图像处理爱好者们!今天,让我们深入研究图像处理领域中的形态学计算。这些非线性的图像处理技术允许我们操纵图像中对象的形状和结构。在本系列中,我们将依次介绍四种基本的形态学操作:腐蚀、膨胀、开操作和闭操作。
闲话少说,我们直接开始吧!
2. 腐蚀操作原理
腐蚀是常见的形态学操作之一,它通过从图像边界中去除像素来精细地缩小图像中的对象。具体而言,它通过考虑每个像素的邻域并将其值设置为该邻域中所有像素中的最小值来实现这一点。在二进制图像中,如果任何相邻像素的值为0,则输出像素也设置为0。
接着,让我们通过具体示例来进行讲解,首先导入我们今天的图像,代码如下:
# Define the image
original_image = np.array([[0, 0, 0, 0, 0, 0, 0, 0],
                           [0, 0, 0, 1, 1, 1, 0, 0],
                           [0, 0, 1, 1, 1, 1, 0, 0],
                           [0, 1, 1, 1, 1, 0, 0, 0],
                           [0, 1, 1, 1, 0, 0, 0, 0],
                           [0, 1, 1, 1, 0, 0, 0, 0],
                           [0, 0, 0, 0, 0, 0, 0, 0],
                           [0, 0, 0, 0, 0, 0, 0, 0]])

plt.figure(figsize=(10,10))
plt.imshow(original_image, cmap='gray', extent=[0, 8, 0, 8])
plt.title('Original Image', fontsize=20);
得到结果如下:

接下来是定义结构化元素,对于这个例子,让我们使用十字架作为我们的选择:
# Define the structuring element
selem_cross = np.array([[0,1,0],
                        [1,1,1],
                        [0,1,0]])
plt.figure(figsize=(9,9))
plt.imshow(selem_cross, cmap='gray')
plt.title('Structuring Element: Cross', fontsize=20);
得到结构化元素可视化效果如下:

3. 腐蚀操作效果
经过上述操作,我们定义了需要操作的原始图像和相应的结构化模板元素,接着我们使用函数apply_erosion 来将上述结构化模板元素作用于相应的图像中,代码如下:
def apply_erosion(image, selem):
    # Perform erosion on the given image using the structuring element, selem
    eroded_image = erosion(image, selem)

    # Display the original and eroded images
    fig, axes = plt.subplots(1, 3, figsize=(15, 10))
    ax = axes.ravel()

    ax[0].imshow(selem, cmap='gray',
                 extent=[0, selem.shape[1], 0, selem.shape[0]])
    ax[0].set_title('Structuring Element', fontsize=20)

    ax[1].imshow(image, cmap='gray',
                 extent=[0, image.shape[1], 0, image.shape[0]])
    ax[1].set_title('Original Image', fontsize=20)

    ax[2].imshow(eroded_image, cmap='gray',
                 extent=[0, image.shape[1], 0, image.shape[0]])
    ax[2].set_title('Eroded Image', fontsize=20)

    plt.tight_layout()
    plt.show()

# Apply erosion on the original image with cross structuring element
apply_erosion(original_image, selem_cross)
得到结果如下:

观察上述输出,可以看到经过变换后的图对应的是原始图像的图的缩小版,这就是腐蚀操作的效果。大家可以通过下列动图进行更加详细的理解,样例图如下:

4. 其他效果
需要注意的是,腐蚀操作中使用的邻域大小或结构元素的选择会对结果产生不同的影响。我们可以通过选择不同的结构元素,如正方形、圆盘或自定义形状,以实现基于所需结果的特定腐蚀的效果。
例如,如果我选择使用一个正方形作为我的结构元素,代码如下:
# Define the structuring element
selem_square = np.array([[0,0,0,0],
                         [0,1,1,0],
                         [0,1,1,0],
                         [0,0,0,0]])

# Apply erosion on the original image with square structuring element
apply_erosion(original_image, selem_square)
得到被侵蚀的图像将看起来像这样: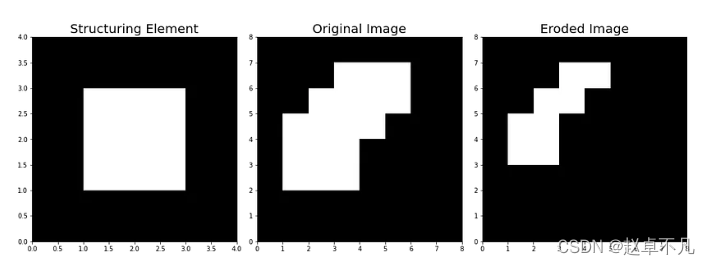
5. 总结
腐蚀的主要目的是去除零散的早点和细线,从而只保留实质性的物体。在我们施加腐蚀操作后,剩余的线条看起来更加细,图像中对象的形状看起来更小。腐蚀蚀通常是对象分割和边界提取等任务中必备的基础操作。
您学废了嘛?