OpenCv图像处理之方框滤波-线性滤波
在接触滤波前,我们先了解一下什么是图像平滑?
图像平滑也称为图像模糊,是一种在图像处理中使用频率很高的操作,进行图像平滑的原因有很多,我们这里介绍的是使用平滑来降低图片的噪声。在图像中,噪声的能量大多集中在幅度谱的低频和中频部分,而在较高的频段,一些重要的细节信息往往会被噪声淹没,在一幅图像中,所谓的高频部分是指图像中像素值落差很大的部分,而低频则是指像素值与相邻的像素值相差不大甚至相同的情况,而图像的一些细节部分往往由高频信息来表现,图像中的噪声往往也处于高频段,这就会造成一些细节信息被噪声淹没,可以根据不同的噪声类型用不同的滤波处理。滤波的目的有两个,一个是抽出对象的特征作为图像识别的特征模式,另一个是为适应图像处理要求,消除数字图像所混入的噪声。对图像滤波有两个要求一个是不能损坏图像的轮廓和边缘等重要信息。另一个是使图像清晰视觉效果更好。
方框滤波是均值滤波的一般形式,和均值滤波不同的是方框滤波求的是滤波器内所有像素之和,并且方框滤波不会强制进行归一化处理。
来看一下源码中对cv::boxFilter()的声明和描述
CV_EXPORTS_W void boxFilter(InputArray src, OutputArray dst, int ddepth,Size ksize, Point anchor = Point(-1, -1),bool normalize = true,int borderType = BORDER_DEFAULT);

@param src input image.
@param dst output image of the same size and type as src.
@param ddepth the output image depth (-1 to use src.depth()).
@param ksize blurring kernel size.
@param anchor anchor point; default value Point(-1,-1) means that the anchor is at the kernel
center.
@param normalize flag, specifying whether the kernel is normalized by its area or not.
@param borderType border mode used to extrapolate pixels outside of the image, see #BorderTypes. #BORDER_WRAP is not supported.
上述参数描述的是输入一个src图像,对其进行方框滤波输出dst图像,dst拥有和src相同的尺寸和数据类型。dst的深度默认和src相同,ksize是滤波核,normalize是否进行归一化,默认为true.anchor是核的中心点,默认为Point(-1,-1)
#include <iostream>
#include <opencv2/opencv.hpp>

using namespace std;
using namespace cv;

void resize_img(Mat &mat, int width, int height, int interpolation = INTER_AREA);

Mat zero_img(int width, int height, int type);

void box_filter_img(Mat &src, Mat &dst, int kernel = 3, int depth = -1, int x = -1, int y = -1, bool normalize = true);

int main() {


    Mat img, clone_img, dst_img, merge_img;
    img = imread("D:/cat.jpg", 3);
    if (img.empty()) {


        cout << "open the file failed" << endl;
        return -1;
    }
    clone_img = img.clone();
    double scale = 0.5;
    int width = int(img.cols * scale);
    int height = int(img.rows * scale);
    int type = clone_img.type();
    int kernel = 5;
    resize_img(clone_img, width, height);
    dst_img = zero_img(width, height, type);
    merge_img = zero_img(width, height, type);
    box_filter_img(clone_img, dst_img, kernel);
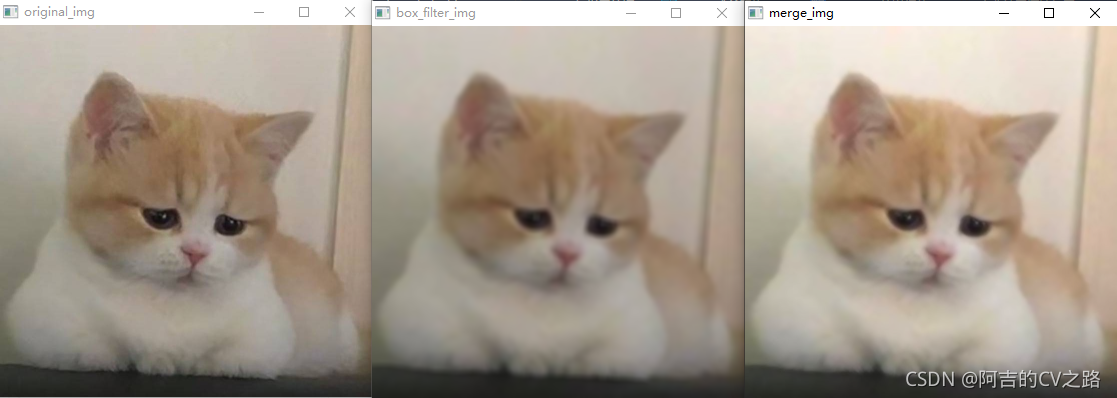
    addWeighted(clone_img, 0.4, dst_img, 0.8, 0, merge_img);
    imshow("original_img", clone_img);
    imshow("box_filter_img", dst_img);
    imshow("merge_img", merge_img);
    waitKey(0);
    return 0;
}

void resize_img(Mat &mat, int width, int height, int interpolate) {


    resize(mat, mat, Size(width, height), 0, 0, interpolate);
}

Mat zero_img(int width, int height, int type) {


    Mat mat = Mat::zeros(Size(width, height), type);
    return mat;
}

void box_filter_img(Mat &src, Mat &dst, int kernel, int depth, int x, int y, bool normalize) {


    boxFilter(src, dst, depth, Size(kernel, kernel), Point(x, y), normalize);
}
效果图
