文中若有代码、术语等错误,欢迎指正
前言
-
此节目的
为完成101所说的,拖动材质赋予实体,需先完成拖动这个功能,因为项目已经有打开场景函数,所以此节完成拖动场景是否能打开场景。
-
如何实现
使用ImGui的Api
-
实现细节
-
看后面的Bug合集
-
最主要的是:PushID区分不同按钮
-
在ImGui_Demo.cpp中可以看到拖动代码如何实现的
-
代码流程
-
在数据源上设置
void ContentBrowserPanel::OnImGuiRender() { ImGui::Begin("Content Browser"); // 为了返回上一级目录 // 1.当前目录!= assets目录 if (m_CurrentDirectory != std::filesystem::path(g_AssetPath)) { // 2.如果点击了按钮 if (ImGui::Button("<-")) { // 3.当前目录 = 当前目录的父目录 m_CurrentDirectory = m_CurrentDirectory.parent_path(); } } // Icon static float padding = 16.0f; static float thumbnailSize = 128.0f; float cellSize = thumbnailSize + padding; float panelWidth = ImGui::GetContentRegionAvail().x; int columnCount = (int)(panelWidth / cellSize); if (columnCount< 1) { columnCount = 1; } ImGui::Columns(columnCount, 0, false); // 为了遍历当前目录下的文件和文件夹 for (auto& directoryEntry : std::filesystem::directory_iterator(m_CurrentDirectory)) { // 1.得到子文件夹或文件path类。 比如:path = assets\cache\shader const auto& path = directoryEntry.path(); // 2.得到子文件与的assets文件夹的相对位置path。 relativePath = cache\shader auto relativePath = std::filesystem::relative(path, g_AssetPath); // 3.获取子文件的文件名。 filenameString = shader std::string filenameString = relativePath.filename().string(); // On source items 拖动 ImGui::PushID(filenameString.c_str());// 区分不同按钮 //ImGui::PushID(path.c_str());// 不知道为什么放入path.c_str()却没用! 看最后面 // Icon Ref<Texture2D> icon = directoryEntry.is_directory() ? m_DirectoryIcon : m_FileIcon; ImGui::PushStyleColor(ImGuiCol_Button, ImVec4(0, 0, 0, 0));// alpha为0 设置背景为无颜色 ImGui::ImageButton((ImTextureID)icon->GetRendererID(), { thumbnailSize, thumbnailSize }, { 0,1 }, { 1,0 });// 1:ID,2:大小,3、4:左上角和右下角的uv坐标 if (ImGui::BeginDragDropSource()) { // 设置数据源 const wchar_t* itemPath = relativePath.c_str(); ImGui::SetDragDropPayload("CONTENT_BROWSER_ITEM", itemPath, (wcslen(itemPath) + 1) * sizeof(wchar_t)); ImGui::EndDragDropSource(); } ImGui::PopStyleColor(); // 4.1如果子文件是目录,双击点进去更新当前目录 if (ImGui::IsItemHovered() && ImGui::IsMouseDoubleClicked(ImGuiMouseButton_Left)) { if (directoryEntry.is_directory()) { m_CurrentDirectory /= path.filename(); } } ImGui::TextWrapped(filenameString.c_str());// 包括文字 ImGui::NextColumn();// 下一列 ImGui::PopID(); } // 设置滑动条 ImGui::Columns(1); ImGui::SliderFloat("Thumbnail Size", &thumbnailSize, 16, 512); ImGui::SliderFloat("Padding", &padding, 0, 32); ImGui::End(); } -
在拖动目标上设置
void EditorLayer::OnImGuiRender(){


ImGui::Begin("Viewport");
.......
uint32_t textureID = m_Framebuffer->GetColorAttachmentRendererID(0);
ImGui::Image((void*)textureID, ImVec2(m_ViewportSize.x, m_ViewportSize.y), ImVec2(0, 1), ImVec2(1, 0));


// 接收在此视口拖放过来的值,On target candidates,拖放目标
if (ImGui::BeginDragDropTarget()) {


    // 因为接收内容可能为空,需要if判断 。 CONTENT_BROWSER_ITEM:拖动携带的内容
    if (const ImGuiPayload* payload = ImGui::AcceptDragDropPayload("CONTENT_BROWSER_ITEM")) {


        const wchar_t* path = (const wchar_t*)payload->Data;
        OpenScene(std::filesystem::path(g_AssetPath) / path);
    }
    ImGui::EndDragDropTarget();
}
.......
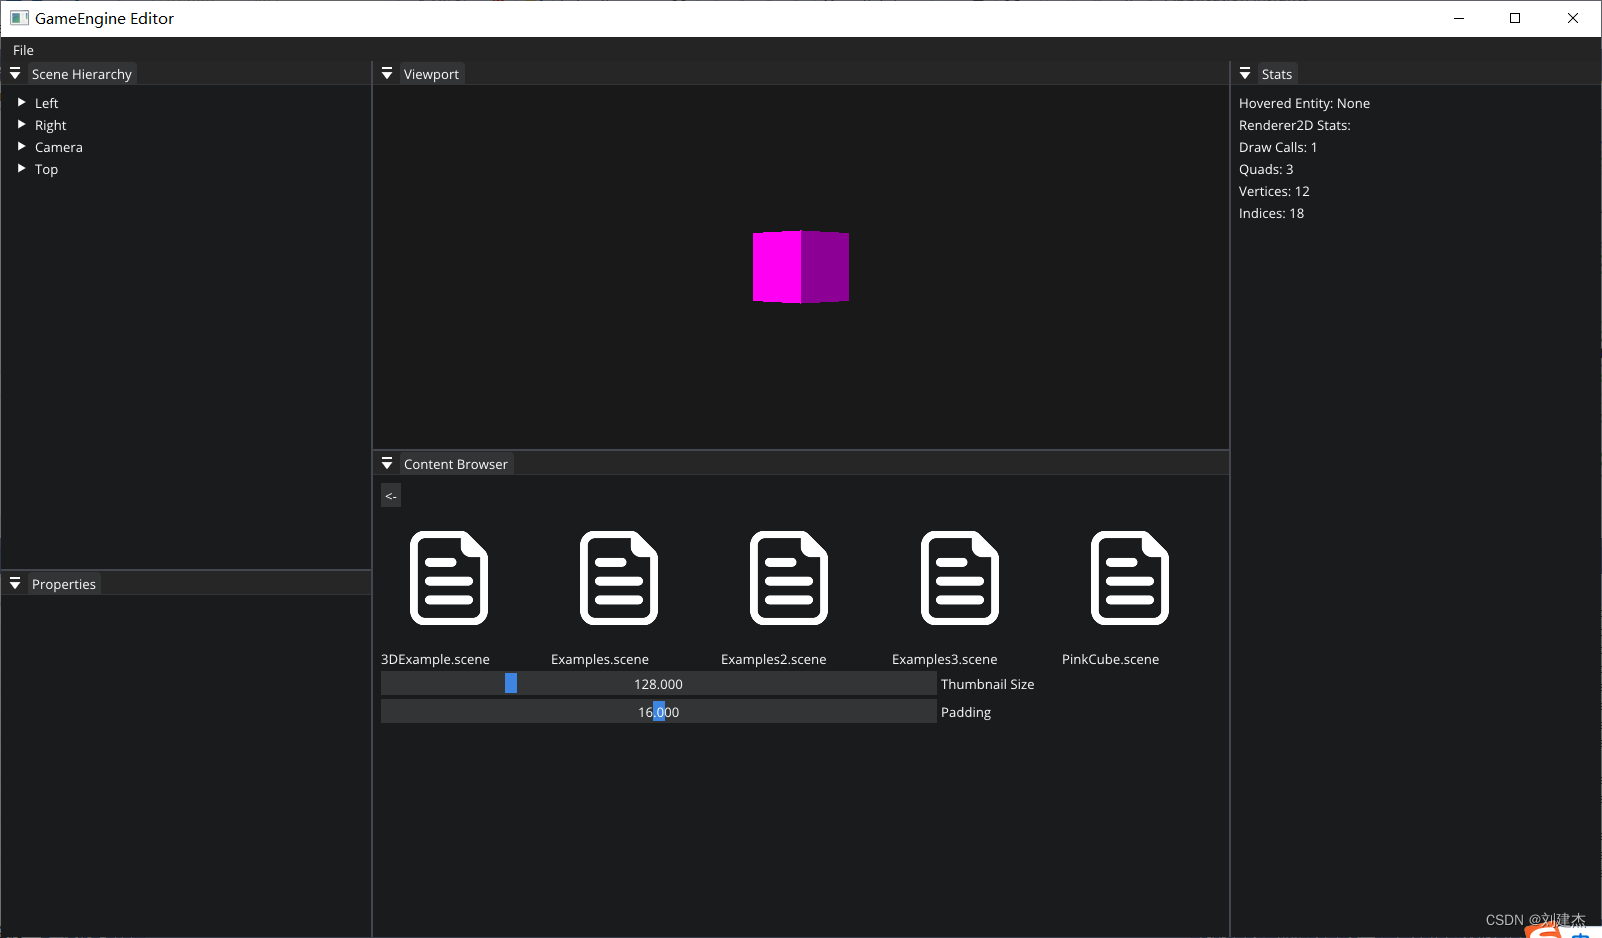
效果
Cherno遇到的问题
-
relativePath.c_str()的类型
relativePath.c_str()返回const的宽字符
const wchar_t* itemPath = relativePath.c_str(); -
wcslen
c字符串的最后一个\0标志为不计入
#include <wchar.h> #include <stdio.h> #include <string.h> int main(void){ wchar_t str[] = L"How"; printf("without null character: %zu\n", wcslen(str)); //3 printf("with null character: %zu\n", sizeof str / sizeof * str);//4 char m_char[] = "123"; printf("%d\n", strlen(m_char)); // 3 printf("%d\n", sizeof(m_char)); // 4 }-
项目错误写法
ImGui::SetDragDropPayload("CONTENT_BROWSER_ITEM", itemPath, wcslen(itemPath) * sizeof(wchar_t));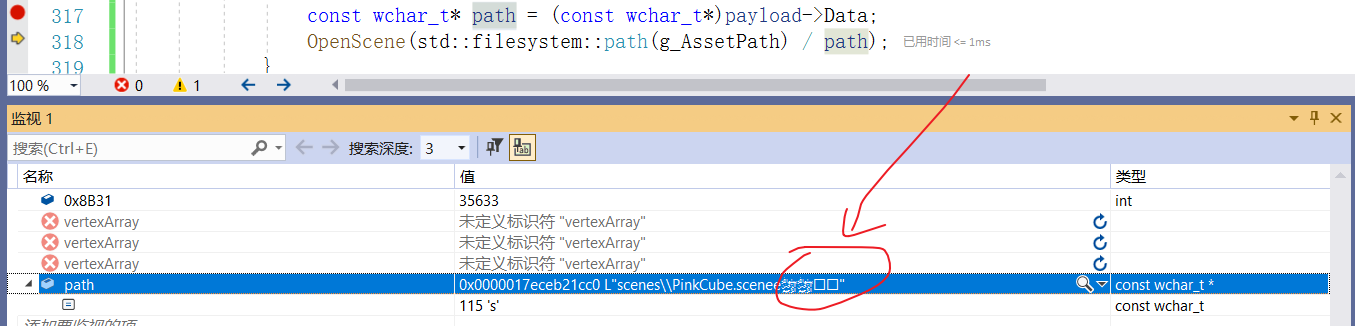
-
所以数据源一方设置大小时要+1
ImGui::SetDragDropPayload("CONTENT_BROWSER_ITEM", itemPath, (wcslen(itemPath) + 1) * sizeof(wchar_t));
-
-
另一边接收目标,可能接收不到内容
因为接收内容可能为空,需要if判断
// 因为接收内容可能为空,需要if判断 if (const ImGuiPayload* payload = ImGui::AcceptDragDropPayload("CONTENT_BROWSER_ITEM")) { const wchar_t* path = (const wchar_t*)payload->Data; OpenScene(std::filesystem::path(g_AssetPath) / path); } -
拖放每个场景,都显示粉红色的cube
因为ImageButton,传入了icon的TextureID,这样同一个Scene文件夹下的所有.scene文件都是使用这个TextureID,外层有for循环遍历,pinkcube.scene在最后,他会在前面的场景最上面,所以每次获取的数据都是pinkcube.scene。
-
解决方法一:
在外层根据文件名作为ID
ImGui::PushID(filenameString.c_str()); //ImGui::PushID(path.c_str());// 不知道为什么放入path.c_str()却没用! ...... ImGui::ImageButton((ImTextureID)icon->GetRendererID(), { thumbnailSize, thumbnailSize }, { 0,1 }, { 1,0 });// 1:ID,2:大小,3、4:左上角和右下角的uv坐标 ...... ImGui::PopID(); -
解决方法二
同上,但是用ImageButtonEx,第一个参数是ID
bool ImGui::ImageButton(ImTextureID user_texture_id, const ImVec2& size, const ImVec2& uv0, const ImVec2& uv1, int frame_padding, const ImVec4& bg_col, const ImVec4& tint_col)

bool ImGui::ImageButtonEx(ImGuiID id, ImTextureID texture_id, const ImVec2& size, const ImVec2& uv0, const ImVec2& uv1, const ImVec2& padding, const ImVec4& bg_col, const ImVec4& tint_col)
-
-
extern
声明和定义都得加上extern
extern const std::filesystem::path s_AssetPath;
extern const std::filesystem::path s_AssetPath = "assets";
为什么ImGui::PushID(path.c_str());无用
path.c_str()得到的是wstring类型。
-
介绍wchar_t类型
wchar_t是C/cpp的字符类型,一种扩展的存储方式,主要用在国际化程序的实现中,但它不等同与Unicode编码;Unicode编码的字符一般是以wchar_t字符存储。
char字符类型只有8个位,只能包含256个字符,而像很多外文字符远超过256个字符,例如:中文、日文、韩文等,这些字符需要占用两个字节空间,所以cpp提出了双字节字符类型wchar_t(或叫宽字符类型)。
wchar_t宽字符类型定义:
wchar_t name[] = L"content";
注:wchar_t定义的是双字节类型,需要L告诉编译器content占用2字节的空间,否则编译产生类型报错。
wchar_t宽字符类型输出:
cout输出:字节十六进制数据
wcout输出: 设置本地语言后,正常输出,未设置则发生流错误,需调用wcout.clear()清除错误后方能正常输出
wprintf()输出:以宽字符形式输出
wcout、wprintf输出内容必须使用L 修饰。
wchar_t环境设置:
头文件:
setlocale(LC_ALL, “chs”); // 设置为中文格式
-
wchar_t例子
#include <iostream>
#include <locale>  // 本地语言设置头文件
using namespace std;
int main(void)
{


    wchar_t chinese[] = L"中国"; // 字符前添加L表示告诉编译器为字符分配2字节空间

    cout << "chinese[] = L\"中国\"" << endl;

    cout << "设置环境前,cout输出:" << chinese << endl;
    cout << "设置环境前,wcout输出:";  // 没有输出,若Chinese内容为字符串,可以正常输出
    wcout << chinese;
    /*
        未设置本地语言之前,wcout直接输出导致流错误,
        需要先把流错误清除,后边wcout才能正常输出
    */
    wcout.clear();
    wcout << endl;

    // wcout << L"你好" <<endl;  // 没有设置环境前,会发生流错误
    setlocale(LC_ALL, "chs");  // 设置为中文环境

    wcout << L"你好" << endl;

    cout << "设置环境后,cout输出: ";
    cout << chinese << endl;
    cout << "设置环境后,wcout输出:";
    wcout << chinese;
    cout << endl;
    cout << "设置环境后,wprintf()输出:";
    wprintf(chinese);
    cout << endl;

    cout << sizeof(chinese) << endl;
    return 0;
}
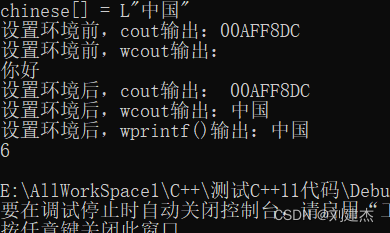
最重要的是cout输出wchar是:字节十六进制数据
-
本项目使用的例子
#include <filesystem> // 要设置项目cpp17
#include <iostream>
#include <wchar.h>
#include <locale>  // 本地语言设置头文件
using namespace std;

// 参数是无符号指针
void GetAdress(const void* str_id) {


	cout << str_id << endl;// 输出16进制
}
const filesystem::path m_CurrentDirectory = "assets";
void func1() {


	for (auto& directoryEntry : filesystem::directory_iterator(m_CurrentDirectory)) {


		const auto& path = directoryEntry.path();
		cout << path.c_str() << endl;  // 由于wchar_t类型,输出16进制
		wcout << path.c_str() << endl;  // 输出字符串
		GetAdress(path.c_str());// wchar_t类型转void*
	}
}

// 参数是字符指针
void GetAdress(const char* str_id) {


	cout << str_id << endl;
}
void func2() {


	for (auto& directoryEntry : filesystem::directory_iterator(m_CurrentDirectory)) {


		const auto& path = directoryEntry.path();
		// 转换为string
		string pathstr = path.filename().string();
		cout << pathstr.c_str() << endl;
		GetAdress(pathstr.c_str());
	}
}
int main(void) {


	cout << "1.path.c_str()测试开始:" << endl;
	cout << "------" << endl;
	func1();
	cout << "------" << endl;

	wstring path = L"234";
	const wchar_t* whp = path.c_str();
	cout << "将wstring 234转为wchar_t* chp = " << whp << endl;// 输出16进制

	const void* chp = path.c_str();
	cout << "将wstring 234转为void* chp = " << chp << endl;	// 输出16进制

	cout << "------------------" << endl;
	cout << "------------------" << endl;

	cout << "2.filename.c_str()测试开始:" << endl;
	cout << "------" << endl;
	func2();
	cout << "------" << endl;

	string str = "234";
	const char* chs = str.c_str();
	cout << "将string 234转为char* chp = " << chs << endl; // 原样输出
}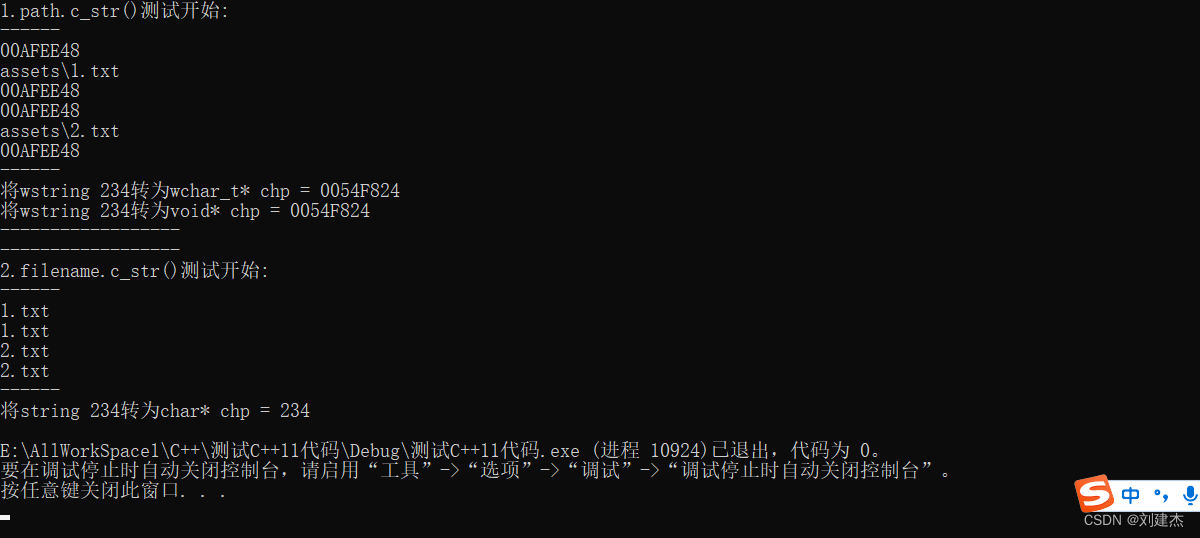
-
ImGui::PushID(filenameString.c_str());可以
void GetAdress(const char* str_id) {,string转为char*,照样输出原字符串
-
ImGui::PushID(path.c_str());不可用
void GetAdress(const void* str_id) {,wstring转为void*,却输出16进制
-