文章目录
1. 人脸检测
人脸检测/人脸识别,是基于人的脸部特征信息进行身份识别的一种生物识别技术。用摄像机或摄像头采集含有人脸的图像或视频流,并自动在图像中检测和跟踪人脸,进而对检测到的人脸进行脸部识别的一系列相关技术,通常也叫做人像识别、面部识别。
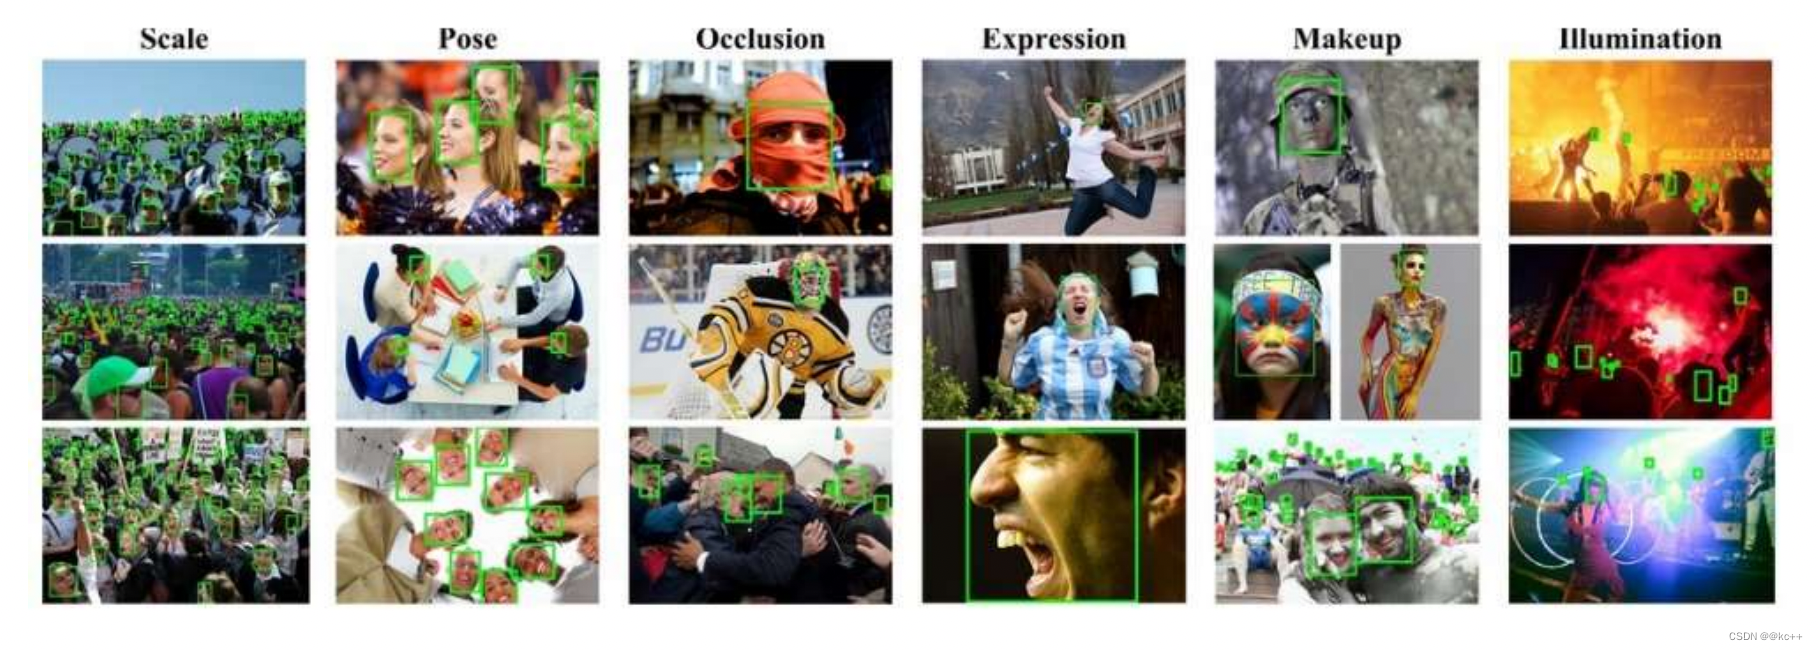
人脸检测—困难
人脸识别主要用于身份识别。
由于视频监控正在快速普及,众多的视频监控应用迫切需要一种远距离、用户非配合状态下的快速身份识别技术,以求远距离快速确认人员身份,实现智能预警。人脸识别技术无疑是最佳的选择,采用快速人脸检测技术可以从监控视频图象中实时查找人脸,并与人脸数据库进行实时比对,从而实现快速身份识别。
人脸识别产品已广泛应用于金融、司法、军队、公安、边检、政府、航天、电力、工厂、教育、医疗及众多企事业单位等领域。随着技术的进一步成熟和社会认同度的提高,人脸识别技术将应用在更多的领域。
- 企业、住宅安全和管理。如人脸识别门禁考勤系统,人脸识别防盗门等。
- 电子护照及身份证。
- 公安、司法和刑侦。如利用人脸识别系统和网络,在全国范围内搜捕逃犯。
- 自助服务。
- 信息安全。如手机、计算机登录、电子政务和电子商务。
2. mtcnn
2.1 概述
MTCNN,英文全称是Multi-task convolutional neural network,中文全称是多任务卷积神经网络,该神经网络将人脸区域检测与人脸关键点检测放在了一起。
从工程实践上,MTCNN是一种检测速度和准确率都很不错的算法,算法的推断流程有一定的启发性。虽然用faster - rcnn 和 yolo 同样可以实现人脸检测,但是 mtcnn 在人脸检测领域是效果最好的。
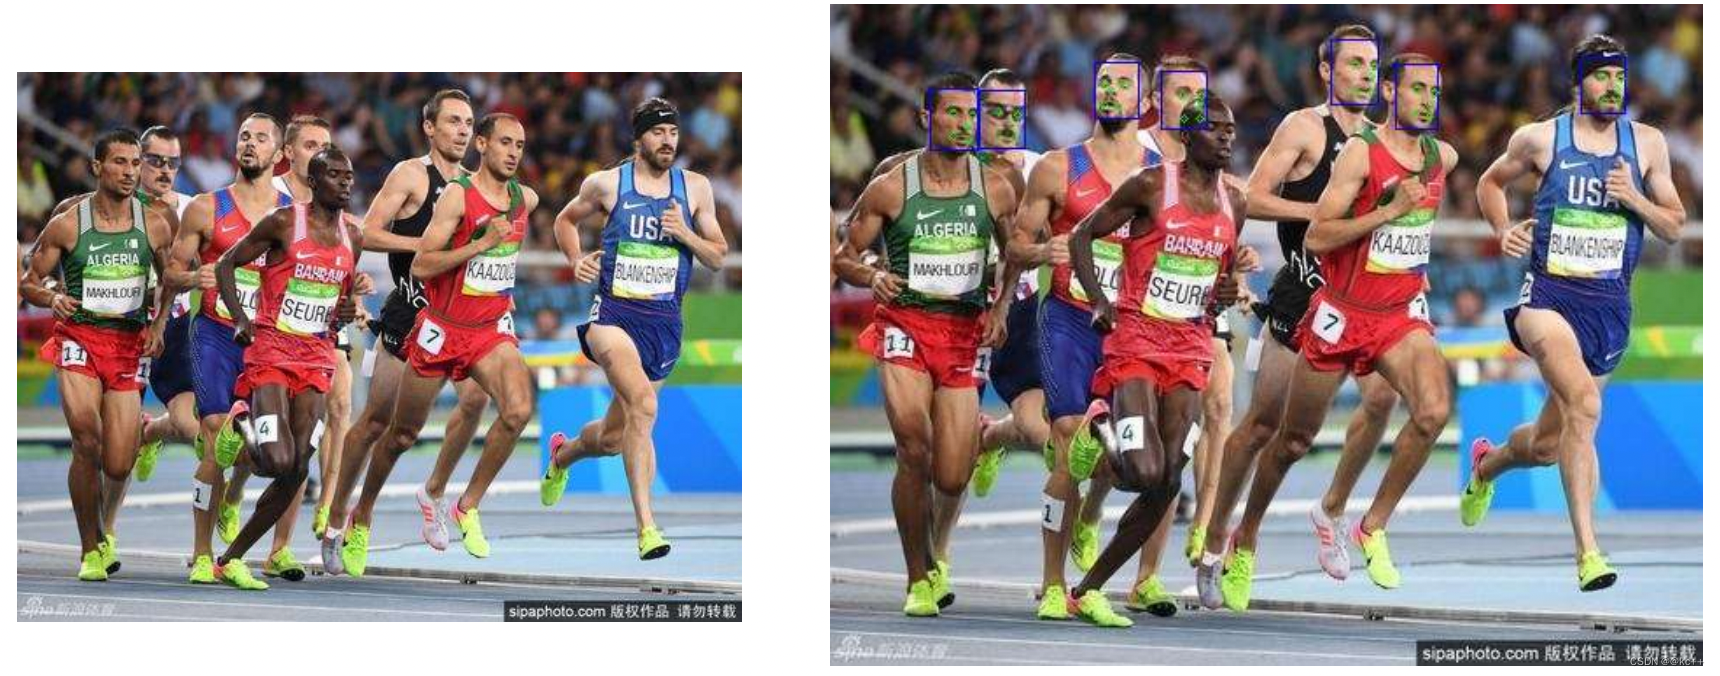
这里可以看到左边的图片经过 mtcnn 后不仅人脸被框出来了,而且每个框里面有5个点,分别是两个眼睛,一个鼻子,两个嘴角。
但是 mtcnn 也不是完全准确的,我们可以看见黑人并没有被检测出来,这里有2个原因,第一,有可能是开源数据集里对黑人的数据集比较少。第二,黑人的特征并不明显,因为肤色的影响,可能黑人处于闭眼状态,导致眼珠与肤色并没有明显的差异。所以没能识别出来。
2.2 网络结构
mtcnn 之所以被称为多任务卷积神经网络,是因为 mtcnn 总体可分为P-Net、R-Net、和O-Net三层网络结构。
首先会有一张数据图像,然后进行resaize , 这个resize 不是简单的将图片进行resize 成网络需要的尺寸大小。而是生成图像金字塔。然后图像金字塔里的所有图都会进入 P - Net , 然后进行NMS消除冗余框和Bouding box regression进行边框回归。然后把P - Net后的结果放到第二个阶段 R - Net 中。步骤同上,最后送入 O - Net网络。生成5个关键点。所以整个过程其实就是一个校准的过程。
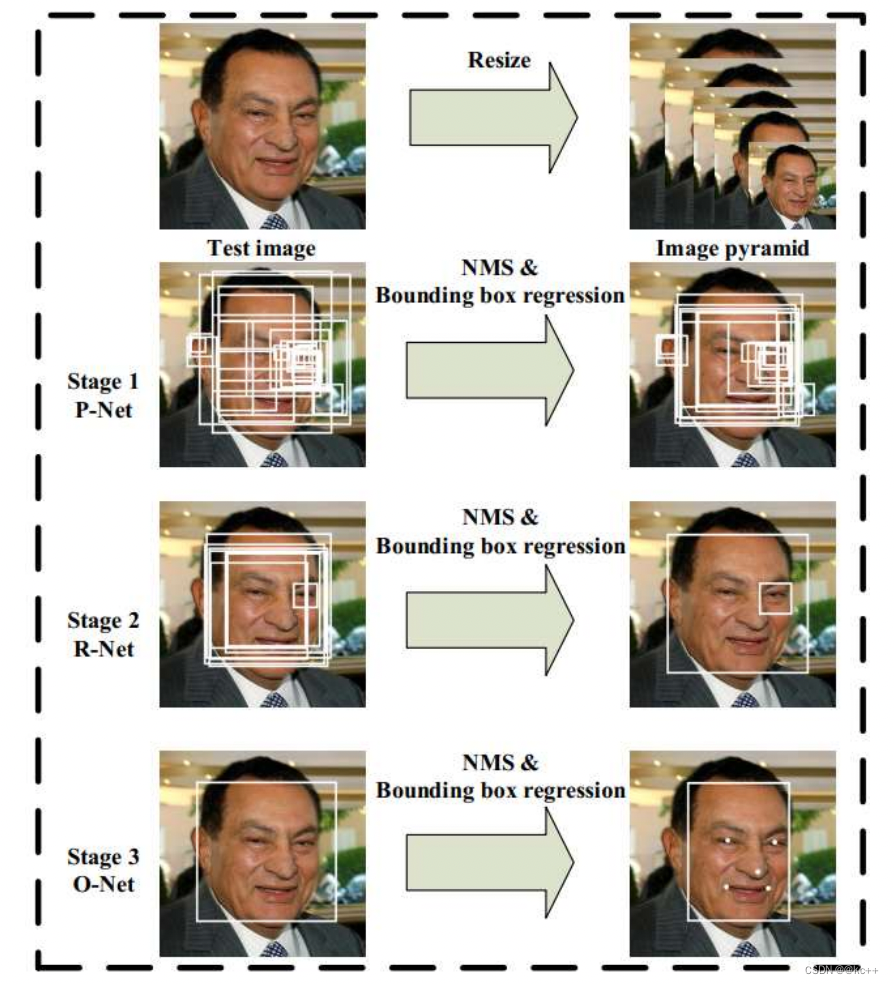
整体的过程如下
- 由原始图片和PNet生成预测的bounding boxes。
- 输入原始图片和PNet生成的bounding box,通过RNet,生成校正后的bounding box。
- 输入原始图片和RNet生成的bounding box,通过ONet,生成校正后的bounding box和人脸面部轮廓关键点。
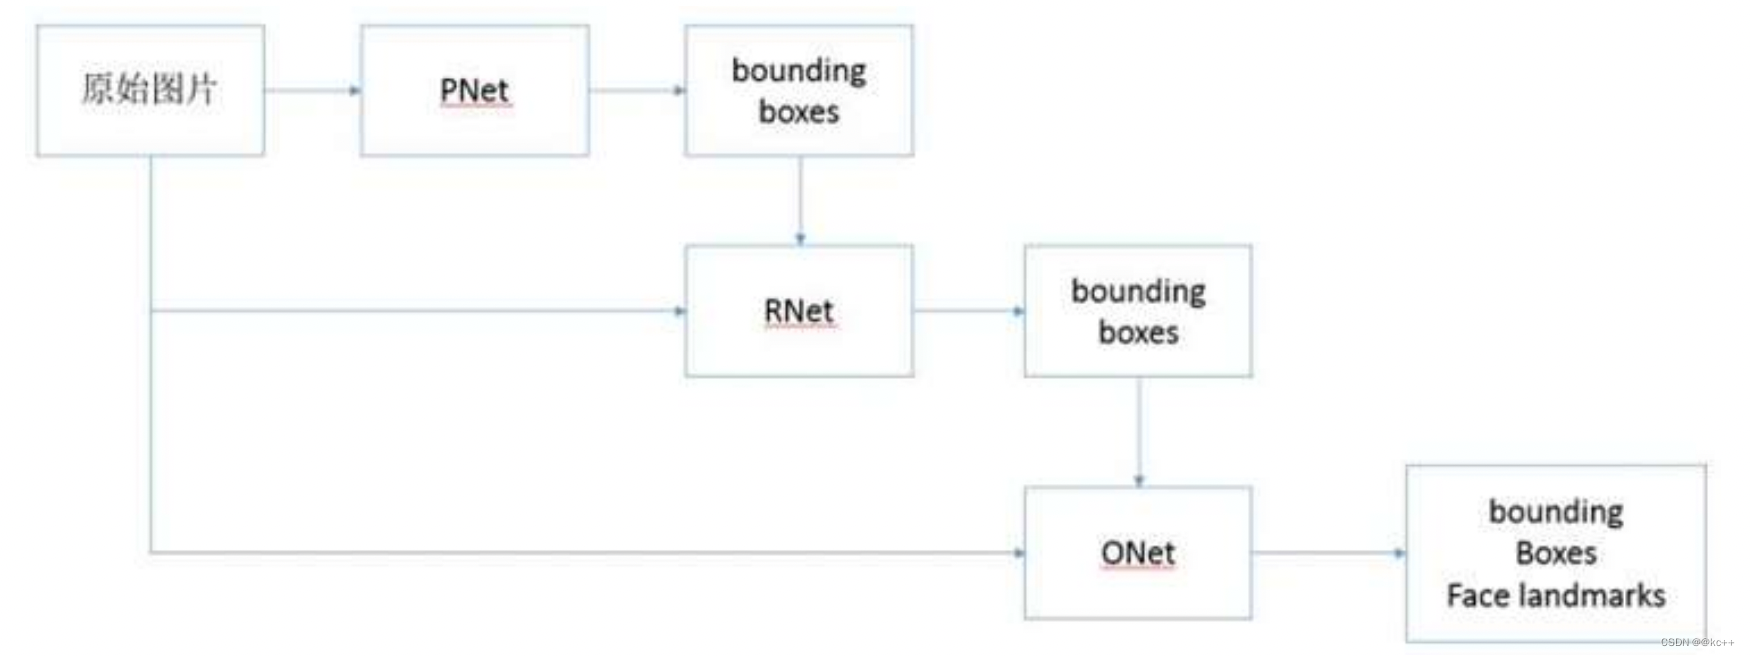
网络结构图如下
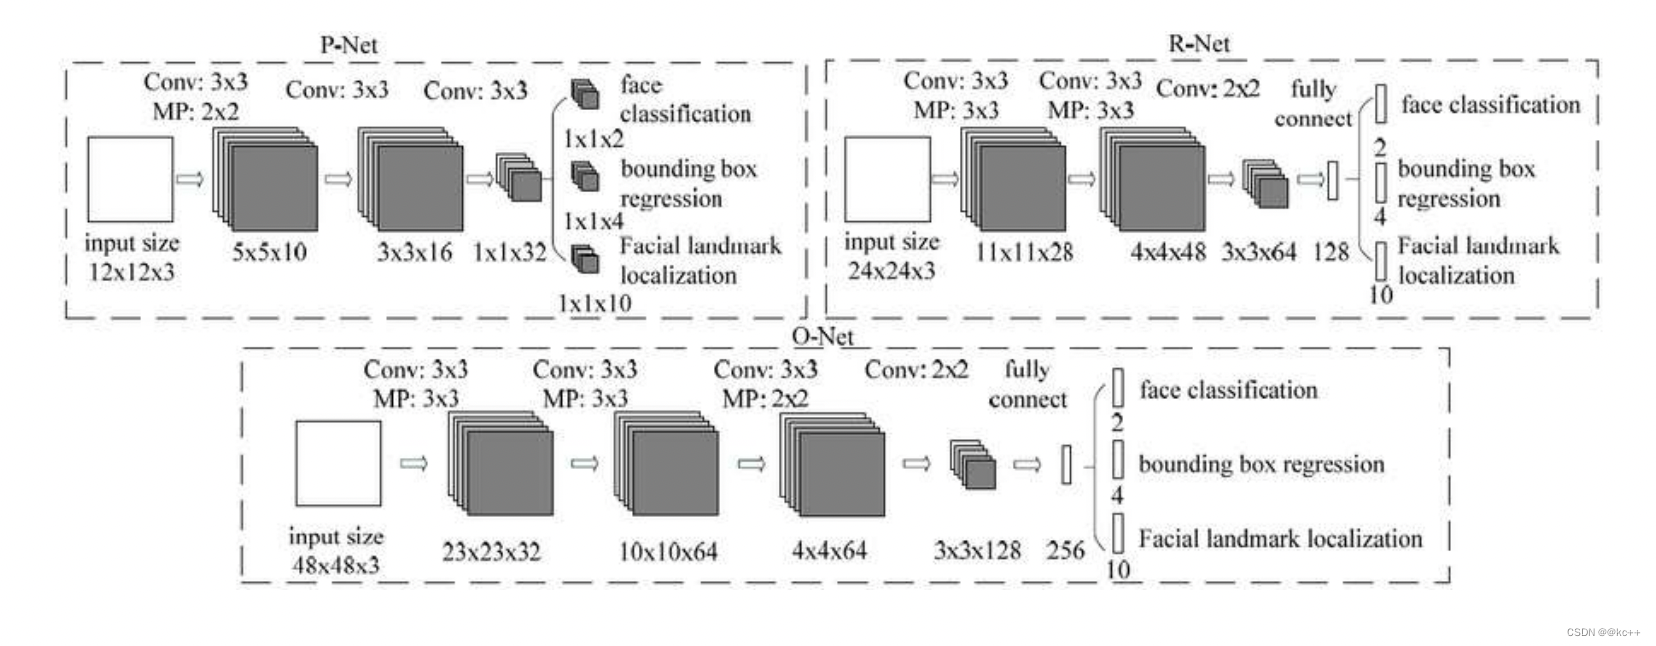
MTCNN主要包括三层网络,
- 第一层P-Net将经过卷积,池化操作后输出分类(对应像素点是否存在人脸)和回归(回归box)结果。
- 第二层网络将第一层输出的结果使用非极大抑制(NMS)来去除高度重合的候选框,并将这些候选框放入R-Net中进行精细的操作,拒绝大量错误框,再对回归框做校正,并使用NMS去除重合框,输出分支同样两个分类和回归。
- 最后将R-Net输出认为是人脸的候选框输入到O-Net中再一次进行精细操作,拒绝掉错误的框,此时输出分支包含三个分类:
a. 是否有人脸:2个输出;
b. 回归:回归得到的框的起始点(或中心点)的xy坐标和框的长宽,4个输出;
c. 人脸特征点定位:5个人脸特征点的xy坐标,10个输出。
注:三段网络都有NMS,但是所设阈值不同。
2.2.1 构建图像金字塔
首先对图片进行Resize 操作,将原始图像缩放成不同的尺度,生成图像金字塔。然后将不同尺度的图像送入到这三个子网络中进行训练,目的是为了可以检测到不同大小的人脸,从而实现多尺度目标检测。
构建方式是通过不同的缩放系数factor 分别对图片的h 和 w 进行缩放,每次缩小为原来的factor 大小。
注意:缩小后的长宽最小不可以小于12
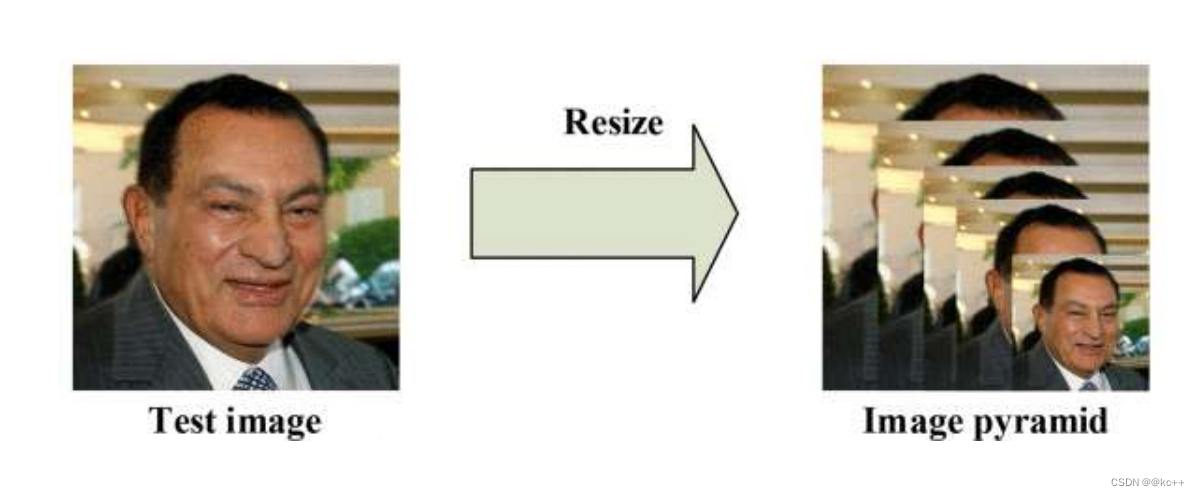
那么,为什么需要对图片做“金字塔”变换?
图片中的人脸的尺度有大有小,让识别算法不被目标尺度影响一直是个挑战。
MTCNN使用了图像金字塔来解决目标多尺度问题,即把原图按照一定的比例(如0.709),多次等比缩放得到多尺度的图片,很像个金字塔。
P-NET的模型是用单尺度(12*12)的图片训练出来的。推理的时候,缩小后的长宽最小不可以小于12。
对多个尺度的输入图像做训练,训练是非常耗时的。因此通常只在推理阶段使用图像金字塔,提高算法的精度。
设置合适的最小人脸尺寸和缩放因子为什么可以优化计算效率?
- factor是指每次对边缩放的倍数。
- 第一阶段会多次缩放原图得到图片金字塔,目的是为了让缩放后图片中的人脸与P-NET训练时候的图片尺度(12px * 12px)接近。
- 引申优化项:先把图像缩放到一定大小,再通过factor对这个大小进行缩放。可以减少计算量。
这里有一个统计
我们会调整一个minsize 对第一阶段循环次数减少程度
图例:如果待测图片1200px1200px,想要让缩放后的尺寸接近模型训练图片的尺度(12px12px)。
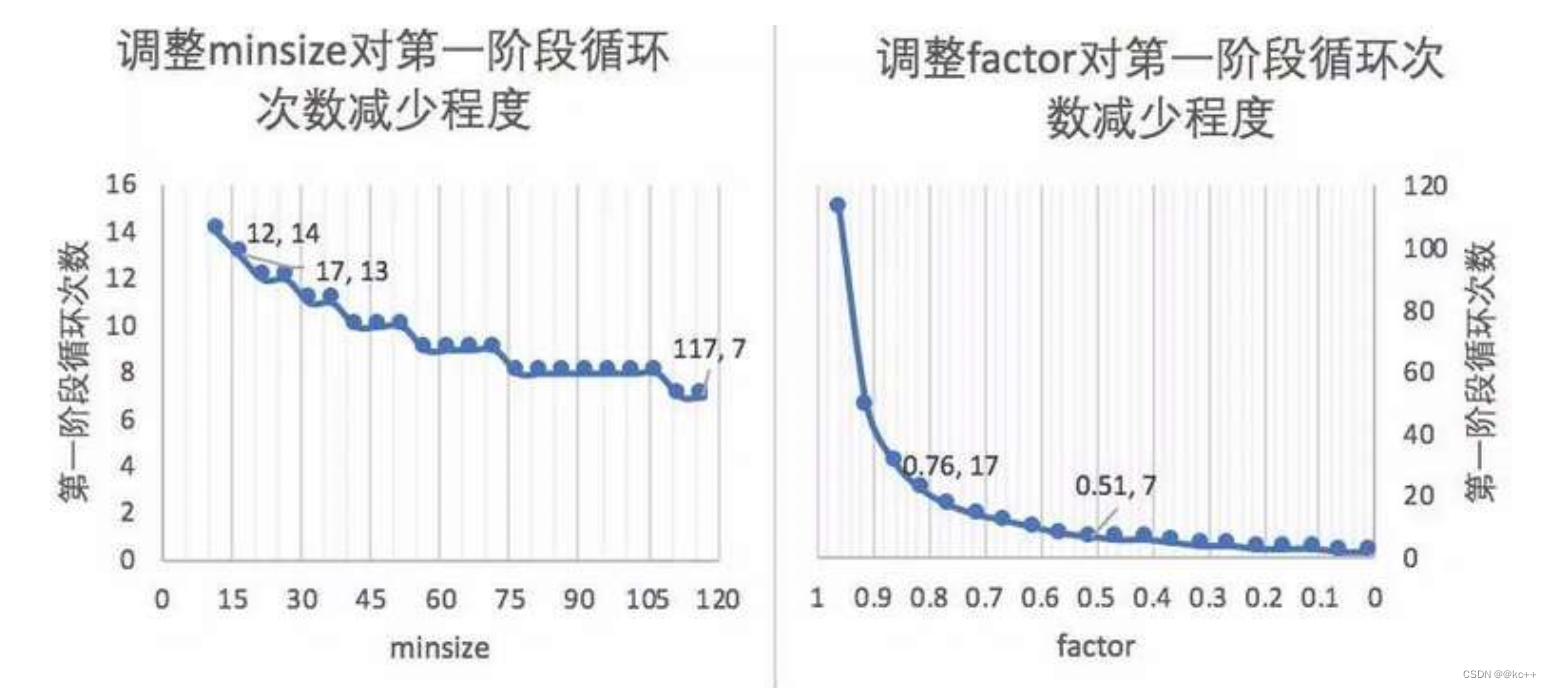
- minsize是指你认为图片中需要识别的人脸的最小尺寸(单位:px)。
- 注:代码中使用的是“引申优化项“的策略。
缩放因子为什么官方选择0.709?
- 图片金字塔缩放时,如果默认把宽,高都变为原来的1/2,缩放后面积变为原来的1/4;
- 如果认为1/4的缩放幅度太大,你会怎么办?—把面积缩放为原来的1/2。
- 这是很直观的想法,所以这里的缩放因子0.709 ≈ sqrt(2)/2,这样宽高变为原来的sqrt(2)/2,面积就变为原来的1/2。
- 从实际意义上看,factor应该设置为小于1。
图像金字塔的缺点:慢。
- 第一,生成图片金字塔慢;
- 第二,每种尺度的图片都需要输入进模型,相当于执行了多次的模型推理流程。
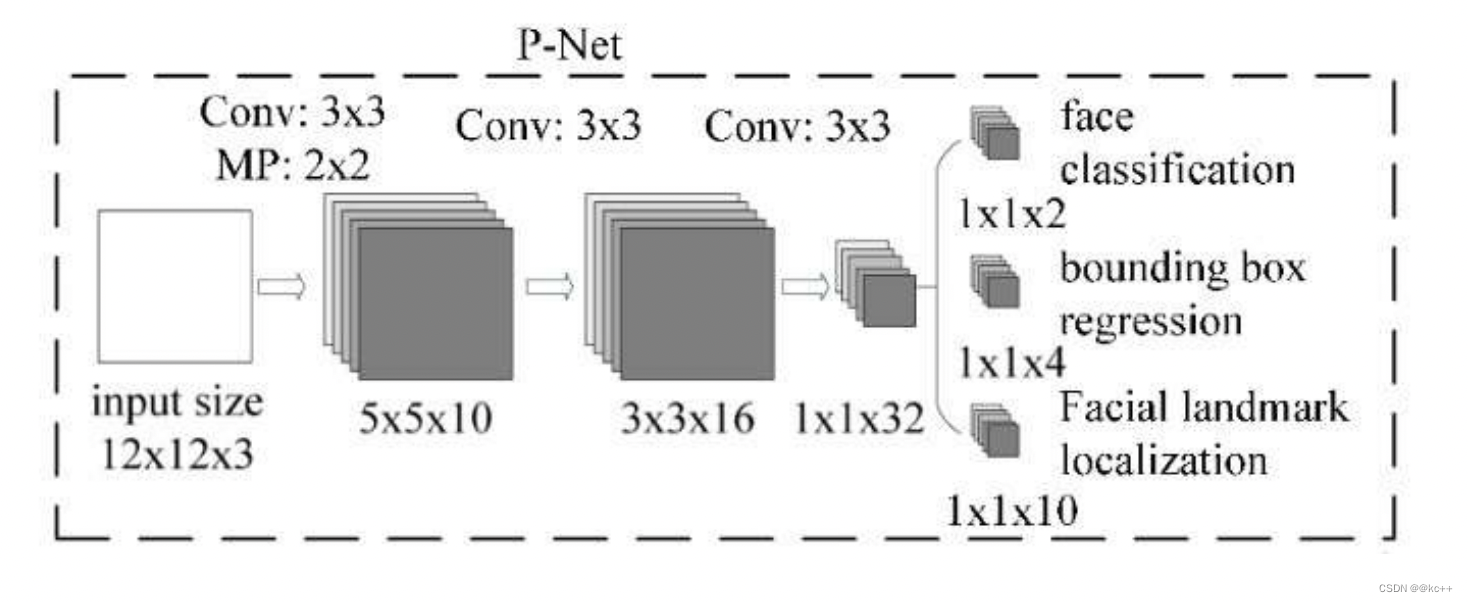
2.2.2 P - Net
其基本的构造是一个全卷积网络。对上一步构建完成的图像金字塔,通过一个FCN(全卷积网络)进行初步特征提取与标定边框。
MTCNN算法可以接受任意尺度的图片,为什么?
- 因为第一阶段的P-NET是一个全卷积网络(Fully Convolutional Networks)。
- 卷积、池化、非线性激活都是一些可以接受任意尺度矩阵的运算,但全连接运算是需要规定输入。如果网络中有全连接层,则输入的图片尺度(一般)需固定;如果没有全连接层,图片尺度可以是任意的。
- 在推理的时候,测试图像中人脸区域的尺度未知。但是因为P网结构是固定的,当输入图为1212时,输出的恰好是11的5通道特征图,所以可以把p网整体看做一个1212的卷积核在图片上从左上方开始,取步长stride=2,依次做滑窗操作。——>所以,当刚开始图很大的时候,1212的框可能只是框住了一张大脸上的某个局部如眼睛、耳朵、鼻子。当该图不断缩至很小的时候(图像金字塔),12*12的框能对其框住的也越来越全,直至完全框住了整张脸。
- 3次卷积和1次池化操作后,原来12123的矩阵变为1132
- 利用这个1132的向量,再通过一个112的卷积,得到了”是否是人脸”的分类结果
- 我们令输入图片矩阵为A,卷积核在原图矩阵A上滑动,把每个12123区域的矩阵都计算成该区域有无人脸的得分,最后可以得到一个二维矩阵为S,S每个元素的值是[0, 1]的数,代表有人脸的概率。即A通过一系列矩阵运算,变化到S。
P-Net的输出:
- 网络的第一部分输出是用来判断该图像是否存在人脸,输出向量大小1x1x2,也就是两个值。
- 网络的第二部分给出框的精确位置,即边框回归:P-Net输入的12×12的图像块可能并不是完美的人脸框的位置,如有的时候人脸并不正好为方形,有可能12×12的图像偏左或偏右,因此需要输出当前框位置相对完美的人脸框位置的偏移。这个偏移大小为1×1×4,即表示框左上角的横坐标的相对偏移,框左上角的纵坐标的相对偏移、框的宽度的误差、框的高度的误差。
- 网络的第三部分给出人脸的5个关键点的位置。5个关键点分别对应着左眼的位置、右眼的位置、鼻子的位置、左嘴巴的位置、右嘴巴的位置。每个关键点需要两维来表示,因此输出是向量大小为1×1×10。
举例:
一张7070的图,经过P网络全卷积后,输出为(70-2)/2 -2 -2 =30,即一个5通道的3030的特征图。这就意味着该图经过p的一次滑窗操作,得到了30*30=900个建议框,而每个建议框对应1个置信度cond与4个偏移量offset。再经nms把cond大于设定的阈值0.6对应的建议框保留下来,将其对应的offset经边框回归操作,得到在原图中的坐标信息,即得到符合p网的这些建议框了。之后再传给R网。
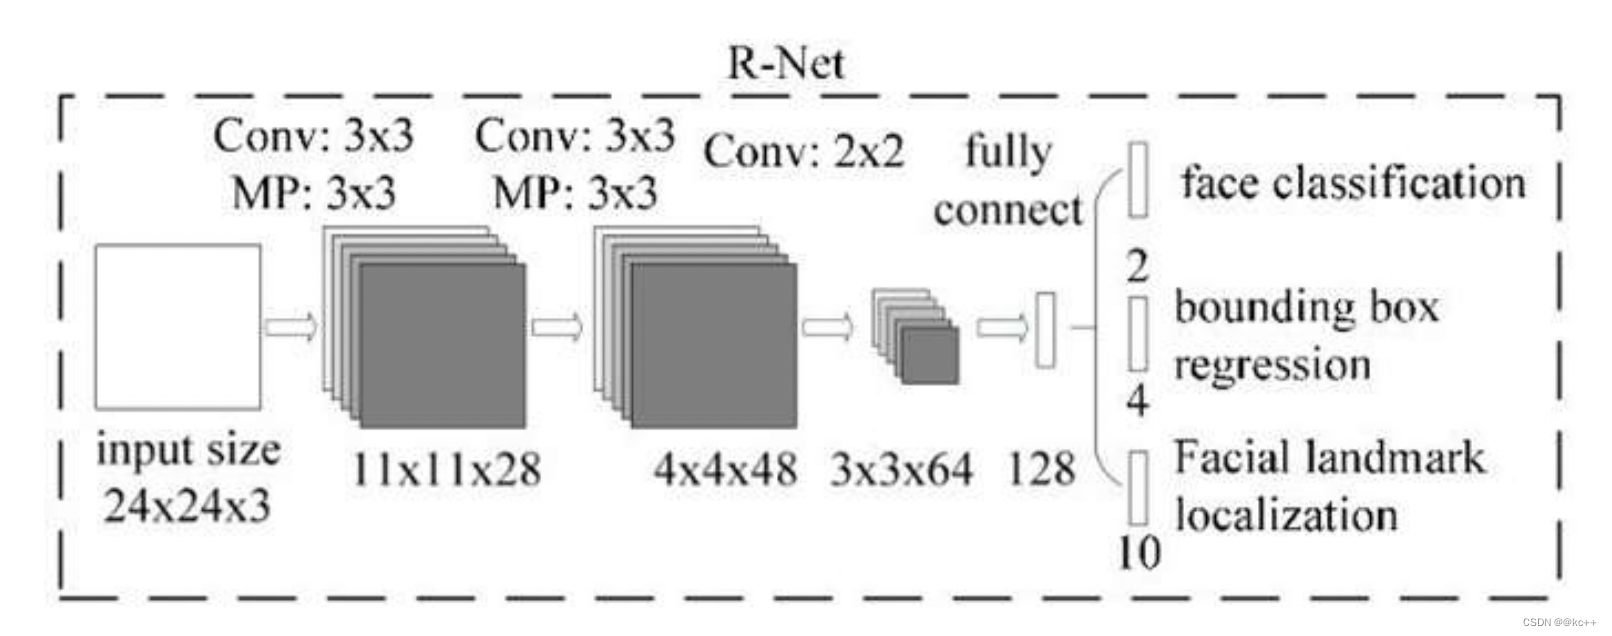
2.2.3 R-Net(Refine Network):
从网络图可以看到,该网络结构只是和P-Net网络结构多了一个全连接层。
图片在输入R-Net之前,都需要缩放到24x24x3。网络的输出与P-Net是相同的,R-Net的目的是为了去除大量的非人脸框。
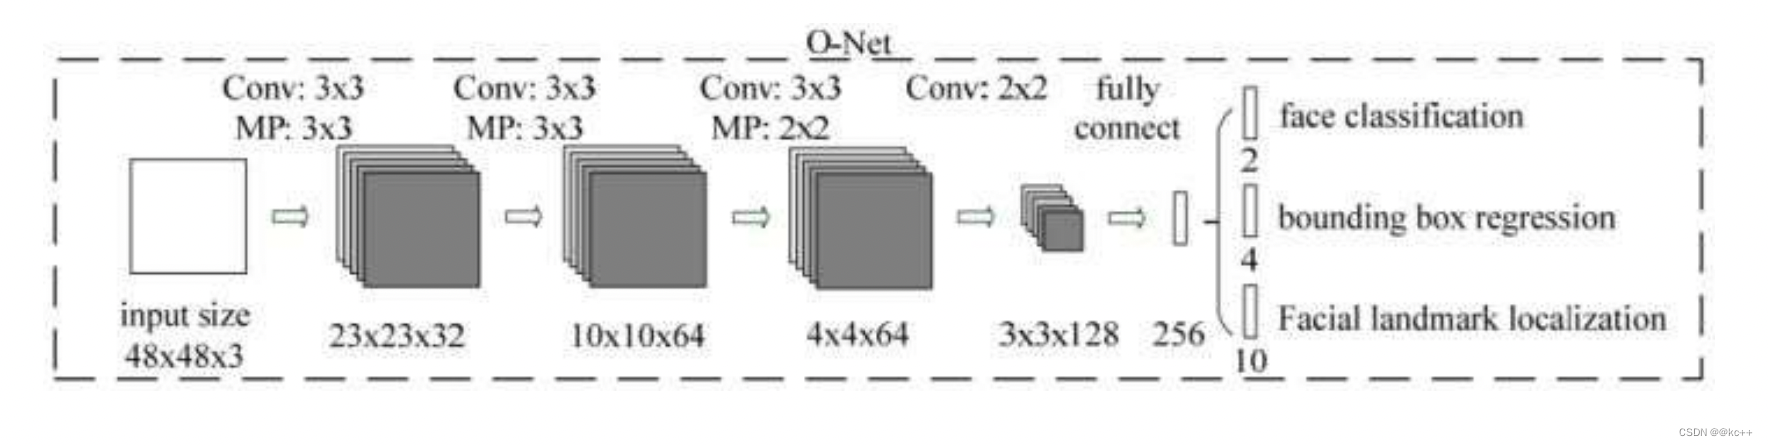
2.2.4 O-Net(Output Network):
该层比R-Net层又多了一层卷积层,所以处理的结果会更加精细。输入的图像大小48x48x3,输出包括N个边界框的坐标信息,score以及关键点位置。
3. 总结
从P-Net到R-Net,再到最后的O-Net,网络输入的图像越来越大,卷积层的通道数越来越多,网络的深度(层数)也越来越深,因此识别人脸的准确率应该也是越来越高的。
MTCNN人脸检测的训练数据可以从http://mmlab.ie.cuhk.edu.hk/projects/WIDERFace/地址下载。该数据集有32,203张图片,共有93,703张脸被标记。
4. 代码示例
mtcnn 使用方法
运行detect.py,所用模型是model_data中的onet.h5、pnet.h5、rnet.h5。
4.1 mtcnn.py
from keras.layers import Conv2D, Input,MaxPool2D, Reshape,Activation,Flatten, Dense, Permute
from keras.layers.advanced_activations import PReLU
from keras.models import Model, Sequential
import tensorflow as tf
import numpy as np
import utils
import cv2
#-----------------------------#
#   粗略获取人脸框
#   输出bbox位置和是否有人脸
#-----------------------------#
def create_Pnet(weight_path):
    input = Input(shape=[None, None, 3])

    x = Conv2D(10, (3, 3), strides=1, padding='valid', name='conv1')(input)
    x = PReLU(shared_axes=[1,2],name='PReLU1')(x)
    x = MaxPool2D(pool_size=2)(x)

    x = Conv2D(16, (3, 3), strides=1, padding='valid', name='conv2')(x)
    x = PReLU(shared_axes=[1,2],name='PReLU2')(x)

    x = Conv2D(32, (3, 3), strides=1, padding='valid', name='conv3')(x)
    x = PReLU(shared_axes=[1,2],name='PReLU3')(x)

    classifier = Conv2D(2, (1, 1), activation='softmax', name='conv4-1')(x)
    # 无激活函数,线性。
    bbox_regress = Conv2D(4, (1, 1), name='conv4-2')(x)

    model = Model([input], [classifier, bbox_regress])
    model.load_weights(weight_path, by_name=True)
    return model

#-----------------------------#
#   mtcnn的第二段
#   精修框
#-----------------------------#
def create_Rnet(weight_path):
    input = Input(shape=[24, 24, 3])
    # 24,24,3 -> 11,11,28
    x = Conv2D(28, (3, 3), strides=1, padding='valid', name='conv1')(input)
    x = PReLU(shared_axes=[1, 2], name='prelu1')(x)
    x = MaxPool2D(pool_size=3,strides=2, padding='same')(x)

    # 11,11,28 -> 4,4,48
    x = Conv2D(48, (3, 3), strides=1, padding='valid', name='conv2')(x)
    x = PReLU(shared_axes=[1, 2], name='prelu2')(x)
    x = MaxPool2D(pool_size=3, strides=2)(x)

    # 4,4,48 -> 3,3,64
    x = Conv2D(64, (2, 2), strides=1, padding='valid', name='conv3')(x)
    x = PReLU(shared_axes=[1, 2], name='prelu3')(x)
    # 3,3,64 -> 64,3,3
    x = Permute((3, 2, 1))(x)
    x = Flatten()(x)
    # 576 -> 128
    x = Dense(128, name='conv4')(x)
    x = PReLU( name='prelu4')(x)
    # 128 -> 2 128 -> 4
    classifier = Dense(2, activation='softmax', name='conv5-1')(x)
    bbox_regress = Dense(4, name='conv5-2')(x)
    model = Model([input], [classifier, bbox_regress])
    model.load_weights(weight_path, by_name=True)
    return model

#-----------------------------#
#   mtcnn的第三段
#   精修框并获得五个点
#-----------------------------#
def create_Onet(weight_path):
    input = Input(shape = [48,48,3])
    # 48,48,3 -> 23,23,32
    x = Conv2D(32, (3, 3), strides=1, padding='valid', name='conv1')(input)
    x = PReLU(shared_axes=[1,2],name='prelu1')(x)
    x = MaxPool2D(pool_size=3, strides=2, padding='same')(x)
    # 23,23,32 -> 10,10,64
    x = Conv2D(64, (3, 3), strides=1, padding='valid', name='conv2')(x)
    x = PReLU(shared_axes=[1,2],name='prelu2')(x)
    x = MaxPool2D(pool_size=3, strides=2)(x)
    # 8,8,64 -> 4,4,64
    x = Conv2D(64, (3, 3), strides=1, padding='valid', name='conv3')(x)
    x = PReLU(shared_axes=[1,2],name='prelu3')(x)
    x = MaxPool2D(pool_size=2)(x)
    # 4,4,64 -> 3,3,128
    x = Conv2D(128, (2, 2), strides=1, padding='valid', name='conv4')(x)
    x = PReLU(shared_axes=[1,2],name='prelu4')(x)
    # 3,3,128 -> 128,12,12
    x = Permute((3,2,1))(x)

    # 1152 -> 256
    x = Flatten()(x)
    x = Dense(256, name='conv5') (x)
    x = PReLU(name='prelu5')(x)

    # 鉴别
    # 256 -> 2 256 -> 4 256 -> 10
    classifier = Dense(2, activation='softmax',name='conv6-1')(x)
    bbox_regress = Dense(4,name='conv6-2')(x)
    landmark_regress = Dense(10,name='conv6-3')(x)

    model = Model([input], [classifier, bbox_regress, landmark_regress])
    model.load_weights(weight_path, by_name=True)

    return model

class mtcnn():
    def __init__(self):
        self.Pnet = create_Pnet('model_data/pnet.h5')
        self.Rnet = create_Rnet('model_data/rnet.h5')
        self.Onet = create_Onet('model_data/onet.h5')

    def detectFace(self, img, threshold):
        #-----------------------------#
        #   归一化,加快收敛速度
        #   把[0,255]映射到(-1,1)
        #-----------------------------#
        copy_img = (img.copy() - 127.5) / 127.5
        origin_h, origin_w, _ = copy_img.shape
        #-----------------------------#
        #   计算原始输入图像
        #   每一次缩放的比例
        #-----------------------------#
        scales = utils.calculateScales(img)

        out = []
        #-----------------------------#
        #   粗略计算人脸框
        #   pnet部分
        #-----------------------------#
        for scale in scales:
            hs = int(origin_h * scale)
            ws = int(origin_w * scale)
            scale_img = cv2.resize(copy_img, (ws, hs))
            inputs = scale_img.reshape(1, *scale_img.shape)
            # 图像金字塔中的每张图片分别传入Pnet得到output
            output = self.Pnet.predict(inputs)
            # 将所有output加入out
            out.append(output)

        image_num = len(scales)
        rectangles = []
        for i in range(image_num):
            # 有人脸的概率
            cls_prob = out[i][0][0][:,:,1]
            # 其对应的框的位置
            roi = out[i][1][0]

            # 取出每个缩放后图片的长宽
            out_h, out_w = cls_prob.shape
            out_side = max(out_h, out_w)
            print(cls_prob.shape)
            # 解码过程
            rectangle = utils.detect_face_12net(cls_prob, roi, out_side, 1 / scales[i], origin_w, origin_h, threshold[0])
            rectangles.extend(rectangle)

        # 进行非极大抑制
        rectangles = utils.NMS(rectangles, 0.7)

        if len(rectangles) == 0:
            return rectangles

        #-----------------------------#
        #   稍微精确计算人脸框
        #   Rnet部分
        #-----------------------------#
        predict_24_batch = []
        for rectangle in rectangles:
            crop_img = copy_img[int(rectangle[1]):int(rectangle[3]), int(rectangle[0]):int(rectangle[2])]
            scale_img = cv2.resize(crop_img, (24, 24))
            predict_24_batch.append(scale_img)

        predict_24_batch = np.array(predict_24_batch)
        out = self.Rnet.predict(predict_24_batch)

        cls_prob = out[0]
        cls_prob = np.array(cls_prob)
        roi_prob = out[1]
        roi_prob = np.array(roi_prob)
        rectangles = utils.filter_face_24net(cls_prob, roi_prob, rectangles, origin_w, origin_h, threshold[1])

        if len(rectangles) == 0:
            return rectangles

        #-----------------------------#
        #   计算人脸框
        #   onet部分
        #-----------------------------#
        predict_batch = []
        for rectangle in rectangles:
            crop_img = copy_img[int(rectangle[1]):int(rectangle[3]), int(rectangle[0]):int(rectangle[2])]
            scale_img = cv2.resize(crop_img, (48, 48))
            predict_batch.append(scale_img)

        predict_batch = np.array(predict_batch)
        output = self.Onet.predict(predict_batch)
        cls_prob = output[0]
        roi_prob = output[1]
        pts_prob = output[2]

        rectangles = utils.filter_face_48net(cls_prob, roi_prob, pts_prob, rectangles, origin_w, origin_h, threshold[2])

        return rectangles
4.2 detect.py
import cv2
import numpy as np
from mtcnn import mtcnn

img = cv2.imread('img/test1.jpg')

model = mtcnn()
threshold = [0.5,0.6,0.7]  # 三段网络的置信度阈值不同
rectangles = model.detectFace(img, threshold)
draw = img.copy()

for rectangle in rectangles:
    if rectangle is not None:
        W = -int(rectangle[0]) + int(rectangle[2])
        H = -int(rectangle[1]) + int(rectangle[3])
        paddingH = 0.01 * W
        paddingW = 0.02 * H
        crop_img = img[int(rectangle[1]+paddingH):int(rectangle[3]-paddingH), int(rectangle[0]-paddingW):int(rectangle[2]+paddingW)]
        if crop_img is None:
            continue
        if crop_img.shape[0] < 0 or crop_img.shape[1] < 0:
            continue
        cv2.rectangle(draw, (int(rectangle[0]), int(rectangle[1])), (int(rectangle[2]), int(rectangle[3])), (255, 0, 0), 1)

        for i in range(5, 15, 2):
            cv2.circle(draw, (int(rectangle[i + 0]), int(rectangle[i + 1])), 2, (0, 255, 0))

cv2.imwrite("img/out.jpg",draw)

cv2.imshow("test", draw)
c = cv2.waitKey(0)
4.3 utils.py
import sys
from operator import itemgetter
import numpy as np
import cv2
import matplotlib.pyplot as plt
#-----------------------------#
#   计算原始输入图像
#   每一次缩放的比例
#-----------------------------#
def calculateScales(img):
    copy_img = img.copy()
    pr_scale = 1.0
    h,w,_ = copy_img.shape
    # 引申优化项  = resize(h*500/min(h,w), w*500/min(h,w))
    if min(w,h)>500:
        pr_scale = 500.0/min(h,w)
        w = int(w*pr_scale)
        h = int(h*pr_scale)
    elif max(w,h)<500:
        pr_scale = 500.0/max(h,w)
        w = int(w*pr_scale)
        h = int(h*pr_scale)

    scales = []
    factor = 0.709
    factor_count = 0
    minl = min(h,w)
    while minl >= 12:
        scales.append(pr_scale*pow(factor, factor_count))
        minl *= factor
        factor_count += 1
    return scales

#-------------------------------------#
#   对pnet处理后的结果进行处理
#-------------------------------------#
def detect_face_12net(cls_prob,roi,out_side,scale,width,height,threshold):
    cls_prob = np.swapaxes(cls_prob, 0, 1)
    roi = np.swapaxes(roi, 0, 2)

    stride = 0
    # stride略等于2
    if out_side != 1:
        stride = float(2*out_side-1)/(out_side-1)
    (x,y) = np.where(cls_prob>=threshold)

    boundingbox = np.array([x,y]).T
    # 找到对应原图的位置
    bb1 = np.fix((stride * (boundingbox) + 0 ) * scale)
    bb2 = np.fix((stride * (boundingbox) + 11) * scale)
    # plt.scatter(bb1[:,0],bb1[:,1],linewidths=1)
    # plt.scatter(bb2[:,0],bb2[:,1],linewidths=1,c='r')
    # plt.show()
    boundingbox = np.concatenate((bb1,bb2),axis = 1)

    dx1 = roi[0][x,y]
    dx2 = roi[1][x,y]
    dx3 = roi[2][x,y]
    dx4 = roi[3][x,y]
    score = np.array([cls_prob[x,y]]).T
    offset = np.array([dx1,dx2,dx3,dx4]).T

    boundingbox = boundingbox + offset*12.0*scale

    rectangles = np.concatenate((boundingbox,score),axis=1)
    rectangles = rect2square(rectangles)
    pick = []
    for i in range(len(rectangles)):
        x1 = int(max(0     ,rectangles[i][0]))
        y1 = int(max(0     ,rectangles[i][1]))
        x2 = int(min(width ,rectangles[i][2]))
        y2 = int(min(height,rectangles[i][3]))
        sc = rectangles[i][4]
        if x2>x1 and y2>y1:
            pick.append([x1,y1,x2,y2,sc])
    return NMS(pick,0.3)
#-----------------------------#
#   将长方形调整为正方形
#-----------------------------#
def rect2square(rectangles):
    w = rectangles[:,2] - rectangles[:,0]
    h = rectangles[:,3] - rectangles[:,1]
    l = np.maximum(w,h).T
    rectangles[:,0] = rectangles[:,0] + w*0.5 - l*0.5
    rectangles[:,1] = rectangles[:,1] + h*0.5 - l*0.5
    rectangles[:,2:4] = rectangles[:,0:2] + np.repeat([l], 2, axis = 0).T
    return rectangles
#-------------------------------------#
#   非极大抑制
#-------------------------------------#
def NMS(rectangles,threshold):
    if len(rectangles)==0:
        return rectangles
    boxes = np.array(rectangles)
    x1 = boxes[:,0]
    y1 = boxes[:,1]
    x2 = boxes[:,2]
    y2 = boxes[:,3]
    s  = boxes[:,4]
    area = np.multiply(x2-x1+1, y2-y1+1)
    I = np.array(s.argsort())
    pick = []
    while len(I)>0:
        xx1 = np.maximum(x1[I[-1]], x1[I[0:-1]]) #I[-1] have hightest prob score, I[0:-1]->others
        yy1 = np.maximum(y1[I[-1]], y1[I[0:-1]])
        xx2 = np.minimum(x2[I[-1]], x2[I[0:-1]])
        yy2 = np.minimum(y2[I[-1]], y2[I[0:-1]])
        w = np.maximum(0.0, xx2 - xx1 + 1)
        h = np.maximum(0.0, yy2 - yy1 + 1)
        inter = w * h
        o = inter / (area[I[-1]] + area[I[0:-1]] - inter)
        pick.append(I[-1])
        I = I[np.where(o<=threshold)[0]]
    result_rectangle = boxes[pick].tolist()
    return result_rectangle


#-------------------------------------#
#   对Rnet处理后的结果进行处理
#-------------------------------------#
def filter_face_24net(cls_prob,roi,rectangles,width,height,threshold):

    prob = cls_prob[:,1]
    pick = np.where(prob>=threshold)
    rectangles = np.array(rectangles)

    x1  = rectangles[pick,0]
    y1  = rectangles[pick,1]
    x2  = rectangles[pick,2]
    y2  = rectangles[pick,3]

    sc  = np.array([prob[pick]]).T

    dx1 = roi[pick,0]
    dx2 = roi[pick,1]
    dx3 = roi[pick,2]
    dx4 = roi[pick,3]

    w   = x2-x1
    h   = y2-y1

    x1  = np.array([(x1+dx1*w)[0]]).T
    y1  = np.array([(y1+dx2*h)[0]]).T
    x2  = np.array([(x2+dx3*w)[0]]).T
    y2  = np.array([(y2+dx4*h)[0]]).T

    rectangles = np.concatenate((x1,y1,x2,y2,sc),axis=1)
    rectangles = rect2square(rectangles)
    pick = []
    for i in range(len(rectangles)):
        x1 = int(max(0     ,rectangles[i][0]))
        y1 = int(max(0     ,rectangles[i][1]))
        x2 = int(min(width ,rectangles[i][2]))
        y2 = int(min(height,rectangles[i][3]))
        sc = rectangles[i][4]
        if x2>x1 and y2>y1:
            pick.append([x1,y1,x2,y2,sc])
    return NMS(pick,0.3)
#-------------------------------------#
#   对onet处理后的结果进行处理
#-------------------------------------#
def filter_face_48net(cls_prob,roi,pts,rectangles,width,height,threshold):

    prob = cls_prob[:,1]
    pick = np.where(prob>=threshold)
    rectangles = np.array(rectangles)

    x1  = rectangles[pick,0]
    y1  = rectangles[pick,1]
    x2  = rectangles[pick,2]
    y2  = rectangles[pick,3]

    sc  = np.array([prob[pick]]).T

    dx1 = roi[pick,0]
    dx2 = roi[pick,1]
    dx3 = roi[pick,2]
    dx4 = roi[pick,3]

    w   = x2-x1
    h   = y2-y1

    pts0= np.array([(w*pts[pick,0]+x1)[0]]).T
    pts1= np.array([(h*pts[pick,5]+y1)[0]]).T
    pts2= np.array([(w*pts[pick,1]+x1)[0]]).T
    pts3= np.array([(h*pts[pick,6]+y1)[0]]).T
    pts4= np.array([(w*pts[pick,2]+x1)[0]]).T
    pts5= np.array([(h*pts[pick,7]+y1)[0]]).T
    pts6= np.array([(w*pts[pick,3]+x1)[0]]).T
    pts7= np.array([(h*pts[pick,8]+y1)[0]]).T
    pts8= np.array([(w*pts[pick,4]+x1)[0]]).T
    pts9= np.array([(h*pts[pick,9]+y1)[0]]).T

    x1  = np.array([(x1+dx1*w)[0]]).T
    y1  = np.array([(y1+dx2*h)[0]]).T
    x2  = np.array([(x2+dx3*w)[0]]).T
    y2  = np.array([(y2+dx4*h)[0]]).T

    rectangles=np.concatenate((x1,y1,x2,y2,sc,pts0,pts1,pts2,pts3,pts4,pts5,pts6,pts7,pts8,pts9),axis=1)

    pick = []
    for i in range(len(rectangles)):
        x1 = int(max(0     ,rectangles[i][0]))
        y1 = int(max(0     ,rectangles[i][1]))
        x2 = int(min(width ,rectangles[i][2]))
        y2 = int(min(height,rectangles[i][3]))
        if x2>x1 and y2>y1:
            pick.append([x1,y1,x2,y2,rectangles[i][4],
                 rectangles[i][5],rectangles[i][6],rectangles[i][7],rectangles[i][8],rectangles[i][9],rectangles[i][10],rectangles[i][11],rectangles[i][12],rectangles[i][13],rectangles[i][14]])
    return NMS(pick,0.3)