上一篇博客介绍了MTCNN网络的原理,这篇博客介绍一个代码的实现。
对应的MTCNN网络目前也有写好的代码,大家可以在代码链接 上下载代码,然后进行识别。对于下载后的代码主要有以下的说明。
1. 该代码中的包含了已经训练好的模型,模型的数据存储在.npy文件中。
2. 代码工程中主要关注detect_face.py和facedetect_mtcnn.py即可,其中detect_face.py中包含了所有关于MTCNN网络结构的实现方式。
3. detect_face.py中实现了PNet,RNet,ONet构造了所需要的网络结构。creat_mtcnn中通过load存储的.npy到对应的网络模型中恢复网络中的参数。
4. detect_face是对图片的具体识别。最终生成的box是一个n行5列的数据,n表示识别出的人脸个数,第5列表示人脸的可能性。1——4列分别表示人脸框的左上角和右下角坐标。具体如下图:
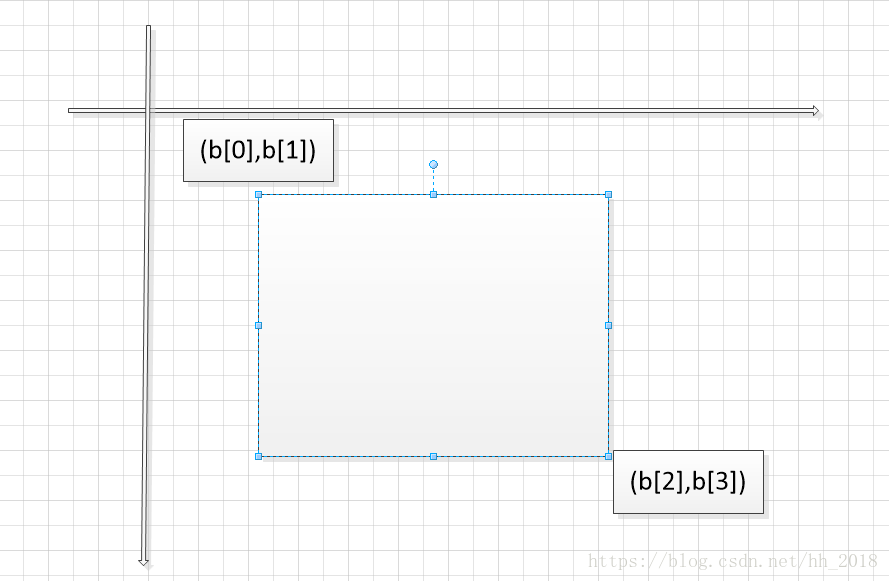
point是一个n行10列的坐标。其中n表示人脸的个数。point的前5列分别表示眼睛鼻子嘴的横坐标,后5列表示其对应的纵坐标。
5. 模型使用,facedetect_mtcnn.py展示了如何使用模型,即在使用时必须先调用detect_facec的creat_mtcnn方法导入网络结构,此时在创建时又需要写出对应的网络结构然后通过.npy进行数据恢复然后再使用。
上述过程主要是对下载下来的代码进行说明,这样大家在使用过程中可以只看与自己相关的部分代码不需要看所有的代码,因为许多代码和自己需要的无关,花大量的时间了解完全是时间上的浪费。接下来主要介绍一下自己对模型的从新存储。
由于在移动端使用时我们往往需要的是.pb文件,并且常见的模型加载方式也是.pb加载,因为这种方法可以让自己在实现模型时不需要手写模型的网络结构。对于上述代码我在他的基础上也进行了改进,让其变成了对应的.pb文件。具体如下:
model_path = None
sess = tf.InteractiveSession()

with tf.variable_scope('pnet'):
    data = tf.placeholder(tf.float32, (None, None, None, 3), 'input')
    pnet = detect_face.PNet({'data': data})
    pnet.load('det1.npy', sess)
with tf.variable_scope('rnet'):
    data = tf.placeholder(tf.float32, (None, 24, 24, 3), 'input')
    rnet = detect_face.RNet({'data': data})
    rnet.load('det2.npy', sess)
with tf.variable_scope('onet'):
    data = tf.placeholder(tf.float32, (None, 48, 48, 3), 'input')
    onet = detect_face.ONet({'data': data})
    onet.load('det3.npy', sess)

constant_graph = graph_util.convert_variables_to_constants(sess, sess.graph_def, ["pnet/input", "rnet/input", "onet/input"
                                                                                  , "pnet/conv4-2/BiasAdd", "pnet/prob1"
                                                                                  , "rnet/conv5-2/conv5-2", "rnet/prob1"
                                                                                  , "onet/conv6-2/conv6-2", "onet/conv6-3/conv6-3"
                                                                                  , "onet/prob1"])
with tf.gfile.FastGFile('face_detect.pb', mode='wb') as f:
    f.write(constant_graph.SerializeToString())
sess.close()
对于上述的.pb文件,我们通过以下代码进行测试:
detection_graph = tf.Graph()
with detection_graph.as_default():
    od_graph_def = tf.GraphDef()
    with tf.gfile.GFile('model/face_detect.pb', 'rb') as fid:
        serialized_graph = fid.read()
        od_graph_def.ParseFromString(serialized_graph)
        tf.import_graph_def(od_graph_def, name='')


def creat_net(sess):
    pnet_fun = lambda img: sess.run(('pnet/conv4-2/BiasAdd:0', 'pnet/prob1:0'), feed_dict={'pnet/input:0': img})
    rnet_fun = lambda img: sess.run(('rnet/conv5-2/conv5-2:0', 'rnet/prob1:0'), feed_dict={'rnet/input:0': img})
    onet_fun = lambda img: sess.run(('onet/conv6-2/conv6-2:0', 'onet/conv6-3/conv6-3:0', 'onet/prob1:0'),
                                            feed_dict={'onet/input:0': img})
    return pnet_fun, rnet_fun, onet_fun


with detection_graph.as_default():
    with tf.Session(graph=detection_graph) as sess:
        pnet, rnet, onet = creat_net(sess)

        bounding_boxes, points = detect_face.detect_face(img, minsize, pnet, rnet, onet, threshold, factor)
他跟源码中facecdetect_mtcnn.py中的实现相比完全不用手写网络结构。并且通过验证在用该方式将代码该为C++版的,调用接口实现网络后就可以用于移动端的识别。