转载:https://zhuanlan.zhihu.com/p/31761796
MTCNN是多任务级联CNN的人脸检测深度学习模型,该模型中综合考虑了人脸边框回归和面部关键点检测。该级联的CNN网络结构包括PNet,RNet,ONet。本文主要介绍人脸检测中常用的数据处理方法,包括Bounding Box绘制,IOU计算,滑动窗口生成,回归框偏移值计算,面部轮廓关键点以及面部轮廓关键点回归。
PNet(Propose NetWork) 用来获取面部窗口和相应的候选框的回归向量。然后采用非极大值抑制方法non-maximum suppression(NMs)对生成的面部候选框进行合并操作。PNet网络结构如下:
RNet(Refine Network)获取PNet检测出来的人脸候选框,进行网络训练,进一步矫正人脸候选框的回归向量,并同样对候选框执行非极大值抑制。RNet网络结构如下:
ONet(Output Newwork)主要生成最终的人脸回归框和面部轮廓关键点。ONet的网络结构如下所示:
本文主要介绍回归框的PNet/RNet/ONet数据预处理部分的相关算法。由于PNet的网络输入是12*12的图片,所以要对训练图片进行预处理。本文采用的数据集为WIDER FACE数据集,可以从如下地址下载:
http://mmlab.ie.cuhk.edu.hk/projects/WIDERFace/
该数据集有32,203图片并且有93,703张脸被标记,如下图所示:
Bounding Box绘制
首先读取标度的人脸图片数据,如下所示:
0--Parade/0_Parade_marchingband_1_849 448.51 329.63 570.09 478.23 可以用PIL把图片中人脸的bounding box绘制出来,示例代码如下:
from PIL import Image, ImageDraw
from pylab import *

#annotation
#0--Parade/0_Parade_marchingband_1_849 448.51 329.63 570.09 478.23
annotation=[448.51,329.63,570.09,478.23]
im = Image.open("0_Parade_marchingband_1_849.jpg")
draw = ImageDraw.Draw(im)

line = 5
x, y = annotation[0], annotation[1]
width= annotation[2]-annotation[0]
height = annotation[3]-annotation[1]

for i in range(1, line + 1):
    draw.rectangle((x + (line - i), y + (line - i), x + width + i, y + height + i), outline='red')

# imshow(im)
# show()
im.save("out.jpeg")
IOU计算
可以通过滑动窗口或者随机采样的方法获取训练数据,训练数据分为三种正样本,负样本,中间样本。其中正阳本是生成的滑动窗口和Guarant True Box的IOU大于0.65,负样本是IOU小于0.3,中间样本是IOU大于0.4小于0.65。
IOU(Intersection-Over-Union)的计算流程如下:
蓝色的框为生成的滑动窗口,红色的框为Guarant Box,其中(x, y)表示回归框的顶点坐标。IOU为两个框相交的面积除以两个框的总面积,如果IOU越大表示生成的滑动窗口和真实的窗口越接近。这样IOU的计算公式可以表示为:
IOU=((x2-gx1)*(y2-gy1))/((x2-x1)*(y2-y1)+(gx2-gx1)*(gy2-gy1))
IOU的计算代码如下所示:
def IoU(box, boxes):
    box_area = (box[2] - box[0] + 1) * (box[3] - box[1] + 1)
    area = (boxes[:, 2] - boxes[:, 0] + 1) * (boxes[:, 3] - boxes[:, 1] + 1)
    xx1 = np.maximum(box[0], boxes[:, 0])
    yy1 = np.maximum(box[1], boxes[:, 1])
    xx2 = np.minimum(box[2], boxes[:, 2])
    yy2 = np.minimum(box[3], boxes[:, 3])

    # compute the width and height of the bounding box
    w = np.maximum(0, xx2 - xx1 + 1)
    h = np.maximum(0, yy2 - yy1 + 1)

    inter = w * h
    ovr = inter / (box_area + area - inter)
    return ovr
其中box为滑动窗口,boxes为多个guarant box(一个图片可以有多个人脸,所以会有多个guarant box)。
滑动窗口生成
那么怎么生成滑动窗口的图片呢?比较简单的方式是采用随机方法,如下所示:
import cv2
import numpy as np
import numpy.random as npr
from PIL import Image, ImageDraw
from pylab import *

img = cv2.imread("0_Parade_marchingband_1_849.jpg")
height, width, channel = img.shape
size = npr.randint(12, min(width, height) / 2)
#top_left
nx = npr.randint(0, width - size)
ny = npr.randint(0, height - size)
#random crop
crop_box = np.array([nx, ny, nx + size, ny + size])

cropped_im = img[ny : ny + size, nx : nx + size, :]
resized_im = cv2.resize(cropped_im, (12, 12), interpolation=cv2.INTER_LINEAR)
cv2.imwrite("resize.jpeg", resized_im)

imshow(resized_im)
show()
生成12*12的滑动窗口图片示例如下所示,是一个负样本:
回归框偏移值计算
考虑到直接采用坐标信息进行回归框的预测,网络收敛比较慢。所以在回归框预测的时候一般采用回归框的坐标偏移进行预测,相当于归一化的一种方式。回归框的坐标偏移如下图所示:
生成滑动窗口后,对应滑动窗口和Guarant True Box的偏移值,即可算出来,如下所示:
offset_x1 = (gx1 - x1) / float(x2-x1)
offset_y1 = (gy1 - y1) / float(y2-y1)
offset_x2 = (gx2 - x2) / float(x2-x1)
offset_y2 = (gy2 - y2) / float(y2-y1)
这样生成滑动窗口的时候,对正样本及中间样本,同时保存相应的offset值,如下所示:
positive/0.jpg 1 0.02 -0.01 -0.20 -0.06
positive/1.jpg 1 0.08 0.04 -0.18 -0.06
positive/2.jpg 1 0.16 0.10 -0.03 0.09
positive/3.jpg 1 0.00 -0.04 0.08 0.28
positive/4.jpg 1 0.08 0.03 -0.12 0.01
生成Offset示例代码如下所示,主要是随机生成一个(x,y)坐标的偏移值:
import cv2
import numpy as np
import numpy.random as npr
from PIL import Image, ImageDraw
from pylab import *

img = cv2.imread("0_Parade_marchingband_1_849.jpg")
height, width, channel = img.shape
annotation=[448.51,329.63,570.09,478.23]
x1, y1, x2, y2 = annotation
w = x2 - x1 + 1
h = y2 - y1 + 1

size = npr.randint(int(min(w, h) * 0.8), np.ceil(1.25 * max(w, h)))

delta_x = npr.randint(-w * 0.2, w * 0.2)
delta_y = npr.randint(-h * 0.2, h * 0.2)

nx1 = int(max(x1 + w / 2 + delta_x - size / 2, 0))
ny1 = int(max(y1 + h / 2 + delta_y - size / 2, 0))
nx2 = nx1 + size
ny2 = ny1 + size

crop_box = np.array([nx1, ny1, nx2, ny2])
offset_x1 = (x1 - nx1) / float(size)
offset_y1 = (y1 - ny1) / float(size)
offset_x2 = (x2 - nx2) / float(size)
offset_y2 = (y2 - ny2) / float(size)

cropped_im = img[ny1 : ny2, nx1 : nx2, :]
resized_im = cv2.resize(cropped_im, (12, 12), interpolation=cv2.INTER_LINEAR)

imshow(resized_im)
show()
面部轮廓关键点
在人脸检测的时候,除了用到回归框的信息外,还会利用到人脸面膜轮廓的关键点信息,主要包括眼睛,嘴,鼻子的坐标。该训练数据可从如下地址下载到:
http://mmlab.ie.cuhk.edu.hk/archive/CNN_FacePoint.htm
上述的数据集包括LFW中的5,590张图片和7,876张从网上下载下来的图片,坐标信息包括:左眼,右眼,鼻子,左嘴,右嘴。例如下面坐标对应图片为:(x1,x2,y1,y2)
lfw_5590/Aaron_Eckhart_0001.jpg 84 161 92 169 106.250000 107.750000 146.750000 112.250000 125.250000 142.750000 105.250000 157.750000 139.750000 161.750000
Bounding Box和面部landmark生成代码如下所示:
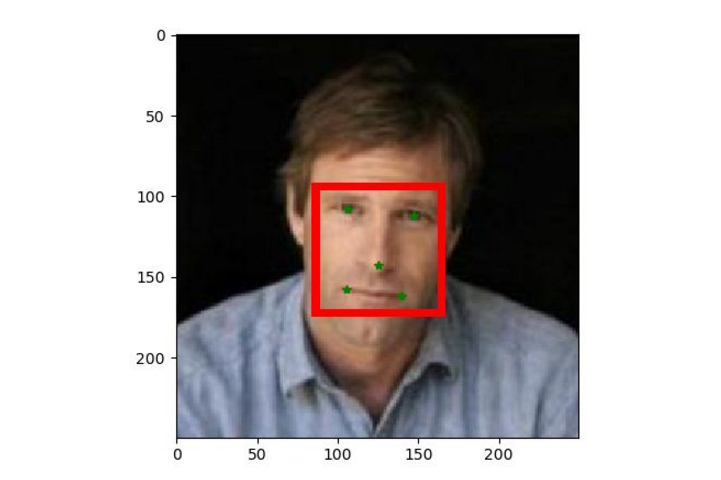
from PIL import Image, ImageDraw
from pylab import *

# 84 161 92 169 106.250000 107.750000 146.750000 112.250000 125.250000 142.750000 105.250000 157.750000 139.750000 161.750000
annotation = [84, 92, 161, 169]  # left, top, right, bottom
landmarkX = [106.250000, 146.750000, 125.250000, 105.250000, 139.750000]
landmarkY = [107.750000, 112.250000, 142.750000, 157.750000, 161.750000]

im = Image.open("Aaron_Eckhart_0001.jpg")
draw = ImageDraw.Draw(im)

line = 5
x, y = annotation[0], annotation[1]
width = annotation[2] - annotation[0]
height = annotation[3] - annotation[1]

for i in range(1, line + 1):
    draw.rectangle((x + (line - i), y + (line - i), x + width + i, y + height + i), outline='red')

imshow(im)
# 绘制点
plot(landmarkX, landmarkY, "g*")
show()
面部轮廓关键点回归值
人脸的面部轮廓关键点不采用绝对坐标,同样使用的是回归值,不过该回归值对应的是Bounding Box的相对坐标,如下所示:
相应的计算公式如下所示:
offsetX=(lx-x)/bbox_width
offsetY=(ly-y)/bbox_height
对所有的landmark点计算offset后生成如下数据:
train_PNet_landmark/0.jpg -2 0.288961038961 0.204545454545 0.814935064935 0.262987012987 0.535714285714 0.659090909091 0.275974025974 0.853896103896 0.724025974026 0.905844155844
train_PNet_landmark/1.jpg -2 0.42816091954 0.215517241379 0.89367816092 0.26724137931 0.646551724138 0.617816091954 0.416666666667 0.790229885057 0.813218390805 0.836206896552
train_PNet_landmark/2.jpg -2 0.153125 0.271875 0.659375 0.328125 0.390625 0.709375 0.140625 0.896875 0.571875 0.946875
train_PNet_landmark/3.jpg -2 0.174327367914 0.242510936232 0.673748423293 0.342669482766 0.372792971258 0.69904560555 0.10740259497 0.864043175755 0.532653771385 0.95143882472
面部轮廓关键点生成
那么如何生成训练数据的面部轮廓关键点呢?生成方法类似于回归框的方式,在guarand true landmark点上加上一个随机偏移量,然后再计算offset值。示例code如下:
import cv2
import numpy as np
import numpy.random as npr
from PIL import Image, ImageDraw
from pylab import *

img = cv2.imread("Aaron_Eckhart_0001.jpg")
img_h,img_w,img_c = img.shape
annotation = [84, 92, 161, 169]
landmarkX = [106.250000, 146.750000, 125.250000, 105.250000, 139.750000]
landmarkY = [107.750000, 112.250000, 142.750000, 157.750000, 161.750000]

landmarkGt = np.zeros((5, 2))
for i in range(5):
    landmarkGt[i]=(landmarkX[i],landmarkY[i])

x1, y1, x2, y2 = annotation
gt_w = x2 - x1 + 1
gt_h = y2 - y1 + 1

bbox_size = npr.randint(int(min(gt_w, gt_h) * 0.8), np.ceil(1.25 * max(gt_w, gt_h)))
delta_x = npr.randint(-gt_w * 0.2, gt_w * 0.2)
delta_y = npr.randint(-gt_h * 0.2, gt_h * 0.2)
nx1 = int(max(x1+gt_w/2-bbox_size/2+delta_x,0))
ny1 = int(max(y1+gt_h/2-bbox_size/2+delta_y,0))

nx2 = int(nx1 + bbox_size)
ny2 = int(ny1 + bbox_size)

crop_box = np.array([nx1,ny1,nx2,ny2])
cropped_im = img[ny1:ny2+1,nx1:nx2+1,:]
resized_im = cv2.resize(cropped_im, (12, 12))

landmark = np.zeros((5, 2))

for index, one in enumerate(landmarkGt):
    rv = ((one[0]-nx1)/bbox_size, (one[1]-ny1)/bbox_size)
    landmark[index] = rv

print(landmark)
imshow(resized_im)
show()
如果面部关键点的训练数据比较少,可以通过数据预处理的方式(比如回归框图像镜像,翻转等操作)增加landmark训练数据。