图像变换
图像变换就是找到一个函数,把原始图像矩阵经过函数处理后,转换为目标图像矩阵。
可以分为两种方式,即像素级别的变换和区域级别的变换
- Point operators (pixel transforms)
- Neighborhood (area-based) operators
像素级别的变换就相当于即变换后的每个像素值都与变换前的同位置的像素值有个函数映射关系。
线性变换
最常用的是线性变换。即
f(i,j)是原像素值,g(i,j)是变换后的像素值。
α调整对比度,β调整亮度.有时也称之为gain和bias参数。
对比度和亮度
对比度是什么?不就是"亮和暗的区别"吗?也就是像素值的大小的区别。那我乘以一个alpha系数,当alpha很大的时候就是放大了这种亮度值的差异,也就是提高了对比度,当alpha很小时,也就是缩小了亮度的差异,也就是缩小了对比度。
beta就更好理解了,直接在像素的亮度值上加上一个数,正数就是提高亮度,负数降低亮度。
看一下下面代码的示例:
from __future__ import print_function
from builtins import input
import cv2 as cv
import numpy as np
import argparse

# Read image given by user
parser = argparse.ArgumentParser(description='Code for Changing the contrast and brightness of an image! tutorial.')
parser.add_argument('--input', help='Path to input image.', default='lena.jpg')
args = parser.parse_args()
image = cv.imread(cv.samples.findFile(args.input))
if image is None:
    print('Could not open or find the image: ', args.input)
    exit(0)
new_image = np.zeros(image.shape, image.dtype)
alpha = 1.0 # Simple contrast control
beta = 0    # Simple brightness control
# Initialize values
print(' Basic Linear Transforms ')
print('-------------------------')
try:
    alpha = float(input('* Enter the alpha value [1.0-3.0]: '))
    beta = int(input('* Enter the beta value [0-100]: '))
except ValueError:
    print('Error, not a number')
# Do the operation new_image(i,j) = alpha*image(i,j) + beta
# Instead of these 'for' loops we could have used simply:
# new_image = cv.convertScaleAbs(image, alpha=alpha, beta=beta)
# but we wanted to show you how to access the pixels :)
for y in range(image.shape[0]):
    for x in range(image.shape[1]):
        for c in range(image.shape[2]):
            new_image[y,x,c] = np.clip(alpha*image[y,x,c] + beta, 0, 255)
cv.imshow('Original Image', image)
cv.imshow('New Image', new_image)
# Wait until user press some key
cv.waitKey()
执行:python change_brightness_contrast.py --input ./lights.jpeg
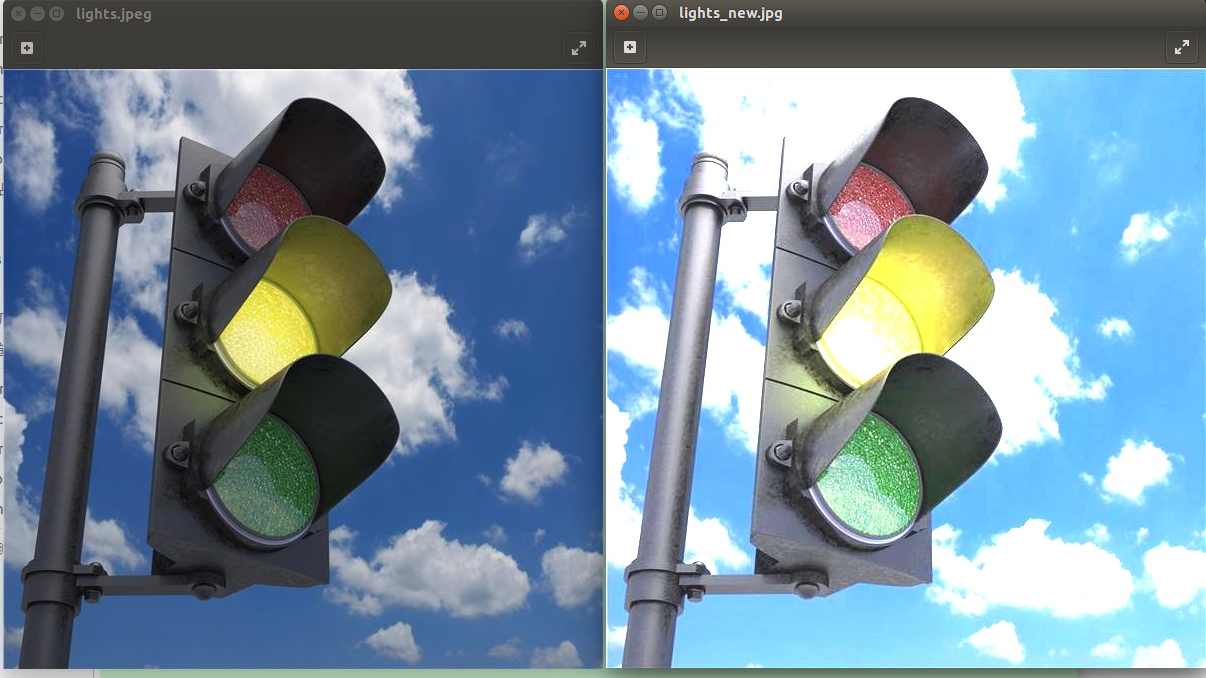
上图是alpha=2,beta=20的一个效果图。
非线性变换
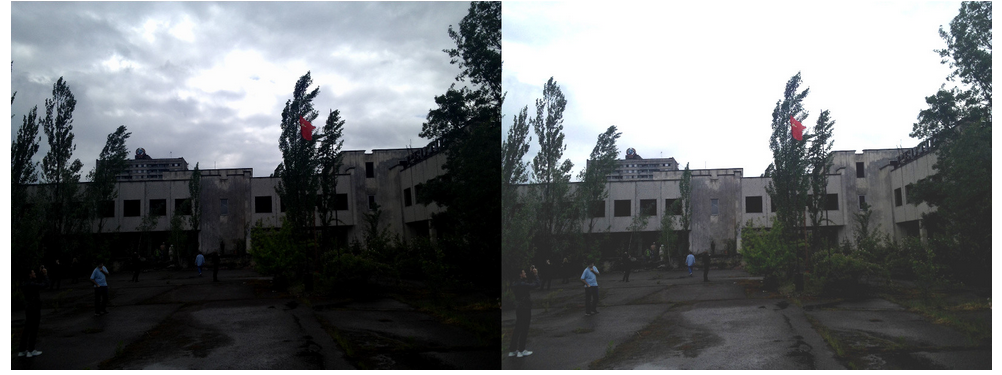
线性变换有个问题,如上图,α=1.3 and β=40,提高原图亮度的同时,导致云几乎看不见了。如果要看见云的话,建筑的亮度又不够。
这个时候就引入了非线性变换. 称之为Gamma correction
与线性变换不同,对不同的原始亮度值,其改变强度是不同的,是非线性的。

在 γ<1的时候,会提高图片亮度.>1时,降低亮度。
γ=0.4的变换效果图如上。可以看到云层及建筑变亮的同时还保持了对比度让图像依然清晰。

如果查看不同变换下的灰度直方图的话可以看到。中间是原图的灰度直方图,可以看到低亮度值的像素点很多。
左边是做了线性变换的,整体直方图产生了右移,并且在255处出现峰值。因为每个像素点都增加了亮度嘛。导致了白云和蓝天过于明亮无法区分。
而右边做了gamma校正的图像亮度分布比较均匀,即使得低亮度值的部分得以加强,又不至于过度曝光使得白云无法区分。
实现Gamma correction的代码如下.
    lookUpTable = np.empty((1,256), np.uint8)
    for i in range(256):
        lookUpTable[0,i] = np.clip(pow(i / 255.0, gamma) * 255.0, 0, 255)
    res = cv.LUT(img_original, lookUpTable)
其中cv.LUT就是个变换函数。从lookUpTable里找到变换关系,生成新的图像矩阵。