系列文章:
用OpenCV实现Photoshop算法(五): 亮度对比度调整
用OpenCV实现Photoshop算法(六): 变为黑白图像
用OpenCV实现Photoshop算法(七): 调整色相饱和度
用OpenCV实现Photoshop算法(九): 高反差保留
五、亮度对比度调整
(一)算法
亮度对比度调整的算法,我在网上找了很多篇,个人觉得以下这个算法效果较好,比较接近Photoshop的效果。
Algorithm of Brightness Contrast transformation
The formula is:
y = [x - 127.5 * (1 - B)] * k + 127.5 * (1 + B);
x is the input pixel value
y is the output pixel value
B is brightness, value range is [-1,1]
k is used to adjust contrast
k = tan( (45 + 44 * c) / 180 * PI );
c is contrast, value range is [-1,1]
The formula is:
y = [x - 127.5 * (1 - B)] * k + 127.5 * (1 + B);
x is the input pixel value
y is the output pixel value
B is brightness, value range is [-1,1]
k is used to adjust contrast
k = tan( (45 + 44 * c) / 180 * PI );
c is contrast, value range is [-1,1]
于是,用OpenCV C++编写了一个 adjustBrightnessContrast()函数,可同时调整亮度、对比度。
(二)源码及例程
例程如下, 其中包含
adjustBrightnessContrast()函数。
#include <iostream>
#include "opencv2/core.hpp"
#include "opencv2/imgproc.hpp"
#include "opencv2/highgui.hpp"

using namespace std;
using namespace cv;


#define SWAP(a, b, t)  do { t = a; a = b; b = t; } while(0)
#define CLIP_RANGE(value, min, max)  ( (value) > (max) ? (max) : (((value) < (min)) ? (min) : (value)) )
#define COLOR_RANGE(value)  CLIP_RANGE(value, 0, 255)

/**
 * Adjust Brightness and Contrast
 *
 * @param src [in] InputArray
 * @param dst [out] OutputArray
 * @param brightness [in] integer, value range [-255, 255]
 * @param contrast [in] integer, value range [-255, 255]
 *
 * @return 0 if success, else return error code
 */
int adjustBrightnessContrast(InputArray src, OutputArray dst, int brightness, int contrast)
{
	Mat input = src.getMat();
	if( input.empty() ) {
		return -1;
	}

	dst.create(src.size(), src.type());
	Mat output = dst.getMat();

	brightness = CLIP_RANGE(brightness, -255, 255);
	contrast = CLIP_RANGE(contrast, -255, 255);

	/**
	Algorithm of Brightness Contrast transformation
	The formula is:
		y = [x - 127.5 * (1 - B)] * k + 127.5 * (1 + B);

		x is the input pixel value
		y is the output pixel value
		B is brightness, value range is [-1,1]
		k is used to adjust contrast
			k = tan( (45 + 44 * c) / 180 * PI );
			c is contrast, value range is [-1,1]
	*/

	double B = brightness / 255.;
	double c = contrast / 255. ;
	double k = tan( (45 + 44 * c) / 180 * M_PI );

	Mat lookupTable(1, 256, CV_8U);
	uchar *p = lookupTable.data;
	for (int i = 0; i < 256; i++)
		p[i] = COLOR_RANGE( (i - 127.5 * (1 - B)) * k + 127.5 * (1 + B) );

	LUT(input, lookupTable, output);

	return 0;
}


//=====主程序开始====

static string window_name = "photo";
static Mat src;
static int brightness = 255;
static int contrast = 255;

static void callbackAdjust(int , void *)
{
	Mat dst;
	adjustBrightnessContrast(src, dst, brightness - 255, contrast - 255);
	imshow(window_name, dst);
}


int main()
{
	src = imread("building.jpg");

	if ( !src.data ) {
		cout << "error read image" << endl;
		return -1;
	}

	namedWindow(window_name);
	createTrackbar("brightness", window_name, &brightness, 2*brightness, callbackAdjust);
	createTrackbar("contrast", window_name, &contrast, 2*contrast, callbackAdjust);
	callbackAdjust(0, 0);

	waitKey();

	return 0;

}
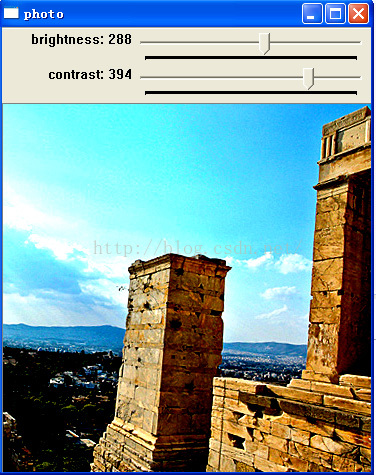
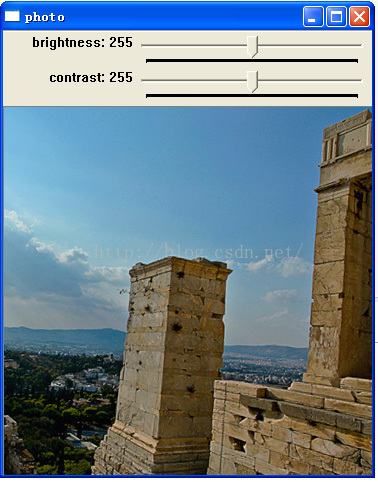
运行效果:
原图:
调整参数, 实施亮度对比度调整后: