基于DETR的人脸伪装检测
前言
- 本文是个人使用DETR训练自己的COCO格式数据集的应用案例,由于水平有限,难免出现错漏,敬请批评改正。
- 更多精彩内容,可点击进入YOLO系列专栏或我的个人主页查看
- YOLOv5:添加SE、CBAM、CoordAtt、ECA注意力机制
- YOLOv5:yolov5s.yaml配置文件解读、增加小目标检测层
- YOLOv5:IoU、GIoU、DIoU、CIoU、EIoU
- YOLOv7训练自己的数据集(口罩检测)
- YOLOv8训练自己的数据集(足球检测)
- 玩转Jetson Nano(五):TensorRT加速YOLOv5目标检测
前提条件
- 熟悉Python
实验环境
cython
git+https://github.com/cocodataset/cocoapi.git#subdirectory=PythonAPI&egg=pycocotools
submitit
torch>=1.5.0
torchvision>=0.6.0
git+https://github.com/cocodataset/panopticapi.git#egg=panopticapi
scipy
onnx
onnxruntime
项目地址
DETR官方源代码地址:https://github.com/facebookresearch/detr.git
Linux
git clone https://github.com/facebookresearch/detr.git
Cloning into 'yolov8'...
remote: Enumerating objects: 4583, done.
remote: Counting objects: 100% (4583/4583), done.
remote: Compressing objects: 100% (1270/1270), done.
remote: Total 4583 (delta 2981), reused 4576 (delta 2979), pack-reused 0
Receiving objects: 100% (4583/4583), 23.95 MiB | 1.55 MiB/s, done.
Resolving deltas: 100% (2981/2981), done.
Windows
请到
https://github.com/facebookresearch/detr.git网站下载源代码zip压缩包。
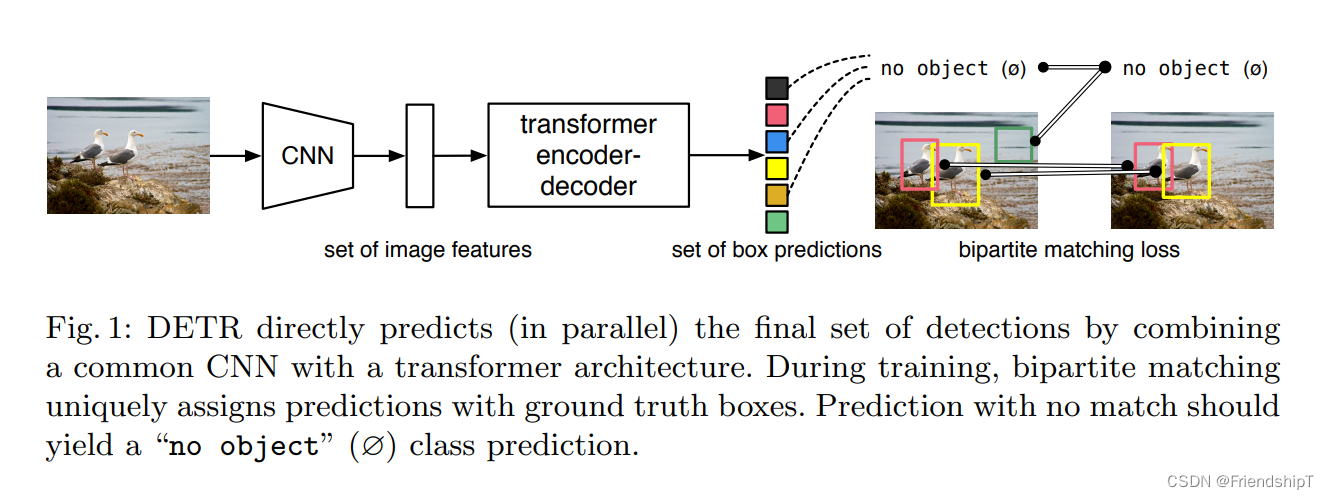
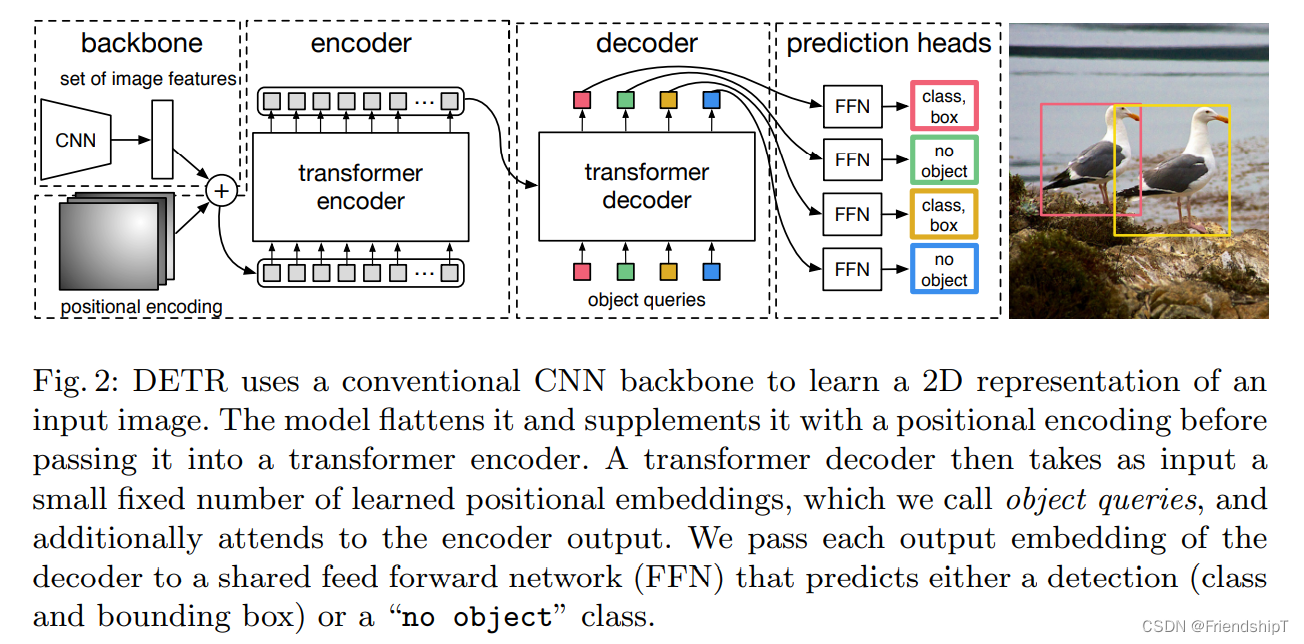
DETR
- DETR是Facebook提出的基于Transformer的端到端目标检测网络。DETR做到了真正没有非最大抑制(NMS)后处理,而且不需要anchor(锚点生成)。但是,训练时间较长,对小目标的检测性能不是很高。建议使用可变形注意模块(deformable attention module)代替原始的多头注意力来关注参考点周围的关键位置。
- DETR论文地址:https://arxiv.org/abs/2005.12872
- DETR官方源代码地址:https://github.com/facebookresearch/detr.git
训练自己的数据集
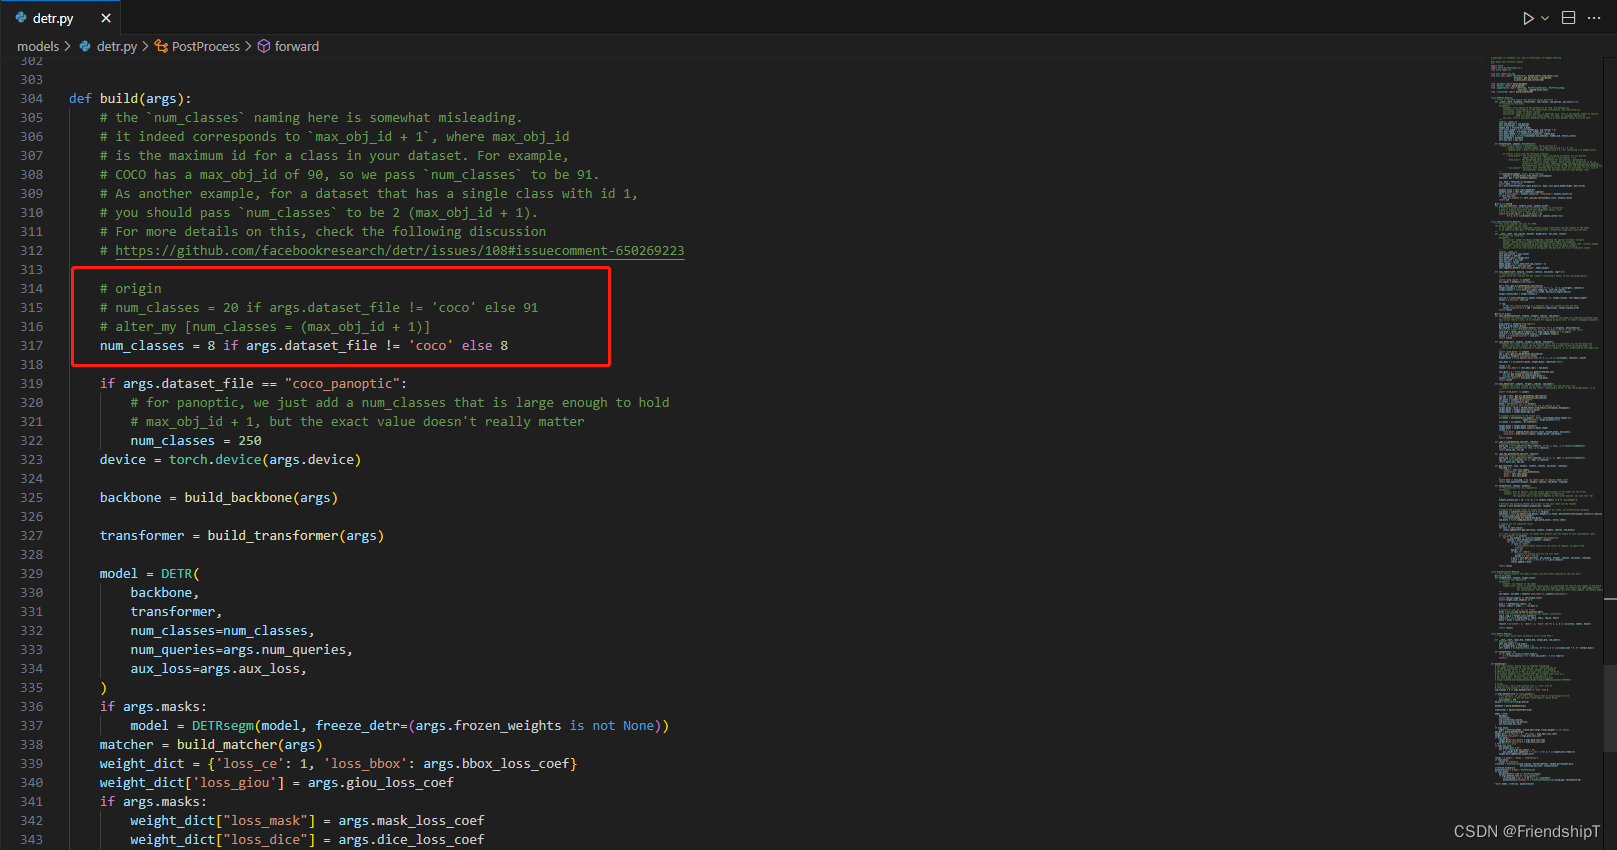
修改models/detr.py中的参数
- num_class需要设置为max_id+1,
- 比如本文使用的人脸伪装数据集,索引从0到7,那么num_class应该设置为7+1=8,索引为8的类为背景类。
- 又比如,有些数据集,索引从1到20,那么num_class应该设置为20+1=21,索引为21的类为背景类,但是因为索引从1开始,所以把索引为0的类设置为N/A,既不是背景也不是前景,应该是缺失类。
- 作者举例4个类别的索引分别为1,23,24,56,那么num_class应该设置为 56+1 = 57,索引为57的类为背景类。其中缺失索引值:0、2-22、25-55应该用N/A填充,都是缺失类。
# origin
# num_classes = 20 if args.dataset_file != 'coco' else 91
# alter_my [num_classes = (max_obj_id + 1)]
num_classes = 8 if args.dataset_file != 'coco' else 8
进行训练
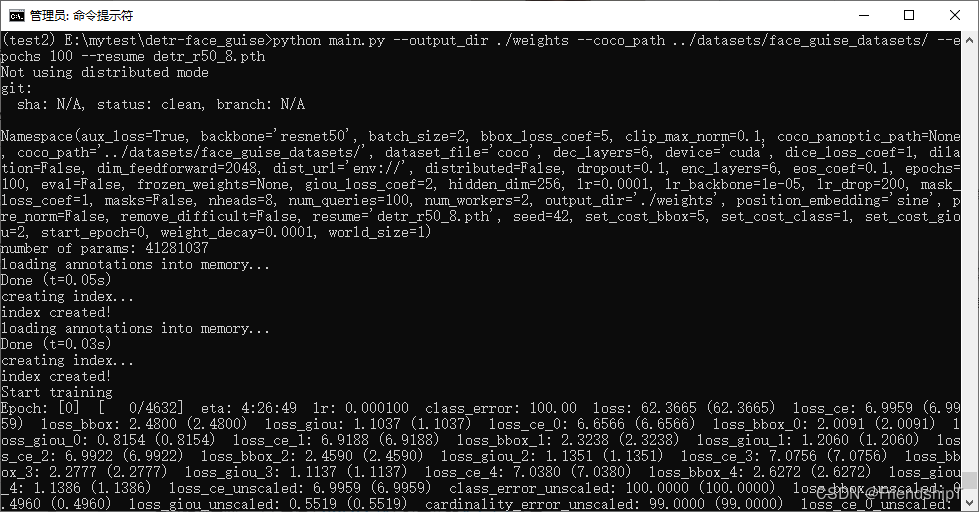
python main.py --output_dir ./weights --coco_path ../datasets/face_guise_datasets/ --epochs 100 --resume detr_r50_8.pth
进行预测
新建一个pre_img.py,内容如下:
import numpy as np
from models.detr import build
from PIL import Image
import matplotlib.pyplot as plt
import torch
import torchvision.transforms as transforms
torch.set_grad_enabled(False)
COLORS = [[0.000, 0.447, 0.741], [0.850, 0.325, 0.098], [0.929, 0.694, 0.125],
[0.494, 0.184, 0.556], [0.466, 0.674, 0.188], [0.301, 0.745, 0.933]]
transform_input = transforms.Compose([transforms.Resize(800),
transforms.ToTensor(),
transforms.Normalize([0.485, 0.456, 0.406], [0.229, 0.224, 0.225])])
def box_cxcywh_to_xyxy(x):
x_c, y_c, w, h = x.unbind(1)
b = [(x_c - 0.5 * w), (y_c - 0.5 * h),
(x_c + 0.5 * w), (y_c + 0.5 * h)]
return torch.stack(b, dim=1)
def rescale_bboxes(out_bbox, size):
img_w, img_h = size
b = box_cxcywh_to_xyxy(out_bbox)
b = b * torch.tensor([img_w, img_h, img_w, img_h], dtype=torch.float32, device="cuda")
return b
def plot_results(pil_img, prob, boxes, img_save_path):
plt.figure(figsize=(16, 10))
plt.imshow(pil_img)
ax = plt.gca()
colors = COLORS * 100
for p, (xmin, ymin, xmax, ymax), c in zip(prob, boxes.tolist(), colors):
ax.add_patch(plt.Rectangle((xmin, ymin), xmax - xmin, ymax - ymin,
fill=False, color=c, linewidth=3))
cl = p.argmax()
text = f'{
CLASSES[cl]}: {
p[cl]:0.2f}'
ax.text(xmin, ymin, text, fontsize=9,
bbox=dict(facecolor='yellow', alpha=0.5))
plt.savefig(img_save_path)
plt.axis('off')
plt.show()
def main(chenkpoint_path, img_path, img_save_path):
args = torch.load(chenkpoint_path)['args']
model = build(args)[0]
device = "cuda" if torch.cuda.is_available() else "cpu"
model.to(device)
# 加载模型参数
model_data = torch.load(chenkpoint_path)['model']
model.load_state_dict(model_data)
model.eval()
img = Image.open(img_path).convert('RGB')
size = img.size
inputs = transform_input(img).unsqueeze(0)
outputs = model(inputs.to(device))
# 这类最后[0, :, :-1]索引其实是把背景类筛选掉了
probs = outputs['pred_logits'].softmax(-1)[0, :, :-1]
# 可修改阈值,只输出概率大于0.7的物体
keep = probs.max(-1).values > 0.7
bboxes_scaled = rescale_bboxes(outputs['pred_boxes'][0, keep], size)
# 保存输出结果
ori_img = np.array(img)
plot_results(ori_img, probs[keep], bboxes_scaled, img_save_path)
if __name__ == "__main__":
# CLASSES = ['N/A', "aeroplane", "bicycle", "bird", "boat",
# "bottle", "bus", "car", "cat", "chair",
# "cow", "diningtable", "dog", "horse",
# "motorbike", "person", "pottedplant",
# "sheep", "sofa", "train", "tvmonitor", "background"]
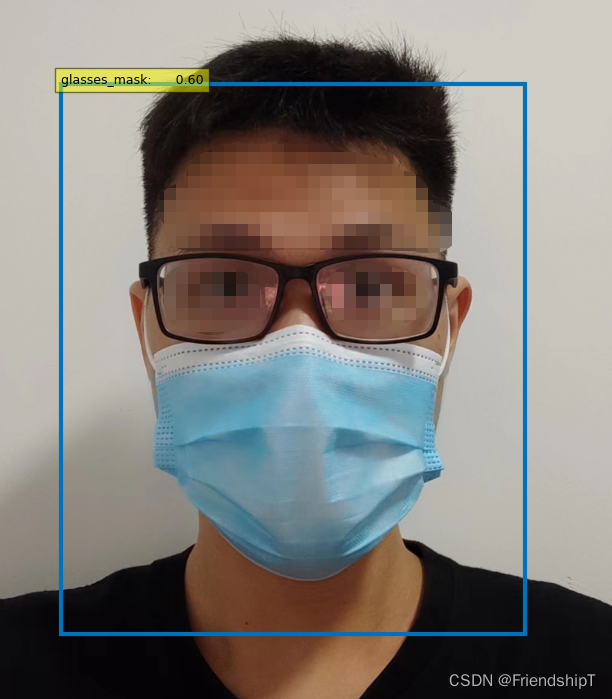
CLASSES = ['glasses', "hat", "nothing", "glasses_hat", "glasses_mask", "hat_mask", "glasses_hat_mask", "mask", "background"]
main(chenkpoint_path="weights/checkpoint.pth", img_path="test.jpg",
img_save_path="result.jpg")
python pre_img.py
相关资源免费获取
- 地址:https://download.csdn.net/download/FriendshipTang/88038140
- 地址:https://download.csdn.net/download/FriendshipTang/88038804
- 地址:https://download.csdn.net/download/FriendshipTang/88038809
注:如资源地址失效,请私信我!
参考
[1] Nicolas Carion, Francisco Massa, Gabriel Synnaeve, Nicolas Usunier, Alexander Kirillov, Sergey Zagoruyko. End-to-End Object Detection with Transformers. 2020
[2] DETR 源代码地址. https://github.com/facebookresearch/detr.git
[3] https://blog.csdn.net/m0_46412065/article/details/128538040