原文地址:https://blog.csdn.net/qq_30815237/article/details/87914775
原文参考:https://blog.csdn.net/minstyrain/article/details/78907425
opencv3.4 版之前自带的人脸检测器是基于Haar+Adaboost的,速度还可以,但是检出率很低,误检也很多,脸的角度稍大就检不出来,还经常会把一些乱七八糟的东西当做人脸,实在不敢恭维。好在随着深度学习领域的发展,涌现了一大批效果相当不错的人脸检测算法,比如MTCNN,给了我们更多施展的空间。看看下面这图就是基于其检测出来的,看着是不是很震撼呢?

MTCNN效果着实不错,但其是基于caffe训练的,caffe可是以配置繁琐著称的,大大小小依赖库就有10几个,每个又有好几个版本,版本间的不兼容比比皆是,初学者没个把星期基本是配不好的,这无形间加大了普及的进度,好在有人做了一整套MTCNN在各个平台上的部署(见GitHub),大大简化了所需的工作量。
opencv发布了3.4版本,主要增强了dnn模块,特别是添加了对faster-rcnn的支持,并且带有openCL加速,效果还不错。
我主要测试了下其中的resnetface示例,效果还不错,除了速度上有些慢之外,基本上是向MTCNN看齐了。
以face_detector Caffe模型为例。(位于${OPENCV_DIR}\sources\samples\dnn\face_detector)
一般需要两个文件:1)模型参数 2)模型配置文件即模型框架
res10_300x300_ssd_iter_140000_fp16.caffemodel
deploy.prototxt
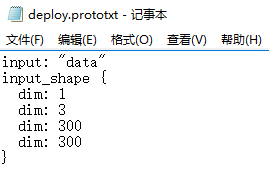
在caffe中,模型定义在prototxt文件中,文件中定义了每层的结构信息。
例如我的opencv路径是:D:\Program Files\OpenCV\opencv\sources\samples\dnn\face_detector,打开之后:
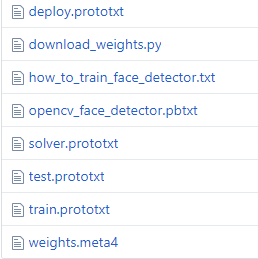
里面有个download_weights.py,使用pycharm执行下就可以自动下载模型(2种模型)了。或者直接点击下方的链接直接下载:
1、'res10_300x300_ssd_iter_140000_fp16.caffemodel'
2、'opencv_face_detector_uint8.pb'
https://raw.githubusercontent.com/opencv/opencv_3rdparty/dnn_samples_face_detector_20180220_uint8/opencv_face_detector_uint8.pb
下载的文件放在face_detector目录下,如图:

python版代码如下:
#coding=utf-8
import numpy as np
import cv2,os,time

def show_detections(image,detections):
    h,w,c=image.shape
    for i in range(0, detections.shape[2]):
        confidence = detections[0, 0, i, 2]
        if confidence >0.6:
            box = detections[0, 0, i, 3:7] * np.array([w, h, w, h])
            (startX, startY, endX, endY) = box.astype("int")
            text = "{:.2f}%".format(confidence * 100)
            y = startY - 10 if startY - 10 > 10 else startY + 10
            cv2.rectangle(image, (startX, startY), (endX, endY),
                (0, 255,0), 1)
            cv2.putText(image, text, (startX, y),
                cv2.FONT_HERSHEY_SIMPLEX, 0.45, (0, 255, 0), 2)
    return image

def detect_img(net,image):
    blob = cv2.dnn.blobFromImage(cv2.resize(image, (300, 300)), 1.0,
	(300, 300), (104.0, 177.0, 123.0))
    net.setInput(blob)
    start=time.time()
    detections = net.forward()
    end=time.time()
    print(end-start)
    return show_detections(image,detections)

def test_dir(net,dir="images"):
    files=os.listdir(dir)
    for file in files:
        filepath=dir+"/"+file
        img=cv2.imread(filepath)
        showimg=detect_img(net,img)
        cv2.imshow("img",showimg)
        cv2.waitKey()

def test_camera(net):
    cap=cv2.VideoCapture(0)
    while True:
        ret,img=cap.read()
        if not ret:
            break
        showimg=detect_img(net,img)
        cv2.imshow("img",showimg)
        cv2.waitKey(1)

if __name__=="__main__":
    net = cv2.dnn.readNetFromCaffe("deploy.prototxt","res10_300x300_ssd_iter_140000_fp16.caffemodel")
    #net =cv2.dnn.readNetFromTensorflow("opencv_face_detector_uint8.pb","opencv_face_detector.pbtxt")
    #test_dir(net)
    test_camera(net)
其支持caffe和tensorflow两种模型,速度在35毫秒左右(CPU:i7 [email protected],4核,占用率60%)
C++版代码如下:
#include <iostream>
#include <cstdlib>
#include<opencv2\dnn\dnn.hpp>
#include<opencv2\core.hpp>
#include<opencv2\highgui\highgui.hpp>
#include<opencv2\imgproc\imgproc.hpp>

using namespace cv;
using namespace cv::dnn;
using namespace std;
const size_t inWidth = 300; //output image size
const size_t inHeight = 300;
const double inScaleFactor = 1.0;
const Scalar meanVal(104.0, 117.0, 123.0);

int main(int argc, char** argv)
{
	float min_confidence = 0.5;
	String modelConfiguration = "D:\\Program Files\\OpenCV\\opencv\\sources\\samples\\dnn\\face_detector\\deploy.prototxt";
	String modelBinary = "D:\\Program Files\\OpenCV\\opencv\\sources\\samples\\dnn\\face_detector\\res10_300x300_ssd_iter_140000_fp16.caffemodel";
	//! [Initialize network]
	dnn::Net net = readNetFromCaffe(modelConfiguration, modelBinary);//Reads a network model stored in Caffe model in memory
	//! [Initialize network]
	if (net.empty())
	{
		cerr << "Can't load network by using the following files: " << endl;
		cerr << "prototxt:   " << modelConfiguration << endl;
		cerr << "caffemodel: " << modelBinary << endl;
		cerr << "Models are available here:" << endl;
		cerr << "<OPENCV_SRC_DIR>/samples/dnn/face_detector" << endl;
		cerr << "or here:" << endl;
		cerr << "https://github.com/opencv/opencv/tree/master/samples/dnn/face_detector" << endl;
		exit(-1);
	}

	//VideoCapture cap(0);//打开摄像头
	VideoCapture cap("C:\\Users\\liuzhe\\Desktop\\face.avi");
	if (!cap.isOpened())
	{
		cout << "Couldn't open camera : " << endl;
		return -1;
	}
	for (;;)//死循环
	{
		Mat frame;
		cap >> frame; // get a new frame from camera/video or read image

		if (frame.empty())
		{
			waitKey();
			break;
		}

		if (frame.channels() == 4)
			cvtColor(frame, frame, COLOR_BGRA2BGR);

		//! [Prepare blob]
		Mat inputBlob = blobFromImage(frame, inScaleFactor,
			Size(inWidth, inHeight), meanVal, false, false); //Convert Mat to batch of images
															 //! [Prepare blob]

															 //! [Set input blob]
		net.setInput(inputBlob, "data"); //set the network input
										 //! [Set input blob]

										 //! [Make forward pass]
          //compute output,这是一个4D数,rows and cols can only hold 2 dimensions, so they are not used here, and set to -1
		Mat detection = net.forward("detection_out");   //! [Make forward pass]

		vector<double> layersTimings;
		double freq = getTickFrequency() / 1000;//用于返回CPU的频率。get Tick Frequency。这里的单位是秒,也就是一秒内重复的次数。
		double time = net.getPerfProfile(layersTimings) / freq;

		Mat detectionMat(detection.size[2], detection.size[3], CV_32F, detection.ptr<float>());//101*7矩阵

		ostringstream ss;
		ss << "FPS: " << 1000 / time << " ; time: " << time << " ms";
		putText(frame, ss.str(), Point(20, 20), 0, 0.5, Scalar(0, 0, 255));

		float confidenceThreshold = min_confidence;
		for (int i = 0; i < detectionMat.rows; i++)
		{
			float confidence = detectionMat.at<float>(i, 2);      //第二列存放可信度

			if (confidence > confidenceThreshold)//满足阈值条件
			{
				//存放人脸所在的图像中的位置信息
				int xLeftBottom = static_cast<int>(detectionMat.at<float>(i, 3) * frame.cols);
				int yLeftBottom = static_cast<int>(detectionMat.at<float>(i, 4) * frame.rows);
				int xRightTop = static_cast<int>(detectionMat.at<float>(i, 5) * frame.cols);
				int yRightTop = static_cast<int>(detectionMat.at<float>(i, 6) * frame.rows);

				Rect object((int)xLeftBottom, (int)yLeftBottom,//定义一个矩形区域(x,y,w,h)
					(int)(xRightTop - xLeftBottom),
					(int)(yRightTop - yLeftBottom));

				rectangle(frame, object, Scalar(0, 255, 0));//画个边框

				ss.str("");
				ss << confidence;
				String conf(ss.str());
				String label = "Face: " + conf;
				int baseLine = 0;
				Size labelSize = getTextSize(label, FONT_HERSHEY_SIMPLEX, 0.5, 1, &baseLine);
				rectangle(frame, Rect(Point(xLeftBottom, yLeftBottom - labelSize.height),
					Size(labelSize.width, labelSize.height + baseLine)),
					Scalar(255, 255, 255), CV_FILLED);
				putText(frame, label, Point(xLeftBottom, yLeftBottom),
					FONT_HERSHEY_SIMPLEX, 0.5, Scalar(0, 0, 0));
			}
		}
		cv::imshow("detections", frame);
		if (waitKey(1) >= 0) break;
	}
	return 0;
}代码地址:https://github.com/liuzheCSDN/OpenCV/tree/master/facedelete/dnn_face_detectorcaffe
核心函数介绍
主要涉及函数有以下几个:
readNetFromCaffe
blobFromImage
setInput
forward
1、blobFormImage
函数原型
Mat cv::dnn::blobFromImage(
    InputArray     image,
    double     scalefactor = 1.0,
    const Size &     size = Size(),
    const Scalar &     mean = Scalar(),
    bool     swapRB = false,
    bool     crop = false,
int ddepth = CV_32F )- image:输入图像
- scalefactor: multiplier for image values.
- size:指的不是输入图像的尺寸,是指所需要的尺寸,也就是返回的Mat中数据的尺寸。
- swapRB:是否交换R和B分量,这在之前的色彩空间转换的文章中介绍过
- crop:输入图像大小与size不符的时候,是否需要裁剪
- ddepth:图像的数据类型,目前仅支持32F和8U
- crop :裁剪标志,指示是否在调整大小后裁剪图像,if crop is true, input image is resized so one side after resize is equal to corresponding dimension in size and another one is equal or larger. Then, crop from the center is performed. If crop is false, direct resize without cropping and preserving aspect ratio is performed.(如果裁剪为真,则调整输入图像的大小,使调整大小后的一侧等于相应的尺寸大小,另一侧等于或大于大小。 然后,执行从中心的裁剪。 如果裁剪为假,则执行直接调整大小而不裁剪并保留纵横比。)
函数返回一个 ( [N,C,H,W] dimensions.)
关于mean参数,如果之前没有深入研究过深度学习,这个还是不太好理解的。首先给出mean的数值:(104 117 123);数字从什么地方来的呢?这个是在Net训练的时候设定的,可以看到在训练的时候transform_param中设置了mean。

这么做的原因有两个,其一,数据规整化或者说标准化;熟悉PCA(主成分分析)算法的同学清楚,在PCA中需要对输入数据的特征向量进行规整化,通过预估均值和方差,将其规整化为0均值和单位方差。由于深度学习中,对图片取样很小例如16*16等,各位置方差相差不大。所以方差的规整化意义不大,所以仅对均值进行规整化。
其二,构造0中心分布的数据,使梯度下降算法更有效。均值一般反应为照度,但是图像识别中,对照度一般不敏感,因此去除照度,构造0中心分布的数据,有利于梯度沿最优路线下降
函数源码
这一部分是通过函数源码简单看一下该函数:
//申请blob
Mat blobFromImage(InputArray image, double scalefactor, const Size& size,
                  const Scalar& mean, bool swapRB, bool crop, int ddepth)
{
    CV_TRACE_FUNCTION();
    Mat blob;
    blobFromImage(image, blob, scalefactor, size, mean, swapRB, crop, ddepth);
    return blob;
}

//把输入图像写入vector<Mat>
void blobFromImage(InputArray image, OutputArray blob, double scalefactor,
                   const Size& size, const Scalar& mean, bool swapRB, bool crop, int ddepth)
{
    CV_TRACE_FUNCTION();
    std::vector<Mat> images(1, image.getMat());
    blobFromImages(images, blob, scalefactor, size, mean, swapRB, crop, ddepth);
}

//核心计算函数,接收的输入是vector<Mat>,输出是Mat
void blobFromImages(InputArrayOfArrays images_, OutputArray blob_, double scalefactor,
                    Size size, const Scalar& mean_, bool swapRB, bool crop, int ddepth)
{
    //检测输入参数的合法性
    CV_TRACE_FUNCTION();
    CV_CheckType(ddepth, ddepth == CV_32F || ddepth == CV_8U, "Blob depth should be CV_32F or CV_8U");
    if (ddepth == CV_8U)
    {
        CV_CheckEQ(scalefactor, 1.0, "Scaling is not supported for CV_8U blob depth");
        CV_Assert(mean_ == Scalar() && "Mean subtraction is not supported for CV_8U blob depth");
    }


    std::vector<Mat> images;
    images_.getMatVector(images);
    CV_Assert(!images.empty());

    //对输入图像的size,depth,swapRB,mean,scalefactor做处理
    for (int i = 0; i < images.size(); i++)
    {
        //处理输入Image的尺寸
        Size imgSize = images[i].size();
        if (size == Size())
            size = imgSize;
        if (size != imgSize)
        {
            if(crop)
            {
            //计算缩放系数图像宽和高的缩放系数,按照较大的缩放
              float resizeFactor = std::max(size.width / (float)imgSize.width,
                                            size.height / (float)imgSize.height);
            //按照缩放系数做双线性插值
              resize(images[i], images[i], Size(), resizeFactor, resizeFactor, INTER_LINEAR);

            //裁剪图像保证中心点对齐
              Rect crop(Point(0.5 * (images[i].cols - size.width),
                              0.5 * (images[i].rows - size.height)),
                        size);
              images[i] = images[i](crop);
            }
            else
            //如果没有设置crop,则直接进行双线性插值,缩放输入图像到目标尺寸
              resize(images[i], images[i], size, 0, 0, INTER_LINEAR);
        }
        //如果输入图像数据类型与目标类型不一致,进行数据类型转换
        if(images[i].depth() == CV_8U && ddepth == CV_32F)
            images[i].convertTo(images[i], CV_32F);
        Scalar mean = mean_;

        //交换RB
        if (swapRB)
            std::swap(mean[0], mean[2]);

        //处理mean和scalefactor(注意直接操作的是图像,运算符应该在Mat中重载了)
        images[i] -= mean;
        images[i] *= scalefactor;
    }

    //保证图像满足NCHW数据格式
    size_t i, nimages = images.size();
    Mat image0 = images[0];
    int nch = image0.channels();
    CV_Assert(image0.dims == 2);
    Mat image;
    if (nch == 3 || nch == 4)
    {
    ...
setInput函数:
函数原型
void cv::dnn::Net::setInput    (
    InputArray     blob,
    const String &     name = "",
    double     scalefactor = 1.0,
const Scalar & mean = Scalar() ) - blob:一个新的blob。 应该有CV_32F或CV_8U深度。就是上文中介绍的blobFromImage的返回值
- name:输入图层的名称。
- scalefactor:可选的标准化比例。
- mean:一个可选的平均减法值。
这个name指的是inputlayer的名字,prototxt的inputlayer:
输入图像与mean,scalefactor的关系如下:
input(n,c,h,w) = scalefactor × (blob(n,c,h,w) - mean_c) ![]()
注意:公式中的input是指最终DNN的输入,blob则是我们程序输入的Image
forward函数:
前向运行计算输出层,输出层名称为outputName。
/** @brief Runs forward pass to compute output of layer with name @p outputName.
         *  @param outputName name for layer which output is needed to get
         *  @return blob for first output of specified layer.
         *  @details By default runs forward pass for the whole network.
         */
       Mat forward(const String& outputName = String());
outputName:需要输出的图层的名称
返回:指定图层outputName的第一个输出的blob。默认情况下,为整个网络运行正向传递。
注意:返回Mat类型,这是一个4D数,rows and cols can only hold 2 dimensions, so they are not used here, and set to -1
调用:
Mat detection = net.forward("detection_out"); //compute output, [Make forward pass] 
from:https://blog.csdn.net/u011028771/article/details/84901361
