【深度学习】【部署】Flask快速部署深度学习模型【入门】
提示:博主取舍了很多大佬的博文并亲测有效,分享笔记邀大家共同学习讨论
前言
Django和Flask都是python的服务框架,Flask相较于Django的优势是更加轻量级,因此尝试用Flask构建API服务,Flask快速部署深度学习模型再打包exe与深度学习模型直接打包exe相比,前者模型只需要加载一次权重就可以一直使用,而后者每一次预测都需要重新加载一次模型权重,严重浪费了时间和资源。
【打包exe参考】
【环境安装参考】
# 安装flask
pip install flask
# 安装pytorch环境
pip3 install torch torchvision torchaudio --index-url https://download.pytorch.org/whl/cu117
搭建简单的Web服务
将以下代码段保存在名为app.py的文件中,并运行代码。
from flask import Flask
app = Flask(__name__)

@app.route('/')
def hello():
    return 'Hello World!'

if __name__ == "__main__":
	app.run()
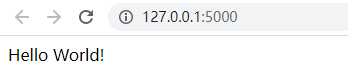
在web浏览器中访问http://127.0.0.1:5000/时,查看到Hello World的文本!

搭建深度学习的Web服务
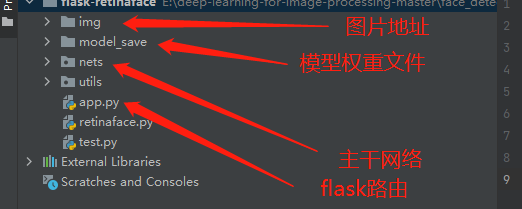
博主以人脸检测之Retinaface算法为例讲解代码:【retinaface-pytorch代码】。有兴趣的朋友可以看看完整的代码,这里博主只保留了与预测相关的代码,并做了部分修改。
app.py中与Web服务相关的部分,博主设置了俩个路由路径:
- 一个是/http://127.0.0.1:5000/setmodel–用于修改模型的主干网络及其权重,因为一个检测模型可能有多个backbone,本例是有resnet50和alpha不同的多个mobilenetV1作为backbone。
- 另一个是/http://127.0.0.1:5000/predict–用于检测,这里博主保留了源码中图片单一和批量俩种预测方式。
# 初始化模型 默认mobilenetX1.00
Model = retinaface("mobilenetX1.00")
from flask import Flask, request
app = Flask(__name__)
# /setmodel用于修改模型
@app.route('/setmodel', methods=['POST'])
def initialization():
    if request.method == 'POST':
        model_mold = request.form
        Model.setModel(model_mold["model_mold"])
    return "initialization " + model_mold["model_mold"] + " finish"

# /predict用于预测
@app.route('/predict', methods=['POST'])
def predict():
    if request.method == 'POST':
        file = request.form
        keys_Points = Model.detect_image(file['mode'], file['path'])
        return keys_Points

if __name__ == '__main__':
    app.run()
app.py中与Retinaface算法相关的部分,用retinaface类进一步封装了Retinaface模型,设置了俩个方法,detect_image方法对于flask中的predict,setModel方法对应flask中的initialization。
class retinaface(object):
    def __init__(self, model_mold):
        if model_mold == "mobilenetX1.00":
            model_path= r"model_save/mobilenetX1.00.pth"
        elif model_mold == "mobilenetX0.75":
            model_path = r"model_save/mobilenetX0.75.pth"
        elif model_mold == "mobilenetX0.50":
            model_path = r"model_save/mobilenetX0.50.pth"
        elif model_mold == "mobilenetX0.25":
            model_path = r"model_save/mobilenetX0.25.pth"
        else:
            model_path = r"model_save/resnet50.pth"
        self.retinaface = Retinaface(model_path=model_path, backbone=model_mold)

    def detect_image(self, mode, path):
        import os
        if mode == "predict" and (path.lower().endswith(('.bmp', '.dib', '.png', '.jpg', '.jpeg', '.pbm', '.pgm', '.ppm', '.tif', '.tiff'))):
            while True:
                image = cv2.imread(path)
                if image is None:
                    print('Open Error! Try again!')
                    continue
                else:
                    image = cv2.cvtColor(image, cv2.COLOR_BGR2RGB)
                    r_image_points = self.retinaface.detect_image(image).tolist()

        elif mode == "dir_predict" and os.path.isdir(path):
            import os
            import time
            r_image_points = []
            img_names = os.listdir(path)
            for img_name in img_names:
                t = time.time()
                if img_name.lower().endswith(('.bmp', '.dib', '.png', '.jpg', '.jpeg', '.pbm', '.pgm', '.ppm', '.tif', '.tiff')):
                    image_path = os.path.join(path, img_name)
                    image = cv2.imread(image_path)
                    image = cv2.cvtColor(image, cv2.COLOR_BGR2RGB)
                    r_image_points.append(self.retinaface.detect_image(image).tolist())
        else:
            return []
        return r_image_points

    def setModel(self,model_mold):
        if model_mold == "mobilenetX1.00":
            model_path= r"model_save/mobilenetX1.00.pth"
        elif model_mold == "mobilenetX0.75":
            model_path = r"model_save/mobilenetX0.75.pth"
        elif model_mold == "mobilenetX0.50":
            model_path = r"model_save/mobilenetX0.50.pth"
        elif model_mold == "mobilenetX0.25":
            model_path = r"model_save/mobilenetX0.25.pth"
        else:
            model_path = r"model_save/resnet50.pth"
        self.retinaface = Retinaface(model_path=model_path, backbone=model_mold)
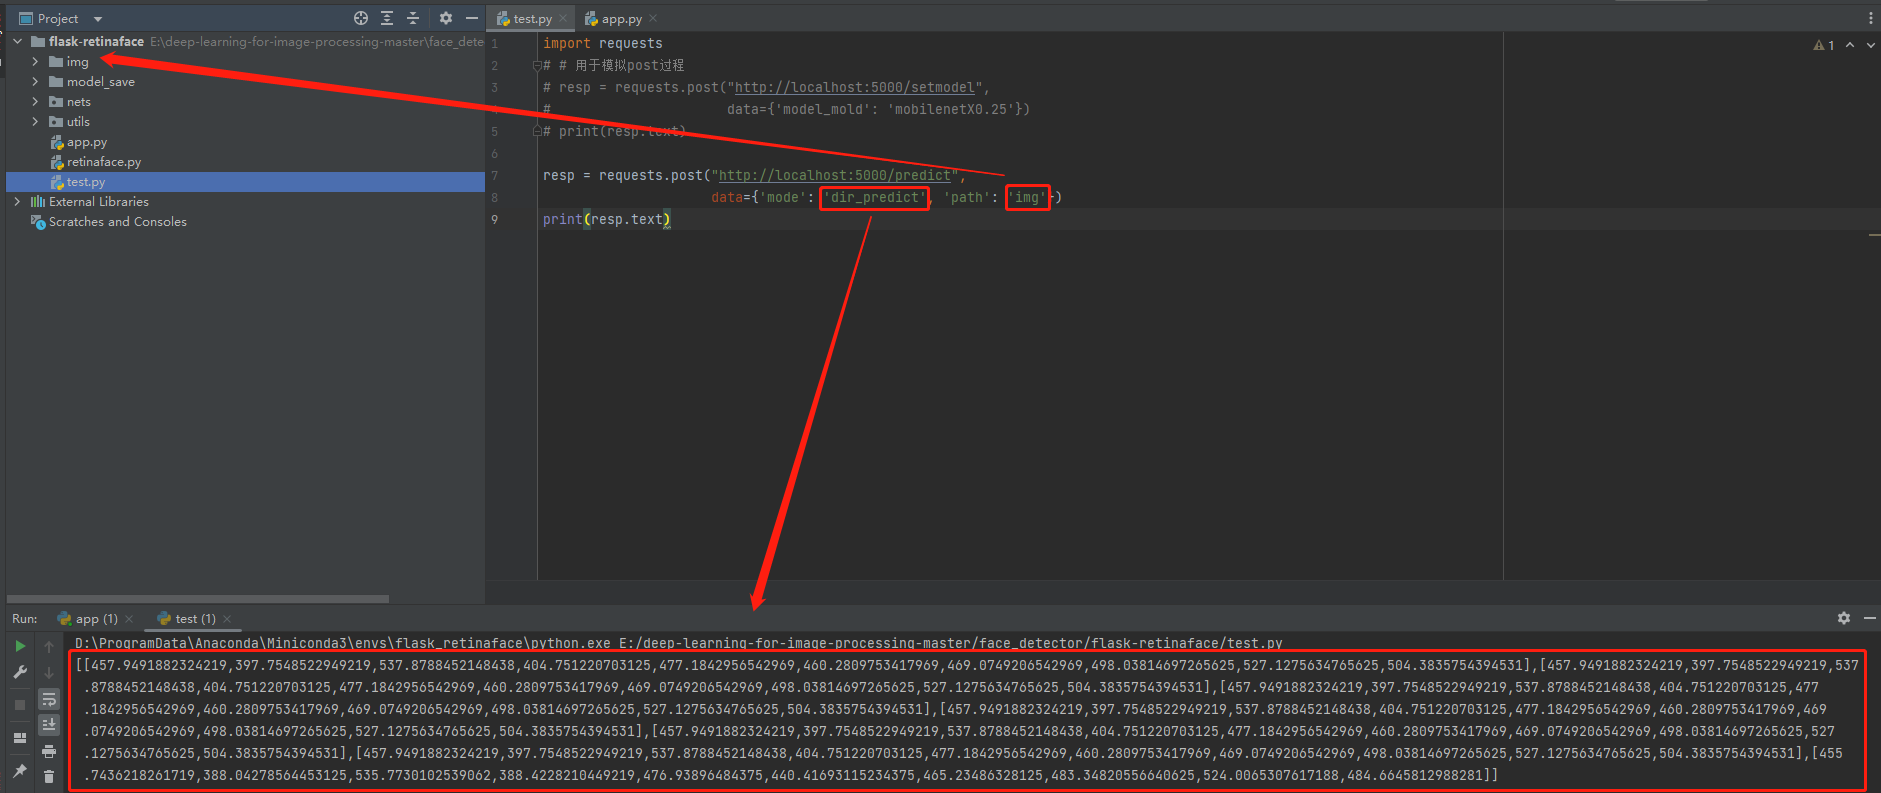
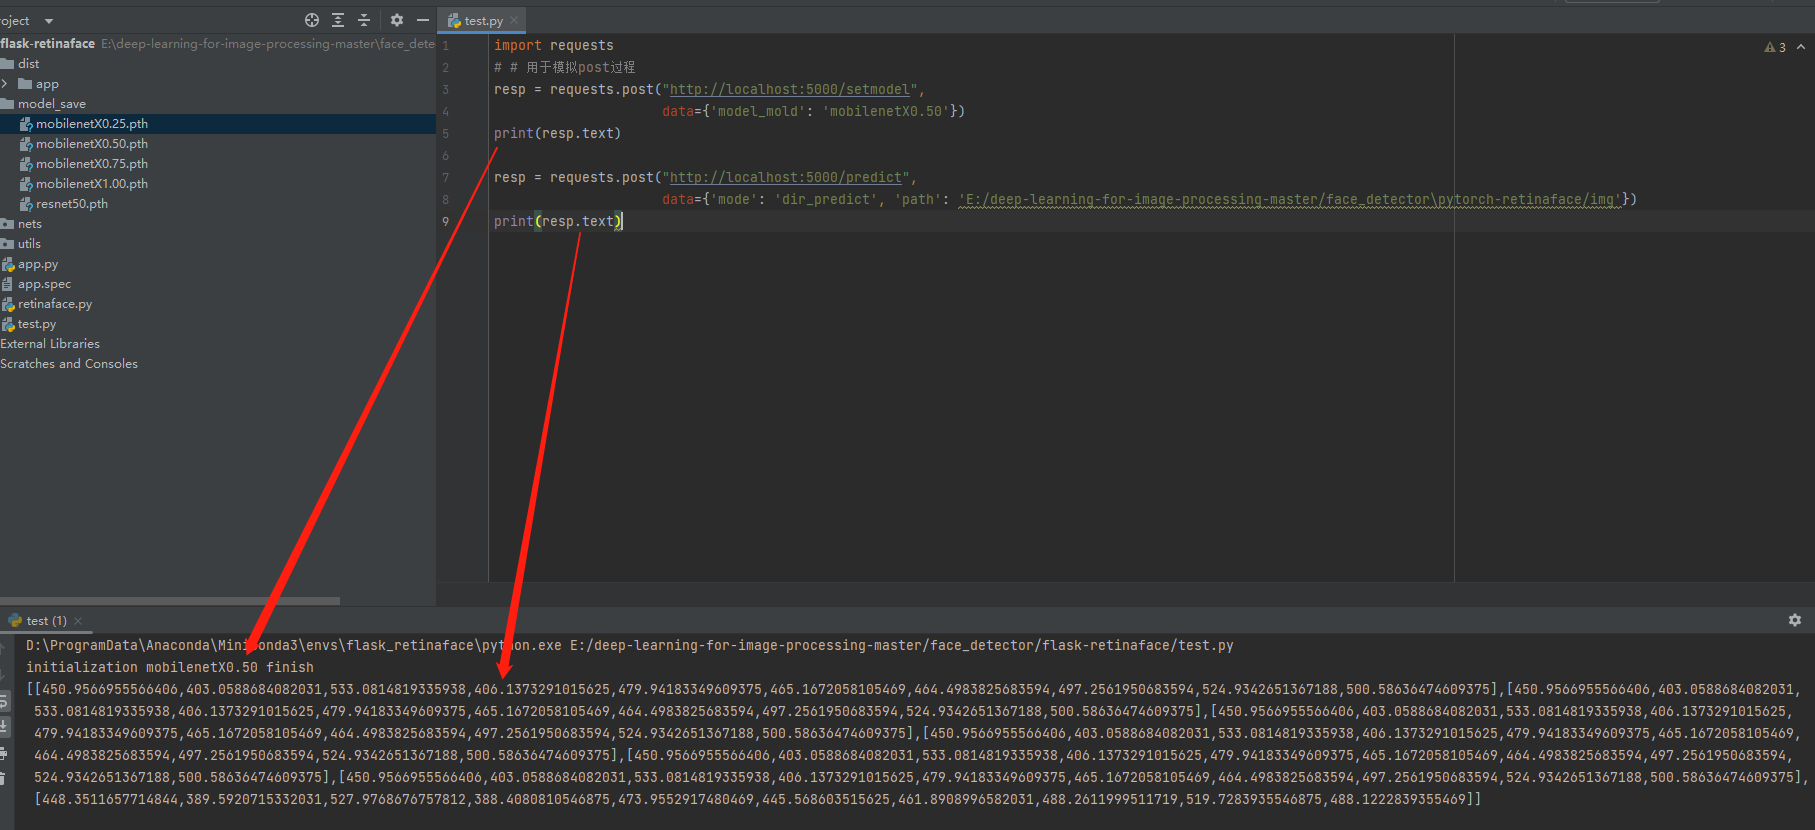
test.py用于HTTP Post请求过程模拟。
"http://localhost:5000/setmodel"加载指定backbone,假设不指定backbone,默认加载mobilenetX1.00。
import requests
resp = requests.post("http://localhost:5000/setmodel",
                     data={

    'model_mold': 'mobilenetX0.25'})
print(resp.text)
"http://localhost:5000/predict"指定模式mode(单张图片或批量图片)和图片路径path。
import requests
resp = requests.post("http://localhost:5000/predict",
                     data={

    'mode': 'dir_predict', 'path': 'img'})
print(resp.text)
启动服务后,post发送http请求,默认backbone加载mobilenetX1.00,path指定批量图片的文件夹地址,dir_predict(批量预测图片)mode方式预测所以图片的五个关键点(双眼、鼻子和俩边嘴角)xy像素坐标,源码其实还有框的坐标和高宽,博主不需要就去掉了。
 多张图片,每张图片数据保存在一个list里–5个关键点xy像素坐标共10个值。
【代码上传】,只保留预测相关文件,功能如下图所示,不做过多讲解,主要讲解部署和使用。
win10下打包成exe(选看)
# 安装PyInstaller包,5.4.0版本
pip install -i https://pypi.tuna.tsinghua.edu.cn/simple Pyinstaller==5.4.0
# 生成spec文件
pyi-makespec -w app.py
安装了5.7.0及以后版本的Pyinstaller,打包部署启动的时候会报如下错误:
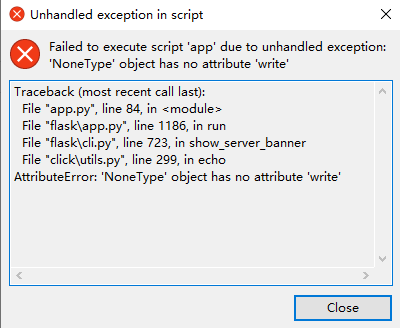
解决方式:pip指定5.4.0版本的安装包安装。
修改app.spec内容:由于打包的主文件是app.py,因此生成的spec文件名称为app.spec,俩者在同一个目录下。
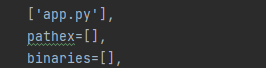
    ['app.py',
    "E:/deep-learning-for-image-processing-master/face_detector/flask-retinaface/retinaface.py",
    "E:/deep-learning-for-image-processing-master/face_detector/flask-retinaface/nets/layers.py",
    "E:/deep-learning-for-image-processing-master/face_detector/flask-retinaface/nets/mobilenet.py",
    "E:/deep-learning-for-image-processing-master/face_detector/flask-retinaface/nets/resnet.py",
    "E:/deep-learning-for-image-processing-master/face_detector/flask-retinaface/nets/retinaface.py",
    "E:/deep-learning-for-image-processing-master/face_detector/flask-retinaface/nets/retinaface_training.py",
    "E:/deep-learning-for-image-processing-master/face_detector/flask-retinaface/utils/anchors.py",
    "E:/deep-learning-for-image-processing-master/face_detector/flask-retinaface/utils/callbacks.py",
    "E:/deep-learning-for-image-processing-master/face_detector/flask-retinaface/utils/config.py",
    "E:/deep-learning-for-image-processing-master/face_detector/flask-retinaface/utils/dataloader.py",
    "E:/deep-learning-for-image-processing-master/face_detector/flask-retinaface/utils/utils.py",
    "E:/deep-learning-for-image-processing-master/face_detector/flask-retinaface/utils/utils_bbox.py",
    "E:/deep-learning-for-image-processing-master/face_detector/flask-retinaface/utils/utils_fit.py",
    "E:/deep-learning-for-image-processing-master/face_detector/flask-retinaface/utils/utils_map.py",
    ],
    pathex=["E:/deep-learning-for-image-processing-master/face_detector/flask-retinaface"],
    binaries=[  ("E:/deep-learning-for-image-processing-master/face_detector/flask-retinaface/model_save/mobilenetX0.25.pth", "model_save"),
                ("E:/deep-learning-for-image-processing-master/face_detector/flask-retinaface/model_save/mobilenetX0.50.pth", "model_save"),
                ("E:/deep-learning-for-image-processing-master/face_detector/flask-retinaface/model_save/mobilenetX0.75.pth", "model_save"),
                ("E:/deep-learning-for-image-processing-master/face_detector/flask-retinaface/model_save/mobilenetX1.00.pth", "model_save"),
                ("E:/deep-learning-for-image-processing-master/face_detector/flask-retinaface/model_save/resnet50.pth", "model_save"),
    ],
# 运行spec文件进行打包
pyinstaller app.spec
完成打包后在pathex指定文件夹下产生build(可以删除)和dist文件夹,所需的可执行文件在dist目录内

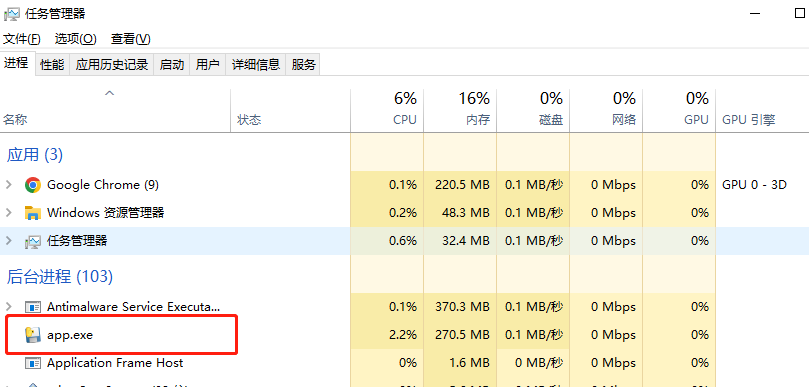
双击运行exe,运行test.py进行Post请求,测试结果如下图:
总结
尽可能简单、详细的介绍Flask快速部署深度学习模型的过程。