文章目录
前言
前段时间看了知乎有一个问题:训练好的深度学习模型是怎样部署的?,当中有一个高赞的回答,大致意思如下:
深度学习部署方式取决于你的需求:
- 需求一:简单的demo演示,看看效果。只需要把训练模型切换到inference模式或者用CPython包装供C++工程进行调用。
- 需求二:放到服务器上开启服务,不要求吞吐不要求时延。基于训练框架(tensorflow,pytorch,caffe)等用C++部署一套。这种尚未脱离框架,导致占用存储空间。
- 需求三:放到服务器上要求吞吐和时延。使用TensorRT、Openvino等推理框架
- 需求四:放在Nvidia嵌入式平台上跑,注重时延。比如PX2、TX2、Xavier等
- 需求五:上面都不满足,那就自己去写推理框架。
根据列出的需求,深度学习模型训练完成后不可能直接在训练框架上通过切换推理模型来进行部署推理,先不说系统要求的吞吐或者时延,使用深度学习的推理框架占用的存储空间非常大,如tensorflow的,当然土豪可以除外。因此为了提升模型的效率,接下来对深度学习模型部署进行论述。
本篇博客主要介绍通过模型的量化与剪枝进行瘦身,后续可能会写其他的瘦身以及提速,如使用一些推理框架TensorRT以及penvino,脱离原来的训练框架,还有是模型如何提速以及模型移动端的部署(Tensorflow Lite)。另外本博客主要是基于Tensorflow框架,模型的优化主要是从模型的剪枝、量化以及权重聚类叙述。
模型剪枝
MNIST
MNIST是深度学习里面的“Hello world”,接下来以这个为例,讲述如何进行模型的剪枝。顺便提及一下,剪枝在决策树中也非常重要,可分为预剪枝和后剪枝。在MNIST的例子当中,模型的剪枝与预剪枝有异曲同工之处,详情可以参考:https://github.com/tensorflow/model-optimization/blob/master/tensorflow_model_optimization/g3doc/guide/pruning/pruning_with_keras.ipynb。Tensorflow的模型剪枝需要安装tensorflow-model-optimization模块。
常规训练
Setup
pip install -q tensorflow-model-optimization
import tempfile
import os
import tensorflow as tf
import numpy as np
from tensorflow import keras
%load_ext tensorboard
常规训练模型
# Load MNIST dataset
mnist = keras.datasets.mnist
(train_images, train_labels), (test_images, test_labels) = mnist.load_data()

# Normalize the input image so that each pixel value is between 0 and 1.
train_images = train_images / 255.0
test_images = test_images / 255.0

# Define the model architecture.
model = keras.Sequential([
  keras.layers.InputLayer(input_shape=(28, 28)),
  keras.layers.Reshape(target_shape=(28, 28, 1)),
  keras.layers.Conv2D(filters=12, kernel_size=(3, 3), activation='relu'),
  keras.layers.MaxPooling2D(pool_size=(2, 2)),
  keras.layers.Flatten(),
  keras.layers.Dense(10)
])

# Train the digit classification model
model.compile(optimizer='adam',
              loss=tf.keras.losses.SparseCategoricalCrossentropy(from_logits=True),
              metrics=['accuracy'])

model.fit(
  train_images,
  train_labels,
  epochs=4,
  validation_split=0.1,
)
得到的输出:
Downloading data from https://storage.googleapis.com/tensorflow/tf-keras-datasets/mnist.npz
11493376/11490434 [==============================] - 0s 0us/step
Epoch 1/4
1688/1688 [==============================] - 10s 6ms/step - loss: 0.2785 - accuracy: 0.9220 - val_loss: 0.1031 - val_accuracy: 0.9740
Epoch 2/4
1688/1688 [==============================] - 9s 5ms/step - loss: 0.1063 - accuracy: 0.9691 - val_loss: 0.0782 - val_accuracy: 0.9790
Epoch 3/4
1688/1688 [==============================] - 9s 5ms/step - loss: 0.0815 - accuracy: 0.9765 - val_loss: 0.0788 - val_accuracy: 0.9775
Epoch 4/4
1688/1688 [==============================] - 9s 5ms/step - loss: 0.0689 - accuracy: 0.9797 - val_loss: 0.0633 - val_accuracy: 0.9840
<tensorflow.python.keras.callbacks.History at 0x7f146fbd8bd0>
模型评估
_, baseline_model_accuracy = model.evaluate(
    test_images, test_labels, verbose=0)

print('Baseline test accuracy:', baseline_model_accuracy)

_, keras_file = tempfile.mkstemp('.h5')
tf.keras.models.save_model(model, keras_file, include_optimizer=False)
print('Saved baseline model to:', keras_file)
Baseline test accuracy: 0.9775999784469604
Saved baseline model to: /tmp/tmpjj6swf59.h5
Pruning
模型定义
在这个模型剪枝的例子当中,模型以50%的稀疏度开始,以稀疏度80%结束。
import tensorflow_model_optimization as tfmot

prune_low_magnitude = tfmot.sparsity.keras.prune_low_magnitude

# Compute end step to finish pruning after 2 epochs.
batch_size = 128
epochs = 2
validation_split = 0.1 # 10% of training set will be used for validation set.

num_images = train_images.shape[0] * (1 - validation_split)
end_step = np.ceil(num_images / batch_size).astype(np.int32) * epochs

# Define model for pruning.
pruning_params = {


      'pruning_schedule': tfmot.sparsity.keras.PolynomialDecay(initial_sparsity=0.50,
                                                               final_sparsity=0.80,
                                                               begin_step=0,
                                                               end_step=end_step)
}

model_for_pruning = prune_low_magnitude(model, **pruning_params)

# `prune_low_magnitude` requires a recompile.
model_for_pruning.compile(optimizer='adam',
              loss=tf.keras.losses.SparseCategoricalCrossentropy(from_logits=True),
              metrics=['accuracy'])

model_for_pruning.summary()
/tmpfs/src/tf_docs_env/lib/python3.7/site-packages/tensorflow/python/keras/engine/base_layer.py:2191: UserWarning: `layer.add_variable` is deprecated and will be removed in a future version. Please use `layer.add_weight` method instead.
  warnings.warn('`layer.add_variable` is deprecated and '
Model: "sequential"
_________________________________________________________________
Layer (type)                 Output Shape              Param #
=================================================================
prune_low_magnitude_reshape  (None, 28, 28, 1)         1
_________________________________________________________________
prune_low_magnitude_conv2d ( (None, 26, 26, 12)        230
_________________________________________________________________
prune_low_magnitude_max_pool (None, 13, 13, 12)        1
_________________________________________________________________
prune_low_magnitude_flatten  (None, 2028)              1
_________________________________________________________________
prune_low_magnitude_dense (P (None, 10)                40572
=================================================================
Total params: 40,805
Trainable params: 20,410
Non-trainable params: 20,395
_________________________________________________________________
在训练的过程中,以下两个callbacks是必须的:
tfmot.sparsity.keras.UpdatePruningStep is required during training, and
tfmot.sparsity.keras.PruningSummaries provides logs for tracking progress and debugging.
不然会出现以下的报错提示:

训练模型
logdir = tempfile.mkdtemp()

callbacks = [
  tfmot.sparsity.keras.UpdatePruningStep(),
  tfmot.sparsity.keras.PruningSummaries(log_dir=logdir),
]

model_for_pruning.fit(train_images, train_labels,
                  batch_size=batch_size, epochs=epochs, validation_split=validation_split,
                  callbacks=callbacks)
Epoch 1/2
WARNING:tensorflow:From /tmpfs/src/tf_docs_env/lib/python3.7/site-packages/tensorflow/python/ops/array_ops.py:5049: calling gather (from tensorflow.python.ops.array_ops) with validate_indices is deprecated and will be removed in a future version.
Instructions for updating:
The `validate_indices` argument has no effect. Indices are always validated on CPU and never validated on GPU.
  3/422 [..............................] - ETA: 12s - loss: 0.0628 - accuracy: 0.9896  WARNING:tensorflow:Callback method `on_train_batch_end` is slow compared to the batch time (batch time: 0.0075s vs `on_train_batch_end` time: 0.0076s). Check your callbacks.
422/422 [==============================] - 5s 9ms/step - loss: 0.0797 - accuracy: 0.9771 - val_loss: 0.0828 - val_accuracy: 0.9790
Epoch 2/2
422/422 [==============================] - 3s 8ms/step - loss: 0.0971 - accuracy: 0.9741 - val_loss: 0.0839 - val_accuracy: 0.9775
<tensorflow.python.keras.callbacks.History at 0x7f12e4502910>
评估模型
_, model_for_pruning_accuracy = model_for_pruning.evaluate(
   test_images, test_labels, verbose=0)

print('Baseline test accuracy:', baseline_model_accuracy)
print('Pruned test accuracy:', model_for_pruning_accuracy)
Baseline test accuracy: 0.9775999784469604
Pruned test accuracy: 0.972100019454956
pruning your model
对自己模型进行剪枝,可以参考我的仓库:https://github.com/RyanCCC/Yolov4/blob/main/pruning.py

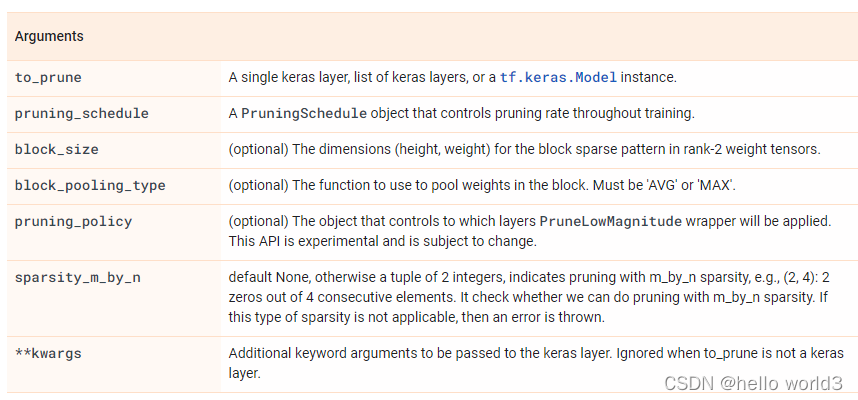
API
prune_low_magnitude
tfmot.sparsity.keras.prune_low_magnitude(
    to_prune, pruning_schedule=pruning_sched.ConstantSparsity(0.5, 0),
    block_size=(1, 1), block_pooling_type='AVG', pruning_policy=None,
    sparsity_m_by_n=None, **kwargs
)
Prune a model:
pruning_params = {


    'pruning_schedule': ConstantSparsity(0.5, 0),
    'block_size': (1, 1),
    'block_pooling_type': 'AVG'
}

model = prune_low_magnitude(
    keras.Sequential([
        layers.Dense(10, activation='relu', input_shape=(100,)),
        layers.Dense(2, activation='sigmoid')
    ]), **pruning_params)
Prune a layer
pruning_params = {


    'pruning_schedule': PolynomialDecay(initial_sparsity=0.2,
        final_sparsity=0.8, begin_step=1000, end_step=2000),
    'block_size': (2, 3),
    'block_pooling_type': 'MAX'
}

model = keras.Sequential([
    layers.Dense(10, activation='relu', input_shape=(100,)),
    prune_low_magnitude(layers.Dense(2, activation='tanh'), **pruning_params)
])
strip_pruning
tfmot.sparsity.keras.strip_pruning(
    model
)
orig_model = tf.keras.Model(inputs, outputs)
pruned_model = prune_low_magnitude(orig_model)
exported_model = strip_pruning(pruned_model)
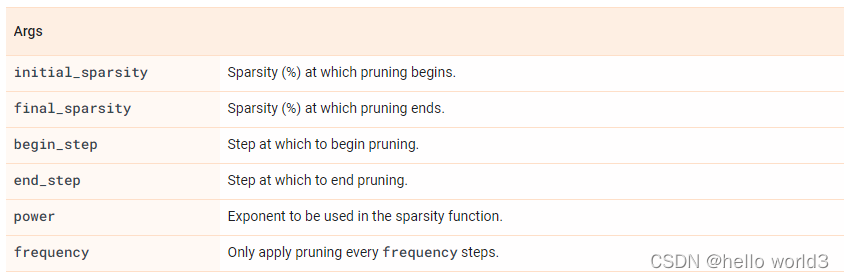
PolynomialDecay
tfmot.sparsity.keras.PolynomialDecay(
    initial_sparsity, final_sparsity, begin_step, end_step, power=3, frequency=100
)
更多的Api请参考:https://www.tensorflow.org/model_optimization/api_docs/python/tfmot
实战
关于实战的话,对自定义的模型层进行剪枝的时候会出现以下错误:

对于自定义的层,而这个层可能继承的是keras.layers.Layer类,但并不支持prunable,因此导致这个错误。解决方案就是使你的模型或层同时继承Layer和Prunable_layer这两个类,使其成为PrunableLayer的实例。
如:
class Mish(Layer, tfmot.sparsity.keras.PrunableLayer):
    def __init__(self, **kwargs):
        super(Mish, self).__init__(**kwargs)
        self.supports_masking = True

    def call(self, inputs):
        return inputs * K.tanh(K.softplus(inputs))

    def get_config(self):
        config = super(Mish, self).get_config()
        return config

    def compute_output_shape(self, input_shape):
        return input_shape

    def get_prunable_weights(self):
        return self.weights
模型量化
模型的量化有两种形式:训练后量化以及量化训练。训练化的量化更易于使用,但是训练后得到的模型性能没有量化训练的好。
量化训练
MNIST
导入相关的模块:
import tempfile
import os

import tensorflow as tf

from tensorflow import keras
训练模型
# Load MNIST dataset
mnist = keras.datasets.mnist
(train_images, train_labels), (test_images, test_labels) = mnist.load_data()

# Normalize the input image so that each pixel value is between 0 to 1.
train_images = train_images / 255.0
test_images = test_images / 255.0

# Define the model architecture.
model = keras.Sequential([
  keras.layers.InputLayer(input_shape=(28, 28)),
  keras.layers.Reshape(target_shape=(28, 28, 1)),
  keras.layers.Conv2D(filters=12, kernel_size=(3, 3), activation='relu'),
  keras.layers.MaxPooling2D(pool_size=(2, 2)),
  keras.layers.Flatten(),
  keras.layers.Dense(10)
])

# Train the digit classification model
model.compile(optimizer='adam',
              loss=tf.keras.losses.SparseCategoricalCrossentropy(from_logits=True),
              metrics=['accuracy'])

model.fit(
  train_images,
  train_labels,
  epochs=1,
  validation_split=0.1,
)
量化模型
import tensorflow_model_optimization as tfmot

quantize_model = tfmot.quantization.keras.quantize_model

# q_aware stands for for quantization aware.
q_aware_model = quantize_model(model)

# `quantize_model` requires a recompile.
q_aware_model.compile(optimizer='adam',
              loss=tf.keras.losses.SparseCategoricalCrossentropy(from_logits=True),
              metrics=['accuracy'])

q_aware_model.summary()
train_images_subset = train_images[0:1000] # out of 60000
train_labels_subset = train_labels[0:1000]

q_aware_model.fit(train_images_subset, train_labels_subset,
                  batch_size=500, epochs=1, validation_split=0.1)
_, baseline_model_accuracy = model.evaluate(
    test_images, test_labels, verbose=0)

_, q_aware_model_accuracy = q_aware_model.evaluate(
   test_images, test_labels, verbose=0)

print('Baseline test accuracy:', baseline_model_accuracy)
print('Quant test accuracy:', q_aware_model_accuracy)
更加详细的指南请参考:量化感知训练综合指南
训练后量化
这部分内容主要针对移动端的部署,详情可以参考:quantization/post_training
import tensorflow as tf

def representative_dataset_gen():
  for _ in range(num_calibration_steps):
    # Get sample input data as a numpy array in a method of your choosing.
    yield [input]

converter = tf.lite.TFLiteConverter.from_saved_model(saved_model_dir)
converter.optimizations = [tf.lite.Optimize.DEFAULT]
converter.representative_dataset = representative_dataset_gen
tflite_quant_model = converter.convert()
参考