基于Faster rcnn pytorch的遥感图像检测
代码:https://github.com/jwyang/faster-rcnn.pytorch/tree/pytorch-1.0
数据集
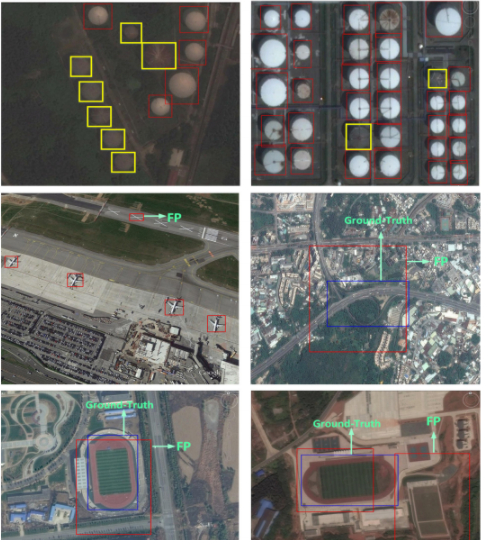
使用RSOD遥感数据集,VOC的数据格式如下:

RSOD是一个开放的目标检测数据集,用于遥感图像中的目标检测。数据集包含飞机,油箱,运动场和立交桥,以PASCAL VOC数据集的格式进行标注。
数据集包括4个文件夹,每个文件夹包含一种对象:
1.飞机数据集,446幅图像中的4993架飞机
2.操场,189副图像中的191个操场。
3.立交桥,176副图像中的180座立交桥。
4.油箱,165副图像中的1586个 油箱。
下载:https://github.com/RSIA-LIESMARS-WHU/RSOD-Dataset-
ubuntu使用Faster rcnn pytorch-1.0
ubuntu使用此代码比较顺利,因为编译Lib文件很容易就过了。
cuda环境:
参考:https://blog.csdn.net/qq_39542170/article/details/119800534
安装环境:
1.conda 创建python3.6的环境
2.运行
conda install pytorch==1.2.0 torchvision==0.4.0 cudatoolkit=10.1 -c pytorch
3.运行
pip install -r requirements.txt -i -i https://pypi.tuna.tsinghua.edu.cn/simple
如果报错:找不到包,则运行;
python -m pip install --upgrade pip
4.编译lib,编译前确保有gcc和g++环境,不知道怎么安装可以查
cd lib
python setup.py build develop
编译之后会生成可执行文件,然后就可以import那些frcnn模型包了。因为原作者也是在ubuntu,linux上编译,所以问题比较少。
数据准备:
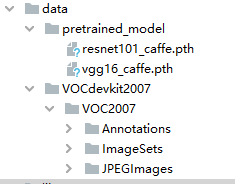
需要在工程文件夹里新建data文件夹,并保持如下图同样的数据路径(文件夹名要一样,懒得改源码了),包括数据集和预训练模型,预训练模型在git上面有下载:
训练:
CUDA_VISIBLE_DEVICES=0,1 python trainval_net.py --dataset pascal_voc --net res101 --cuda
其中需要修改的只是–net,可以是vgg16,也可以是res101。gpu看个人情况而定。
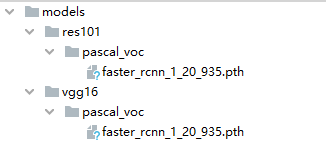
训练完成之后,会在models文件夹保存权重pth文件。
评估:
python test_net.py --dataset pascal_voc --net res101 --checksession 1 --checkepoch 20 --checkpoint 935--cuda
其中需要修改的只是–net,可以是vgg16,也可以是res101。gpu看个人情况而定。注意,这里的三个check参数,是定义了训好的检测模型名称,我训好的名称为faster_rcnn_1_20_935,代表了checksession = 1,checkepoch = 20, checkpoint = 935,这样才可以读到模型“faster_rcnn_1_20_935”。训练中,我设置的epoch为20,所以checkepoch选择20,也就是选择最后那轮训好的模型,理论上应该是效果最好的。当然着也得看loss。
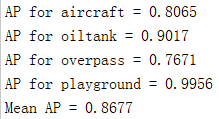
测试之后就可以看到终端打印的每种类别(包括背景bg)的AP值,顺便可以计算mAP值,
vgg16训练的mAP如下:
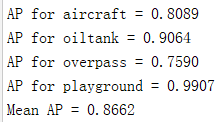
resnet101训练的mAP如下:
测试图片:
python demo.py --net vgg16 --checksession 1 --checkepoch 20 --checkpoint 935 --cuda --load_dir models
此处我们需输入使用的网络(vgg16),以及训练好的模型路径(models)。我们测试的图片都在images文件夹里。在此处有坑。作者提供了4张image做测试,因为测试完的图像会输出到images文件夹里,所以做完一次测试,images文件夹会有8张图片(输出图片命名规则是在原图像文件名后面加上"_det"),而原作者没有把他自己测试后的图片删去,所以大家在做demo测试时,别忘把以"_det"结尾的检测输出文件先删去,否则测试完你的images文件夹可能会得到16张图像。当然,你可以放一些你自己在网上搜的图片在images文件夹里进行demo测试,看看效果。但检测类别一定在训练的类别中要有。
报错:
一些报错经验和解决方法大家可以参考这篇博客:
https://www.cnblogs.com/wind-chaser/p/11359521.html
里面特别注意训练前要改类别个数和类别名。
win10使用Faster rcnn pytorch-1.0
cuda环境:
参考:https://blog.csdn.net/qq_39542170/article/details/119800534
第一次安装过程(未成功,特此记录,虽然没有什么用,大家想成功安装就看第二次安装过程):
安装环境:
1.conda 创建python3.6的环境
2.运行
pip install torch==1.5.0+cu101 torchvision==0.6.0+cu101 -f https://download.pytorch.org/whl/torch_stable.html
如果你们可以直接运行安装:
conda install pytorch==1.4.0 torchvision==0.5.0 cudatoolkit=10.1 -c pytorch
就不要用我上面提到的安装方法,因为可能会报fPIC的错误。
3.运行
pip install -r requirements.txt -i -i https://pypi.tuna.tsinghua.edu.cn/simple
如果报错:找不到包,则运行;
python -m pip install --upgrade pip
4.安装visual studio 2019,安装下面教程安装:
visual studio 2019安装教程(详细的很)
5.编译lib
cd lib
python setup.py build develop
win10编译没有那么幸运,一堆错误,先将遇到的错误总结如下:
报错经验:
1.D:\anaconda3\envs\frcnn\include/pyconfig.h:241:15: error: ‘std::_hypot’ has not been declared #define hypot _hypot
解决方法:把对应的#define hypot _hypot改为#define _hypot hypot
2.nvcc fatal : Cannot find compiler ‘cl.exe’ in PATH
解决方法:win10+2019+cuda11.6 nvcc fatal : Cannot find compiler ‘cl.exe‘ in PATH
3.nvcc -fPIC: No such file or directory
解决方法:这个报错跟torch有关,如果你们可以直接运行安装:
conda install pytorch==1.4.0 torchvision==0.5.0 cudatoolkit=10.1 -c pytorch
就不要用我上面提到的安装方法。如果用了我上面的方法,那么需要改这个文件下的东西:

在文件夹里将所有
“‘-fPIC’”
替换为
‘-fPIC’
4.报错:
C:/Users/Skaldak/FasterRCNN/lib/model/csrc/cuda/ROIAlign_cuda.cu(275): error:
no instance of function template "THCCeilDiv" matches the argument list
            argument types are: (long long, long)

C:/Users/Skaldak/FasterRCNN/lib/model/csrc/cuda/ROIAlign_cuda.cu(275):
error: no instance of overloaded function "std::min" matches the argument list
            argument types are: (<error-type>, long)

C:/Users/Skaldak/FasterRCNN/lib/model/csrc/cuda/ROIAlign_cuda.cu(321):
error: no instance of function template "THCCeilDiv" matches the argument list
            argument types are: (int64_t, long)

C:/Users/Skaldak/FasterRCNN/lib/model/csrc/cuda/ROIAlign_cuda.cu(321):
error: no instance of overloaded function "std::min" matches the argument list
            argument types are: (<error-type>, long)
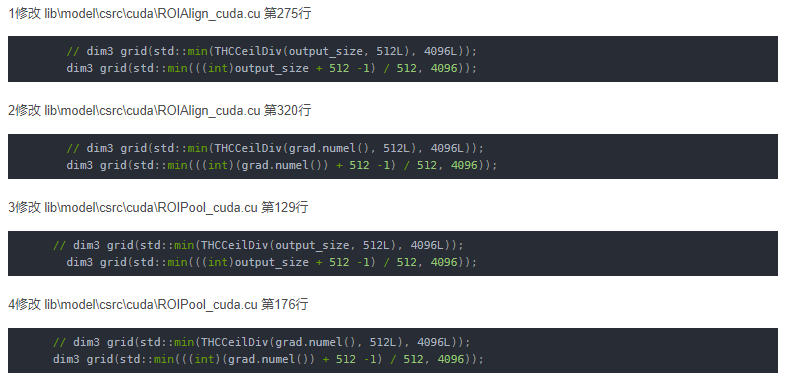
解决方法:
参考:win10和win7系统配置faster rcnn(pytorch)
5.collect2.exe: error: ld returned 1 exit status
放弃。
那么,经历了以上报错之后,我重振旗鼓,首先考虑是不是环境的问题,于是有了第二次安装过程。
第二次安装过程(成功):
安装环境:
1.conda 创建python3.6的环境
2.运行
conda install pytorch==1.4.0 torchvision==0.5.0 cudatoolkit=10.1 -c pytorch
你们也可以运行:
pip install torch==1.2.0+cu92 torchvision==0.4.0+cu92 -f https://download.pytorch.org/whl/torch_stable.html
3.运行
pip install -r requirements.txt -i -i https://pypi.tuna.tsinghua.edu.cn/simple
如果报错:找不到包,则运行;
python -m pip install --upgrade pip
4.安装visual studio 2019,安装下面教程安装:
visual studio 2019安装教程(详细的很)
5.编译lib
cd lib
python setup.py build develop
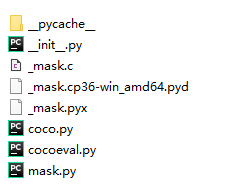
6.重新编译编译lib/pycocotools
因为原作者是使用ubuntu编译的,所以wins10直接使用会报“can not import ‘_mask’”的错误,所以需要下载:https://github.com/cocodataset/cocoapi/tree/master
然后进入PythonAPI,将12行的
extra_compile_args=['-Wno-cpp', '-Wno-unused-function', '-std=c99'],
改为
extra_compile_args=['-std=c99'],
然后运行
python setup.py build develop
把编译完成的内容替换原来的lib/pycocotools的内容,替换完为:
报错经验:
1.报错:
C:/Users/Skaldak/FasterRCNN/lib/model/csrc/cuda/ROIAlign_cuda.cu(275): error:
no instance of function template "THCCeilDiv" matches the argument list
            argument types are: (long long, long)

C:/Users/Skaldak/FasterRCNN/lib/model/csrc/cuda/ROIAlign_cuda.cu(275):
error: no instance of overloaded function "std::min" matches the argument list
            argument types are: (<error-type>, long)

C:/Users/Skaldak/FasterRCNN/lib/model/csrc/cuda/ROIAlign_cuda.cu(321):
error: no instance of function template "THCCeilDiv" matches the argument list
            argument types are: (int64_t, long)

C:/Users/Skaldak/FasterRCNN/lib/model/csrc/cuda/ROIAlign_cuda.cu(321):
error: no instance of overloaded function "std::min" matches the argument list
            argument types are: (<error-type>, long)
解决方法:
参考:win10和win7系统配置faster rcnn(pytorch)
2.TORCH_API Value* insertGetAttr
这个错误困扰我很久,很多博主都没遇到,于是我从编译gcc.exe找到了灵感。结果发现,我下载的mingw64里面的gcc.exe不能用来编译此项目,但是好在安装了visual studio 2019,于是我们可以换一种编译器去编译,即msvc 。
之前是运行:
python setup.py build develop
现在变为运行:
python setup.py build_ext --compiler=msvc develop
进行编译,终于成功了!
wins10下测试图片:
先在images文件放要检测的图片,比如:

这里先来两张,
然后运行:
python demo.py --net vgg16 --checksession 1 --checkepoch 20 --checkpoint 935 --cuda --load_dir models
检测结果:
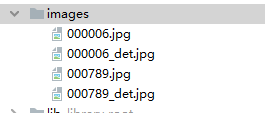
有_det就是检测保存的图片,看看效果:
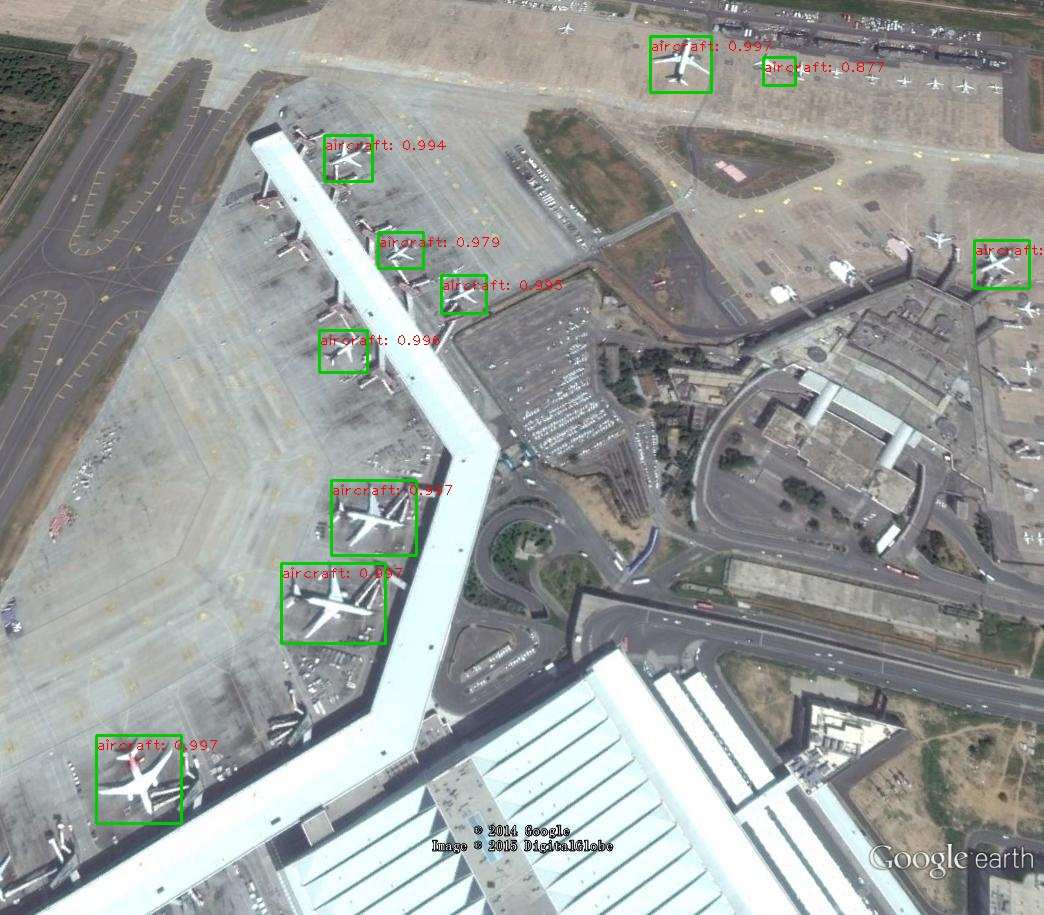
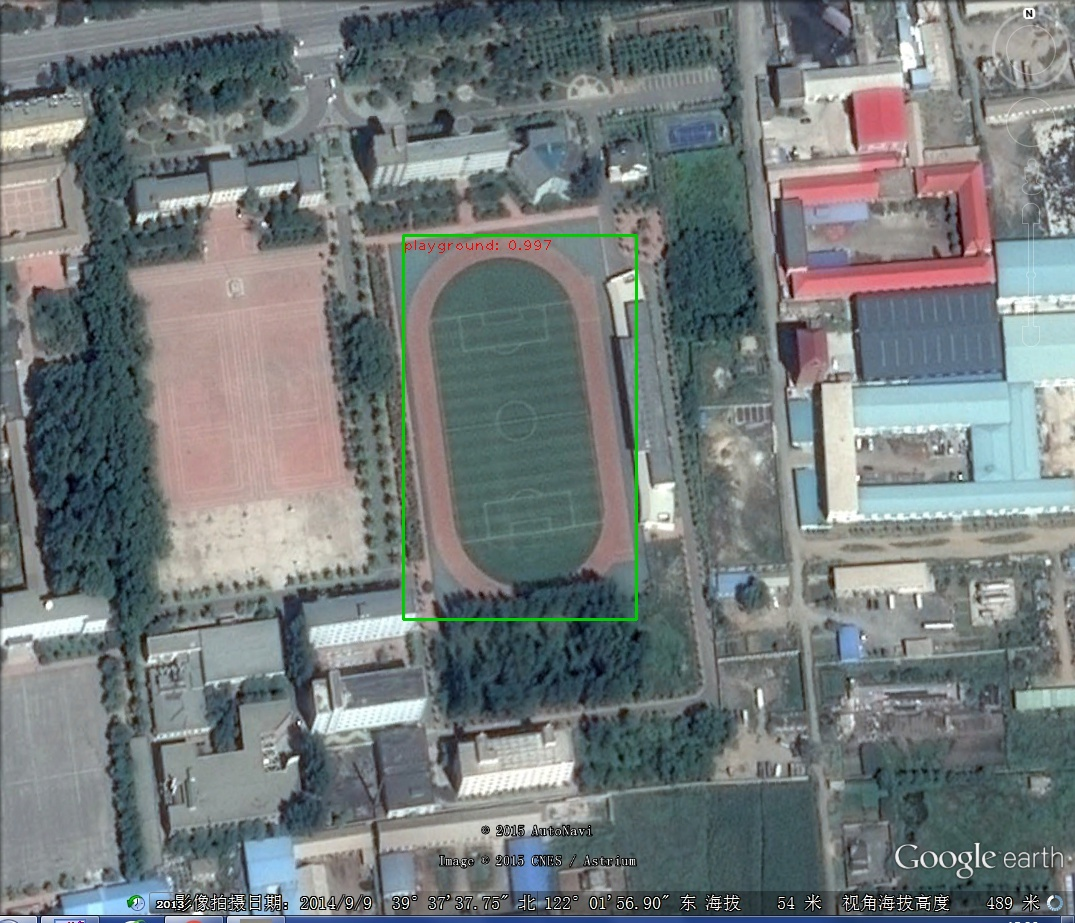
实属不易,需要代码的可以私