写在前面
-
为了保证整个示例项目更加直观,方便理解,在展示一些函数的源码时会使用numpy版本进行展示,而在示例程序中并未使用numpy版本的库,在Cython版本与numpy版本出现差异的原码前会有标注,希望读者留意。
-
3DMM实例程序的jupyter版本后续会更新,完全免费,欢迎大家下载
预备
上一篇文章在MATLAB里面对BFM模型执行了Face3D提供的程序生成了新的模型数据BFM.mat、BFM_info.mat、BFM_UV.mat。这三个文件的格式分别如下:
- BFM.mat

- BFM_info.mat

- BFM_UV.mat 就是一个53215*2的矩阵

MATLAB里面的程序到底干了些啥,下面从原理进行一些分析:
首先要知道3DMM的公式为
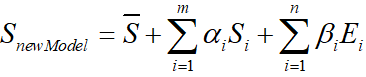
其中, S ‾ \overline{S} S代表平均人脸形状, S i S_i Si表示形状PCA主成分, α i \alpha_i αi是形状系数, E i E_i Ei是人脸表情PCA主成分, β i \beta_i βi是人脸表情系数。
BFM模型不直接提供原始人脸数据或参数化后的人脸,只提供了形状和纹理信息
PS:在BMF模型经过去中心化后的数据所对应式中的m、n均为199。
01_MorphableModel.mat中具体包含数据如下
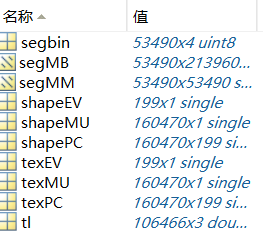
如表所示:
| 名称 | 含义 | 维度 |
|---|---|---|
| shapeMU | 平均人脸形状 | (160470,1) |
| shapePC | 形状主成分 | (160470,199) |
| shapeEV | 形状主成分方差 | (199,1) |
| texMU | 平均人脸纹理 | (160470,1) |
| texPC | 纹理主成分 | (160470,199) |
| texEV | 纹理主成分方差 | (199,1) |
| tl | 三角面片 | (106466,3) |
| segbin | 区域分割信息 | (53490,4) |
在经过MATLAB运算输出的BFM.mat从3DDFA那里获取了表情数据,这样来看face3d里面的3dmm例程:
bfm = MorphabelModel('Data/BFM/Out/BFM.mat')
print('init bfm model success')
其中MorphabelModel所对应的源码为
class  MorphabelModel(object):
    """docstring for  MorphabelModel
    model: nver: number of vertices. ntri: number of triangles. *: must have. ~: can generate ones array for place holder.
            'shapeMU': [3*nver, 1]. *
            'shapePC': [3*nver, n_shape_para]. *
            'shapeEV': [n_shape_para, 1]. ~
            'expMU': [3*nver, 1]. ~
            'expPC': [3*nver, n_exp_para]. ~
            'expEV': [n_exp_para, 1]. ~
            'texMU': [3*nver, 1]. ~
            'texPC': [3*nver, n_tex_para]. ~
            'texEV': [n_tex_para, 1]. ~
            'tri': [ntri, 3] (start from 1, should sub 1 in python and c++). *
            'tri_mouth': [114, 3] (start from 1, as a supplement to mouth triangles). ~
            'kpt_ind': [68,] (start from 1). ~
    """
    def __init__(self, model_path, model_type = 'BFM'):
        super( MorphabelModel, self).__init__()
        if model_type=='BFM':
            self.model = load.load_BFM(model_path)
        else:
            print('sorry, not support other 3DMM model now')
            exit()

        # fixed attributes
        self.nver = self.model['shapePC'].shape[0]/3
        self.ntri = self.model['tri'].shape[0]
        self.n_shape_para = self.model['shapePC'].shape[1]
        self.n_exp_para = self.model['expPC'].shape[1]
        self.n_tex_para = self.model['texPC'].shape[1]

        self.kpt_ind = self.model['kpt_ind']
        self.triangles = self.model
['tri']
        self.full_triangles = np.vstack((self.model['tri'], self.model['tri_mouth']))
就可以理解self.model = load.load_BFM(model_path)所读取的model里面所包含的元素都是什么了,下面以表格的形式列出来。
| 名称 | 含义 | 格式 |
|---|---|---|
| shapeMU | 平均人脸形状 | (159645,1) |
| shapePC | 形状主成分 | (159645,199) |
| shapeEV | 形状主成分方差 | (199,1) |
| expMU | 平均人脸表情 | (159645,1) |
| expPC | 表情主成分 | (159645,29) |
| expEV | 表情主成分方差 | (29,1) |
| texMU | 平均人脸纹理 | (159645,1) |
| texPC | 纹理主成分 | (159645,199) |
| texEV | 纹理主成分方差 | (199,1) |
| tri | 三角格坐标 | (105840,3) |
| tri_mouth | 嘴部三角格坐标 | (114, 3) |
| kpt_ind | 特征点 | (68,) |
源码解读
1.读取模型&&生成面部网格
读取处理过的BFM模型
bfm = MorphabelModel('Data/BFM/Out/BFM.mat')
print('init bfm model success')
用随机的形状系数和表情系数生成面部网格
sp = bfm.get_shape_para('random')
ep = bfm.get_exp_para('random')
vertices = bfm.generate_vertices(sp, ep)

tp = bfm.get_tex_para('random')
colors = bfm.generate_colors(tp)
colors = np.minimum(np.maximum(colors, 0), 1)
sp对应形状系数 α \alpha α,ep对应表情系数 β \beta β,tp对应的是纹理系数。这些系数均随机产生。
这部分对应的源码如下:
def get_shape_para(self, type = 'random'):
        if type == 'zero':
            sp = np.zeros((self.n_shape_para, 1))
        elif type == 'random':
            sp = np.random.rand(self.n_shape_para, 1)*1e04
        return sp

    def get_exp_para(self, type = 'random'):
        if type == 'zero':
            ep = np.zeros((self.n_exp_para, 1))
        elif type == 'random':
            ep = -1.5 + 3*np.random.random([self.n_exp_para, 1])
            ep[6:, 0] = 0

        return ep

    def generate_vertices(self, shape_para, exp_para):
        '''
        Args:
            shape_para: (n_shape_para, 1)
            exp_para: (n_exp_para, 1)
        Returns:
            vertices: (nver, 3)
        '''
        vertices = self.model['shapeMU'] + \
                   self.model['shapePC'].dot(shape_para) + \
                   self.model['expPC'].dot(exp_para)
        vertices = np.reshape(vertices, [int(3), int(len(vertices)/3)], 'F').T

        return vertices

    # -------------------------------------- texture: here represented with rgb value(colors) in vertices.
    def get_tex_para(self, type = 'random'):
        if type == 'zero':
            tp = np.zeros((self.n_tex_para, 1))
        elif type == 'random':
            tp = np.random.rand(self.n_tex_para, 1)
        return tp

    def generate_colors(self, tex_para):
        '''
        Args:
            tex_para: (n_tex_para, 1)
        Returns:
            colors: (nver, 3)
        '''
        colors = self.model['texMU'] + self.model['texPC'].dot(tex_para)
        colors = np.reshape(colors, [int(3), int(len(colors)/3)], 'F').T/255.

        return colors
形状和表情部分进行了下式的矩阵运算:
纹理部分也进行了类似运算,这里不赘述。
到这里产生了新的人脸模型。
2. 网格位置变换
变换网格顶点位置到合适处。
s = 8e-04
angles = [10, 30, 20]
t = [0, 0, 0]
transformed_vertices = bfm.transform(vertices, s, angles, t)
projected_vertices = transformed_vertices.copy() # using stantard camera & orth projection
 def transform(self, vertices, s, angles, t3d):
        R = mesh.transform.angle2matrix(angles)
        return mesh.transform.similarity_transform(vertices, s, R, t3d)
对应的源码:
def similarity_transform(vertices, s, R, t3d):
    ''' similarity transform. dof = 7.
    3D: s*R.dot(X) + t
    Homo: M = [[sR, t],[0^T, 1]].  M.dot(X)
    Args:(float32)
        vertices: [nver, 3].
        s: [1,]. scale factor.
        R: [3,3]. rotation matrix.
        t3d: [3,]. 3d translation vector.
    Returns:
        transformed vertices: [nver, 3]
    '''
    t3d = np.squeeze(np.array(t3d, dtype = np.float32))
    transformed_vertices = s * vertices.dot(R.T) + t3d[np.newaxis, :]

    return transformed_vertices
这部分和之前pipeline源码分析中的顶点位置变换部分相同,输入为网格顶点vertices、缩放比例s、旋转矩阵R和平移向量t3d执行空间坐标变换s*R.dot(X) + t后输出变换后的顶点位置
3.转化为二维图像
这部分同样与pipeline例程相同,放出来代码:
h = w = 256; c = 3
image_vertices = mesh.transform.to_image(projected_vertices, h, w)
image = mesh.render.render_colors(image_vertices, bfm.triangles, colors, h, w)
plt.imshow(image)
plt.show()
得到新生成的三维人脸模型图片如下图:

后续将继续更新代码后半部分的解读,敬请关注