本地部署 MiniGPT-4
- 1. 什么是 MiniGPT-4
- 2. Github 地址
- 3. 安装 MiniGPT-4
- 4. 准备预训练的 MiniGPT-4 checkpoint
- 5. 在本地启动演示
- 其他 1,安装 CUDA Toolkit 11.8
- 其他 2,安装 GCC 9 版本,并设置为默认GCC版本
- 其他 3(成功),重新安装 bitsandbytes 兼容 CUDA Toolkit 11.8
- 其他 3(失败),重新安装 bitsandbytes 兼容 CUDA Toolkit 11.8
- 其他 4,安装 libgl1-mesa-dev
- 其他 5,解决 `/sbin/ldconfig.real: /usr/lib/wsl/lib/libcuda.so.1 is not a symbolic link` 错误
1. 什么是 MiniGPT-4
MiniGPT-4:使用高级大型语言模型增强视觉语言理解。
MiniGPT-4 是一种改进型的预训练自编码器模型,用于改进视觉-语言理解任务的性能。
MiniGPT-4 基于 GPT-4 架构,但参数数量减少了约 40 倍,以降低计算成本和提高训练速度。
MiniGPT-4 被应用于图像描述生成、视觉问答和视觉常识推理三个视觉-语言理解任务。实验结果表明,相比于最先进的方法,MiniGPT-4 可以在这三个任务中实现更好的性能,同时训练速度也更快。研究表明,通过减少高级语言模型的参数数量,可以在视觉-语言理解领域实现更快、更准确的推理。
MiniGPT-4 可以作为一种轻量级的选择,应用于视觉-语言联合学习环境。
2. Github 地址
https://github.com/Vision-CAIR/MiniGPT-4
3. 安装 MiniGPT-4
refer: https://pytorch.org/get-started/locally/
准备代码和环境,
git clone https://github.com/Vision-CAIR/MiniGPT-4.git
cd MiniGPT-4
conda env create -f environment.yml
conda activate minigpt4
(可选)我使用的是 WSL-Ubuntu 22.04,安装的 CUDA Toolkit 11.8,将 pytorch、torchvision、torchaudio 更新为兼容 CUDA Toolkit 11.8 的版本。
conda uninstall pytorch torchvision torchaudio
conda install pytorch torchvision torchaudio pytorch-cuda=11.8 -c pytorch -c nvidia
(可选)使用 pip 安装时的命令如下,
pip3 install torch torchvision torchaudio --index-url https://download.pytorch.org/whl/cu118
准备好预先训练好的 Vicuna weights,Vicuna 是一个开源的基于 LLAMA 的 LLM,其性能接近于 ChatGPT。我们目前使用Vicuna-13B的v0版本。
安装 git-lfs (https://git-lfs.com),
sudo apt install -y git-lfs
下载 Vicuna 的 delta weight,
git lfs install
git clone https://huggingface.co/lmsys/vicuna-13b-delta-v0  # 更强大,需要至少24G的gpu内存
# or
git clone https://huggingface.co/lmsys/vicuna-7b-delta-v0  # 更小,需要12G gpu内存
注意,这不是直接的 working weight,而是 working weight 和 LLAMA-13B 的 original weight 之间的差异。(由于LLAMA的规则,我们不能发布 LLAMA 的 weight)。
从互联网上获得 HuggingFace 格式的 LLAMA-7B 或 LLAMA-13B 的 original weight,
git clone https://huggingface.co/decapoda-research/llama-13b-hf  # 更强大,需要至少24G的gpu内存
# or
git clone https://huggingface.co/decapoda-research/llama-7b-hf  # 更小,需要12G gpu内存
模型的作者在编写配置文件时,出现了拼写错误。请将 tokenizer_config.json 文件通过执行以下命令修改即可,
sed -i 's/LLaMATokenizer/LlamaTokenizer/g' ./llama-13b-hf/tokenizer_config.json
当这两个 weight 准备好后,我们可以使用 Vicuna 团队的工具来创建真正的 working weight。
首先,通过以下方式安装他们与 v0 Vicuna 兼容的库,
pip install git+https://github.com/lm-sys/[email protected]
然后,运行以下命令来创建最终的 working weight,
python3 -m fastchat.model.apply_delta --base ./llama-13b-hf/ --target ./vicuna_weights/ --delta ./vicuna-13b-delta-v0/
最后的 weight 将在一个单一的文件夹中,其结构类似于以下,
vicuna_weights/
├── config.json
├── generation_config.json
├── pytorch_model-00001-of-00003.bin
├── pytorch_model-00002-of-00003.bin
├── pytorch_model-00003-of-00003.bin
├── pytorch_model.bin.index.json
├── special_tokens_map.json
├── tokenizer.model
└── tokenizer_config.json
然后,在第 16 行这里的模型配置文件中设置 vicuna weight 的路径,
vi minigpt4/configs/models/minigpt4.yaml

--- modify
  llama_model: "/root/workspace/MiniGPT-4/vicuna_weights/"
---
4. 准备预训练的 MiniGPT-4 checkpoint
根据你准备的 Vicuna 模型,下载预训练的 checkpoint。
然后,在 eval_configs/minigpt4_eval.yaml 的评估配置文件中第11行设置预训练的检查点的路径。
vi eval_configs/minigpt4_eval.yaml

--- modify
  ckpt: '/root/workspace/pretrained/pretrained_minigpt4.pth'
---
5. 在本地启动演示
在你的本地机器上尝试我们的演示 Demo.py,运行以下命令,
python demo.py --cfg-path eval_configs/minigpt4_eval.yaml --gpu-id 0
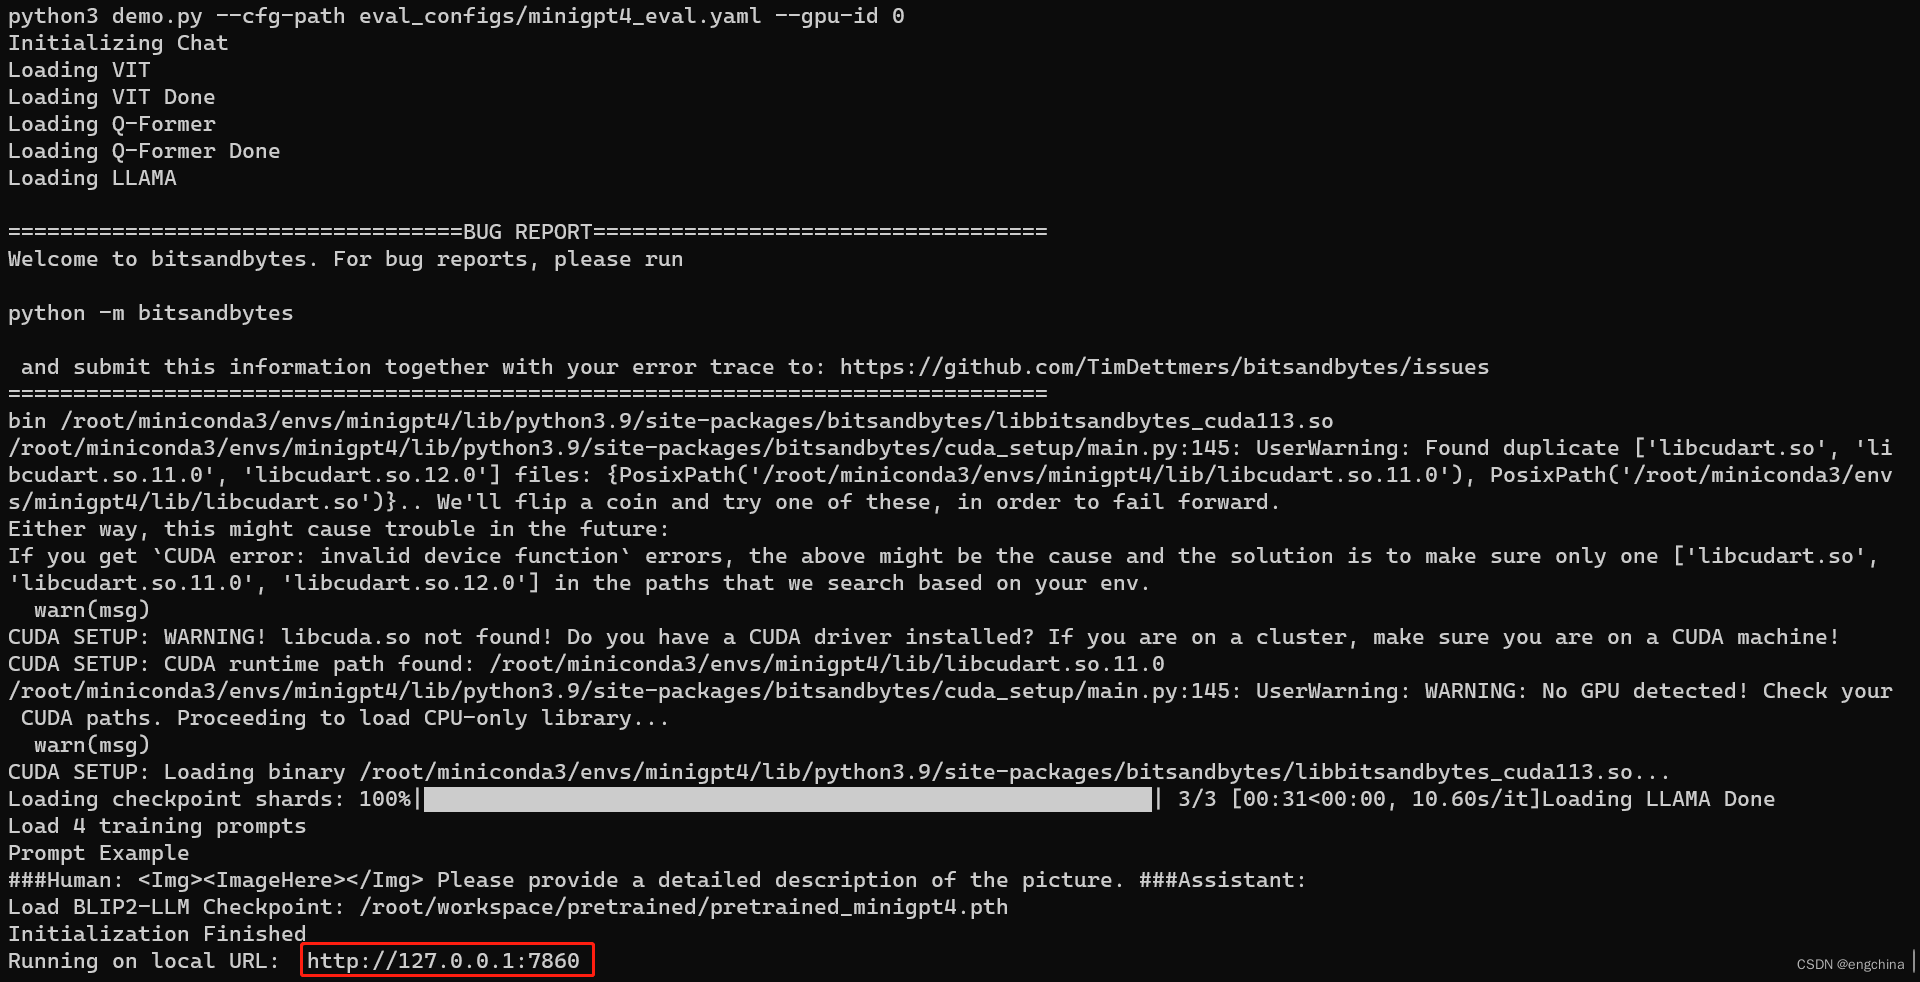
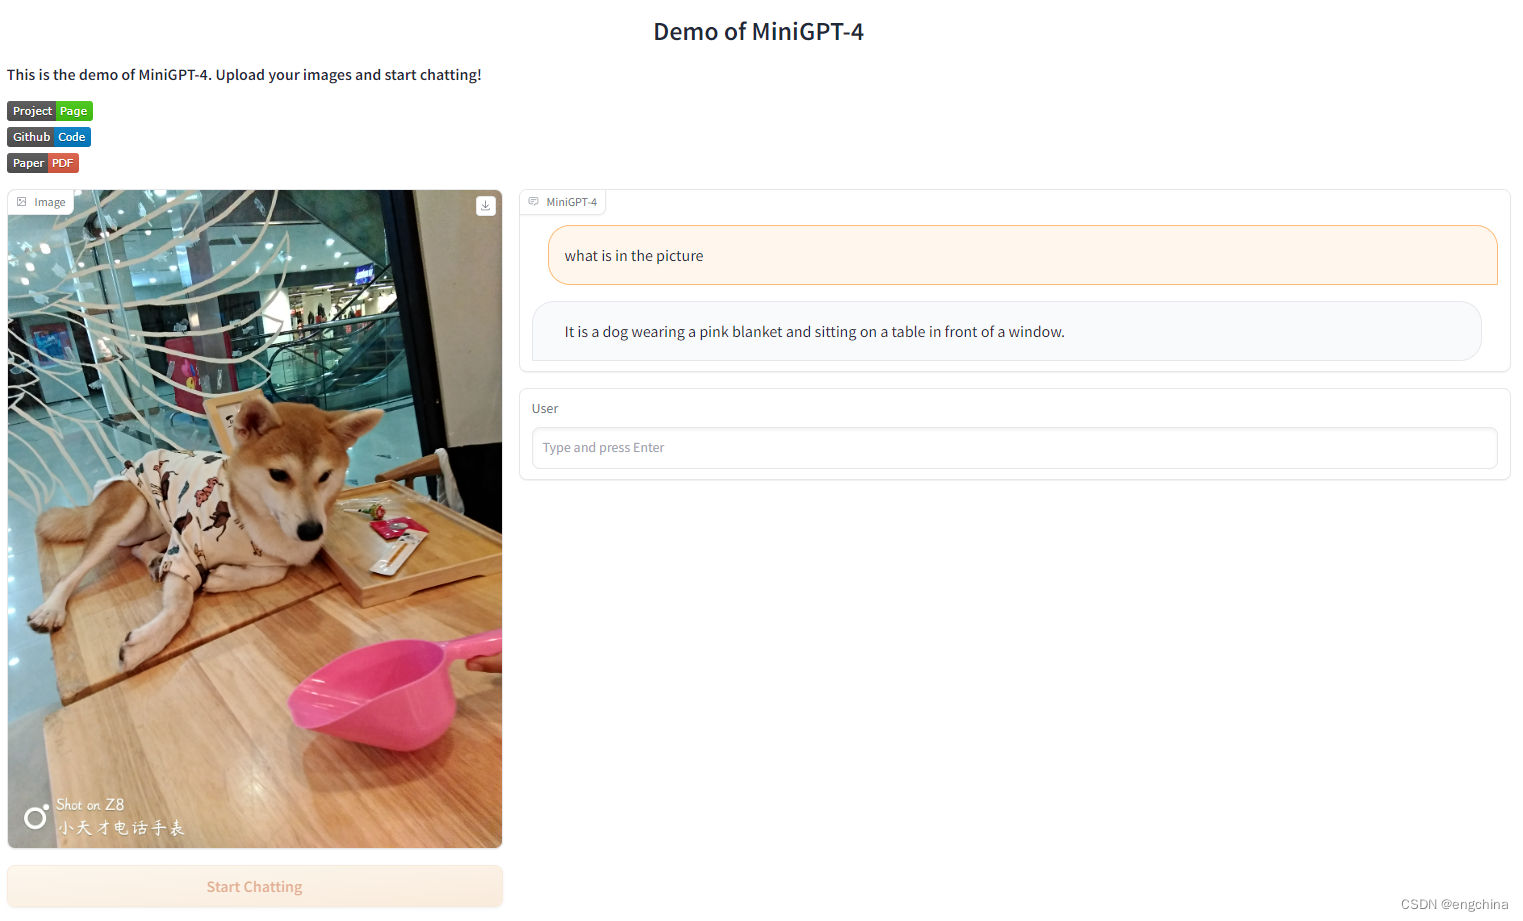
使用浏览器打开 http://127.0.0.1:7860 访问 MiniGPT-4,上传一张图片测试一下效果,
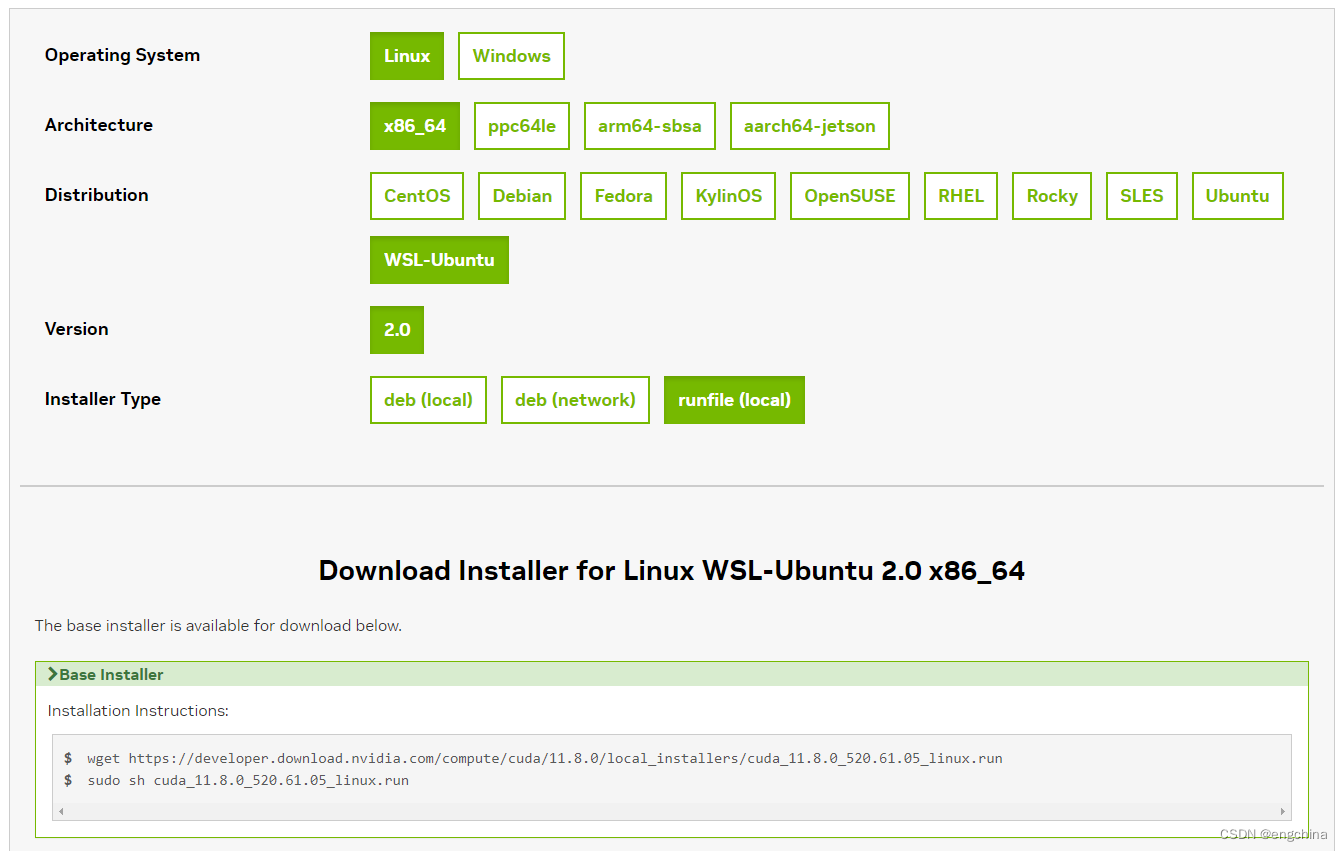
其他 1,安装 CUDA Toolkit 11.8
refer: https://developer.nvidia.com/cuda-11-8-0-download-archive
我使用的是 WSL-Ubuntu 22.04,下面是安装 CUDA Toolkit 11.8 的命令。
sudo apt install -y dkms
wget https://developer.download.nvidia.com/compute/cuda/11.8.0/local_installers/cuda_11.8.0_520.61.05_linux.run
sudo sh cuda_11.8.0_520.61.05_linux.run
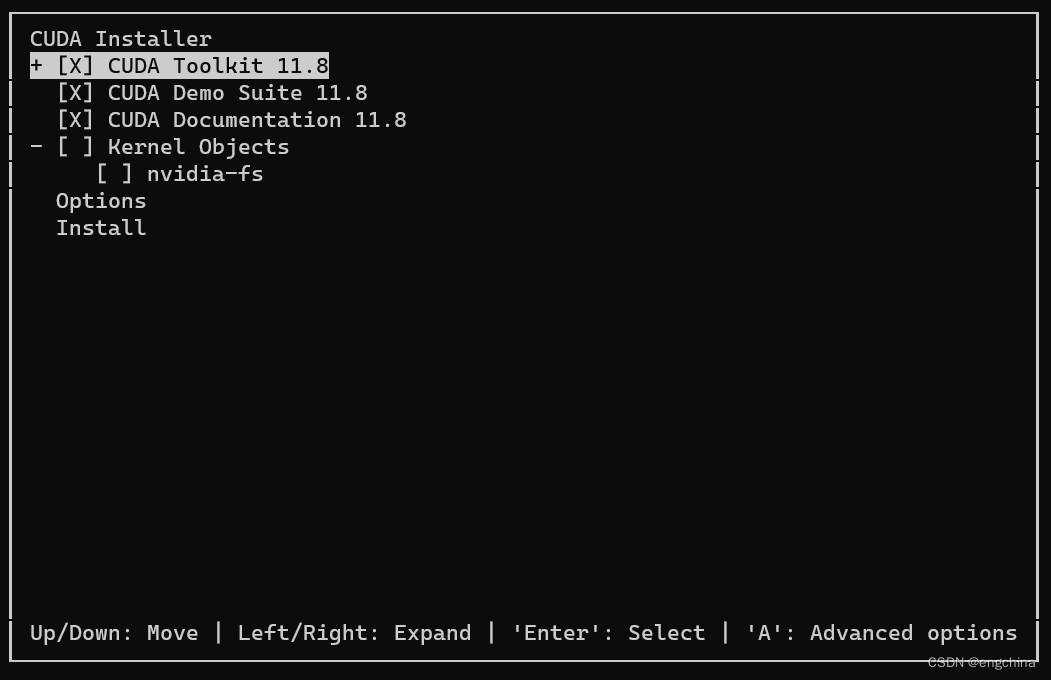
输入日志如下,
===========
= Summary =
===========

Driver:   Not Selected
Toolkit:  Installed in /usr/local/cuda-11.8/

Please make sure that
 -   PATH includes /usr/local/cuda-11.8/bin
 -   LD_LIBRARY_PATH includes /usr/local/cuda-11.8/lib64, or, add /usr/local/cuda-11.8/lib64 to /etc/ld.so.conf and run ldconfig as root

To uninstall the CUDA Toolkit, run cuda-uninstaller in /usr/local/cuda-11.8/bin
***WARNING: Incomplete installation! This installation did not install the CUDA Driver. A driver of version at least 520.00 is required for CUDA 11.8 functionality to work.
To install the driver using this installer, run the following command, replacing <CudaInstaller> with the name of this run file:
    sudo <CudaInstaller>.run --silent --driver
设置环境变量,
sudo vi ~/.bashrc

--- add
export CUDA_HOME=/usr/local/cuda-11.8
export CuDNN_HOME=/usr/local/cuda-11.8/include
export PATH=/usr/local/cuda-11.8/bin:$PATH
export CPLUS_INCLUDE_PATH=/usr/local/cuda-11.8/include:$CPLUS_INCLUDE_PATH
export LD_LIBRARY_PATH=/usr/local/cuda-11.8/lib64:/usr/local/cuda-11.8/targets/x86_64-linux/lib/stubs/libcuda.so:$LD_LIBRARY_PATH
---
source ~/.bashrc
sudo vi /etc/ld.so.conf

--- add
/usr/local/cuda-11.8/lib64
---
sudo ldconfig
其他 2,安装 GCC 9 版本,并设置为默认GCC版本
sudo apt-get uninstall -y gcc
sudo apt-get install -y gcc-9 g++-9
sudo update-alternatives --install /usr/bin/gcc gcc /usr/bin/gcc-9 90
sudo update-alternatives --install /usr/bin/g++ g++ /usr/bin/g++-9 90
其他 3(成功),重新安装 bitsandbytes 兼容 CUDA Toolkit 11.8
refer: https://blog.csdn.net/anycall201/article/details/129930919
pip3 uninstall bitsandbytes
pip3 install bitsandbytes
解决 bitsandbytes 报错信息,
cp /root/miniconda3/envs/minigpt4/lib/python3.9/site-packages/bitsandbytes/cuda_setup/main.py /root/miniconda3/envs/minigpt4/lib/python3.9/site-packages/bitsandbytes/cuda_setup/main.py.old
vi /root/miniconda3/envs/minigpt4/lib/python3.9/site-packages/bitsandbytes/cuda_setup/main.py

--- modify
(略)

                # self.lib = ct.cdll.LoadLibrary(binary_path)
                self.lib = ct.cdll.LoadLibrary(str(binary_path))
            else:
                self.add_log_entry(f"CUDA SETUP: Loading binary {binary_path}...")
                # self.lib = ct.cdll.LoadLibrary(binary_path)
                self.lib = ct.cdll.LoadLibrary(str(binary_path))
(略)
    # if not torch.cuda.is_available(): return 'libbitsandbytes_cpu.so', None, None, None, None
    if not torch.cuda.is_available(): return 'libbitsandbytes_cuda118.so', None, None, None, None
(略)
    if failure:
        # binary_name = "libbitsandbytes_cpu.so"
        binary_name = "libbitsandbytes_cuda118.so"
---
其他 3(失败),重新安装 bitsandbytes 兼容 CUDA Toolkit 11.8
refer: https://blog.csdn.net/anycall201/article/details/129930919
pip3 uninstall bitsandbytes
git clone https://github.com/timdettmers/bitsandbytes.git;cd bitsandbytes
CUDA_VERSION=118 make cuda11x
python3 setup.py install
解决 bitsandbytes 报错信息,
cp /root/miniconda3/envs/minigpt4/lib/python3.9/site-packages/bitsandbytes-0.38.1-py3.9.egg/bitsandbytes/cuda_setup/main.py /root/miniconda3/envs/minigpt4/lib/python3.9/site-packages/bitsandbytes-0.38.1-py3.9.egg/bitsandbytes/cuda_setup/main.py.old
vi /root/miniconda3/envs/minigpt4/lib/python3.9/site-packages/bitsandbytes-0.38.1-py3.9.egg/bitsandbytes/cuda_setup/main.py

--- modify
(略)

                # self.lib = ct.cdll.LoadLibrary(binary_path)
                self.lib = ct.cdll.LoadLibrary(str(binary_path))
            else:
                self.add_log_entry(f"CUDA SETUP: Loading binary {binary_path}...")
                # self.lib = ct.cdll.LoadLibrary(binary_path)
                self.lib = ct.cdll.LoadLibrary(str(binary_path))
(略)
    # if not torch.cuda.is_available(): return 'libbitsandbytes_cpu.so', None, None, None, None
    if not torch.cuda.is_available(): return 'libbitsandbytes_cuda118.so', None, None, None, None
(略)
    if failure:
        # binary_name = "libbitsandbytes_cpu.so"
        binary_name = "libbitsandbytes_cuda118.so"
---
其他 4,安装 libgl1-mesa-dev
sudo apt-get install libgl1-mesa-dev
其他 5,解决 /sbin/ldconfig.real: /usr/lib/wsl/lib/libcuda.so.1 is not a symbolic link 错误
mv /usr/lib/wsl/lib/libcuda.so.1 /usr/lib/wsl/lib/libcuda.so.1.old
sudo ln -s /usr/lib/wsl/lib/libcuda.so /usr/lib/wsl/lib/libcuda.so.1
sudo ldconfig
完结!