本项目将在Android上实现一种通过识别表情类别,从而给人脸戴上不同样式脸谱的AR软件,效果如下:
基于表情识别的脸谱换脸AR安卓APP效果演示
想要实现这样一个软件,核心就是两部分:
1)使用卷积神经网络训练一个人脸表情识别模型,
2)将训练好的模型移植到Android平台,同时在Android实现脸谱AR效果,并结合表情识别模型的识别结果,渲染不同的脸谱样式
本文讲第二部分,如何将卷积神经网络模型移植到Android,并在Android进行脸谱AR效果。
第一部分见:基于卷积神经网络的人脸表情识别应用–AR川剧变脸(一)
在第一部分中,我们训练了一个可以识别angry、disgust、fear、happy、sad、surprised、normal七种人脸表情的卷积神经网络模型,而且分析发现效果不错。
本文将建立在表情识别的基础上,设计一款AR变脸效果的软件,通过前置摄像头获取人脸图像,使用训练好的模型进行人脸表情识别,然后根据不同的表情,实现不同脸谱的渲染。
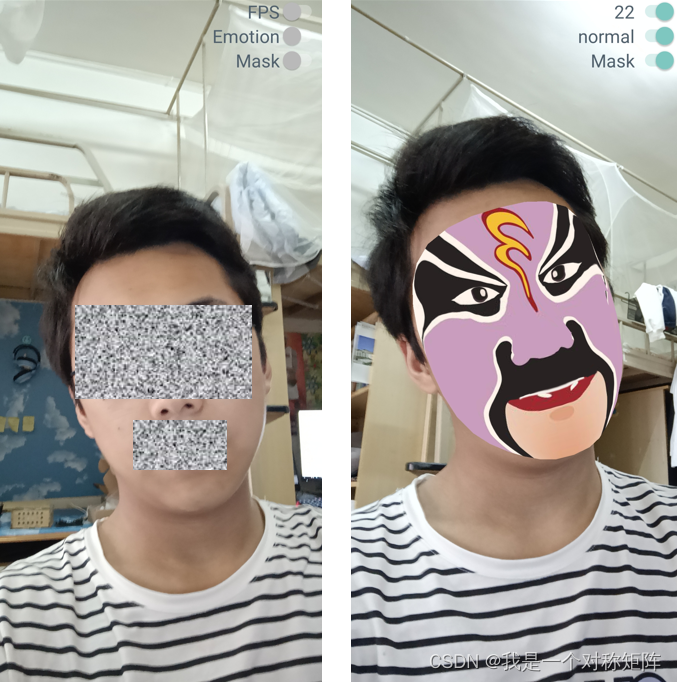
软件效果截图如下,首先右上角有按钮,FPS打开则显示当前帧数,Emotion打开则显示当前表情识别结果,Mask打开则渲染脸谱效果。
1、模型转换
我们的模型使用Keras训练,但是这样的模型是无法直接在Android移动端使用的,所以需要转换为Android可用的。
幸运的是TensorFlow的TensorFlow Lite(tflite)可以在Android上使用,如果能将模型转换为tflite,则就可以将模型移植到Android。
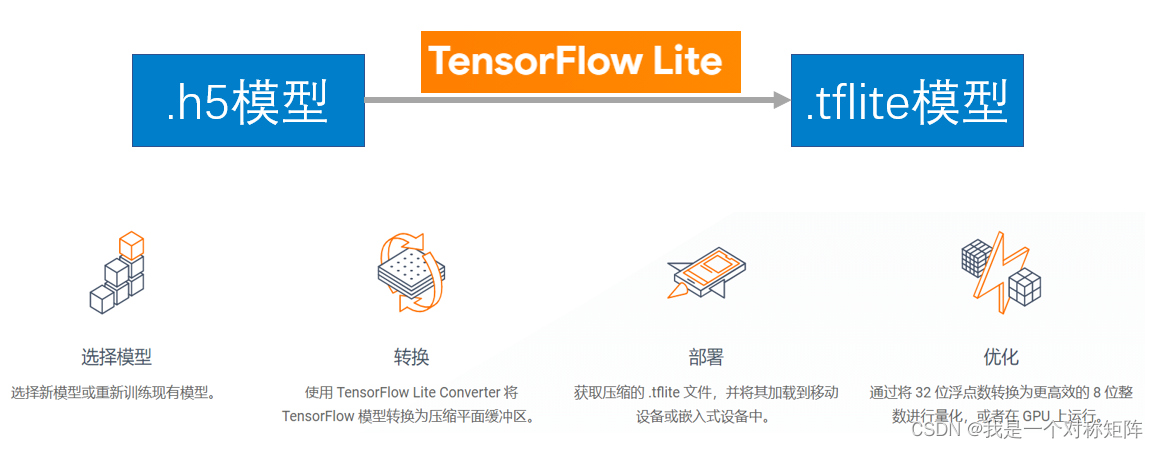
因为Keras以及被包含在TensorFlow里了,所以转换也非常方便:
from keras.models import Model,load_model
import tensorflow as tf

# keras模型的文件按路径
model=load_model(r"keras.hdf5",compile=False)   # keras.hdf5是Keras训练好的模型

converter =tf.lite.TFLiteConverter.from_keras_model(model)
tflite_model = converter.convert()

open("output.tflite", 'wb').write(tflite_model)  # 转换成功后会得到output.tflite文件,这个就是转换后的模型,可以在Android中使用
2、Android部署
现在我们得到了模型文件,那么在Android部署还需要一个推理框架:tensorflow.lite
在Android中模型部署,将表情识别写成一个类:TFLiteClassificationUtil,在这个类里主要有两个方法,preProcess用于预处理:当我们从前置摄像头拿到人脸图像后,需要进行图像缩放、类型变换、维度变换、灰度变换等处理,让输入符合模型的要求,predict用于预测:也就是接收一个图像数据,使用我们的tflite模型进行预测得到结果并返回。
package com.google.ar.core.examples.java.augmentedfaces;

import android.graphics.Bitmap;

import org.tensorflow.lite.DataType;
import org.tensorflow.lite.Interpreter;
import org.tensorflow.lite.nnapi.NnApiDelegate;
import org.tensorflow.lite.support.tensorbuffer.TensorBuffer;
import java.nio.ByteBuffer;
import java.nio.ByteOrder;

import java.io.File;

public class TFLiteClassificationUtil {


    private Interpreter tflite;
    private final TensorBuffer outputProbabilityBuffer;
    private static final int NUM_THREADS = 4;
    int[] imageShape;   //用以储存model的input_shape    [1,n,n,channel]


    /**
     * @param modelPath model path
     */
    public TFLiteClassificationUtil(String modelPath) throws Exception {


        File file = new File(modelPath);
        if (!file.exists()) {


            throw new Exception("model file is not exists!");
        }

        try {


            Interpreter.Options options = new Interpreter.Options();
            // 使用多线程预测
            options.setNumThreads(NUM_THREADS);
            // 使用Android自带的API或者GPU加速
            NnApiDelegate delegate = new NnApiDelegate();
//            GpuDelegate delegate = new GpuDelegate();
            options.addDelegate(delegate);
            tflite = new Interpreter(file, options);
            // 获取输入,shape为{1, height, width, 3}
            String input="conv2d_input";
            String output="Identity";
            imageShape = tflite.getInputTensor(tflite.getInputIndex(input)).shape();
            DataType imageDataType = tflite.getInputTensor(tflite.getInputIndex(input)).dataType();
            // 获取输入,shape为{1, NUM_CLASSES}
            int[] probabilityShape = tflite.getOutputTensor(tflite.getOutputIndex(output)).shape();
            DataType probabilityDataType = tflite.getOutputTensor(tflite.getOutputIndex(output)).dataType();
            outputProbabilityBuffer = TensorBuffer.createFixedSize(probabilityShape, probabilityDataType);

            // 添加图像预处理方式
            //about input/output more info: https://www.tensorflow.org/lite/inference_with_metadata/lite_support
        } catch (Exception e) {


            e.printStackTrace();
            throw new Exception("load model fail!");
        }
    }


    private ByteBuffer preProcess(Bitmap bitmap) {


        // 设置想要的大小(也即是model的input shape)
        int newWidth = imageShape[1];
        int newHeight = imageShape[2];

        bitmap=Bitmap.createScaledBitmap(bitmap, newWidth, newHeight, false);

        //buffer初始化    //定义一个Buffer,可以直接加载run()
        ByteBuffer inputBuffer = ByteBuffer.allocateDirect(4 * 1 * newWidth * newHeight * 1);
        inputBuffer.order(ByteOrder.nativeOrder());
        inputBuffer.rewind();

        // The bitmap shape should be 28 x 28
        int[] pixels=new int[newWidth * newHeight];

        bitmap.getPixels(pixels, 0, newWidth, 0, 0, newWidth, newHeight);


        for(int i =0;i<newWidth * newHeight;i++){


            int pixel = pixels[i];
            float avg = (((pixel >> 16) & 0xFF) * 38 + ((pixel >> 8) & 0xFF) * 75 + (pixel & 0xFF) * 15) >> 7;  //RGB图像转灰度图,pixels是多字节直接换算后的整数,所以还是用位运算更直接简便
            inputBuffer.putFloat(avg);
        }
        return inputBuffer;

    }

    // 执行预测
    float[] predict(Bitmap bmp) throws Exception {

       //传入一张bitmap图

        ByteBuffer inputImageBuffer= preProcess(bmp);

        try {


            tflite.run(inputImageBuffer, outputProbabilityBuffer.getBuffer().rewind());   //开始推理
        } catch (Exception e) {


            throw new Exception("predict image fail! log:" + e);
        }

        float[] results = outputProbabilityBuffer.getFloatArray();
        int l = getMaxResult(results);
        return new float[]{

    l, results[l]};
    }

    // 获取概率最大的标签
    public static int getMaxResult(float[] result) {


        float probability = 0;
        int r = 0;
        for (int i = 0; i < result.length; i++) {


            if (probability < result[i]) {


                probability = result[i];
                r = i;
            }
        }
        return r;
    }

}
3、脸谱AR
既然表情识别问题解决了,现在来解决脸谱AR的实现。
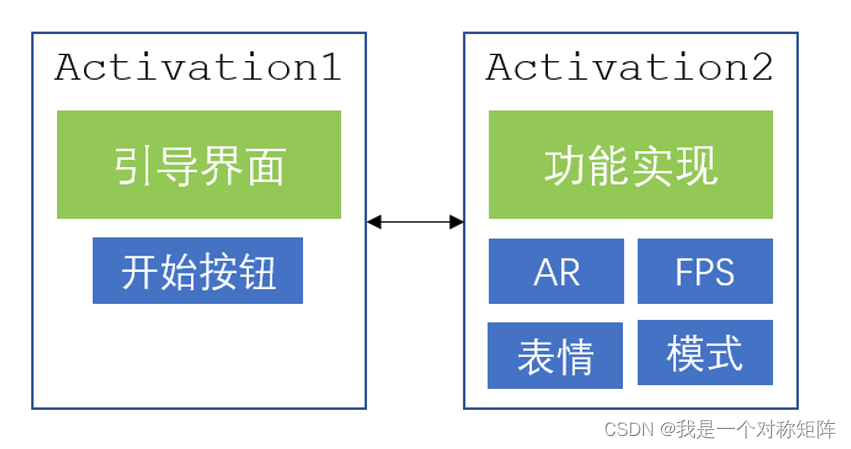
首先Android软件的整体框架:
其中AR使用Google ARCore框架实现,下图是ARCore的流程图,通过拿去摄像头图像数据、位置分析、渲染效果,不断重复,就感觉实现了AR效果。
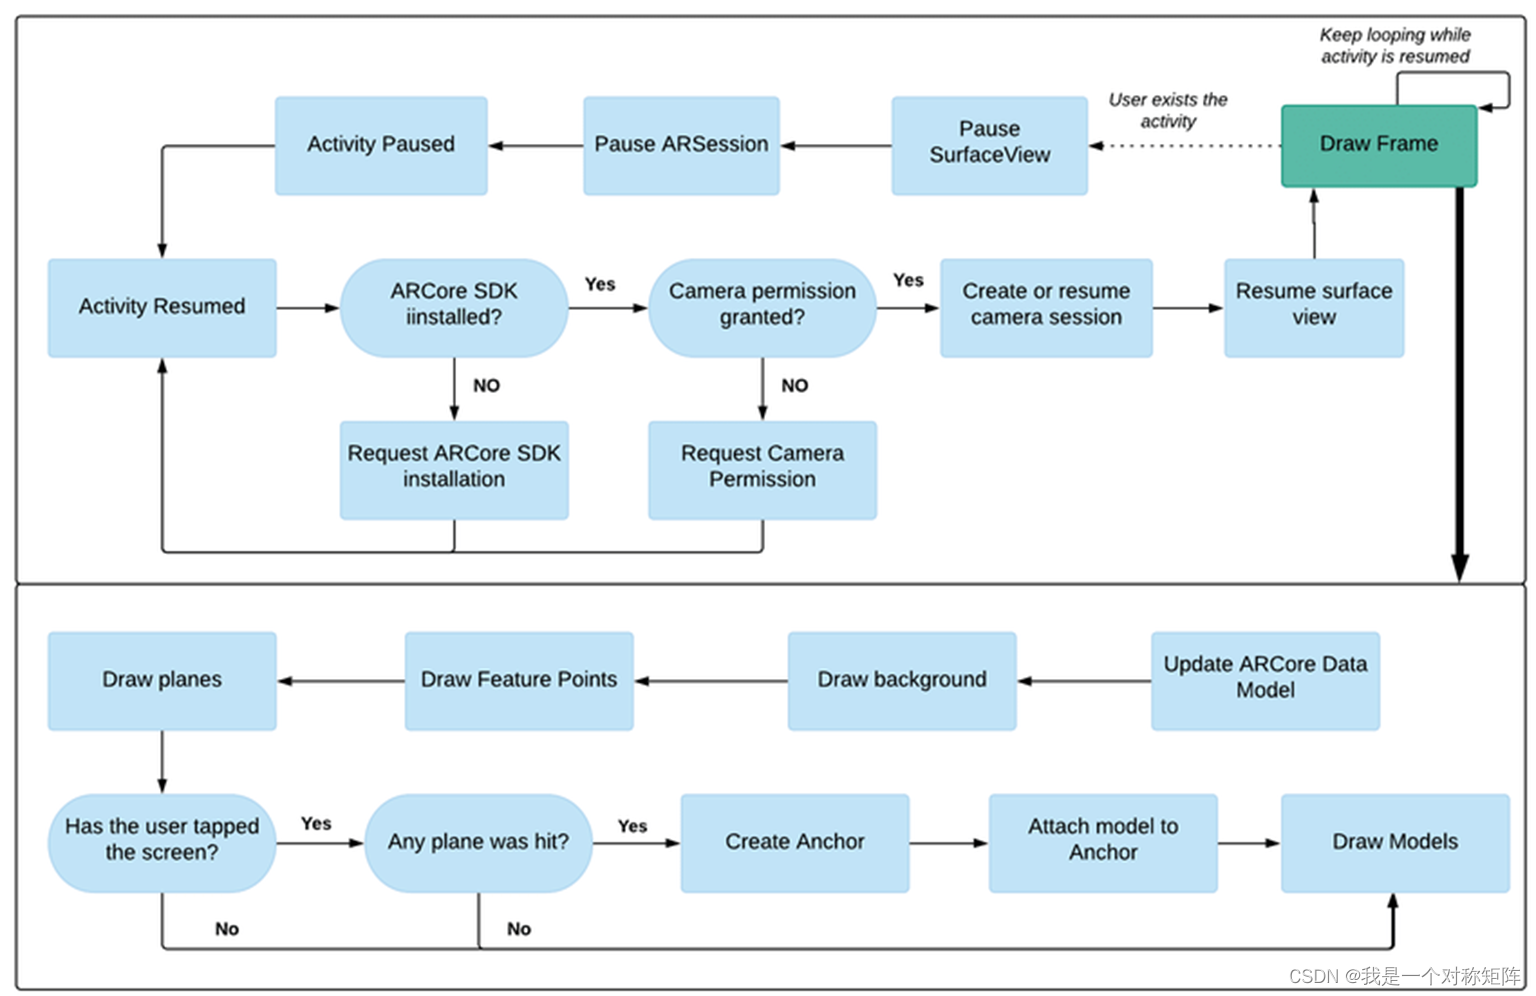
结合本设计,最后设计的流程图如下所示:
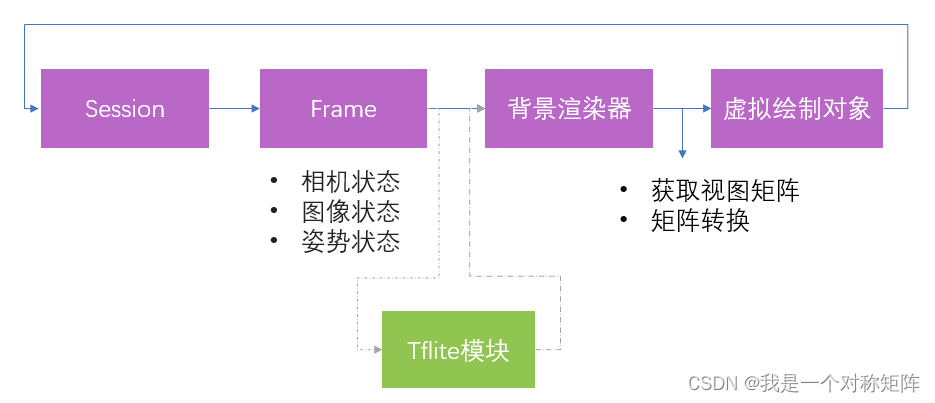
Tflite模块就是表情识别。获取图像数据后,分析人脸表情,根据不同表情加载不同的脸谱样式,然后给人脸渲染上脸谱。
比如,下面的代码就是通过不同表情类别(0~6表示),渲染不同的脸谱
switch (maxIndex) {


    case 0:
        augmentedFaceRenderer_0.draw(projectionMatrix, viewMatrix, modelMatrix, colorCorrectionRgba, face);
        break;
    case 1:
        augmentedFaceRenderer_1.draw(projectionMatrix, viewMatrix, modelMatrix, colorCorrectionRgba, face);
        break;
    case 2:
        augmentedFaceRenderer_2.draw(projectionMatrix, viewMatrix, modelMatrix, colorCorrectionRgba, face);
        break;
    case 3:
        augmentedFaceRenderer_3.draw(projectionMatrix, viewMatrix, modelMatrix, colorCorrectionRgba, face);
        break;
    case 4:
        augmentedFaceRenderer_4.draw(projectionMatrix, viewMatrix, modelMatrix, colorCorrectionRgba, face);
        break;
    case 5:
        augmentedFaceRenderer_5.draw(projectionMatrix, viewMatrix, modelMatrix, colorCorrectionRgba, face);
        break;
    case 6:
        augmentedFaceRenderer_6.draw(projectionMatrix, viewMatrix, modelMatrix, colorCorrectionRgba, face);
        break;
}
4、演示效果
通过变换不同的表情,实现脸谱变脸:
脸谱AR演示_x264
代码资源:
链接:https://pan.baidu.com/s/1Gb_dQwF8yq1SL8Zg76iZZw?pwd=4c4w
提取码:4c4w