0. Faster RCNN概述
论文地址:https://arxiv.org/pdf/1506.01497.pdf
Faster R-CNN源自2016年发表在cs.CV上的论文《Faster R-CNN: Towards Real-Time Object Detection with Region Proposal Networks》,使用RPN(建议区域网络)的实时物体检测,Faster R-CNN实现了end-to-end的训练,不仅明显地加快了目标检测速度,在模型精确度方面也有提升。
在目标检测领域,基于回归思想的YOLO系列和基于分类思想的RCNN系列几乎平分了天下,YOLO的特点就是速度快,RCNN的特点就是精确度更高。
Faster RCNN发展于RCNN和Fast RCNN,其主要改进是,相对于Fast RCNN, Faster RCNN使用RPN网络代替Selective Search。

上图是原论文的截图,概括了Faster RCNN的主要架构。
- conv layers(backbone)。 特征提取网络,生成feature map。
- Region Proposal Networks,(RPN)。RPN网络用于生成region proposals。该层通过softmax判断anchors属于positive或者negative,再利用bounding box regression修正anchors获得精确的proposals。
- ROI Pooling。该层把RPN网络提取positive anchors对应到feature map得到proposals feature map。
- Classification。利用proposal feature maps计算proposal的类别,同时再次bounding box regression获得检测框最终的精确位置。
本文从上面四个角度来讲解Faster RCNN网络。
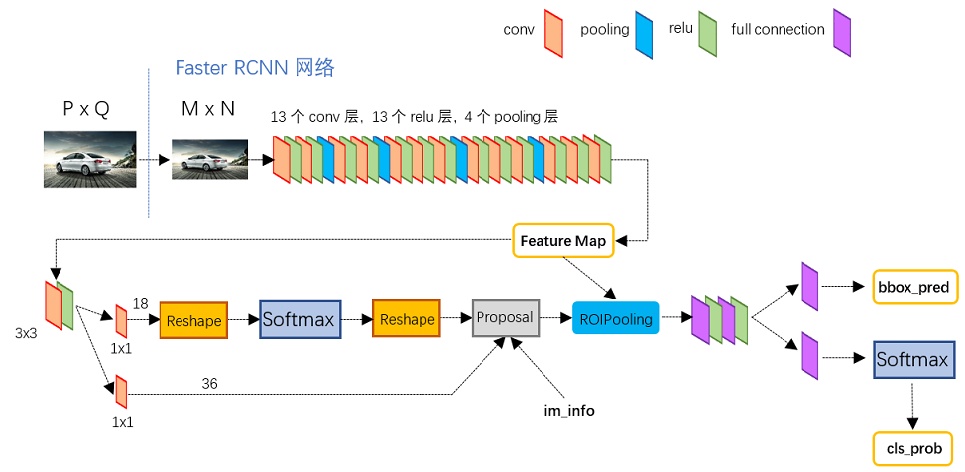
上图展示了python版本中的VGG16模型中的faster_rcnn_test.pt的网络结构,该网络对于一副任意大小PxQ的图像:
- 预处理图像。把图像resize成统一的
大小
- 经过VGG16提取特征,得到feature map
- RPN网络提取proposals, 结合feature map得到 proposals feature map, 然后ROIPooling
- softmax分类和边框再次回归调整
1. Conv Layer(backbone)
在原论文中使用VGG16作为backbone,但在目前的使用中,resnet作为backbone进行特征提取的更多,常见的有resnet50, resnet101等。
backbone就是一个特征提取网络,从分类网络中得来,如Alexnet, VGGNet, Inception, ResNet等。主要包含了conv+pool+relu的基本结构,一般是下采样卷积操作。
2. Region Proposal Networks(RPN)
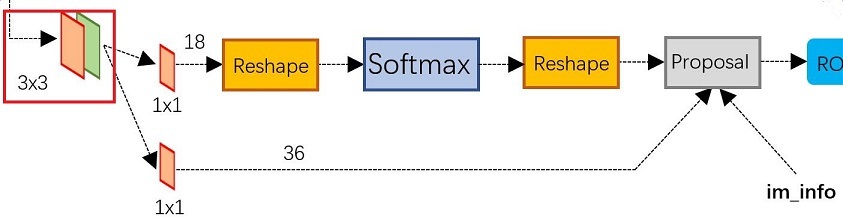
RPN 网络才是Faster RCNN的精髓。开头这里的卷积是单独的一个卷积操作,不属于RPN网络,至于为什么要加这个卷积,可能加了鲁棒性更好吧。
RPN有两条线路,上面一条通过softmax分类anchors获得positive和negative分类,下面一条用于计算对于anchors的bounding box regression偏移量,以获得精确的proposal。而最后的Proposal层则负责综合positive anchors和对应bounding box regression偏移量获取proposals,同时剔除太小和超出边界的proposals。
2.1 Anchors
特征可以看做一个尺度51*39的256通道图像,对于该图像的每一个位置,考虑9个可能的候选窗口:三种面积{128,256,512}×{128,256,512}×三种比例{1:1,1:2,2:1}{1:1,1:2,2:1}。这些候选窗口称为anchors。下图示出9种anchor示例。
也就是说,anchors提供的是预设框,把anchor反映射到原图得到的区域,就是预设的目标框,这个目标框中可能有物体,也可能没有物体,同时,这个目标框是很可能不够准确的。

现在结合上图再次理解下RPN网络
- 图像经过backbone后得到feature map,在feature map的每个点上(忽略channel)有k(k=9)个anchors, 每个anchor包含目标是positive, 不包含目标是negative, 即这里是softmax二分类,所以对于RPN的分类线路,每个feature map的点都对应2k个scores
- 对于bounding box regression线路,由于每个anchor都要回归(x, y, w, h)四个偏移量,所以feature map上每个点都对应4k个coordinates
- 补充一点,全部anchors拿去训练太多了,训练程序会在合适的anchors中随机选取128个postive anchors+128个negative anchors进行训练
2.2 softmax 分类
假设特征图shape为, 其
卷积的作用就是把shape变为
, 其中18正好对应于9个anchors的输出。然后进行softmax分类
2.3 bounding box 回归
假设特征图shape为, 其
卷积的作用就是把shape变为
, 其中39正好对应于9个anchors的偏移量回归。
2.4 proposal
proposal layer 负责综合回归偏量和 positive anchor,计算出精确的 proposal。除了回归偏量和 positive anchor 外,proposal layer 还有一个输入 im_info,以及一个参数 feature_stride = 16
- feature_stride 记录了 Conv Layers 的缩放程度,如经过 4 次池化,每次缩小为原来的一半,最终的 feature map 为
- 对于一张任意大小
的图像都会缩放到固定大小
- 利用回归偏量对所有的 anchor 做位置修正生成 anchor
- 按照输入的 positive softmax socre 对 anchor 进行排序,然后提取前 12k 个(测试时 6k)修正位置后的 positive anchor
- 剔除尺寸非常小的 positive anchor
- 对剩余的 positive anchor 进行非极大值抑制,然后取前 2k 个(测试时300 个) positive anchor
- 最后取挑出 128 个正样本和 128 个负样本用于训练
3. ROI Pooling
为什么需要 RoI Pooling 呢?
在历史上,网络训练好后输入图像的尺寸也就固定了,对于输入大小不同的图像有两种解决方法:(1)从图像中截取出固定大小的区域;
(2)将图像 warp 成固定大小。但是这两种方式都存在一定的问题,第一种破坏了图像的完整结构,第二种破坏了图像的原始形状信息
 而 RoI Pooling 的提出正是为了解决这些问题,对大小形状不同的 proposal 进行一个统一化的处理。RoI Pooling 在 Fast RCNN 中就已经提出,大致流程也是相同的:
由于前面传入的 proposal 尺寸对应,所以先将其映射回
的 feature map 大小进行讨论。将每个 proposal 对应的区域分为
大小的网格,最后进行 max pooling 操作。
4. Classification
Classification 通过前面的 proposal feature map 经过全连接层和 softmax 计算每个 proposal 对应每个类别的得分。同时,在 Classification 中会再次利用 bbox regression 对每个 proposal 的位置进行精修。
5. pytorch里封装的faster rcnn
pytorch里封装的faster rcnn的backbone就是用的resnet。其使用coco的90个类别训练,加上背景一共91类。整体结构如下:

pytorch代码测试faster rcnn
import torch
import torchvision
from torchvision import transforms
from PIL import Image
import numpy as np
import cv2

coco_names = [
    '__background__', 'person', 'bicycle', 'car', 'motorcycle', 'airplane', 'bus',
    'train', 'truck', 'boat', 'traffic light', 'fire hydrant', 'N/A', 'stop sign',
    'parking meter', 'bench', 'bird', 'cat', 'dog', 'horse', 'sheep', 'cow',
    'elephant', 'bear', 'zebra', 'giraffe', 'N/A', 'backpack', 'umbrella', 'N/A', 'N/A',
    'handbag', 'tie', 'suitcase', 'frisbee', 'skis', 'snowboard', 'sports ball',
    'kite', 'baseball bat', 'baseball glove', 'skateboard', 'surfboard', 'tennis racket',
    'bottle', 'N/A', 'wine glass', 'cup', 'fork', 'knife', 'spoon', 'bowl',
    'banana', 'apple', 'sandwich', 'orange', 'broccoli', 'carrot', 'hot dog', 'pizza',
    'donut', 'cake', 'chair', 'couch', 'potted plant', 'bed', 'N/A', 'dining table',
    'N/A', 'N/A', 'toilet', 'N/A', 'tv', 'laptop', 'mouse', 'remote', 'keyboard', 'cell phone',
    'microwave', 'oven', 'toaster', 'sink', 'refrigerator', 'N/A', 'book',
    'clock', 'vase', 'scissors', 'teddy bear', 'hair drier', 'toothbrush'
]
# this will help us create a different color for each class
COLORS = np.random.uniform(0, 255, size=(len(coco_names), 3))
# define the torchvision image transforms
transform = transforms.Compose([
    transforms.ToTensor(),
])


def predict(image, model, device, detection_threshold):
    # transform the image to tensor
    image = transform(image).to(device)
    image = image.unsqueeze(0) # add a batch dimension
    print(image.shape)
    outputs = model(image) # get the predictions on the image
    # print the results individually
    # print(f"BOXES: {outputs[0]['boxes']}")
    # print(f"LABELS: {outputs[0]['labels']}")
    # print(f"SCORES: {outputs[0]['scores']}")
    # get all the predicited class names
    pred_classes = [coco_names[i] for i in outputs[0]['labels'].cpu().numpy()]
    # get score for all the predicted objects
    pred_scores = outputs[0]['scores'].detach().cpu().numpy()
    # get all the predicted bounding boxes
    pred_bboxes = outputs[0]['boxes'].detach().cpu().numpy()
    # get boxes above the threshold score
    boxes = pred_bboxes[pred_scores >= detection_threshold].astype(np.int32)
    return boxes, pred_classes, outputs[0]['labels']

def draw_boxes(boxes, classes, labels, image):
    # read the image with OpenCV
    image = cv2.cvtColor(np.asarray(image), cv2.COLOR_BGR2RGB)
    for i, box in enumerate(boxes):
        color = COLORS[labels[i]]
        cv2.rectangle(
            image,
            (int(box[0]), int(box[1])),
            (int(box[2]), int(box[3])),
            color, 2
        )
        cv2.putText(image, classes[i], (int(box[0]), int(box[1]-5)),
                    cv2.FONT_HERSHEY_SIMPLEX, 0.8, color, 2,
                    lineType=cv2.LINE_AA)
    return image

model = torchvision.models.detection.fasterrcnn_resnet50_fpn(pretrained=True, min_size=800)
device = torch.device('cuda' if torch.cuda.is_available() else 'cpu')


path = "images/img2.jpg"
image = Image.open(path)
model.eval().to(device)

boxes, classes, labels = predict(image, model, device, 0.8)
image = draw_boxes(boxes, classes, labels, image)
cv2.imshow('Image', image)
cv2.waitKey(0)
结果是:

6. faster rcnn训练
未完待续