vue3-element-admin 是基于 vue-element-admin 升级的 Vue3 + Element Plus 版本的后台管理前端解决方案,是 有来技术团队 继 youlai-mall 全栈开源商城项目的又一开源力作
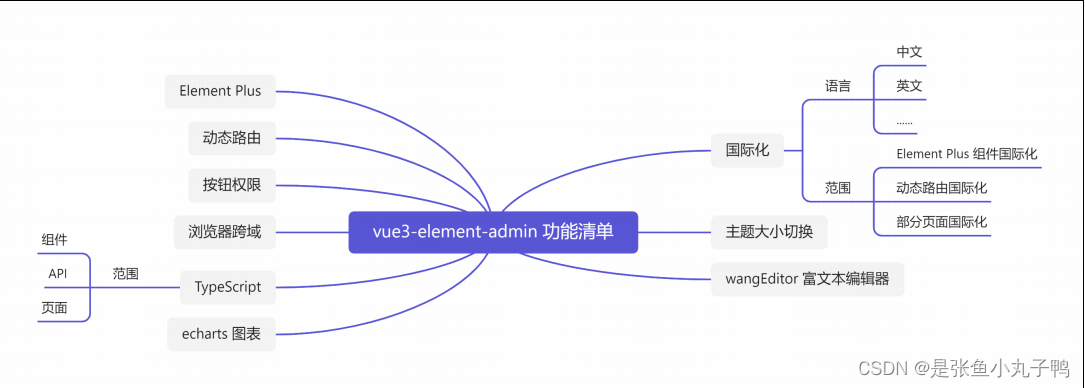
功能清单
技术栈清单
技术栈 |
描述 |
官网 |
Vue3 |
渐进式 JavaScript 框架 |
|
TypeScript |
微软新推出的一种语言,是 JavaScript 的超集 |
|
Vite4 |
前端开发与构建工具 |
|
Element Plus |
基于 Vue 3,面向设计师和开发者的组件 库 |
|
Pinia |
新一代状态管理工具 |
|
Vue Router |
Vue.js 的官方路由 |
|
wangEditor |
Typescript 开发的 Web 富文本编辑器 |
|
Echarts |
一个基于 JavaScript 的开源可视化图表库 |
环境准备
运行环境node:Node下载地址: http://nodejs.cn/download/
开发工具vscode:下载地址:https://code.visualstudio.com/Download
必装插件Volar:

项目初始化
创建项目
npm create vite@latest 项目名称创建完成之后,cd进入我们的项目,然后执行npm i
整合element-plus
本地安装element-plus和图标组件
npm install element-plus
npm install @element-plus/icons-vue
全局注册
// main.ts
import ElementPlus from 'element-plus'
import 'element-plus/theme-chalk/index.css'

createApp(App).use(ElementPlus).mount('#app')
Element Plus全局组件类型声明
// tsconfig.json
{
"compilerOptions": {
// ...
"types": ["element-plus/global"]
}
}
页面使用element-plus组件和图标
<!-- src/App.vue -->
<template>

<div style="text-align: center;margin-top: 10px">
 <el-button :icon="Search" circle></el-button>
 <el-button type="primary" :icon="Edit" circle></el-button>
 <el-button type="success" :icon="Check" circle></el-button>
 <el-button type="info" :icon="Message" circle></el-button>
 <el-button type="warning" :icon="Star" circle></el-button>
 <el-button type="danger" :icon="Delete" circle></el-button>
</div>
</template>
<script lang="ts" setup>
import {Search, Edit,Check,Message,Star, Delete} from '@element-plus/iconsvue'
</script>
3.路径别名设置
vite配置
// vite.config.ts
import {defineConfig} from 'vite'
import vue from '@vitejs/plugin-vue'
import path from 'path'
export default defineConfig({
plugins: [vue()],
resolve: {
alias: {
"@": path.resolve("./src") // 相对路径别名配置,使用 @ 代替 src
}
}
})
安装@types/node
import path from 'path' 编译器报错:TS2307: Cannot find module 'path' or its corresponding type declarations.
本地安装 Node 的 TypeScript 类型描述文件即可解决编译器报错
npm install @types/node --save-devtypeScript编译配置
同样还是 import path from 'path' 编译报错: TS1259: Module '"path"' can only be default imported using the 'allowSyntheticDefaultImports' flag
因为 typescript 特殊的 import 方式 , 需要配置允许默认导入的方式,还有路径别名的配置
// tsconfig.json
{
"compilerOptions": {
"baseUrl": "./", // 解析非相对模块的基地址,默认是当前目录
"paths": { //路径映射,相对于baseUrl
"@/*": ["src/*"]
},
"allowSyntheticDefaultImports": true // 允许默认导入
}
}
别名使用举例
// App.vue
import HelloWorld from '/src/components/HelloWorld.vue'
↓
import HelloWorld from '@/components/HelloWorld.vue'
4.配置环境变量
项目根目录分别添加 开发、生产和模拟环境配置
开发环境配置:.env.development
# 变量必须以 VITE_ 为前缀才能暴露给外部读取
VITE_APP_TITLE = 'vue3-element-admin'
VITE_APP_PORT = 3000
VITE_APP_BASE_API = '/dev-api'
生产环境配置:.env.production
VITE_APP_TITLE = 'vue3-element-admin'
VITE_APP_PORT = 3000
VITE_APP_BASE_API = '/prod-api'
环境变量智能提示
// 环境变量类型声明
interface ImportMetaEnv {
VITE_APP_TITLE: string,
VITE_APP_PORT: string,
VITE_APP_BASE_API: string
}
interface ImportMeta {
readonly env: ImportMetaEnv
}
5.浏览器跨域配置
1. 跨域原理
浏览器同源策略: 协议、域名和端口都相同是同源,浏览器会限制非同源请求读取响应结果。
解决浏览器跨域限制大体分为后端和前端两个方向:
后端:开启 CORS 资源共享;
前端:使用反向代理欺骗浏览器误认为是同源请求
2. 前端反向代理解决跨域
Vite 配置反向代理解决跨域,因为需要读取环境变量,故写法和上文的出入较大,这里贴出完整的vite.config.ts 配置。
// vite.config.ts
import {UserConfig, ConfigEnv, loadEnv} from 'vite'
import vue from '@vitejs/plugin-vue'
import path from 'path'
export default ({command, mode}: ConfigEnv): UserConfig => {
// 获取 .env 环境配置文件
const env = loadEnv(mode, process.cwd())
return (
{
plugins: [
vue()
],
// 本地反向代理解决浏览器跨域限制
server: {
host: 'localhost',
port: Number(env.VITE_APP_PORT),
open: true, // 启动是否自动打开浏览器
proxy: {
[env.VITE_APP_BASE_API]: {
target: 'https://api.youlai.tech', // 有来商城线上接口地址
changeOrigin: true,
rewrite: path => path.replace(new RegExp('^' +
env.VITE_APP_BASE_API), '')
}
}
},
resolve: {
alias: {
"@": path.resolve("./src") // 相对路径别名配置,使用 @ 代替 src
}
}
}
)
}
6.svg图标
Element Plus 图标库往往满足不了实际开发需求,可以引用和使用第三方例如 iconfont 的图标,通过整合 vite-plugin-svg-icons 插件使用第三方图标库
1.安装 vite-plugin-svg-icons
npm i [email protected] -D
npm i [email protected] -D
2.创建图标文件夹
项目创建 src/assets/icons 文件夹,存放 iconfont 下载的 SVG 图标
3.main.ts 引入注册脚本
// main.ts
import 'virtual:svg-icons-register';
4. vite.config.ts 插件配置
// vite.config.ts
import {UserConfig, ConfigEnv, loadEnv} from 'vite'
import vue from '@vitejs/plugin-vue'
import { createSvgIconsPlugin } from 'vite-plugin-svg-icons';
export default ({command, mode}: ConfigEnv): UserConfig => {
// 获取 .env 环境配置文件
const env = loadEnv(mode, process.cwd())
return (
{
plugins: [
vue(),
createSvgIconsPlugin({
// 指定需要缓存的图标文件夹
iconDirs: [path.resolve(process.cwd(), 'src/assets/icons')],
// 指定symbolId格式
symbolId: 'icon-[dir]-[name]',
})
]
}
)
}
5.TypeScript支持
// tsconfig.json
{
"compilerOptions": {
"types": ["vite-plugin-svg-icons/client"]
}
}
6. 组件封装
<!-- src/components/SvgIcon/index.vue -->
<template>
<svg aria-hidden="true" class="svg-icon">
<use :xlink:href="symbolId" :fill="color" />
</svg>
</template>
<script setup lang="ts">
import { computed } from 'vue';
const props=defineProps({
prefix: {
type: String,
default: 'icon',
},
iconClass: {
type: String,
required: true,
},
color: {
type: String,
default: ''
}
})
const symbolId = computed(() => `#${props.prefix}-${props.iconClass}`);
</script>
<style scoped>
.svg-icon {
width: 1em;
height: 1em;
vertical-align: -0.15em;
overflow: hidden;
fill: currentColor;
}
</style>
7.Pinia状态管理
Pinia 是 Vue.js 的轻量级状态管理库,Vuex 的替代方案
尤雨溪于2021.11.24 在 Twitter 上宣布:Pinia 正式成为 vuejs 官方的状态库,意味着 Pinia 就是 Vuex5
1. 安装Pinia
npm install pinia2. Pinia全局注册
import { createPinia } from "pinia"
const app=createApp(App)
createPinia(app)
app.use(ElementPlus).component('SvgIcon',SvgIcon).mount('#app')
3. Pinia模块封装
import { defineStore } from "pinia";
export const useUserStore=defineStore({
    id:'app-user',
    state:()=>({
        userInfo:null,
        token:'undefined',
        roleList:[],
        setTimeout:false,
        lastUpdateTime:0
    })
})
4. 使用Pinia
//App.vue
<script setup lang="ts">
import {useUserStore} from './store/modules/user'
</script>

<template>
  <div>
<div>{

    { useUserStore.$id }}</div>
  </div>

</template>
配置eslint+prettier
下载
yarn add -D eslint
npx eslint --init
yarn add -D eslint-plugin-vue@latest @typescript-eslint/eslint-plugin@latest
@typescript-eslint/parser@latest [根据个人电脑的反馈来安装]
yarn add prettier eslint-config-prettier eslint-plugin-prettier -D配置
// .eslintrc.json
{
"env": {
"browser": true,
"es2021": true,
"node": true
},
"extends": [
"plugin:vue/vue3-recommended",
"plugin:@typescript-eslint/recommended",
"plugin:prettier/recommended"
],
"overrides": [],
"parser": "vue-eslint-parser",
"parserOptions": {
"ecmaVersion": "latest",
"sourceType": "module",
"parser": "@typescript-eslint/parser"
},
"plugins": ["vue", "@typescript-eslint"],
"rules": {}
}
// .prettierrc
{
"printWidth": 100,
"tabWidth": 2,
"useTabs": false,
"semi": true,
"vueIndentScriptAndStyle": true,
"singleQuote": true,
"quoteProps": "as-needed",
"bracketSpacing": true,
"trailingComma": "es5",
"jsxBracketSameLine": true,
"jsxSingleQuote": false,
"arrowParens": "always",
"insertPragma": false,
"requirePragma": false,
"proseWrap": "never",
"htmlWhitespaceSensitivity": "ignore",
"endOfLine": "auto",
"rangeStart": 0
}
安装node-sass的话,可能会报错,原因是我们版本冲突的问题,这个问题暂时无解,我的项目中无法使用node-sass
可以不使用node-sass,可以使用css或者less