前言
在上一节博客中我们系统的学习了关于URDF的基本使用语法,并从标签、属性、结构关系等多个方面深入体会了URDF文件的框架和理念,本篇文章则主要针对于实际的仿真开发,分别从带有摄像头的长方体和四轮圆柱式机器人进行实例分析,最后给出一些适用的开发工具,帮助理解URDF文件的使用方法.

一、旋转的摄像头
1. 目标机器人模型
-
需求:底盘为长方体、在前方有一个可以沿Z轴自由旋转的摄像头
-
URDF文件代码:
<!--
    需求: 底盘为长方体、
    在前方有一个可以沿Z轴自由旋转的摄像头
    的机器人模型
 -->
<robot name="mycar">
    <!-- 底盘 -->
    <link name="base_link">
        <visual>
            <geometry>
                <box size="0.5 0.2 0.1" />
            </geometry>
            <origin xyz="0 0 0" rpy="0 0 0" />
            <material name="blue">
                <color rgba="0 0 1.0 0.5" />
            </material>
        </visual>
    </link>

    <!-- 摄像头 -->
    <link name="camera">
        <visual>
            <geometry>
                <box size="0.02 0.05 0.05" />
            </geometry>
            <origin xyz="0 0 0" rpy="0 0 0" />
            <material name="red">
                <color rgba="1 0 0 0.5" />
            </material>
        </visual>
    </link>

    <!-- 关节 -->
    <joint name="camera2baselink" type="continuous">
        <parent link="base_link"/>
        <child link="camera" />
        <!-- 需要计算两个 link 的物理中心之间的偏移量 -->
        <origin xyz="0.2 0 0.075" rpy="0 0 0" />
        <axis xyz="0 0 1" />
    </joint>

</robot>
2. 启动文件
- 注意项:状态发布节点是必须创建的,其次是关节运动控制节点用于测试关节运动,并生成UI
<launch>

    <param name="robot_description" textfile="$(find urdf_rviz_demo)/urdf/urdf/urdf03_joint.urdf" />
    <node pkg="rviz" type="rviz" name="rviz" args="-d $(find urdf_rviz_demo)/config/helloworld.rviz" />

    <!-- 添加关节状态发布节点 -->
    <node pkg="joint_state_publisher" type="joint_state_publisher" name="joint_state_publisher" />
    <!-- 添加机器人状态发布节点 -->
    <node pkg="robot_state_publisher" type="robot_state_publisher" name="robot_state_publisher" />
    <!-- 可选:用于控制关节运动的节点 -->
    <node pkg="joint_state_publisher_gui" type="joint_state_publisher_gui" name="joint_state_publisher_gui" />

</launch>
3. 问题及优化方法
1)初始模型位置
-
问题:上述代码产生的机器人模型在初始时会半沉到地下
-
原因:底盘的重心位于地图原点
-
解决方法:将初始 link 设置为一个尺寸极小的 link(比如半径为 0.001m 的球体,或边长为 0.001m 的立方体),然后再在初始 link 上添加底盘等刚体
-
优化代码:
<!--
    使用 base_footprint 优化
-->
<robot name="mycar">
    <!-- 设置一个原点(机器人中心点的投影) -->
    <link name="base_footprint">
        <visual>
            <geometry>
                <sphere radius="0.001" />
            </geometry>
        </visual>
    </link>

    <!-- 添加底盘 -->
    <link name="base_link">
        <visual>
            <geometry>
                <box size="0.5 0.2 0.1" />
            </geometry>
            <origin xyz="0 0 0" rpy="0 0 0" />
            <material name="blue">
                <color rgba="0 0 1.0 0.5" />
            </material>
        </visual>
    </link>

    <!-- 底盘与原点连接的关节 -->
    <joint name="base_link2base_footprint" type="fixed">
        <parent link="base_footprint" />
        <child link="base_link" />
        <origin xyz="0 0 0.05" />
    </joint>

    <!-- 添加摄像头 -->
    <link name="camera">
        <visual>
            <geometry>
                <box size="0.02 0.05 0.05" />
            </geometry>
            <origin xyz="0 0 0" rpy="0 0 0" />
            <material name="red">
                <color rgba="1 0 0 0.5" />
            </material>
        </visual>
    </link>
    <!-- 关节 -->
    <joint name="camera2baselink" type="continuous">
        <parent link="base_link"/>
        <child link="camera" />
        <origin xyz="0.2 0 0.075" rpy="0 0 0" />
        <axis xyz="0 0 1" />
    </joint>

</robot>
2)命令行错误
- 错误提示如下:
UnicodeEncodeError: 'ascii' codec can't encode characters in position 463-464: ordinal not in range(128)
[joint_state_publisher-3] process has died [pid 4443, exit code 1, cmd /opt/ros/melodic/lib/joint_state_publisher/joint_state_publisher __name:=joint_state_publisher __log:=/home/rosmelodic/.ros/log/b38967c0-0acb-11eb-aee3-0800278ee10c/joint_state_publisher-3.log].
log file: /home/rosmelodic/.ros/log/b38967c0-0acb-11eb-aee3-0800278ee10c/joint_state_publisher-3*.log
解决方法:去除中文注释,避免编码问题
- 错误提示如下:
[ERROR] [1584370263.037038]: Could not find the GUI, install the ‘joint_state_publisher_gui’ package解决方法:
sudo apt install ros-noetic-joint-state-publisher-gui
二、四轮圆柱式机器人
1. 目标机器人模型
- 需求:底盘为圆柱体,四个轮子分别为两个驱动轮,两个支撑轮
- 具体数据及图示:
1.底盘:半径10cm、高8cm,离地间距1.5cm
2.轮子:驱动轮:半径3.25cm、宽1.5cm;支撑轮:球形,半径0.75cm

- URDF文件代码:
<robot name="mycar">
    <!-- 设置 base_footprint  -->
	    <link name="base_footprint">
	        <visual>
	            <geometry>
	                <sphere radius="0.001" />
	            </geometry>
	        </visual>
	    </link>

    <!-- 添加底盘 -->
		<!--
	        	参数
	            形状:圆柱
	            半径:10     cm
	            高度:8      cm
	            离地:1.5    cm
	    -->
	    <link name="base_link">
	        <visual>
	            <geometry>
	                <cylinder radius="0.1" length="0.08" />
	            </geometry>
	            <origin xyz="0 0 0" rpy="0 0 0" />
	            <material name="yellow">
	                <color rgba="0.8 0.3 0.1 0.5" />
	            </material>
	        </visual>
	    </link>

	    <joint name="base_link2base_footprint" type="fixed">
	        <parent link="base_footprint" />
	        <child link="base_link"/>
	        <origin xyz="0 0 0.055" />
	    </joint>


    <!-- 添加驱动轮 -->
	    <!--
	        驱动轮是侧翻的圆柱
	        参数
	            半径: 3.25 cm
	            宽度: 1.5  cm
	            颜色: 黑色
	        关节设置:
	            x = 0
	            y = 底盘的半径 + 轮胎宽度 / 2
	            z = 离地间距 + 底盘长度 / 2 - 轮胎半径 = 1.5 + 4 - 3.25 = 2.25(cm)
	            axis = 0 1 0
	    -->
	    <link name="left_wheel">
	        <visual>
	            <geometry>
	                <cylinder radius="0.0325" length="0.015" />
	            </geometry>
	            <origin xyz="0 0 0" rpy="1.5705 0 0" />
	            <material name="black">
	                <color rgba="0.0 0.0 0.0 1.0" />
	            </material>
	        </visual>

	    </link>

	    <joint name="left_wheel2base_link" type="continuous">
	        <parent link="base_link" />
	        <child link="left_wheel" />
	        <origin xyz="0 0.1 -0.0225" />
	        <axis xyz="0 1 0" />
	    </joint>


	    <link name="right_wheel">
	        <visual>
	            <geometry>
	                <cylinder radius="0.0325" length="0.015" />
	            </geometry>
	            <origin xyz="0 0 0" rpy="1.5705 0 0" />
	            <material name="black">
	                <color rgba="0.0 0.0 0.0 1.0" />
	            </material>
	        </visual>

	    </link>

	    <joint name="right_wheel2base_link" type="continuous">
	        <parent link="base_link" />
	        <child link="right_wheel" />
	        <origin xyz="0 -0.1 -0.0225" />
	        <axis xyz="0 1 0" />
	    </joint>


    <!-- 添加万向轮(支撑轮) -->
	    <!--
	        参数
	            形状: 球体
	            半径: 0.75 cm
	            颜色: 黑色

	        关节设置:
	            x = 自定义(底盘半径 - 万向轮半径) = 0.1 - 0.0075 = 0.0925(cm)
	            y = 0
	            z = 底盘长度 / 2 + 离地间距 / 2 = 0.08 / 2 + 0.015 / 2 = 0.0475
	            axis= 1 1 1

	    -->
	    <link name="front_wheel">
	        <visual>
	            <geometry>
	                <sphere radius="0.0075" />
	            </geometry>
	            <origin xyz="0 0 0" rpy="0 0 0" />
	            <material name="black">
	                <color rgba="0.0 0.0 0.0 1.0" />
	            </material>
	        </visual>
	    </link>

	    <joint name="front_wheel2base_link" type="continuous">
	        <parent link="base_link" />
	        <child link="front_wheel" />
	        <origin xyz="0.0925 0 -0.0475" />
	        <axis xyz="1 1 1" />
	    </joint>

	    <link name="back_wheel">
	        <visual>
	            <geometry>
	                <sphere radius="0.0075" />
	            </geometry>
	            <origin xyz="0 0 0" rpy="0 0 0" />
	            <material name="black">
	                <color rgba="0.0 0.0 0.0 1.0" />
	            </material>
	        </visual>
	    </link>

	    <joint name="back_wheel2base_link" type="continuous">
	        <parent link="base_link" />
	        <child link="back_wheel" />
	        <origin xyz="-0.0925 0 -0.0475" />
	        <axis xyz="1 1 1" />
	    </joint>
</robot>
2. 启动文件
- launch文件代码:
<launch>
    <!-- 将 urdf 文件内容设置进参数服务器 -->
    <param name="robot_description" textfile="$(find demo01_urdf_helloworld)/urdf/urdf/test.urdf" />

    <!-- 启动 rivz -->
    <node pkg="rviz" type="rviz" name="rviz_test" args="-d $(find demo01_urdf_helloworld)/config/helloworld.rviz" />

    <!-- 启动机器人状态和关节状态发布节点 -->
    <node pkg="robot_state_publisher" type="robot_state_publisher" name="robot_state_publisher" />
    <node pkg="joint_state_publisher" type="joint_state_publisher" name="joint_state_publisher" />

    <!-- 启动图形化的控制关节运动节点 -->
    <node pkg="joint_state_publisher_gui" type="joint_state_publisher_gui" name="joint_state_publisher_gui" />
</launch>
- 实现流程:此机器人可先新建一个基本的URDF文件,集成启动文件后在逐渐添加底盘及轮子等部件
三、URDF编写工具
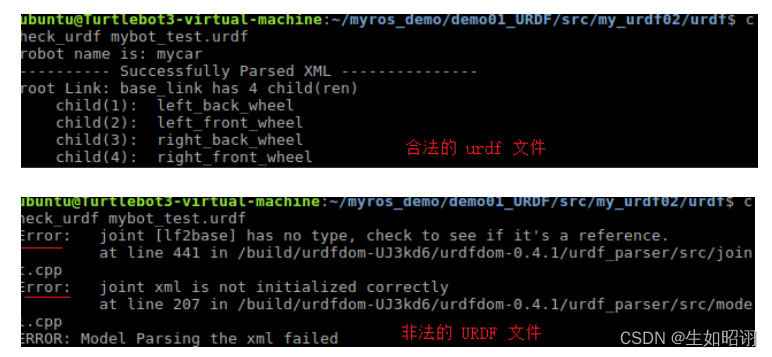
1. 语法检查 check_urdf
- 工具安装:
sudo apt install liburdfdom-tools
-
具体工具:check_urdf,检查复杂的 urdf 文件是否存在语法问题
-
使用方法:进入对应目录,使用命令
check_urdf 对应urdf文件 -
效果示意:
2. 查看结构 urdf_to_graphiz
-
工具安装:同上
-
具体工具:urdf_to_graphiz,查看 urdf 模型结构,显示不同 link 的层级关系
-
使用方法:进入对应目录,使用命令
urdf_to_graphiz 对应urdf文件,查看当前目录下的PDF文件即可 -
效果示意:

总结
- 声明:本节博客部分参考了CSDN用户赵虚左的ROS教程,本篇博客主要介绍了两个使用URDF进行机器人建模的具体实例,一个是重点在于自由旋转的摄像头,而另一个则是四轮机器人,最后给出了URDF的一些基本ROS工具,包含语法错误检查和link结构展示等,下篇博客将会介绍如何使用Xacro对URDF进行编程优化,敬请期待。
