前言
之前的threejs入门视频教学已经学习完了,下面会陆续学习官方demo。官方网址太卡了建议在本地进行搭建,具体见:threejs视频教程学习(1):本地搭建threeJS官网、渲染第一个场景
官方的例子都是html格式,后续以vue3的格式进行学习。
webgl_animation_keyframes
代码
<template>
    <div id="keyframes"> </div>
</template>

<script setup lang="ts">
import {

     onMounted, ref } from 'vue';
import * as THREE from 'three';
// 引入轨道控制器
import {

     OrbitControls } from 'three/examples/jsm/controls/OrbitControls';
// 引入模型加载器
import {

     GLTFLoader } from 'three/examples/jsm/loaders/GLTFLoader';
// 引入模型解压器
import {

     DRACOLoader } from 'three/examples/jsm/loaders/DRACOLoader';
// 引入房间环境,之前没有用过,应该是创建一个室内环境
import {

     RoomEnvironment } from 'three/examples/jsm/environments/RoomEnvironment';
// 引入性能监视器,之前也没用过
import Stats from 'three/examples/jsm/libs/stats.module';

const mixer = ref();

onMounted(() => {


    // 创建一个clock对象,用于跟踪时间
    const clock = new THREE.Clock();
    // 获取dom容器
    const container = document.getElementById('keyframes');
    // 创建一个性能监听器
    const stats = new Stats();
    // 修改一下位置
    stats.dom.style.position = 'relative';
    // 将性能监听器添加到容器中
    container?.appendChild(stats.dom);
    // 创建一个渲染器
    const renderer = new THREE.WebGLRenderer({


        antialias: true // 设置防锯齿
    });
    // 设置渲染器的像素比例
    renderer.setPixelRatio(window.devicePixelRatio);
    // 设置渲染的尺寸
    renderer.setSize(1000, 800);
    // 设置渲染的输出格式
    renderer.outputEncoding = THREE.sRGBEncoding;
    // 将渲染的内容添加到容器中
    container?.appendChild(renderer.domElement);

    // 创建一个PMREMGenerator,从立方体映射环境纹理生成预过滤的 Mipmap 辐射环境贴图
    const pmremGenerator = new THREE.PMREMGenerator(renderer);
    // 创建一个场景
    const scene = new THREE.Scene();
    // 设置背景色
    scene.background = new THREE.Color(0xbfe3dd);
    // 设置场景的纹理,从提供的场景中生成纹理
    scene.environment = pmremGenerator.fromScene(new RoomEnvironment(), 0.04).texture;

    // 创建相机并设置位置
    const camera = new THREE.PerspectiveCamera(40, 1.25, 1, 100);
    camera.position.set(5, 2, 8);

    // 设置轨道控制器
    const controls = new OrbitControls(camera, renderer.domElement);
    controls.target.set(0, 0.5, 0);
    controls.update();
    controls.enablePan = false; // 当设置为false时,控制器将不会响应用户的操作。默认值为true。
    controls.enableDamping = true; // 开启阻尼

    // 创建解压器并设置路径,官方文档中有draco文件夹,直接复制到自己项目里就好,另外gltf后面一定要加斜杠
    const dracoLoader = new DRACOLoader();
    dracoLoader.setDecoderPath('../../../../public/draco/gltf/');

    // 创建模型加载器并加载模型
    const loader = new GLTFLoader();
    loader.setDRACOLoader(dracoLoader);
    loader.load('../../../../public/LittlestTokyo.glb', gltf => {


        const model = gltf.scene;
        // 设置模型的位置
        model.position.set(1, 1, 0);
        // 设置视角
        model.scale.set(0.01, 0.01, 0.01);
        // 将模型添加到场景中
        scene.add(model);

        // 创建一个动画混合器,动画混合器是用于场景中特定对象的动画的播放器。当场景中的多个对象独立动画时,每个对象都可以使用同一个动画混合器。
        mixer.value = new THREE.AnimationMixer(model);
        // 设置剪辑动画
        mixer.value.clipAction(gltf.animations[0]).play();
        // 执行动画
        animate();
    });

    // 动画执行函数
    const animate = () => {


        // 调用动画帧执行动画
        requestAnimationFrame(animate);
        // 获取当前秒数
        const delta = clock.getDelta();
        // 更新动画混合器、轨道控制器、性能监听器
        mixer.value.update(delta);
        controls.update();
        stats.update();
        // 重新渲染
        renderer.render(scene, camera);
    };
});
</script>

<style lang="scss" scoped>
#keyframes {


    background-color: #bfe3dd;
    width: 1000px;
    height: 800px;
}
</style>
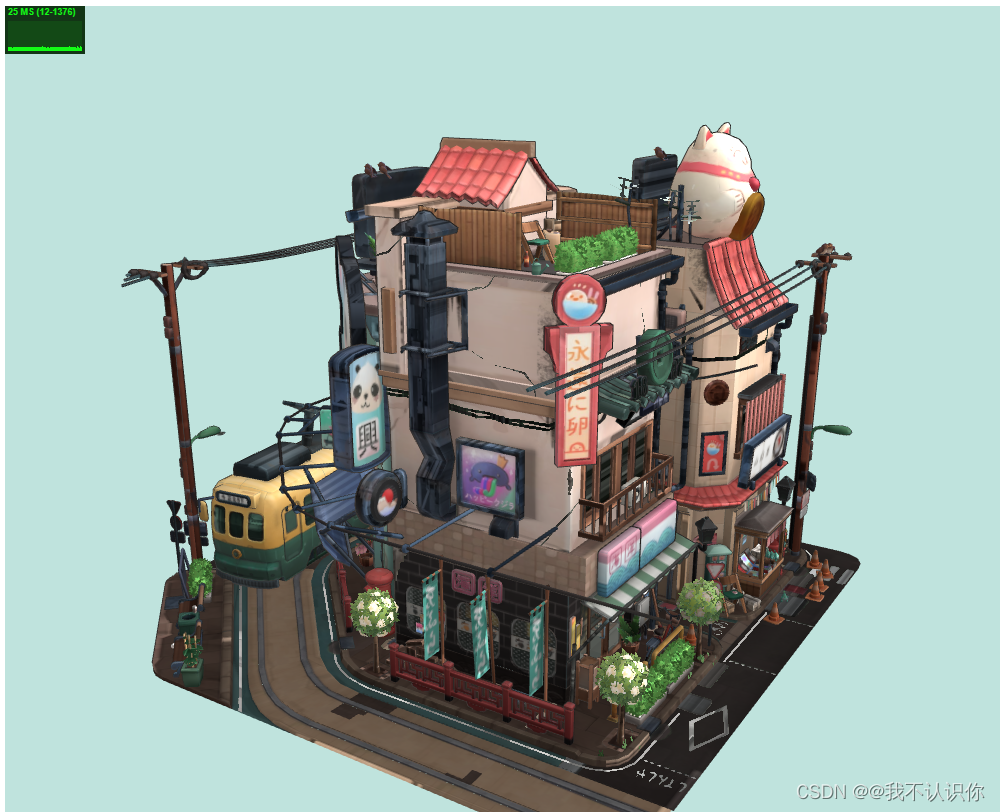
效果图
左上角的是性能监听器,点击启动,再次点击关闭
知识点
最复杂的是模型,不过模型是做好的。主要是如何加载模型,设置动画。
RoomEnvironment
import {

     RoomEnvironment } from 'three/examples/jsm/environments/RoomEnvironment';
应该是室内环境,但是在官方文档里没有找到。
PMREMGenerator
// 创建一个PMREMGenerator,从立方体映射环境纹理生成预过滤的 Mipmap 辐射环境贴图
 const pmremGenerator = new THREE.PMREMGenerator(renderer);
 // 创建一个场景
 const scene = new THREE.Scene();
 // 设置背景色
 scene.background = new THREE.Color(0xbfe3dd);
 // 设置场景的纹理,从提供的场景中生成纹理
 scene.environment = pmremGenerator.fromScene(new RoomEnvironment(), 0.04).texture;
看官方的demo应该是用来提取场景中的纹理的。
AnimationMixer
官方文档的解释是:动画混合器是用于场景中特定对象的动画的播放器。
当我将相关代码注释后,模型里的动画停止了执行,结合文档的解释,应该就是用于播放模型自身的动画。
Clock
该对象用于跟踪时间,结合上面动画混合器的update 方法,这里单纯用于给动画混合器提供参数。

webgl_animation_skinning_blending
官方的例子有点复杂,看了好几遍才明白,实际上也是基于上面的动画加载,只是将各个动作给拆解开来了。在官方例子的基础上进行了简化,把一些代码进行了删除,这样更适合我这样的初学者。
代码
这里是有点问题的,没太搞明白,new THREE.AnimationMixer(model)单独定为一个变量使用时会提示某些方法找不到,因此就没有单独定义
<template>
    <div id="keyframes"> </div>
</template>

<script setup lang="ts">
import {

     onMounted } from 'vue';
import * as THREE from 'three';
// 引入gui
import * as dat from 'dat.gui';
// 模型加载器
import {

     GLTFLoader } from 'three/examples/jsm/loaders/GLTFLoader';
// 引入轨道控制器
import {

     OrbitControls } from 'three/examples/jsm/controls/OrbitControls';

onMounted(() => {


    // 获取dom容器
    const container = document.getElementById('keyframes');
    // 创建一个场景
    const scene = new THREE.Scene();
    // 设置场景的背景色
    scene.background = new THREE.Color(0xa0a0a0);
    // 给场景中添加雾、雾的颜色、最小距离、最大距离。最小距离和最大距离之间是雾的范围
    scene.fog = new THREE.Fog(0xa0a0a0, 10, 50);

    // 创建相机
    const camera = new THREE.PerspectiveCamera(75, 1.25, 1, 1000);
    // 设置相机的位置
    camera.position.set(2, 2, -10);
    // 将相机添加到场景里
    scene.add(camera);

    // 创建渲染器
    const renderer = new THREE.WebGLRenderer({


        antialias: true // 设置防锯齿
    });
    // 设置渲染器的像素比例
    renderer.setPixelRatio(window.devicePixelRatio);
    // 设置渲染尺寸
    renderer.setSize(1000, 800);
    // 设置渲染输出的编码
    renderer.outputEncoding = THREE.sRGBEncoding;
    // 开启场景阴影渲染
    renderer.shadowMap.enabled = true;
    // 将渲染对象添加到容器
    container?.appendChild(renderer.domElement);

    // 添加平行光,平行光可以产生投影
    const dirLight = new THREE.DirectionalLight(0xffffff);
    // 设置平行光的位置
    dirLight.position.set(-3, 10, -10);
    // 设置光照产生阴影
    dirLight.castShadow = true;

    // 向场景中添加灯光
    scene.add(dirLight);
    // 添加坐标辅助器
    const axesHelper = new THREE.AxesHelper(10);
    scene.add(axesHelper);
    // 创建轨道控制器
    const controls = new OrbitControls(camera, renderer.domElement);
    // 设置控制器阻尼
    controls.enableDamping = true;

    // 渲染函数
    const render = () => {


        controls.update();
        renderer.render(scene, camera);
        requestAnimationFrame(render);
    };
    render();
    // 创建一个具有镜面高光的平面
    const mesh = new THREE.Mesh(new THREE.PlaneGeometry(100, 100), new THREE.MeshPhongMaterial({

     color: 0x999999 }));
    // 把平面变成水平的
    mesh.rotation.x = -Math.PI / 2;
    // 设置接收物体投影
    mesh.receiveShadow = true;
    scene.add(mesh);

    // 模型
    let model = null;
    // clock对象
    const clock = new THREE.Clock();
    // 用来模拟骨骼 Skeleton 的辅助对象
    let skeleton = null;
    // 放松动作
    let idleAction = null;
    // 步行
    let walkAction = null;
    // 跑
    let runAction = null;
    // 所有的设置
    let settings = {

    };
    // 所有动作
    let actions = [];
    // 当前激活动作
    let active = 2;
    // 所有的动画
    let animations = [];

    // 创建模型加载器,加载模型
    const loader = new GLTFLoader();
    // 应该是模型比较小,这里没有引入模型解压器
    loader.load('../../../../public/Soldier.glb', gltf => {


        model = gltf.scene;
        scene.add(model);
        // 进行深度遍历
        model.traverse(function(object) {


            // 如果是物体的话开启投影
            if (object.isMesh) {


                object.castShadow = true;
            }
        });
        // 获取模型的骨骼对象
        skeleton = new THREE.SkeletonHelper(model);
        // 将骨骼设置为可见
        skeleton.visible = true;
        // 向场景中添加骨骼辅助对象
        scene.add(skeleton);

        // 创建控制面板
        createPanel();
        // 获取模型的动画
        animations = gltf.animations;
        // 这里new THREE.AnimationMixer(model);不统一使用一个变量代替是因为,使用一个变量代替后报错了,不知道因为什么
        // 跑
        runAction = new THREE.AnimationMixer(model);
        runAction.clipAction(animations[1]);
        // 放松动作
        idleAction = new THREE.AnimationMixer(model);
        idleAction.clipAction(animations[2]);
        // 步行
        walkAction = new THREE.AnimationMixer(model);
        walkAction.clipAction(animations[3]).play();

        actions = [runAction, idleAction, walkAction];
        animate();
    });

    /** **************上面的是模型的加载和渲染,下面这些都与动画有关***************** */

    // 执行动画
    const animate = () => {


        // 调用动画帧执行动画
        requestAnimationFrame(animate);
        // 获取当前秒数
        const delta = clock.getDelta();
        // 更新动画混合器、轨道控制器、性能监听器
        actions[active].update(delta);
        controls.update();
        // 重新渲染
        renderer.render(scene, camera);
    };

    // 创建GUI面板
    const createPanel = () => {


        const panel = new dat.GUI({

     width: 310 });
        settings = {


            visible: true, // 显示模型
            idle: false // 放松
        };
        panel.add(settings, 'visible').name('是否显示').onChange(showModel);
        panel.add(settings, 'idle').name('放松').onChange(runIdleAction);
    };

    // 显示模型
    const showModel = (visibility: boolean) => {


        // 隐藏模型
        model.visible = visibility;
        // 隐藏骨骼
        skeleton.visible = visibility;
    };

    // 放松
    const runIdleAction = (value:boolean) => {


        if (value) {


            // 将跑、走动画停止,开启放松动画
            actions[0].clipAction(animations[1]).stop();
            actions[2].clipAction(animations[3]).stop();
            actions[1].clipAction(animations[2]).play();
            // 更新激活的动作
            active = 1;
        } else {


        // 变为走
            actions[0].clipAction(animations[1]).stop();
            actions[2].clipAction(animations[3]).play();
            actions[1].clipAction(animations[2]).stop();
            // 更新激活的动作
            active = 2;
        }
    };
});
</script>

<style lang="scss" scoped>
#keyframes {


    width: 1000px;
    height: 800px;
    background-color: #bfe3dd;
}
</style>
效果图
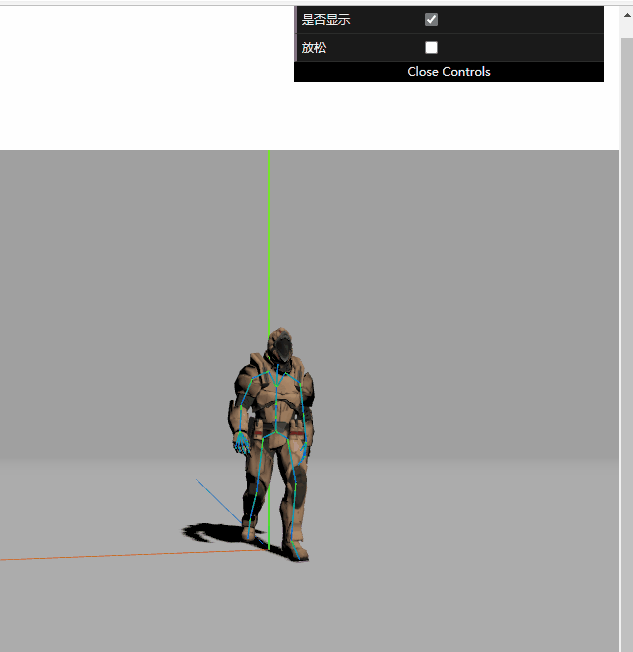
知识点
Fog
在常见中添加雾,具体内容可以看官方文档
scene.fog = new THREE.Fog(0xa0a0a0, 10, 50);
如何产生投影
这个之前梳理过,具体见:threejs视频教程学习(4):贴图、材质、光线
SkeletonHelper
SkeletonHelper,用来模拟骨骼 Skeleton 的辅助对象.。该辅助对象使用 LineBasicMaterial 材质。
模型里面必须有骨骼辅助对象,才能够获取到
// 获取模型的骨骼对象
skeleton = new THREE.SkeletonHelper(model);
// 将骨骼设置为可见
skeleton.visible = true;
// 向场景中添加骨骼辅助对象
scene.add(skeleton);
gui
gui的基本使用见:threejs视频教程学习(3):应用图形用户界面更改变量 (dat.gui的简单使用)
webgl_animation_skinning_additive_blending
做的比较简陋,好多细节都没有实现。
代码
<template>
    <div id="keyframes"> </div>
</template>

<script setup lang="ts">
import {

     onMounted } from 'vue';
import * as THREE from 'three';
// 引入gui
import * as dat from 'dat.gui';
// 模型加载器
import {

     GLTFLoader } from 'three/examples/jsm/loaders/GLTFLoader';
// 引入轨道控制器
import {

     OrbitControls } from 'three/examples/jsm/controls/OrbitControls';

onMounted(() => {


    // 获取dom
    const container = document.getElementById('keyframes');
    // 走
    let walkAction = null;
    let walk = null;
    // 跑
    let runAction = null;
    let run = null;
    const clock = new THREE.Clock();

    // 创建场景
    const scene = new THREE.Scene();
    // 设置背景色
    scene.background = new THREE.Color(0xa0a0a0);
    // 设置雾气
    scene.fog = new THREE.Fog(0xa0a0a0, 10, 50);
    // 设置半球光
    const hemiLight = new THREE.HemisphereLight(0xffffff, 0x444444);
    hemiLight.position.set(0, 20, 0);
    scene.add(hemiLight);
    // 设置平行光
    const dirLight = new THREE.DirectionalLight(0xffffff);
    dirLight.position.set(3, 10, 10);
    dirLight.castShadow = true; // 开启阴影
    scene.add(dirLight);

    // 创建透视相机
    const camera = new THREE.PerspectiveCamera(75, window.innerWidth / window.innerHeight, 1, 100);
    camera.position.set(-1, 2, 3);
    scene.add(camera);

    // 创建渲染器
    const renderer = new THREE.WebGLRenderer({


        antialias: true // 抗锯齿
    });
    renderer.setPixelRatio(window.devicePixelRatio); // 像素比
    renderer.setSize(window.innerWidth, window.innerHeight); // 渲染尺寸
    renderer.outputEncoding = THREE.sRGBEncoding;
    renderer.shadowMap.enabled = true; // 开启场景阴影渲染
    container?.appendChild(renderer.domElement);

    // 创建轨道控制器
    const control = new OrbitControls(camera, renderer.domElement);
    control.enableZoom = false; // 关闭缩放
    control.target.set(0, 1, 0);
    control.update(); // 更新控制器

    // 创建一个平面
    const mesh = new THREE.Mesh(new THREE.PlaneGeometry(100, 100), new THREE.MeshPhongMaterial({

     color: 0x999999, depthWrite: false }));
    mesh.rotation.x = -Math.PI / 2;
    mesh.receiveShadow = true; // 设置平面接收阴影
    scene.add(mesh);

    // 加载模型
    const loader = new GLTFLoader();
    loader.load('../../../../public/Xbot.glb', gltf => {


        // 模型
        const model = gltf.scene;
        scene.add(model);
        // 递归找到物体开启阴影
        model.traverse(object => {


            if (object.isMesh) object.castShadow = true;
        });
        // 获取模型的动作
        const animations = gltf.animations;
        console.log('动画', animations);

        // 跑
        runAction = new THREE.AnimationMixer(model);
        run = runAction.clipAction(animations[3]);

        // 走
        walkAction = new THREE.AnimationMixer(model);
        walk = walkAction.clipAction(animations[6]);

        animate();
    });

    // 执行动画
    const animate = () => {


        // 调用动画帧执行动画
        requestAnimationFrame(animate);
        // 获取当前时间,这个不能直接new ,不然动画不会生效
        const delta = clock.getDelta();
        if (settings.run) {


            run.play();
            runAction.update(delta);
        } else {


            walk.play();
            walkAction.update(delta);
        }
        control.update();
        // 重新渲染
        renderer.render(scene, camera);
    };

    // 添加GUI
    let settings = {

    };
    const panel = new dat.GUI({

     width: 310 });
    settings = {


        run: true,
        speed: 1
    };
    panel.add(settings, 'run').name('跑');
    panel.add(settings, 'speed').min(0).max(5)
        .onChange((value) => {


            // 通过修改AnimationAction对象的timeScale(时间比例因子)来调节动画的速度
            if (settings.run) {


                runAction.timeScale = value;
            } else {


                walkAction.timeScale = value;
            }
        });
});
</script>

<style lang="scss" scoped>
#keyframes {


    width: 1000px;
    height: 800px;
    background-color: #bfe3dd;
}
</style>
效果图
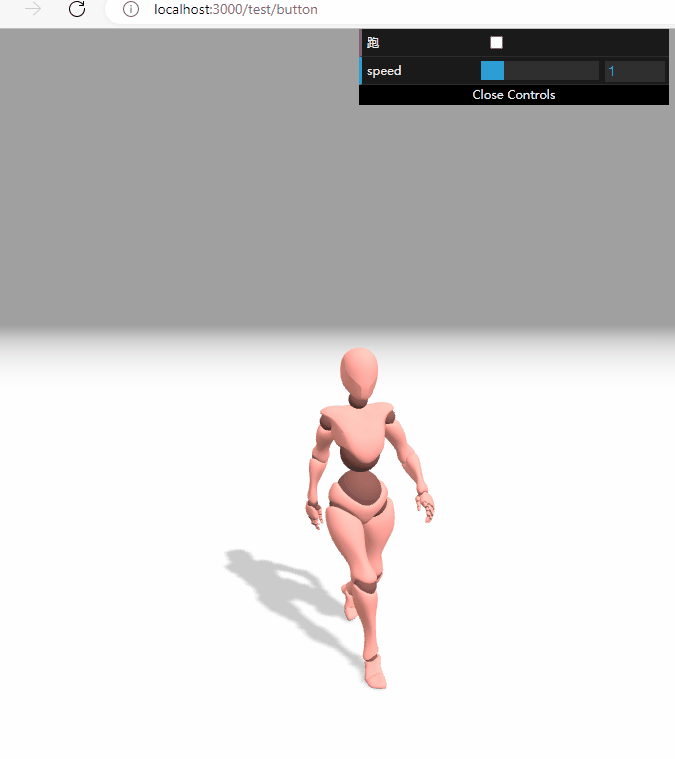
知识点
主要是AnimationAction 动画对象的应用。动画的速度是通过修改timeScale 来实现的,动作之间的过渡是通过修改weight来实现的,动作过渡没太弄清楚。
详情内容可以看官方文档。