前言
案例太多了,考虑了一下,实际项目中有可能用的情况一般就是加载模型,然后对模型进行一些操作。因此打算好好看一下关于模型加载的案例,其他案例就不看了。
模型加载并改变材质
<script lang="ts" setup>
import {

     onMounted } from 'vue';
// threejs
import * as THREE from 'three';
// 引入轨道控制器
import {

     OrbitControls } from 'three/examples/jsm/controls/OrbitControls';
// 模型加载器,用于加载3D Studio Max软件中的3DS和MAX文件格式
import {

     TDSLoader } from 'three/examples/jsm/loaders/TDSLoader';

onMounted(() => {


    console.log(document.getElementById('test'));
    // 创建一个场景
    const scene = new THREE.Scene();
    scene.background = new THREE.Color(0xfff);
    // 创建一个相机
    const camera = new THREE.PerspectiveCamera(75, window.innerWidth / window.innerHeight, 1, 100);
    // 设置相机的位置
    camera.position.z = 5;
    // 将相机添加到场景中
    scene.add(camera);

    // 添加直线光,并设置光源位置
    const light1 = new THREE.DirectionalLight(0xffeedd);
    light1.position.set(0, 0, 2);
    scene.add(light1);
    const light2 = new THREE.DirectionalLight(0xffeedd);
    light2.position.set(0, 0, -2);
    scene.add(light2);

    // 创建一个渲染器
    const renderer = new THREE.WebGLRenderer({


        antialias: true // 设置抗锯齿
    });
    // 设置渲染尺寸
    renderer.setSize(window.innerWidth, window.innerHeight);
    // 设置渲染的输出编码
    renderer.outputEncoding = THREE.sRGBEncoding;
    // 将内容渲染到页面中
    document.getElementById('test')?.appendChild(renderer.domElement);

    // 创建轨道控制器
    const control = new OrbitControls(camera, renderer.domElement);
    control.target.set(0, 0, 0);
    // 设置阻尼
    control.enableDamping = true;

    // 加载纹理
    const normal = new THREE.TextureLoader().load('../../../../public/normal.jpg');
    // 加载模型
    const loader = new TDSLoader();
    loader.load('../../../../public/portalgun.3ds', object => {


        // 遍历对象,给物体添加贴图
        object.traverse(child => {


            // 如果是物体,则修改物体的材质
            if (child.isMesh) {


                child.material = new THREE.MeshPhongMaterial({


                    color: 0xfff,
                    reflectivity: 0.7,
                    refractionRatio: 0.9,
                    envMap: normal
                });
            }
        });
        scene.add(object);
    });

    // 创建渲染函数
    const render = () => {


        control.update();
        renderer.render(scene, camera);
        // 通过动画帧来执行函数
        requestAnimationFrame(render);
    };

    render();
});

</script>
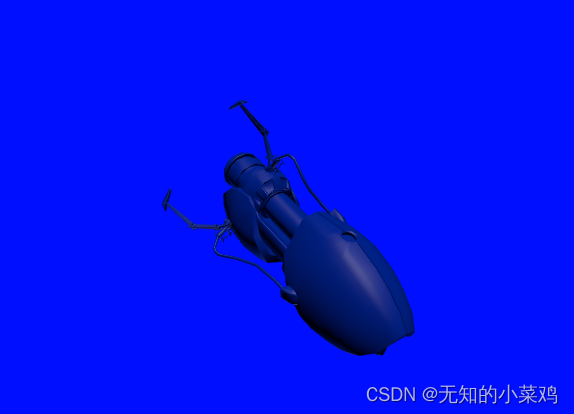
这里最重要的知识应该就是遍历模型,来修改模型的材质。
模型加载产生投影
<script setup lang="ts">
import {

     onMounted } from 'vue';
import * as THREE from 'three';

// 导入轨道控制器,模块化开发导入的是jsm不是js
import {

     OrbitControls } from 'three/examples/jsm/controls/OrbitControls';
import {

     ThreeMFLoader } from 'three/examples/jsm//loaders/3MFLoader';

onMounted(() => {


    // 创建一个场景
    const scene = new THREE.Scene();
    // 设置背景
    scene.background = new THREE.Color(0x999999);
    // 创建相机
    const camera = new THREE.PerspectiveCamera(35, window.innerWidth / window.innerHeight, 1, 500);
    // 添加环境光
    scene.add(new THREE.AmbientLight(0x999999));
    // 设置相机位置和向上的方向
    camera.up.set(0, 0, 1);
    camera.position.set(100, 9, 50);
    scene.add(camera);
    // 添加平行光
    const directionalLight = new THREE.DirectionalLight(0xffffff, 1);
    // 设置光线的位置,设置光照产生阴影
    directionalLight.position.set(60, 10, 60);
    directionalLight.castShadow = true;
    // 设置了阴影贴图(二维的)的上下左右边界的坐标,x轴正方向代表右,y轴正方向代表上
    directionalLight.shadow.camera.top = 70;
    directionalLight.shadow.camera.bottom = -55;
    directionalLight.shadow.camera.left = -50;
    directionalLight.shadow.camera.right = 10;
    // 设置阴影的最近最远观察激励
    directionalLight.shadow.camera.near = 0.1;
    directionalLight.shadow.camera.far = 200;
    // 值越大越清晰
    directionalLight.shadow.mapSize.set(1024, 1024);
    scene.add(directionalLight);
    // 添加一个小球,来显示光照的位置
    const ball = new THREE.Mesh(
        new THREE.SphereGeometry(2, 32, 32),
        new THREE.MeshBasicMaterial({

     color: 0xfff })
    );
    ball.position.set(60, 10, 60);
    scene.add(ball);
    // 添加坐标轴辅助器
    const axesHelper = new THREE.AxesHelper(100);
    scene.add(axesHelper);
    // 添加平面
    const ground = new THREE.Mesh(new THREE.PlaneGeometry(1000, 1000), new THREE.MeshPhongMaterial());
    ground.receiveShadow = true;
    scene.add(ground);
    // 加载模型
    const loader = new ThreeMFLoader();
    loader.load('../../../../public/truck.3mf', object => {


        // 设置模型的位置
        object.position.set(0, 0, -10);
        object.traverse(child => {


            child.castShadow = true;
        });
        scene.add(object);
    });

    // 创建渲染器、设置像素比、渲染尺寸
    const renderer = new THREE.WebGLRenderer({

     antialias: true });
    renderer.setPixelRatio(window.devicePixelRatio);
    renderer.setSize(window.innerWidth, window.innerHeight);
    // 开启场景阴影渲染
    renderer.shadowMap.enabled = true;
    document.getElementById('container')?.appendChild(renderer.domElement);

    // 添加控制器
    const controls = new OrbitControls(camera, renderer.domElement);
    controls.target.set(0, 1.2, 2);
    controls.update();

    // 渲染函数
    const render = () => {


        renderer.render(scene, camera);
        requestAnimationFrame(render);
        controls.update();
    };
    render();
});
</script>
关于阴影加载的部分挺复杂的需要满足以下条件:
- 添加的光源能够使物体产生投影
- 物体本身能够产生投影
- 地面能够接收物体产生的投影
- 渲染器要开启场景的阴影渲染
满足了以上条件起始还不一定能够看见阴影,还与光源的位置有关,阴影的设置有关、相机的位置有关
- 可以通过添加辅助坐标系(红色的x轴、绿色的y轴、蓝色的z轴)、添加一个小球来模拟光源的位置。通过不断的调整位置来产生一个合适的阴影
- 要对阴影进行相关的设置,设置大小,清晰度
- 可以添加一个小球来模拟相机,来调整相机的位置
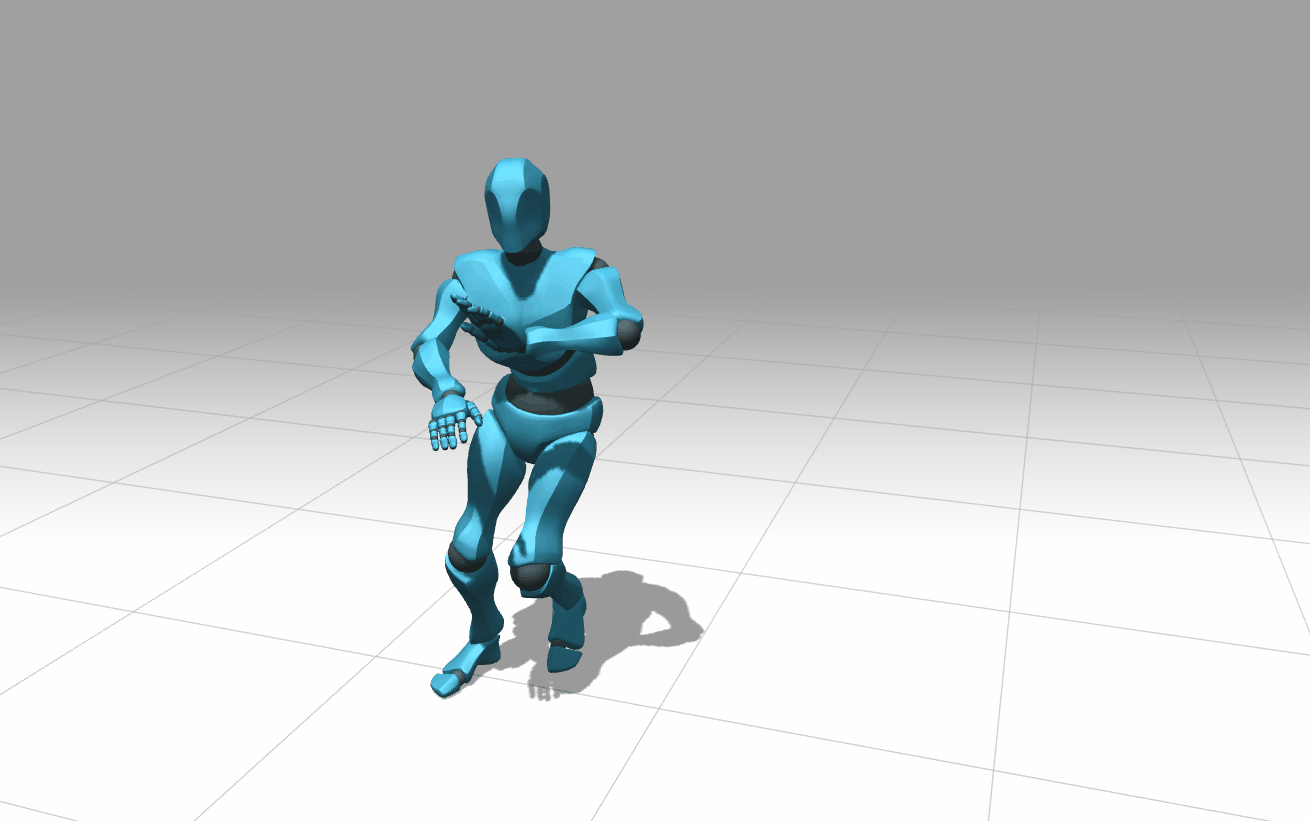
执行模型本身的动画
<script setup lang="ts">
import {

     onMounted } from 'vue';
import * as THREE from 'three';
// 引入轨道
import {

     OrbitControls } from 'three/examples/jsm/controls/OrbitControls';
// 引入模型加载器
import {

     FBXLoader } from 'three/examples/jsm/loaders/FBXLoader';

onMounted(() => {


    const clock = new THREE.Clock();
    // 动画混合器对象
    let mixer;
    // 创建一个场景
    const scene = new THREE.Scene();
    // 设置背景
    scene.background = new THREE.Color(0xa0a0a0);
    // 添加雾气
    scene.fog = new THREE.Fog(0xa0a0a0, 200, 1000);
    // 创建相机
    const camera = new THREE.PerspectiveCamera(45, window.innerWidth / window.innerHeight, 1, 2000);
    camera.position.set(100, 200, 300);
    scene.add(camera);
    // 添加渐变光
    const hemiLight = new THREE.HemisphereLight(0xffffff, 0x444444);
    hemiLight.position.set(0, 200, 0);
    scene.add(hemiLight);
    // 添加平行光、设置阴影
    const dirLight = new THREE.DirectionalLight(0xffffff);
    dirLight.position.set(0, 200, 100);
    dirLight.castShadow = true;
    dirLight.shadow.camera.top = 180;
    dirLight.shadow.camera.bottom = -100;
    dirLight.shadow.camera.left = -120;
    dirLight.shadow.camera.right = 120;
    scene.add(dirLight);

    //  添加平面是为了提供一个地面,让其他物体可以在其上运动和投射阴影。
    //  添加网格辅助对象是为了在场景中提供一个可视化的参考网格,方便调整其他物体的位置和大小。
    //  设置网格的透明度是为了让其不会完全遮挡其他物体,同时又能提供足够的参考信息。

    // 添加一个平面
    const mesh = new THREE.Mesh(new THREE.PlaneGeometry(2000, 2000), new THREE.MeshPhongMaterial({

     color: 0x999999, depthWrite: false }));
    mesh.rotation.x = -Math.PI / 2;
    mesh.receiveShadow = true;
    scene.add(mesh);
    // 添加一个网格辅助对象
    const grid = new THREE.GridHelper(2000, 20, 0x000, 0x000);
    // 开启透明,才能设置透明度
    grid.material.transparent = true;
    grid.material.opacity = 0.2;
    scene.add(grid);

    // 加载模型
    const loader = new FBXLoader();
    loader.load('../../../../public/SambaDancing.fbx', object => {


        console.log('对象', object);
        mixer = new THREE.AnimationMixer(object);
        // 创建一个动画剪辑action,使用mixer.clipAction方法,传入模型对象的第一个动画
        const action = mixer.clipAction(object.animations[0]);
        // 播放动画
        action.play();
        // 开启阴影效果
        object.traverse(child => {


            if (child.isMesh) {


                child.castShadow = true;
                child.receiveShadow = true;
            }
        });
        scene.add(object);
        animate();
    });

    // 创建渲染器,设置抗锯齿
    const renderer = new THREE.WebGLRenderer({

     antialias: true });
    // 设置像素比
    renderer.setPixelRatio(window.devicePixelRatio);
    // 渲染尺寸
    renderer.setSize(window.innerWidth, window.innerHeight);
    // 开启阴影渲染
    renderer.shadowMap.enabled = true;
    // 将内容添加到dom中
    document.getElementById('container')?.appendChild(renderer.domElement);

    // 添加轨道
    const controls = new OrbitControls(camera, renderer.domElement);
    // 设置轨道的目标位置,用于控制相机绕着场景的中心点旋转的方法
    controls.target.set(0, 100, 0);
    controls.update();

    // 监听容器的变化
    window.addEventListener('resize', () => {


        // 更新相机的视锥体
        camera.aspect = window.innerWidth / window.innerHeight;
        camera.updateProjectionMatrix();
        // 更新渲染大小
        renderer.setSize(window.innerWidth, window.innerHeight);
    });

    // 渲染方法
    const animate = () => {


        requestAnimationFrame(animate);
        // 获取时间差(delta)以便于在动画播放时进行帧率控制
        const delta = clock.getDelta();
        if (mixer) {


            mixer.update(delta);
        }
        renderer.render(scene, camera);
    };
});
这里有个点要注意:动画是根据时间差来进行播放的,因此const clock = new THREE.Clock();不要放在动画执行函数里