原文链接:
Playable API:定制你的动画系统 简单使用_王王王渣渣的博客-CSDN博客
我们先在场景中创建一个Cube,然后选中Cube在Animation面板中为其创建几个简单动画即可(当然了,有现成资源的小伙伴可以跳过这步了),Demo中我创建了三个名为Jump,Rotate,Scale的Animation文件。同时由于刚刚Create Animation的操作,Unity会在我们的Cube上自动添加Animator组件,并且关联了一个Animator的Controller文件。Animator组件需要保留(驱动Playable Graph的实际上依然是Animator组件),但是Controller我们暂时用不到,先删除它。
同时Unity提供了一个查看Playable结构的工具:PlayableGraph Visualizer,我们打开Package Manager,在Advanced中选中Show Preview Packages,然后找到PlayableGraph Visualizer,下载它。下载好后可以在Window-Analysis-PlayaleGraph Visualizer打开它。
关于这个工具的源码解析可以查看我之前的文章:
Playable Graph Visualizer源码剖析_漫漫无期的博客-CSDN博客
AnimationPlayable
接下来自然是要利用Playable使我们的Cube播放动画了,我们先创建一个脚本组件(PlayableTest)挂载在Cube上。
我们先创建几个AnimationClip变量用于关联我们的Animation文件:
    public AnimationClip JumpAnimationClip;
    public AnimationClip RotateAnimationClip;
    public AnimationClip ScaleAnimationClip;
AnimationPlayableOutput与AnimationClipPlayable
接下里我们来看看一个最简单的AnimationPlayable的实现
    private PlayableGraph _graph;

    void Start()
    {
        _graph = PlayableGraph.Create("TestPlayableGraph1");

        var animationOutputPlayable =
            AnimationPlayableOutput.Create(_graph, "AnimationOutput", GetComponent<Animator>());
        var jumpAnimationClipPlayable = AnimationClipPlayable.Create(m_graph, jumpAnimationClip);
        //AnimationPlayableOutput只有一个输入口,所以port为0
        animationOutputPlayable.SetSourcePlayable(_jumpAnimationClipPlayable, 0);


        _graph.Play();
    }


   void OnDisable()
    {
        // 销毁graph中所有的Playables和PlayableOutputs
        _graph.Destroy();
    }
PlayableGraph类似于一个Playable的容器,我们往里面添加了一个用做动画输出的AnimationPlayableOutput和一个关联动画的AnimationClipPlayable,并用SetSourcePlayable将其关联起来(一个PlayableOutput只能有一个SourcePlayable)。
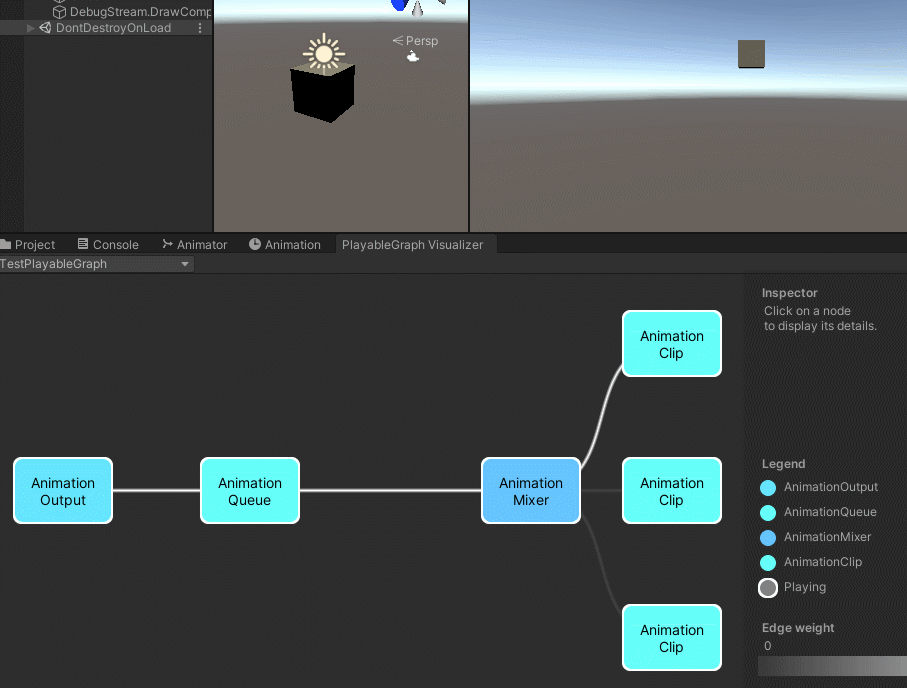
运行后,就可以看见我们的Cube播放了我们设置的Jump动画,同时查看PlayaleGraph Visualizer来更直观的了解,如图:

通过该视图我们可以查看每个节点的相关信息,例如播放状态,速度,时间等。
如果我们要手动控制动画的播放或暂停,可以使用Playable的Play和Pause方法,如:
jumpAnimationClipPlayable.Play();
jumpAnimationClipPlayable.Pause();
AnimationPlayableUtilities
此外Unity还提供了一个工具类:AnimationPlayableUtilities,例如上面例子中Start里面好几行的代码,我们可以使用它来只用一行代码实现
   var jumpAnimationClipPlayable =
            AnimationPlayableUtilities.PlayClip(GetComponent<Animator>(), JumpAnimationClip, out _graph);
AnimationMixerPlayable
如果想要多个动画同时播放,我们也可以用AnimationMixerPlayable实现Blend Tree来混合动画。
using System.Collections;
using System.Collections.Generic;
using UnityEngine;
using UnityEngine.Animations;
using UnityEngine.Playables;
using UnityEngine.UI;

public class PlayableTestMixer : MonoBehaviour
{
    [Range(0, 1)]
    public float Weight;

    private PlayableGraph _graph;
    private AnimationMixerPlayable _mixerAnimationPlayable;

    public AnimationClip JumpAnimationClip;
    public AnimationClip RotateAnimationClip;
    public AnimationClip ScaleAnimationClip;


    void Start()
    {
        _graph = PlayableGraph.Create("TestPlayableGraph2");

        var animationOutputPlayable = AnimationPlayableOutput.Create(_graph, "AnimationOutput", GetComponent<Animator>());

        //inputCount=2,即有两个输入节点
        _mixerAnimationPlayable = AnimationMixerPlayable.Create(_graph, 2);

        animationOutputPlayable.SetSourcePlayable(_mixerAnimationPlayable, 0);

        var jumpAnimationClipPlayable = AnimationClipPlayable.Create(_graph, JumpAnimationClip);
        //使用Connect方法连接Playable节点,如下面的jumpAnimationClipPlayable第0个输出口连接到m_mixerAnimationPlayable的第0个输入口
        _graph.Connect(jumpAnimationClipPlayable, 0, _mixerAnimationPlayable, 0);

        var rotateAnimationClipPlayable = AnimationClipPlayable.Create(_graph, RotateAnimationClip);
        _graph.Connect(rotateAnimationClipPlayable, 0, _mixerAnimationPlayable, 1);


        //同时可以利用Disconnect方法来断开连接,如断开m_mixerAnimationPlayable第0个输入端
        //m_graph.Disconnect(m_mixerAnimationPlayable, 0);

        _graph.Play();
    }

    void Update()
    {
        //设置不同输入节点的权重
        _mixerAnimationPlayable.SetInputWeight(0, Weight);
        _mixerAnimationPlayable.SetInputWeight(1, 1 - Weight);
    }

    void OnDisable()
    {
        // 销毁graph中所有的Playables和PlayableOutputs
        _graph.Destroy();
    }
}
运行之后,我们可以通过改变weight的值,来改变两个动画的权重,PlayaleGraph如下(线条越白说明该节点的权重越高):
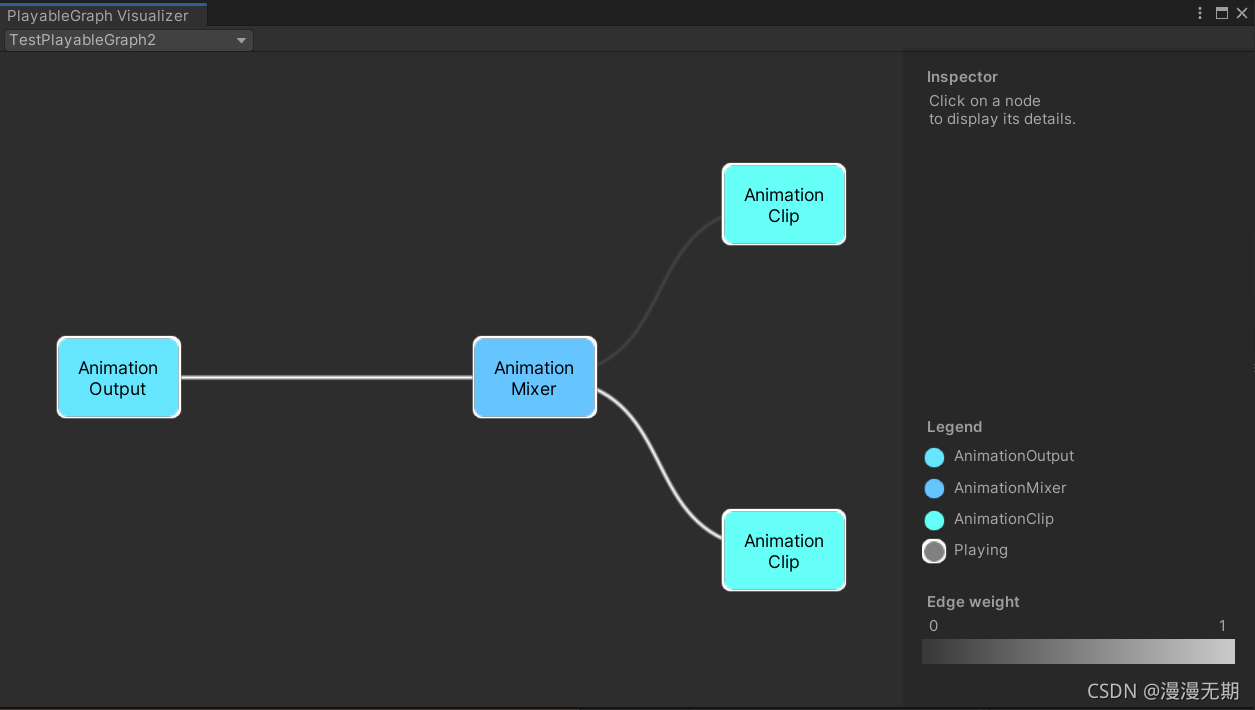
通过AnimationMixerPlayable来进行混合,并且通过Input weight来控制混合过程。为了保证动画的准确性,AnimationMixerPlayable的混合权重在内部会保证和为1。
AnimationLayerMixerPlayable
我们还可以利用AnimationLayerMixerPlayable来实现类似于Animator中的Layer功能,例如角色的边跑边射击的效果,而且可以运行时动态的增加、删除Layer。使用方法与AnimationMixerPlayable类似,就不过多介绍了。
AnimatorControllerPlayable
我们在使用AnimationMixerPlayable或者AnimationLayerMixerPlayable的时候,除了混合AnimationClipPlayable,我们还可以利用AnimatorControllerPlayable来混合Animator的Controller。
首先,Playable可以和Controller叠加分层动画。在动画状态机中Layer是Static的。所以利用Playable和Animator controller混合就可以起到动态添加你想要的Layer的作用。
其次,Playable可以和Controller进行混合,你可以让它们按一定的权重进行Blend。
再者,Playable可以和Controller互相CrossFade。例如:我们有一把武器,想要让武器来告诉角色该怎么使用这把武器。所以我们创建一个Animator controller放在武器上,当角色拿起武器后,就可以CrossFade到武器的动画状态机上。这可以让大大降低我们的动画系统的复杂度,因为动画的CrossFade不在局限于一个状态机里了。
最后,二个Controller可以进行混合。例如:你可以从一个状态机Crossfade到另一个状态机上。
在代码实现上,我们只需要将之前的AnimationClipPlayable替换为AnimatorControllerPlayable即可。
using System.Collections;
using System.Collections.Generic;
using UnityEngine;
using UnityEngine.Animations;
using UnityEngine.Playables;
using UnityEngine.UI;

public class PlayableTestControllerMixer : MonoBehaviour
{
    [Range(0, 1)]
    public float Weight;

    private PlayableGraph _graph;
    private AnimationMixerPlayable _mixerAnimationPlayable;

    public AnimationClip JumpAnimationClip;
    public AnimationClip RotateAnimationClip;
    public AnimationClip ScaleAnimationClip;


    //关联Animator的Controller文件
    public RuntimeAnimatorController AnimatorController;


    void Start()
    {
        _graph = PlayableGraph.Create("TestPlayableGraph3");

        var animationOutputPlayable = AnimationPlayableOutput.Create(_graph, "AnimationOutput", GetComponent<Animator>());

        //inputCount=2,即有两个输入节点
        _mixerAnimationPlayable = AnimationMixerPlayable.Create(_graph, 2);

        animationOutputPlayable.SetSourcePlayable(_mixerAnimationPlayable, 0);

        var jumpAnimationClipPlayable = AnimationClipPlayable.Create(_graph, JumpAnimationClip);
        //使用Connect方法连接Playable节点,如下面的jumpAnimationClipPlayable第0个输出口连接到m_mixerAnimationPlayable的第0个输入口
        _graph.Connect(jumpAnimationClipPlayable, 0, _mixerAnimationPlayable, 0);
        //_graph.Connect(rotateAnimationClipPlayable, 0, _mixerAnimationPlayable, 1);


        var animatorPlayable = AnimatorControllerPlayable.Create(_graph, AnimatorController);
        _graph.Connect(animatorPlayable, 0, _mixerAnimationPlayable, 1);


        //同时可以利用Disconnect方法来断开连接,如断开m_mixerAnimationPlayable第0个输入端
        //m_graph.Disconnect(m_mixerAnimationPlayable, 0);

        _graph.Play();
    }

    void Update()
    {
        //设置不同输入节点的权重
        _mixerAnimationPlayable.SetInputWeight(0, Weight);
        _mixerAnimationPlayable.SetInputWeight(1, 1 - Weight);
    }

    void OnDisable()
    {
        // 销毁graph中所有的Playables和PlayableOutputs
        _graph.Destroy();
    }
}

AudioPlayable
AudioPlayable可以实现声音的播放,使用方法可以说和AnimationPlayable一模一样,只不过需要传入一个AudioSource组件,然后把AnimationClip替换为AudioClip,简单的示例如下:
using UnityEngine;
using UnityEngine.Animations;
using UnityEngine.Audio;
using UnityEngine.Playables;

public class PlayableTestAudioSource : MonoBehaviour
{
    [Range(0, 1)]
    public float Weight;

    private PlayableGraph _graph;
    private AnimationMixerPlayable _mixerAnimationPlayable;

    public AnimationClip JumpAnimationClip;
    public AnimationClip RotateAnimationClip;
    public AnimationClip ScaleAnimationClip;

    public AudioClip JumpAudioClip;

    void Start()
    {
        _graph = PlayableGraph.Create("TestPlayableGraph4");

        var animationOutputPlayable = AnimationPlayableOutput.Create(_graph, "AnimationOutput", GetComponent<Animator>());

        //inputCount=2,即有两个输入节点
        _mixerAnimationPlayable = AnimationMixerPlayable.Create(_graph, 2);

        animationOutputPlayable.SetSourcePlayable(_mixerAnimationPlayable, 0);

        var jumpAnimationClipPlayable = AnimationClipPlayable.Create(_graph, JumpAnimationClip);
        //使用Connect方法连接Playable节点,如下面的jumpAnimationClipPlayable第0个输出口连接到m_mixerAnimationPlayable的第0个输入口
        _graph.Connect(jumpAnimationClipPlayable, 0, _mixerAnimationPlayable, 0);

        var rotateAnimationClipPlayable = AnimationClipPlayable.Create(_graph, RotateAnimationClip);
        _graph.Connect(rotateAnimationClipPlayable, 0, _mixerAnimationPlayable, 1);


        var audioOutput = AudioPlayableOutput.Create(_graph, "AudioOutput", GetComponent<AudioSource>());
        var audioMixerPlayable = AudioMixerPlayable.Create(_graph, 1);
        var jumoAudioClipPlayable = AudioClipPlayable.Create(_graph, JumpAudioClip, true);
        _graph.Connect(jumoAudioClipPlayable, 0, audioMixerPlayable, 0);
        audioMixerPlayable.SetInputWeight(0, 1);
        audioOutput.SetSourcePlayable(audioMixerPlayable);


        //同时可以利用Disconnect方法来断开连接,如断开m_mixerAnimationPlayable第0个输入端
        //m_graph.Disconnect(m_mixerAnimationPlayable, 0);

        _graph.Play();
    }

    void Update()
    {
        //设置不同输入节点的权重
        _mixerAnimationPlayable.SetInputWeight(0, Weight);
        _mixerAnimationPlayable.SetInputWeight(1, 1 - Weight);
    }

    void OnDisable()
    {
        // 销毁graph中所有的Playables和PlayableOutputs
        _graph.Destroy();
    }
}
ScriptPlayable
要创建自定义的PlayableBehaviour,必须从 PlayableBehaviour 基类继承。
public class MyCustomPlayableBehaviour : PlayableBehaviour
{

}
要将 PlayableBehaviour 用作自定义可播放项,还必须将其封装在 ScriptPlayable<> 对象内。如果不具备自定义可播放项的实例,可通过调用以下函数为对象创建 ScriptPlayable<>:
ScriptPlayable<MyCustomPlayableBehaviour>.Create(playableGraph);如果已有自定义可播放项的实例,可通过调用以下函数用 ScriptPlayable<> 来包裹该实例:
MyCustomPlayableBehaviour myPlayable = new MyCustomPlayableBehaviour();
ScriptPlayable<MyCustomPlayableBehaviour>.Create(playableGraph, myPlayable);
此情况中将克隆该实例,然后将实例分配给 ScriptPlayable<>。实际上,此代码与先前代码执行的操作完全相同;不同之处在于 myPlayable 可能是将要在 Inspector 中配置的公有属性,然后可为脚本的每个实例设置行为。
PlayableBehaviour
PlayableBehaviour可以让我们自定义Playable,可以对Playable进行直接的访问和控制。同时它也定义了一些回调函数来捕捉一些事件。例如:开始播放时的事件、销毁事件。
而且它还提供了一些在每一帧的动画计算流程上的回调。例如:可以用PrepareFrame函数在每一帧对Playable中的元素进行访问和设置。
下面就用一个例子来说明:新建一个脚本,名为AnimationQueuePlayable,继承PlayableBehaviour,脚本如下,原理很简单,就是利用AnimationMixerPlayable绑定多个AnimationClipPlayable,然后在PrepareFrame中利用设置权重来设置当前播放的动画,达到循环播放的效果。
using System.Collections;
using System.Collections.Generic;
using UnityEngine;
using UnityEngine.Animations;
using UnityEngine.Playables;

public class PlayableTestBehaviour : PlayableBehaviour
{
    int _currentClipIndex = -1;
    float _timeToNextClip;
    AnimationMixerPlayable _mixerPlayable;

    public void Initialize(AnimationClip[] clipArray, Playable owner, PlayableGraph graph)
    {
        owner.SetInputCount(1);
        _mixerPlayable = AnimationMixerPlayable.Create(graph, clipArray.Length);
        graph.Connect(_mixerPlayable, 0, owner, 0);
        owner.SetInputWeight(0, 1);

        //根据clipArray创建AnimationClipPlayable并连接
        for (int clipIndex = 0 ; clipIndex < _mixerPlayable.GetInputCount() ; ++clipIndex)
            graph.Connect(AnimationClipPlayable.Create(graph, clipArray[clipIndex]), 0, _mixerPlayable, clipIndex);
    }

    public override void PrepareFrame(Playable owner, FrameData info)
    {
        int clipCount = _mixerPlayable.GetInputCount();
        if (clipCount == 0)
            return;

        _timeToNextClip -= info.deltaTime;

        if (_timeToNextClip <= 0.0f)
        {
            _currentClipIndex++;
            if (_currentClipIndex >= clipCount)
                _currentClipIndex = 0;
            var currentClip = (AnimationClipPlayable) _mixerPlayable.GetInput(_currentClipIndex);

            //SetTime(0),从头开始播放动画
            currentClip.SetTime(0);
            _timeToNextClip = currentClip.GetAnimationClip().length;
        }

        //利用权重来设置当前播放的Clip
        for (int clipIndex = 0; clipIndex < clipCount; ++clipIndex)
            _mixerPlayable.SetInputWeight(clipIndex, clipIndex == _currentClipIndex ? 1 : 0);
    }

    public override void OnGraphStart(Playable playable)
    {
        Debug.Log("Graph.Play()");
    }

    public override void OnGraphStop(Playable playable)
    {
        Debug.Log("Graph.Stop()");
    }

    public override void OnPlayableCreate(Playable playable)
    {
        Debug.Log("Playable.Create()");
    }

    public override void OnPlayableDestroy(Playable playable)
    {
        Debug.Log("Playable.Destroy()");
    }

    public override void OnBehaviourPlay(Playable playable, FrameData info)
    {
        Debug.Log("Playable.Play()");
    }

    public override void OnBehaviourPause(Playable playable, FrameData info)
    {
        Debug.Log("Playable.Pause()");
    }

    public override void PrepareData(Playable playable, FrameData info)
    {
        Debug.Log("PrepareData");
    }

    public override void ProcessFrame(Playable playable, FrameData info, object playerData)
    {
        //当连接在ScriptPlayableOutput的时候,会每帧调用
        Debug.Log("ProcessFrame");
    }
}
接着我们就可以利用ScriptPlayable<T>.Create()的方法进行创建我们自定义Playable。
using System.Collections;
using System.Collections.Generic;
using UnityEngine;
using UnityEngine.Animations;
using UnityEngine.Playables;

public class PlayableSpawnBehaviour : MonoBehaviour
{
    public AnimationClip JumpAnimationClip;
    public AnimationClip RotateAnimationClip;
    public AnimationClip ScaleAnimationClip;

    private PlayableGraph _graph;


    void Start()
    {
        _graph = PlayableGraph.Create("TestPlayableGraph1");

        var playQueuePlayable = ScriptPlayable<PlayableTestBehaviour>.Create(_graph);
        var playQueue = playQueuePlayable.GetBehaviour();
        playQueue.Initialize(new[] {JumpAnimationClip, RotateAnimationClip, ScaleAnimationClip}, playQueuePlayable,
            _graph);

        var animationOutputPlayable =
            AnimationPlayableOutput.Create(_graph, "AnimationOutput", GetComponent<Animator>());

        animationOutputPlayable.SetSourcePlayable(playQueuePlayable, 0);
        _graph.Play();
    }


    void OnDisable()
    {
        // 销毁graph中所有的Playables和PlayableOutputs
        _graph.Destroy();
    }
}
运行效果如下:
SimpleAnimationPlayable
SimpleAnimationPlayable是官方Demo提供的一个ScriptPlayable,里面为我们封装好了代码,只需要我们在GameObject上添加SimpleAnimation组件,就可以简单便捷的实现Playable的大部分功能。
简单使用:
还是我们之前的Cube,我们先删除我们原先的PlayableTest组件,添加SimpleAnimation组件。然后在Animation选项上关联上我们的AnimationClip,运行就会播放我们关联上的动画了。
然后我们可以写个新的组件用来管理SimpleAnimation,例如我们要添加多个动画,可以在SimpleAnimation组件上修改Animations,也可以自己调用SimpleAnimation的AddClip方法
SimpleAnimation.AddClip(AnimationClip, Name);要播放动画可以使用其Play方法
SimpleAnimation.Play(Name);若要按顺序播放多个动画,可以使用PlayQueued方法
PlayerSimpleAnimation.Play(Name1);
PlayerSimpleAnimation.PlayQueued(Name2);
PlayerSimpleAnimation.PlayQueued(Name3);
若要混合动画可以使用Blend方法
SimpleAnimation.Play("Scale");
//Default对应的动画权重从0到1花费5秒时间
SimpleAnimation.Blend("Default", 1, 5);
//由于Scale的权重也是1,所以最后两个动画的权重分别为0.5
若要是一个动画淡出到另个动画,可以使用CrossFade方法
SimpleAnimation.Play("Scale");
//花费5秒时间,从Scale动画淡出为Default动画
SimpleAnimation.CrossFade("Default", 5);
总结
Playable就是利用代码创建一个个的Playable节点,然后进行组合连接,最终输出到PlayableOutput上。
PlayableOutput和Playable一共以下几种:


TimeUpdateMode
我们可以通过PlayableGraph的SetTimeUpdateMode方法来设置更新的方法,参数为DirectorUpdateMode枚举。
