Sklearn学习笔记 : 总章
写在前面
Sklearn 官方文档内容相当地详实,反而显得对初学者学习不太友好。
本 “学习笔记” 系列就是参照Sklearn官方文档整理而得,结构上基本维持不变,内容少会有少许删减(过于详细和”偏“),以便自己以后查阅和复习。
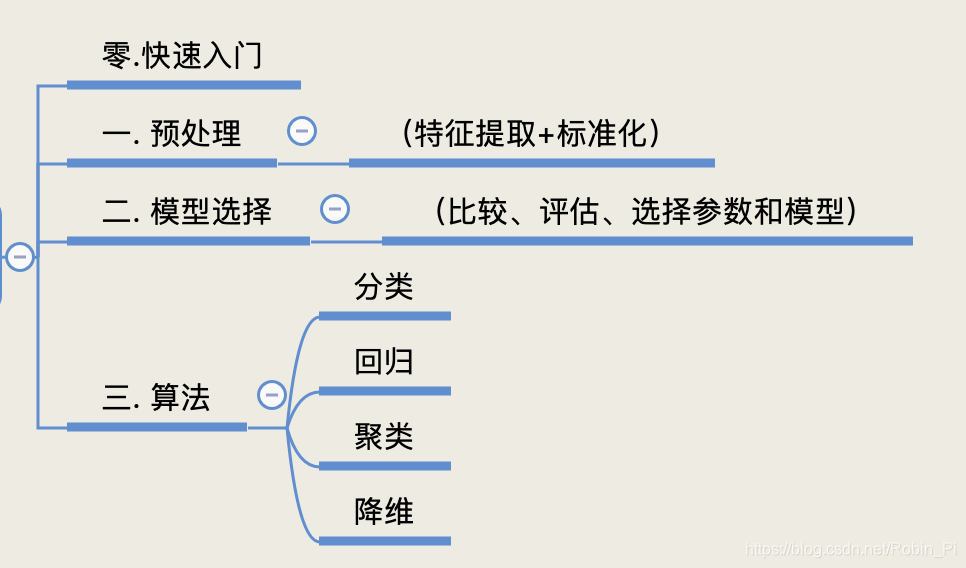
0. 快速入门(Getting Started)
Scikit-learn,是一个开源的机器学习库,支持监督和无监督学习。它还提供了模型拟合各种工具,数据预处理,模型选择和评估,以及许多其他工具。
0.1 拟合和预测:评估器的基础(输出)
(Fitting and predicting: estimator basics)
- Scikit-learn 内提供的大量内置机器学习算法和模型叫做estimator(评估器)。
- 每个评估器都可以用它的 fit() 方法去拟合数据。
- fit(X) → y ,fit()函数接收两个输入
- X的格式:(n_samples, n_features) ,即样本行排,特征列排。
- y 的值是实数(回归任务)或者整数(分类任务);
- X 和 y 都应该是numpy数组或者 array-like 数据类型。
拟合:
>>> from sklearn.ensemble import RandomForestClassifier
>>> clf = RandomForestClassifier(random_state=0)
>>> X = [[ 1,  2,  3],  # 2 samples, 3 features
...      [11, 12, 13]]
>>> y = [0, 1]  # classes of each sample
>>> clf.fit(X, y)
RandomForestClassifier(random_state=0)
预测:
>>> clf.predict(X)  # predict classes of the training data
array([0, 1])
>>> clf.predict([[4, 5, 6], [14, 15, 16]])  # predict classes of new data
array([0, 1])
0.2 转换器和预处理器(输入)
(Transformers and pre-processors)
一般的管道( pipeline ) 包括了两个部分:
① 作为输入端的预处理器( pre-processor):
转换(Transform)或者”推断?“( imputes )数据
② 作为输出端的预测器( predictor ):预测目标值的预测器( predictor )
>>> from sklearn.preprocessing import StandardScaler
>>> X = [[0, 15],
...      [1, -10]]
>>> StandardScaler().fit(X).transform(X)
array([[-1.,  1.],
       [ 1., -1.]])
0.3 管道:链接了预处理器和评估器
转换器 和 评估器/预测器 整合到一起就成了一个统一的整体(对象): Pipeline,即:

Transformers + estimators (predictors) = Pipeline
注:在 Sklearn-learn 中 评估器和预测器应该可以直接等价( estimators (predictors))
例子:
>>> from sklearn.preprocessing import StandardScaler
>>> from sklearn.linear_model import LogisticRegression
>>> from sklearn.pipeline import make_pipeline
>>> from sklearn.datasets import load_iris
>>> from sklearn.model_selection import train_test_split
>>> from sklearn.metrics import accuracy_score
...
>>> # create a pipeline object
>>> pipe = make_pipeline(
...     StandardScaler(),
...     LogisticRegression(random_state=0)
... )
...
>>> # load the iris dataset and split it into train and test sets
>>> X, y = load_iris(return_X_y=True)
>>> X_train, X_test, y_train, y_test = train_test_split(X, y, random_state=0)
...
>>> # fit the whole pipeline
>>> pipe.fit(X_train, y_train)
Pipeline(steps=[('standardscaler', StandardScaler()),
                ('logisticregression', LogisticRegression(random_state=0))])
>>> # we can now use it like any other estimator
>>> accuracy_score(pipe.predict(X_test), y_test)
0.97...
0.4 模型评估
(Model evaluation)
模型训练完成之后应该立马进行模型评估,而不是直接去预测未见过的”新数据“。
我们上面使用的是 train_test_split()方法将数据集划分训练集和测试集,但是在 scikit-learn 中还有喝多其它的工具用于模型验证,特别是交叉验证( cross-validation )。
以5-fold 交叉验证为例:
>>> from sklearn.datasets import make_regression
>>> from sklearn.linear_model import LinearRegression
>>> from sklearn.model_selection import cross_validate
...
>>> X, y = make_regression(n_samples=1000, random_state=0)
>>> lr = LinearRegression()
...
>>> result = cross_validate(lr, X, y)  # defaults to 5-fold CV
>>> result['test_score']  # r_squared score is high because dataset is easy
array([1., 1., 1., 1., 1.])
0.5 自动参数搜索
所有的评估器都有参数(或者说超参数),它们可以被调试。一般情况下,我们并不知道该怎么选参数值,因为它们由我们手里的数据所决定。
Sklearn 中提供了一些可以自动寻找最优参数组合的工具(通过交叉验证)。下面以 RandomizedSearchCV 对象为例,当搜索结束之后 RandomizedSearchCV 就变成了类似 RandomForestRegressor 的角色:已经由最优的参数组合训练过。
>>> from sklearn.datasets import fetch_california_housing
>>> from sklearn.ensemble import RandomForestRegressor
>>> from sklearn.model_selection import RandomizedSearchCV
>>> from sklearn.model_selection import train_test_split
>>> from scipy.stats import randint
...
>>> X, y = fetch_california_housing(return_X_y=True)
>>> X_train, X_test, y_train, y_test = train_test_split(X, y, random_state=0)
...
>>> # define the parameter space that will be searched over
>>> param_distributions = {

    'n_estimators': randint(1, 5),
...                        'max_depth': randint(5, 10)}
...
>>> # now create a searchCV object and fit it to the data
>>> search = RandomizedSearchCV(estimator=RandomForestRegressor(random_state=0),
...                             n_iter=5,
...                             param_distributions=param_distributions,
...                             random_state=0)
>>> search.fit(X_train, y_train)
RandomizedSearchCV(estimator=RandomForestRegressor(random_state=0), n_iter=5,
                   param_distributions={

    'max_depth': ...,
                                        'n_estimators': ...},
                   random_state=0)
>>> search.best_params_
{

    'max_depth': 9, 'n_estimators': 4}

>>> # the search object now acts like a normal random forest estimator
>>> # with max_depth=9 and n_estimators=4
>>> search.score(X_test, y_test)
0.73...
注意:要通过一个pipeline来搜索而不是一个单独的评估器。
Note:
In practice, you almost always want to search over a pipeline, instead of a single estimator. One of the main reasons is that if you apply a pre-processing step to the whole dataset without using a pipeline, and then perform any kind of cross-validation, you would be breaking the fundamental assumption of independence between training and testing data. Indeed, since you pre-processed the data using the whole dataset, some information about the test sets are available to the train sets. This will lead to over-estimating the generalization power of the estimator (you can read more in this kaggle post).
Using a pipeline for cross-validation and searching will largely keep you from this common pitfall.
1. 预处理
2. 模型选择
3. 算法
3.1 分类
3.2 回归
3.3 聚类
3.4 降维
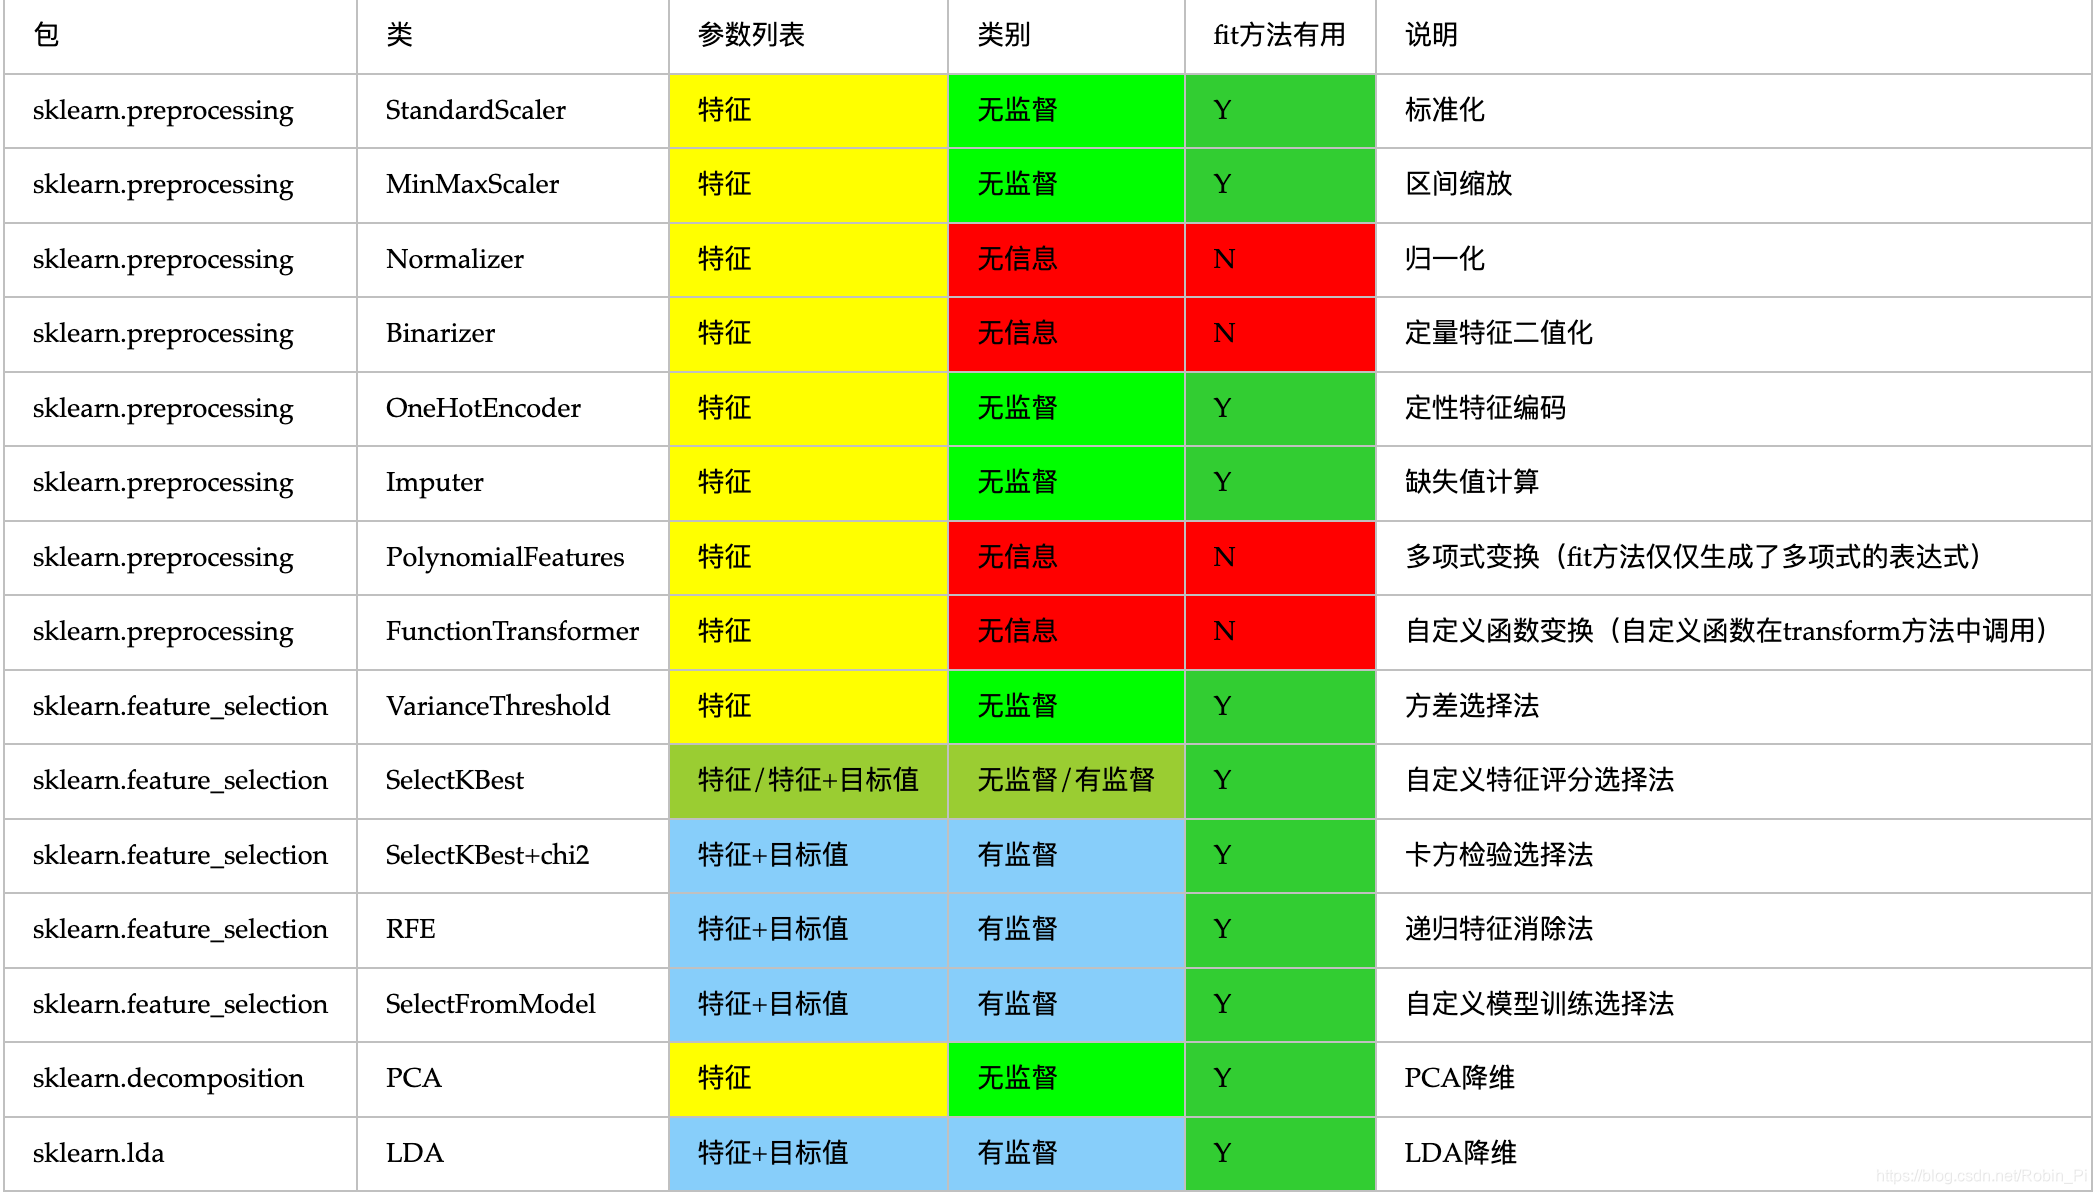
API
使用sklearn进行数据挖掘
待研究~
写在最后
后续还会继续更新 “学习总结” 系列,作为该系列的一个消化和总结。
参考: