使用Tween.js实现动画
1.demo效果
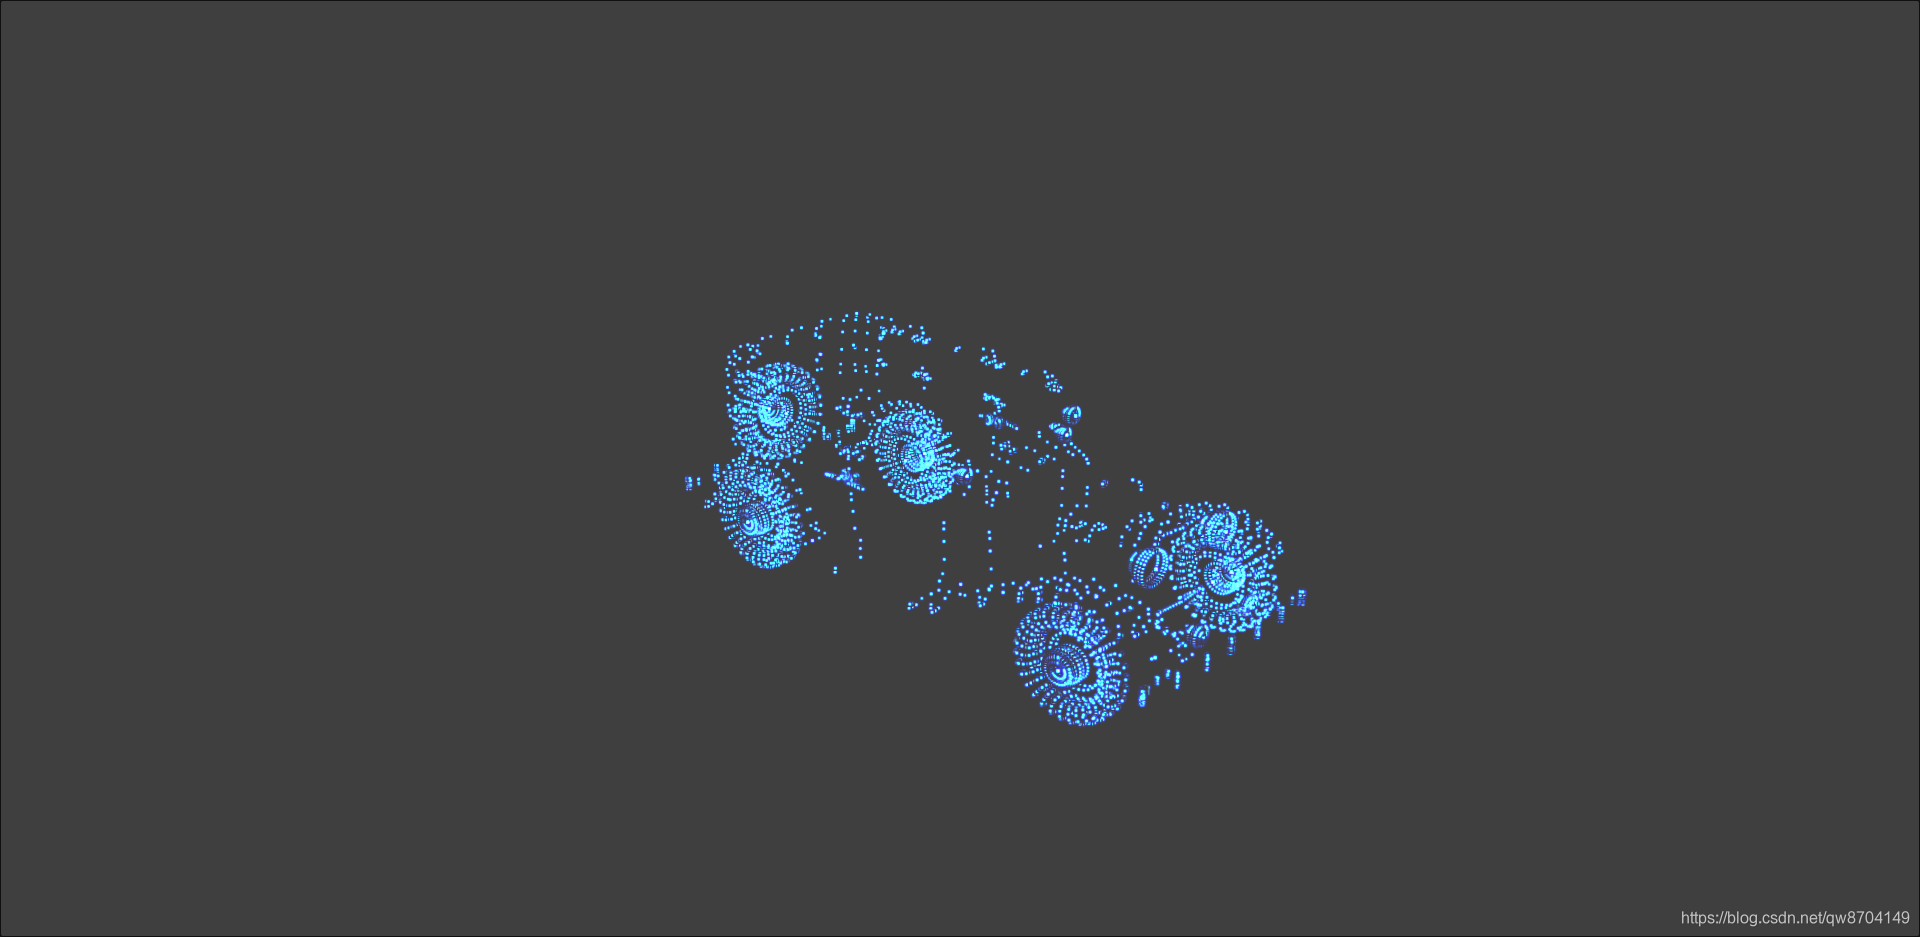
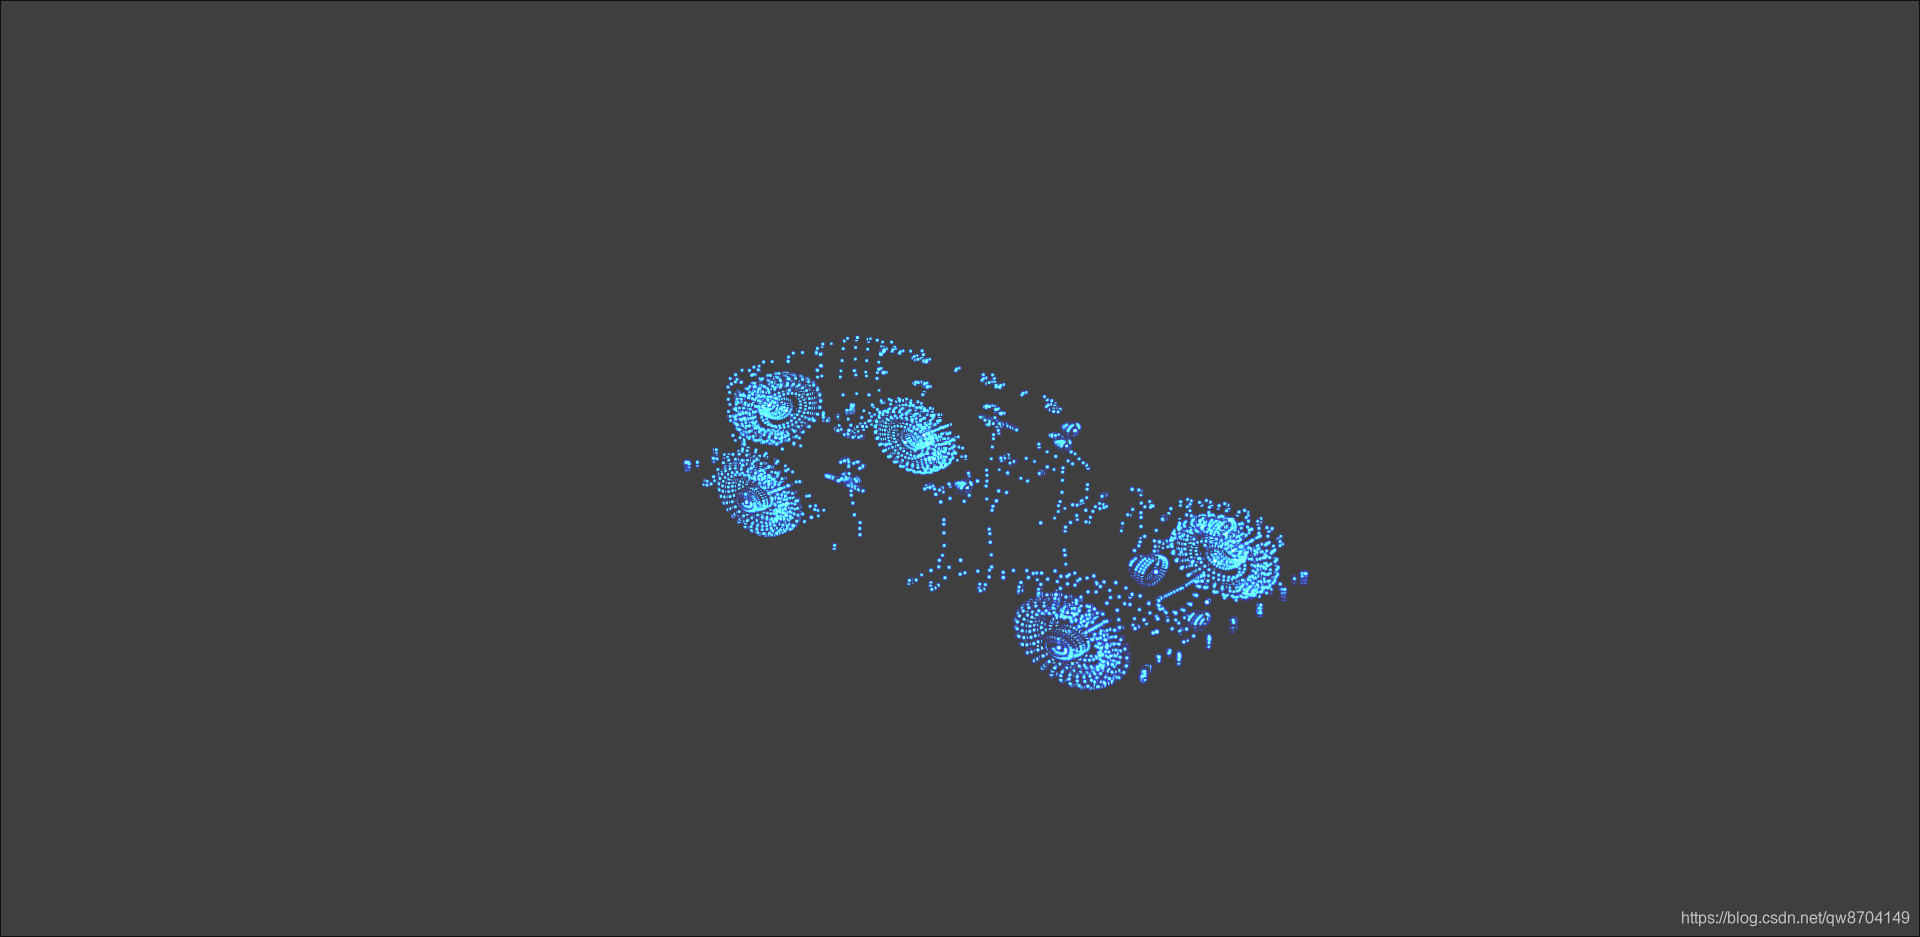
如上图,该demo通过tween动画实现动态改变模型的高度。让其变矮然后恢复,再变矮再恢复,往复循环
2.Tween.js基本用法
tween.js可以平滑的修改元素的属性值。在配合动画函数实现动画效果
2.1 tween的基本使用
2.1.1 创建Tween对象
创建Tween对象的时候,你要告诉它,你要修改什么属性。最终将这个属性修改为多少,以及这个动作在多长时间内完成。例如你需要把一个position对象的x属性在1000毫秒内变成10,具体实现如下
//创建初始位置position对象,以及它的x属性值为100
var position = {

     x: 100 };
//创建tween对象并告诉它初始位置
var tween = new TWEEN.Tween(position);
//通过tween对象的to()方法告诉它目标位置和所需时间
tween.to({

     x: 10 }, 1000);
//指定过渡形式
tween.easing(TWEEN.Easing.Linear.None);
//启动tween
tween.start()
由于Tween对象的每个函数调用都返回一个tween对象。所以也支持链式调用。以下代码与上一个例子实现同样的功能
//创建对象position对象,以及它的x属性值为100
var position = {

     x: 100 };
//创建tween对象实现position对象的x属性在1000毫秒内变成10
new TWEEN.Tween(position).to({

     x: 10 }, 1000).easing(TWEEN.Easing.Linear.None).start()
2.1.2 定期更新tween
为了实现平滑的动画效果,我们需要在一个循环动画中调用TWEEN.update方法,一般会把它放入在render里循环,具体如下:
render();
function render() {


    requestAnimationFrame(animate);
    TWEEN.update();
}
2.2 控制tween动画
2.2.1控制动画的开始和结束
动画的开始的控制。上面已经提到了就是tween.start(),该函数可以接收一个参数,代表动画在参数指定的时间后开始执行。没有参数代表立即执行。
控制动画结束的函数就是tween.stop(),需要注意的是已经结束的动画和没有开始的动画对该函数不生效
2.2.2控制多个动画
如果在程序中需要多个动画,并且有一定的先后顺序。那么就可以通过tween.chain()方法实现。例如已经创建了tween1和tween2两个TWEEN对象。希望tween1结束后tween2开始。那么可以这样使用tween1.chain(tween2);, 如果你希望tween1结束后tween2开始,tween2结束后tween1开始,往复调用,那么可以这样写代码
tween1.chain(tween2);tween2.chain(tween1);
2.2.3控制动画执行次数
如果你想让一个动画执行指定次数。这时就可以使用tween.repeat()方法实现,它接收一个参数表示循环的次数,例如你希望某个动画执行10次,可以这样实现tween.repeat(10)
2.2.4控制动画更新
动画更新可以通过TWEEN.update()方法来实现
2.3 tween回调函数
- onStart -tween开始动画前的回调函数
- onStop -tween结束动画后的回调函数
- onUpdate -在tween每次被更新后的回调函数
- onComplete -tween动画全部结束后的回调函数
3.实现要点
3.1 vue中tween.js引入
示例中是在vue中public目录下的index.html文件中引入,需提前将tween.min.js放在public目录下
<script type="text/javascript" src="./tween.min.js"></script>
3.2 创建并启动Tween动画
initTween() {


  this.animationMap = {

     yScale: 1 } //动画变量
  //创建一个动画,它的yScale的值在 5000毫秒 内变为 0
  const tween = new TWEEN.Tween(this.animationMap).to({

     yScale: 0 }, 5000)
  tween.easing(TWEEN.Easing.Sinusoidal.InOut)
  tween.start()
  //创建另一个动画,它的yScale的值在 5000毫秒 恢复为1
  const tweenBack = new TWEEN.Tween(this.animationMap).to(
    {

     yScale: 1 },
    5000
  )
  tweenBack.easing(TWEEN.Easing.Sinusoidal.InOut)
  //第一个动画和第二个动画往复调用
  tween.chain(tweenBack)
  tweenBack.chain(tween)

  //二个动画更新的回调处理
  tween.onUpdate(this.onUpdate)
  tweenBack.onUpdate(this.onUpdate)
}
3.3 动画更新回调处理
onUpdate() {


  const vertices = []
  // 获取导入几何体顶点坐标分量数组
  const loadedGeometryVerticesArray = this.loadedGeometry.attributes
    .position.array

  // 每三个分量确定一个顶点
  for (let i = 0; i < loadedGeometryVerticesArray.length; i += 3) {


    //顶点的x坐标不变
    this.points.geometry.attributes.position.array[i] =
      loadedGeometryVerticesArray[i]
    //顶点的y坐标根据pos参数动态变化
    this.points.geometry.attributes.position.array[i + 1] =
      loadedGeometryVerticesArray[i + 1] * this.animationMap.yScale
    //顶点的z坐标不变
    this.points.geometry.attributes.position.array[i + 2] =
      loadedGeometryVerticesArray[i + 2]
  }

  this.points.sortParticles = true
}
3.4 render中处理动画更新
render() {


  TWEEN.update() //更新Tween
  if (this.points) {


    //设置顶点需要更新
    this.points.geometry.attributes.position.needsUpdate = true
    //计算当前几何体的的边界球形
    this.points.geometry.computeBoundingSphere()
  }
  this.renderer.render(this.scene, this.camera)
  requestAnimationFrame(this.render)
}
4.demo代码
<template>
  <div>
    <div id="container"></div>
  </div>
</template>

<script>
import * as THREE from 'three'
import {

     OrbitControls } from 'three/examples/jsm/controls/OrbitControls.js'
import {

     PLYLoader } from 'three/examples/jsm/loaders/PLYLoader.js'

export default {


  data() {


    return {


      publicPath: process.env.BASE_URL,
      points: null,
      loadedGeometry: null,
      animationMap: {

    },
      camera: null,
      scene: null,
      renderer: null,
      controls: null
    }
  },
  mounted() {


    this.init()
  },
  methods: {


    // 初始化
    init() {


      this.createScene() // 创建场景
      this.loadPLY() // 加载PLY模型
      this.createLight() // 创建光源
      this.createCamera() // 创建相机
      this.createRender() // 创建渲染器
      this.createControls() // 创建控件对象
      this.render() // 渲染
    },
    // 创建场景
    createScene() {


      this.scene = new THREE.Scene()
    },
    // 加载PLY模型
    loadPLY() {


      const THIS = this
      const loader = new PLYLoader()
      loader.load(`${

      THIS.publicPath}models/test.ply`, geometry => {


        this.loadedGeometry = geometry.clone()
        // 创建粒子材质
        const material = new THREE.PointsMaterial({


          color: 0xffffff,
          size: 0.4,
          opacity: 0.6,
          transparent: true,
          blending: THREE.AdditiveBlending,
          map: this.generateSprite()
        })
        // 创建粒子系统
        this.points = new THREE.Points(geometry, material)
        // 添加到场景
        this.scene.add(this.points)
        this.initTween()
      })
    },
    //生成纹理
    generateSprite() {


      const canvas = document.createElement('canvas')
      canvas.width = 16
      canvas.height = 16

      const context = canvas.getContext('2d')
      const gradient = context.createRadialGradient(
        canvas.width / 2,
        canvas.height / 2,
        0,
        canvas.width / 2,
        canvas.height / 2,
        canvas.width / 2
      )
      gradient.addColorStop(0, 'rgba(255,255,255,1)')
      gradient.addColorStop(0.2, 'rgba(0,255,255,1)')
      gradient.addColorStop(0.4, 'rgba(0,0,64,1)')
      gradient.addColorStop(1, 'rgba(0,0,0,1)')

      context.fillStyle = gradient
      context.fillRect(0, 0, canvas.width, canvas.height)

      const texture = new THREE.Texture(canvas)
      texture.needsUpdate = true
      return texture
    },

    // 创建光源
    createLight() {


      // 环境光
      const ambientLight = new THREE.AmbientLight(0xffffff, 0.1) // 创建环境光
      this.scene.add(ambientLight) // 将环境光添加到场景

      const spotLight = new THREE.SpotLight(0xffffff) // 创建聚光灯
      spotLight.position.set(50, 50, 50)
      spotLight.castShadow = true
      this.scene.add(spotLight)
    },
    // 创建相机
    createCamera() {


      const element = document.getElementById('container')
      const width = element.clientWidth // 窗口宽度
      const height = element.clientHeight // 窗口高度
      const k = width / height // 窗口宽高比
      // PerspectiveCamera( fov, aspect, near, far )
      this.camera = new THREE.PerspectiveCamera(35, k, 0.1, 1000)
      this.camera.position.set(20, 20, 20) // 设置相机位置

      this.camera.lookAt(new THREE.Vector3(10, 40, 0)) // 设置相机方向
      this.scene.add(this.camera)
    },
    // 创建渲染器
    createRender() {


      const element = document.getElementById('container')
      this.renderer = new THREE.WebGLRenderer({

     antialias: true, alpha: true })
      this.renderer.setSize(element.clientWidth, element.clientHeight) // 设置渲染区域尺寸
      this.renderer.shadowMap.enabled = true // 显示阴影
      this.renderer.shadowMap.type = THREE.PCFSoftShadowMap
      this.renderer.setClearColor(0x3f3f3f, 1) // 设置背景颜色
      element.appendChild(this.renderer.domElement)
    },
    initTween() {


      this.animationMap = {

     yScale: 1 } //动画变量
      //创建一个动画,它的yScale的值在 5000毫秒 内变为 0
      const tween = new TWEEN.Tween(this.animationMap).to({

     yScale: 0 }, 5000)
      tween.easing(TWEEN.Easing.Sinusoidal.InOut)
      tween.start()
      //创建另一个动画,它的yScale的值在 5000毫秒 恢复为1
      const tweenBack = new TWEEN.Tween(this.animationMap).to(
        {

     yScale: 1 },
        5000
      )
      tweenBack.easing(TWEEN.Easing.Sinusoidal.InOut)
      //第一个动画和第二个动画往复调用
      tween.chain(tweenBack)
      tweenBack.chain(tween)

      //二个动画更新的回调处理
      tween.onUpdate(this.onUpdate)
      tweenBack.onUpdate(this.onUpdate)
    },
    onUpdate() {


      const vertices = []
      // 获取导入几何体顶点坐标分量数组
      const loadedGeometryVerticesArray = this.loadedGeometry.attributes
        .position.array

      // 每三个分量确定一个顶点
      for (let i = 0; i < loadedGeometryVerticesArray.length; i += 3) {


        //顶点的x坐标不变
        this.points.geometry.attributes.position.array[i] =
          loadedGeometryVerticesArray[i]
        //顶点的y坐标根据pos参数动态变化
        this.points.geometry.attributes.position.array[i + 1] =
          loadedGeometryVerticesArray[i + 1] * this.animationMap.yScale
        //顶点的z坐标不变
        this.points.geometry.attributes.position.array[i + 2] =
          loadedGeometryVerticesArray[i + 2]
      }

      this.points.sortParticles = true
    },
    render() {


      TWEEN.update() //更新Tween
      if (this.points) {


        //设置顶点需要更新
        this.points.geometry.attributes.position.needsUpdate = true
        //计算当前几何体的的边界球形
        this.points.geometry.computeBoundingSphere()
      }
      this.renderer.render(this.scene, this.camera)
      requestAnimationFrame(this.render)
    },
    // 创建控件对象
    createControls() {


      this.controls = new OrbitControls(this.camera, this.renderer.domElement)
    }
  }
}
</script>
<style>
#container {


  position: absolute;
  width: 100%;
  height: 100%;
}
</style>