paddle深度学习高层API第三天
大家好,这里是三岁,别的不会,擅长白话,今天就是我们的白话系列,内容是paddle2.0新出的高程API,在这里的七日打卡营0基础学习,emmm我这个负基础的也来凑凑热闹,那么就开始吧~~~~
注:以下白话内容为个人理解,如有不同看法和观点及不对的地方欢迎大家批评指正!


人脸关键点识别的本质是一个回归任务
分类VS回归

关键点识别和分类的区别嘛:应该还是很大的,分类只要识别是什么类型的得到一个大概的位置即可,但是回归问题在处理完这些以后要定性,确定到那个位置,一个是区域性质的一个是固定的点,这个难度可想而知。
损失函数
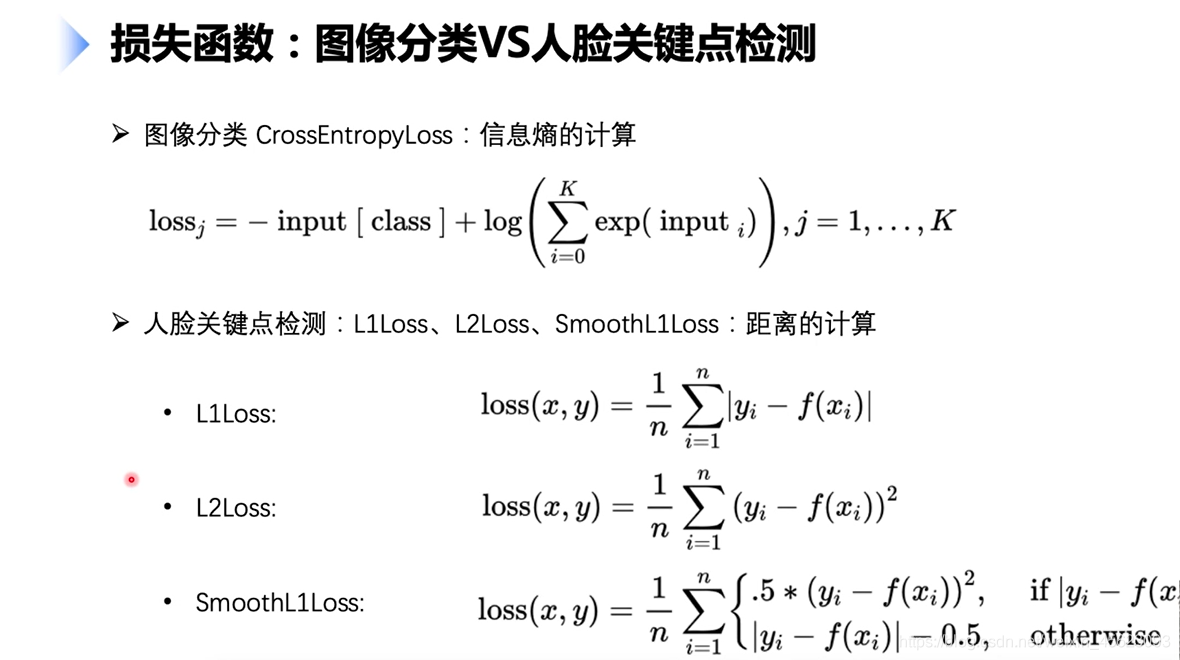
两个损失函数的层面就可以看出差距还是很大的
评估指标(NME)
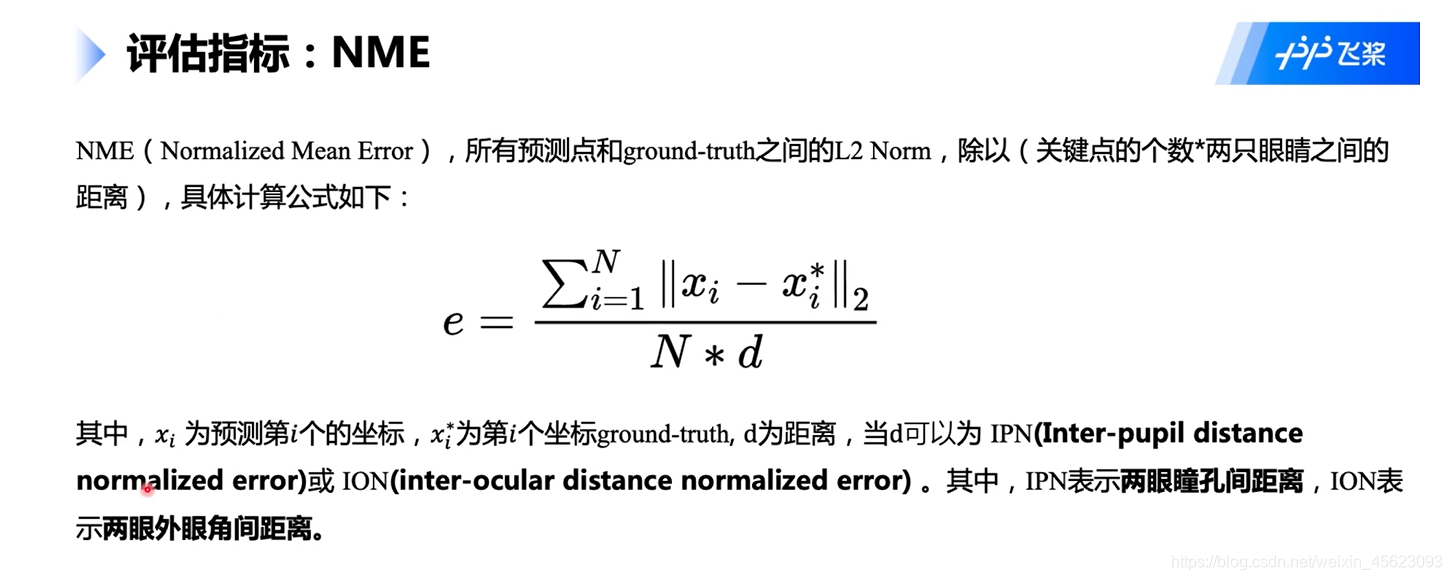
这里表示的主要是两眼瞳孔之间的距离或者是眼角之间的距离
代码实战
paddle.set_device('gpu') # 设置为GPU
数据分析及处理
- 数据的结构
data/
|—— test
|   |—— Abdel_Aziz_Al-Hakim_00.jpg
    ... ...
|—— test_frames_keypoints.csv
|—— training
|   |—— Abdullah_Gul_10.jpg
    ... ...
|—— training_frames_keypoints.csv
其中,
training和test文件夹分别存放训练集和测试集。training_frames_keypoints.csv和test_frames_keypoints.csv存放着训练集和测试集的标签。接下来,我们先来观察一下training_frames_keypoints.csv文件,看一下训练集的标签是如何定义的。
- 查看csv文件的内容
key_pts_frame = pd.read_csv('data/training_frames_keypoints.csv') # 读取数据集
print('Number of images: ', key_pts_frame.shape[0]) # 输出数据集大小
key_pts_frame.head(5) # 看前五条数据
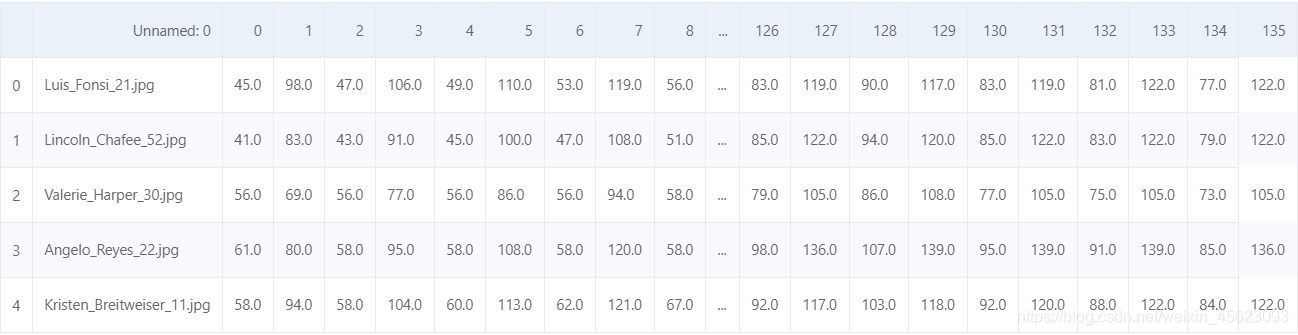
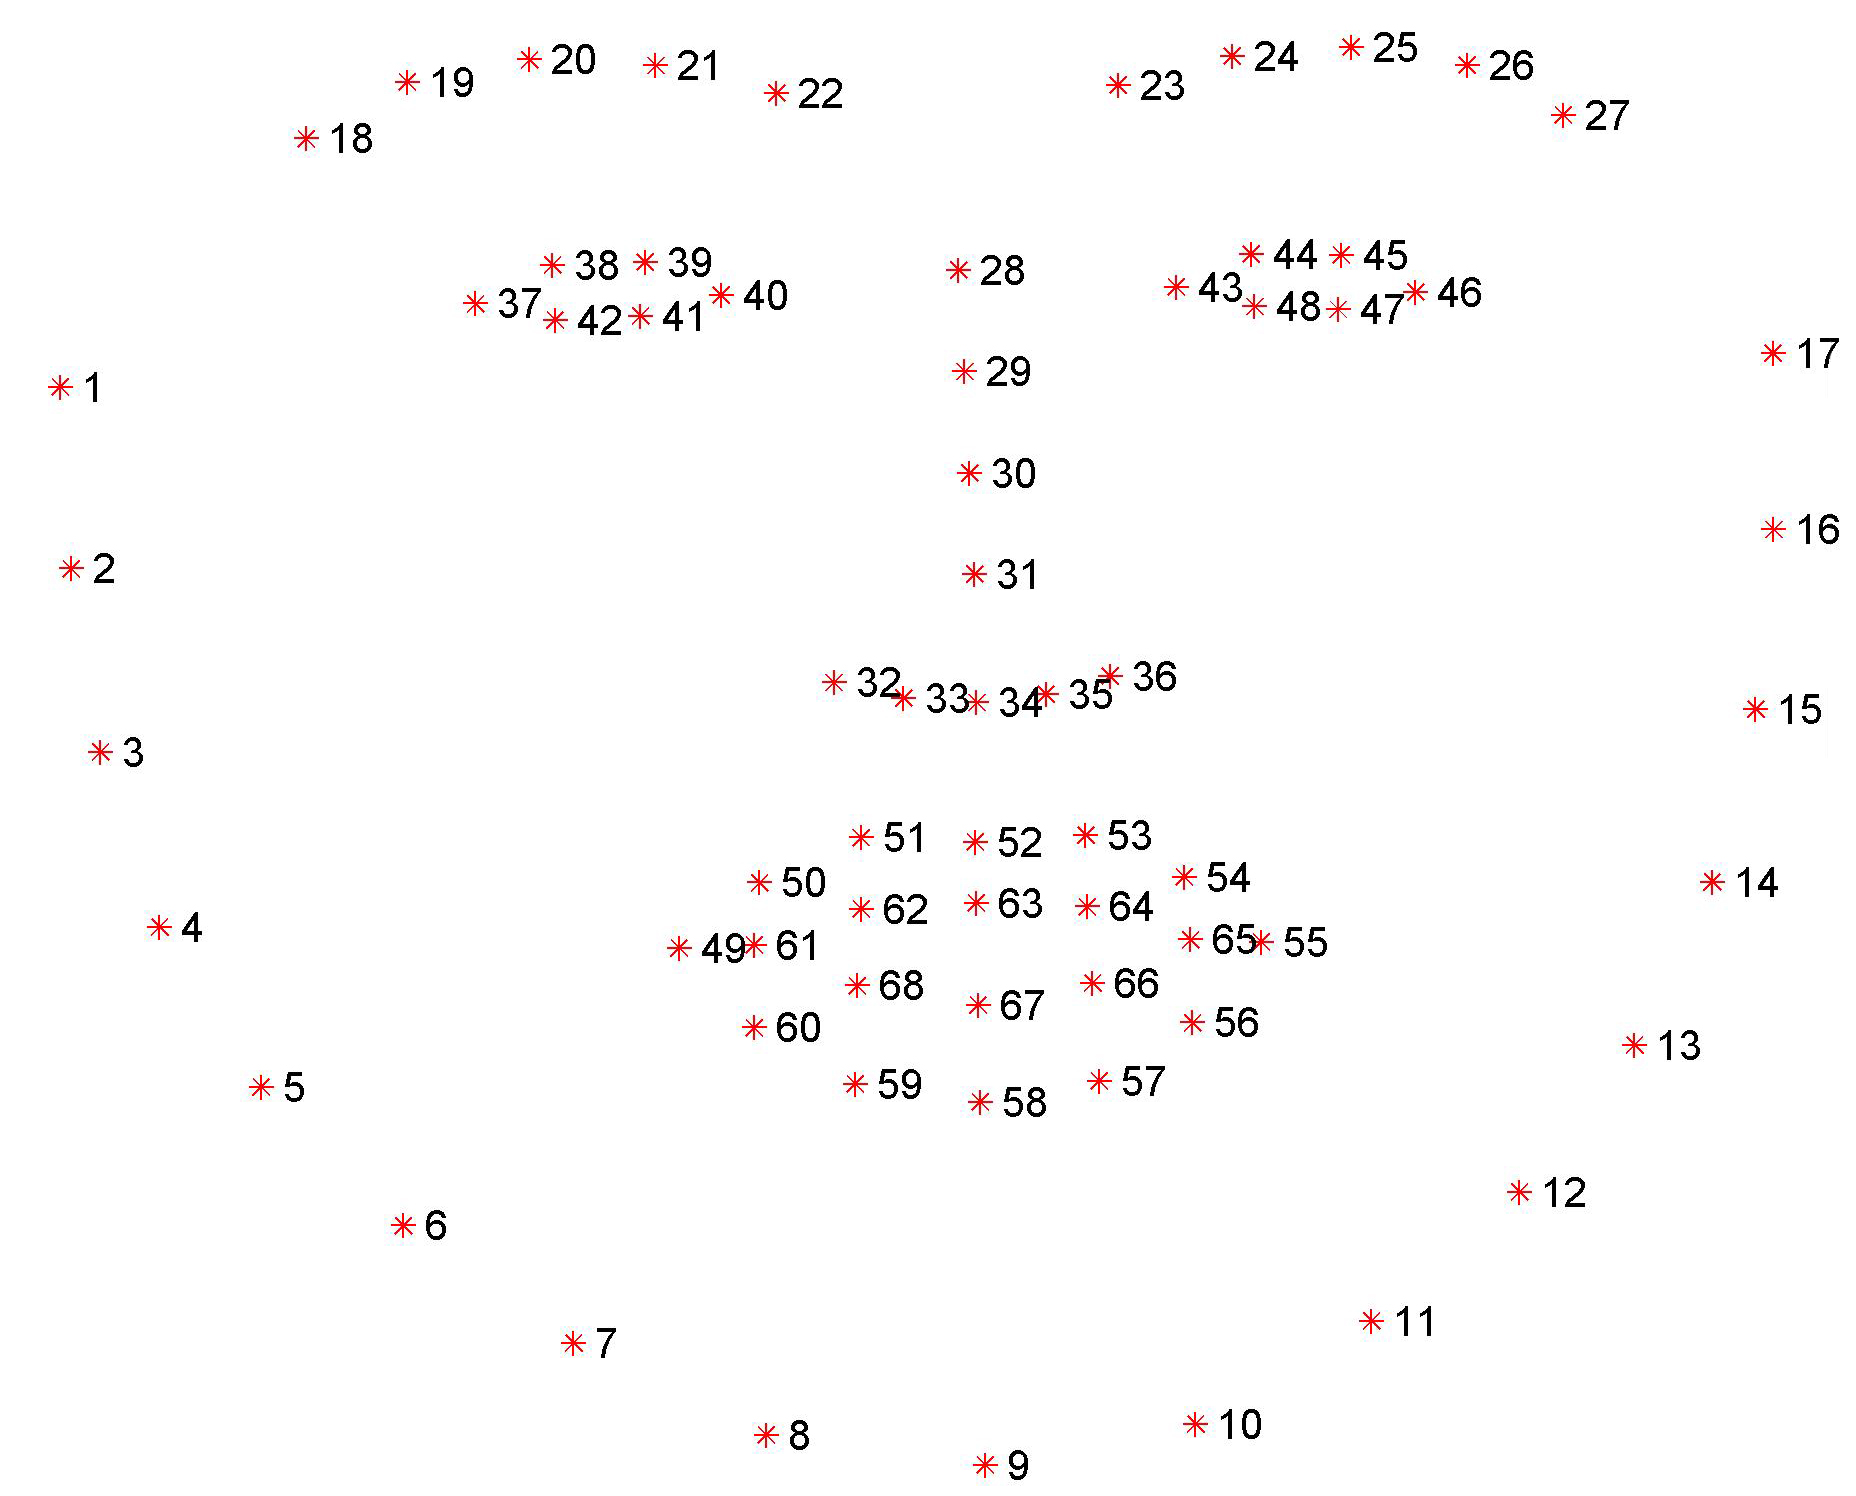
通过pandas对前5条数据进行读取查看到一共是136个点数据也就是有68个关键点
- 展示68点数据排列
看到这里不禁想到paddleHub的人脸检测模型 传送门
感兴趣对的小伙伴也可以去看一看
- 对标签数据做平均和标准差
# 计算标签的均值和标准差,用于标签的归一化
key_pts_values = key_pts_frame.values[:,1:] # 取出标签信息
data_mean = key_pts_values.mean() # 计算均值
data_std = key_pts_values.std()   # 计算标准差
print('标签的均值为:', data_mean)
print('标签的标准差为:', data_std)
标签的均值为: 104.4724870017331
标签的标准差为: 43.17302271754281
- 展示关键点
def show_keypoints(image, key_pts):
    """
    Args:
        image: 图像信息
        key_pts: 关键点信息,
    展示图片和关键点信息
    """
    plt.imshow(image.astype('uint8'))  # 展示图片信息
    for i in range(len(key_pts)//2,):
        plt.scatter(key_pts[i*2], key_pts[i*2+1], s=20, marker='.', c='b') # 展示关键点信息
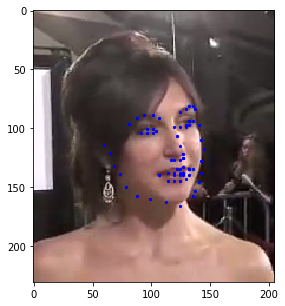
- 调用
show_keypoints函数对第19张图进行查看
n = 19 # n为数据在表格中的索引
image_name = key_pts_frame.iloc[n, 0] # 获取图像名称
key_pts = key_pts_frame.iloc[n, 1:].as_matrix() # 将图像label格式转为numpy.array的格式
key_pts = key_pts.astype('float').reshape(-1) # 获取图像关键点信息
print(key_pts.shape)
plt.figure(figsize=(5, 5)) # 展示的图像大小
show_keypoints(mpimg.imread(os.path.join('data/training/', image_name)), key_pts) # 展示图像与关键点信息
plt.show() # 展示图像
os.path.join():是用于拼接地址的
- 定义数据集
在paddle2.0.0中使用高级API:paddle.io.Dataset来对数据进行处理
导入我们的处理高级API,新建类并继承dataset
from paddle.io import Dataset

class FacialKeypointsDataset(Dataset):
导入并获取数据
def __init__(self, csv_file, root_dir, transform=None):
        """
        步骤二:实现构造函数,定义数据集大小
        Args:
            csv_file (string): 带标注的csv文件路径
            root_dir (string): 图片存储的文件夹路径
            transform (callable, optional): 应用于图像上的数据处理方法
        """
        self.key_pts_frame = pd.read_csv(csv_file) # 读取csv文件
        self.root_dir = root_dir # 获取图片文件夹路径
        self.transform = transform # 获取 transform 方法
(1)先获取图片位置然后通过os.path.join函数拼接地址,然后读取图片。
(2)图片处理,把alpha(图像透明通道)忽略
(3)和上面查看图片有一的方式通过pandas获取关键点的数据
(4)定义transform方法,虽然默认是None,但是也要进行定义
(5)把上述处理以后的数据转换成数组
    def __getitem__(self, idx):
        """
        步骤三:实现__getitem__方法,定义指定index时如何获取数据,并返回单条数据(训练数据,对应的标签)
        """
        image_name = os.path.join(self.root_dir,
                                self.key_pts_frame.iloc[idx, 0])
        # 获取图像
        image = mpimg.imread(image_name)

        # 图像格式处理,如果包含 alpha 通道,那么忽略它
        if(image.shape[2] == 4):
            image = image[:,:,0:3]

        # 获取关键点信息
        key_pts = self.key_pts_frame.iloc[idx, 1:].as_matrix()
        key_pts = key_pts.astype('float').reshape(-1) # [136, 1]

        # 如果定义了 transform 方法,使用 transform方法
        if self.transform:
            image, key_pts = self.transform([image, key_pts])

        # 转为 numpy 的数据格式
        image = np.array(image, dtype='float32')
        key_pts = np.array(key_pts, dtype='float32')

        return image, key_pts
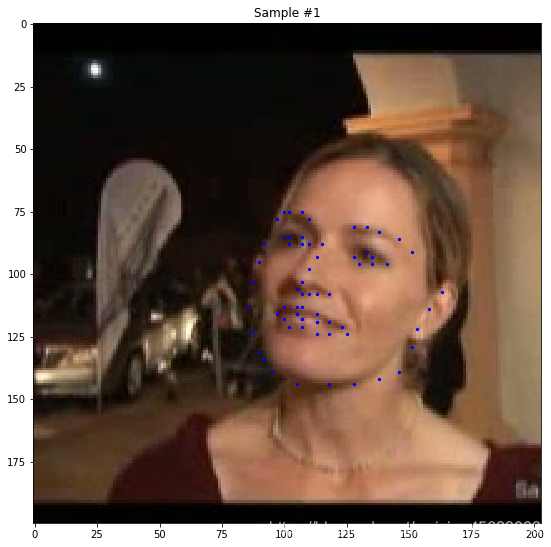
- 对上面定义的数据进行展示(相当于一种检测是否有问题)
把之前的类进行调用并把数据集的有关资料进行“填喂”
# 构建一个数据集类
face_dataset = FacialKeypointsDataset(csv_file='data/training_frames_keypoints.csv',
                                      root_dir='data/training/')
查看数据集的大小
# 输出数据集大小
print('数据集大小为: ', len(face_dataset))
展示图片
for i in range(num_to_display):

    # 定义图片大小
    fig = plt.figure(figsize=(20,10))

    # 随机选择图片
    rand_i = np.random.randint(0, len(face_dataset))
    sample = face_dataset[rand_i]

    # 输出图片大小和关键点的数量
    print(i, sample[0].shape, sample[1].shape)

    # 设置图片打印信息
    ax = plt.subplot(1, num_to_display, i + 1)
    ax.set_title('Sample #{}'.format(i))

    # 输出图片
    show_keypoints(sample[0], sample[1])
*目前为止数据存在的问题:
-
每张图像的大小不一样,图像大小需要统一以适配网络输入要求
-
图像格式需要适配模型的格式输入要求
-
数据量比较小,没有进行数据增强
-
Transforms(之前做了定义)
对图像进行预处理,包括灰度化、归一化、重新设置尺寸、随机裁剪,修改通道格式等等,以满足数据要求;每一类的功能如下:
- 灰度化:丢弃颜色信息,保留图像边缘信息;识别算法对于颜色的依赖性不强,加上颜色后鲁棒性会下降,而且灰度化图像维度下降(3->1),保留梯度的同时会加快计算。
- 归一化:加快收敛
- 重新设置尺寸:数据增强
- 随机裁剪:数据增强
- 修改通道格式:改为模型需要的结构
设置 Transforms
标准化定义 transform 方法
class TransformAPI(object):
    """
    步骤一:继承 object 类
    """
    def __call__(self, data):
        """
        步骤二:在 __call__ 中定义数据处理方法
        """

        processed_data = data
        return  processed_data
接下去通过paddle.vision.transformsAPI对数据进行处理
- 对图片进行灰度处理任何进行数据归一化
class GrayNormalize(object):
    # 将图片变为灰度图,并将其值放缩到[0, 1]
    # 将 label 放缩到 [-1, 1] 之间

    def __call__(self, data):
        image = data[0]   # 获取图片
        key_pts = data[1] # 获取标签

        image_copy = np.copy(image)
        key_pts_copy = np.copy(key_pts)

        # 灰度化图片
        gray_scale = paddle.vision.transforms.Grayscale(num_output_channels=3)
        image_copy = gray_scale(image_copy)

        # 将图片值放缩到 [0, 1]
        image_copy = image_copy / 255.0

        # 将坐标点放缩到 [-1, 1]
        mean = data_mean # 获取标签均值
        std = data_std   # 获取标签标准差
        key_pts_copy = (key_pts_copy - mean)/std

        return image_copy, key_pts_copy
- 对图像的大小和关键点数据进行处理,使其图像大小相同任何关键点配套
class Resize(object):
    # 将输入图像调整为指定大小

    def __init__(self, output_size):
        assert isinstance(output_size, (int, tuple))
        self.output_size = output_size

    def __call__(self, data):

        image = data[0]    # 获取图片
        key_pts = data[1]  # 获取标签

        image_copy = np.copy(image)
        key_pts_copy = np.copy(key_pts)
        # 对关键点进行缩放
        h, w = image_copy.shape[:2]
        if isinstance(self.output_size, int):
            if h > w:
                new_h, new_w = self.output_size * h / w, self.output_size
            else:
                new_h, new_w = self.output_size, self.output_size * w / h
        else:
            new_h, new_w = self.output_size

        new_h, new_w = int(new_h), int(new_w)

        img = F.resize(image_copy, (new_h, new_w))

        # scale the pts, too
        key_pts_copy[::2] = key_pts_copy[::2] * new_w / w
        key_pts_copy[1::2] = key_pts_copy[1::2] * new_h / h

        return img, key_pts_copy
- 使用
np.random对数据进行增强
class RandomCrop(object):
    # 随机位置裁剪输入的图像

    def __init__(self, output_size):
        assert isinstance(output_size, (int, tuple))
        if isinstance(output_size, int):
            self.output_size = (output_size, output_size)
        else:
            assert len(output_size) == 2
            self.output_size = output_size

    def __call__(self, data):
        image = data[0]
        key_pts = data[1]

        image_copy = np.copy(image)
        key_pts_copy = np.copy(key_pts)

        h, w = image_copy.shape[:2]
        new_h, new_w = self.output_size

        top = np.random.randint(0, h - new_h)
        left = np.random.randint(0, w - new_w)

        image_copy = image_copy[top: top + new_h,
                      left: left + new_w]

        key_pts_copy[::2] = key_pts_copy[::2] - left
        key_pts_copy[1::2] = key_pts_copy[1::2] - top

        return image_copy, key_pts_copy
- 使用
paddle.vision.transforms.Transpose修改成CHW表示形式
class ToCHW(object):
    # 将图像的格式由HWC改为CHW
    def __call__(self, data):

        # 实现ToCHW,可以使用 paddle.vision.transforms.Transpose 实现
        image = data[0]
        key_pts = data[1]

        transpose = T.Transpose((2, 0, 1)) # 改为CHW
        image = transpose(image)

        return image, key_pts
最后完成数据集的定义
把之前做了定义的transform做固定对裁剪修改等的数据传入数据集
from paddle.vision.transforms import Compose

data_transform = Compose([Resize(256), RandomCrop(224), GrayNormalize(), ToCHW()])

# create the transformed dataset
train_dataset = FacialKeypointsDataset(csv_file='data/training_frames_keypoints.csv',
                                       root_dir='data/training/',
                                       transform=data_transform)
print('Number of train dataset images: ', len(train_dataset))

for i in range(4):
    sample = train_dataset[i]
    print(i, sample[0].shape, sample[1].shape)

test_dataset = FacialKeypointsDataset(csv_file='data/test_frames_keypoints.csv',
                                             root_dir='data/test/',
                                             transform=data_transform)

print('Number of test dataset images: ', len(test_dataset))
模型的处理
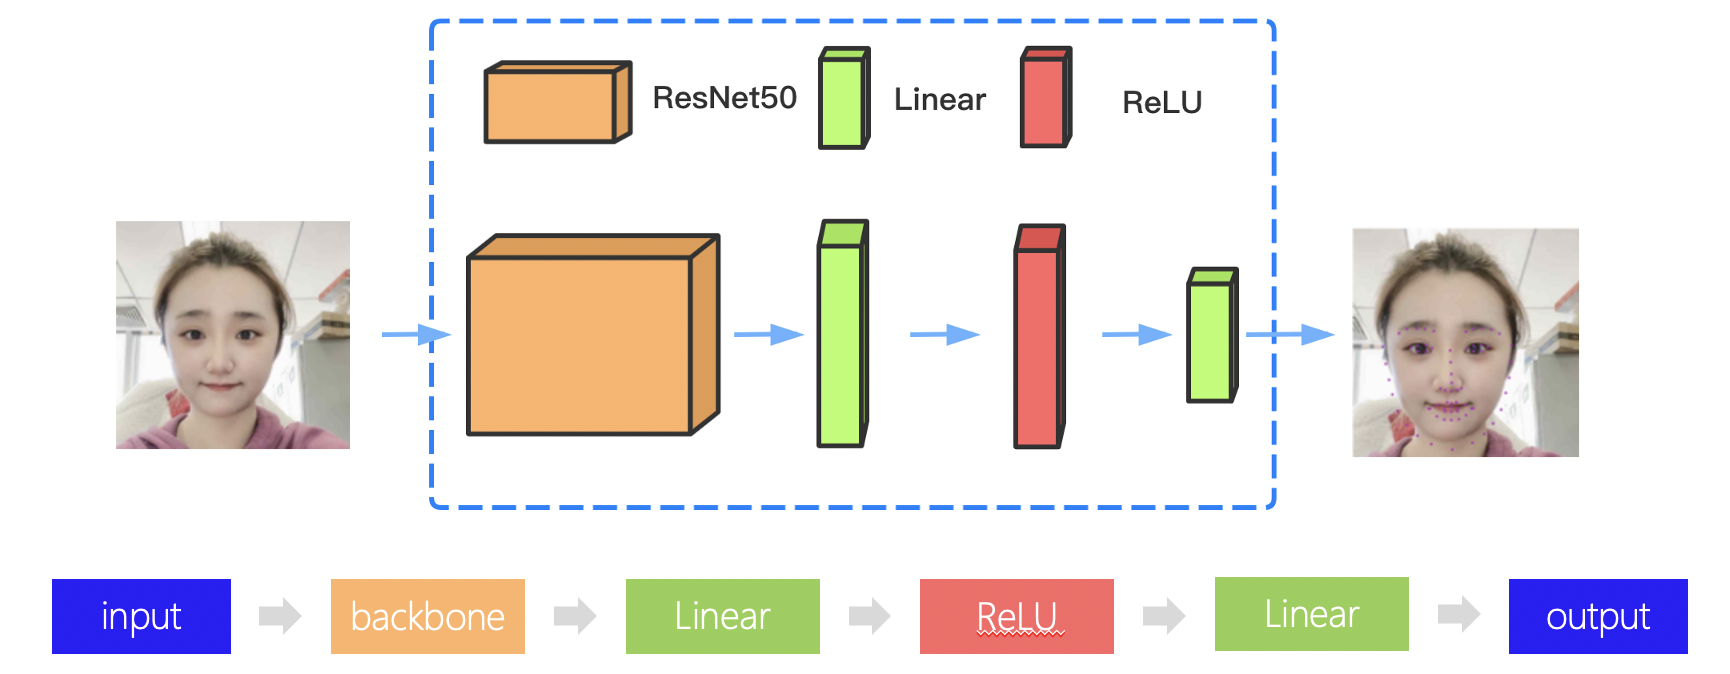
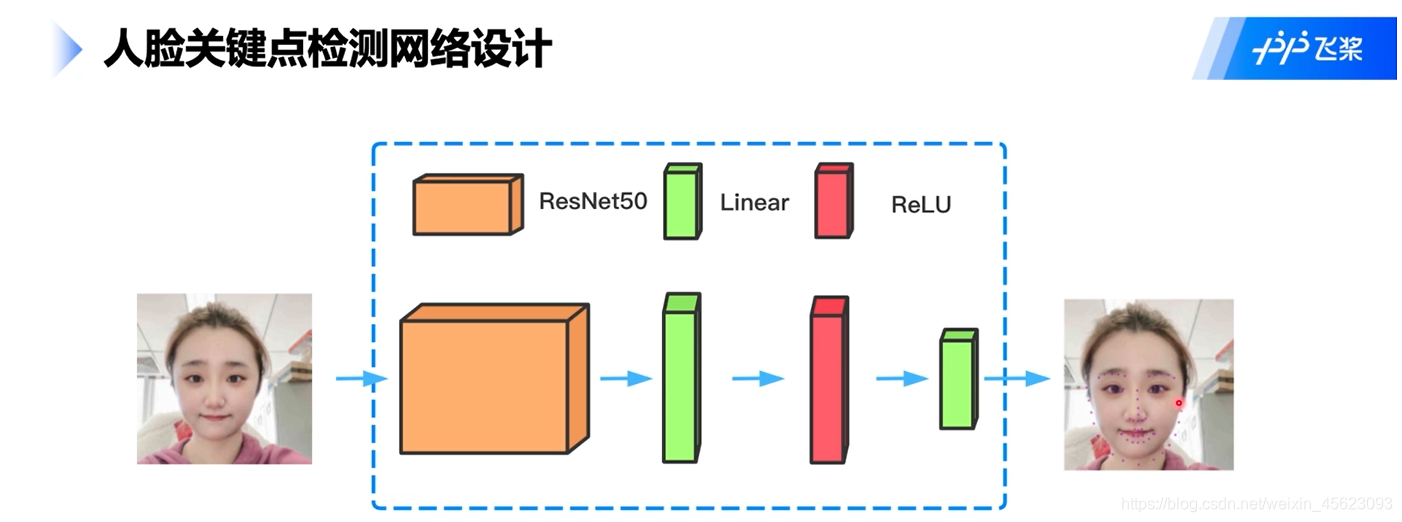
先使用resnet50卷积网络然后添加一个线性层使用的是Linear输入为1000因为卷积的输出是1000然后添加一个激活函数
        def __init__(self, key_pts):

        super(SimpleNet, self).__init__()

        # 实现 __init__
        # 使用resnet50作为backbone
        self.backbone = paddle.vision.models.resnet50(pretrained=True)

        # 添加第一个线性变换层
        self.linear1 = nn.Linear(in_features=1000, out_features=512)

        # 使用 ReLU 激活函数
        self.act1 = nn.ReLU()

        # 添加第二个线性变换层作为输出,输出元素的个数为 key_pts*2,代表每个关键点的坐标
        self.linear2 = nn.Linear(in_features=512, out_features=key_pts*2)
可视化模型
使用model.summary对刚刚定义的模型进行可视化
model = paddle.Model(SimpleNet(key_pts=68))
model.summary((-1, 3, 224, 224))

模型训练
以下内容和前两天的数据基本上是一样的,训练模型,保存,测试,展示等就不再过多的赘述。
总结
今天的人脸检测数据归类的任务,再一次从数据集的处理到网络的搭建一条龙的解析,今天的内容也确实比前两天的难度会大很多还是需要细细的品尝的。
那么今天就到这里了,明天再见
这里是三岁,飞桨社区最菜的小白
我在AI Studio上获得黄金等级,点亮7个徽章,来互关呀~
CSDN首页
如果喜欢记得关注呦!!!