就是菜啊!
该文章主要介绍的是利用touchgfx提供的PixelDataWidget控件来制作简易的函数图像
开发环境:
touchgfx designer13.0 、visual studio2019 、keil5 -5.27
UI界面设计:
打开Touchgfx designer,创建一个screen,添加一个box充当背景,添加一张图片,充当坐标系的背景图片,再添加三个按钮,分别是控制显示Sin(x)、SQR(方波)、Cos(x)函数图像,具体配置入下图所示:

在touchgfx designer上的工作就这么多,点击运行,然后生成代码,用vs打开该项目工程。
软件代码编写:
因为我创建了两个Screen,并且将函数图像显示设置为Screen2,所以我是打开的Screen2ViewBase.hpp文件,首先在该文件的顶部添加PixelDataWidget.hpp文件
#include <touchgfx/widgets/PixelDataWidget.hpp>然后在该文件中定义一个PixelDataWidget对象,并且添加按钮点击事件的回调函数。具体代码如下所示。
    /*
     * Callback Declarations
     */
    touchgfx::Callback<Screen2ViewBase, const touchgfx::AbstractButton&> buttonCallback;

    /*
     * Callback Handler Declarations
     */
    void buttonCallbackHandler(const touchgfx::AbstractButton& src);               //声明按钮点击事件的回调函数
	touchgfx::PixelDataWidget pixelDataWidget;                                     //创建PixelDataWidget对象
点击保存该文件,然后打开Screen2ViewBase.cpp文件
在文件头部添加如下代码:
#include <math.h> //需要借助sin(x)、cos(x)函数计算轨迹
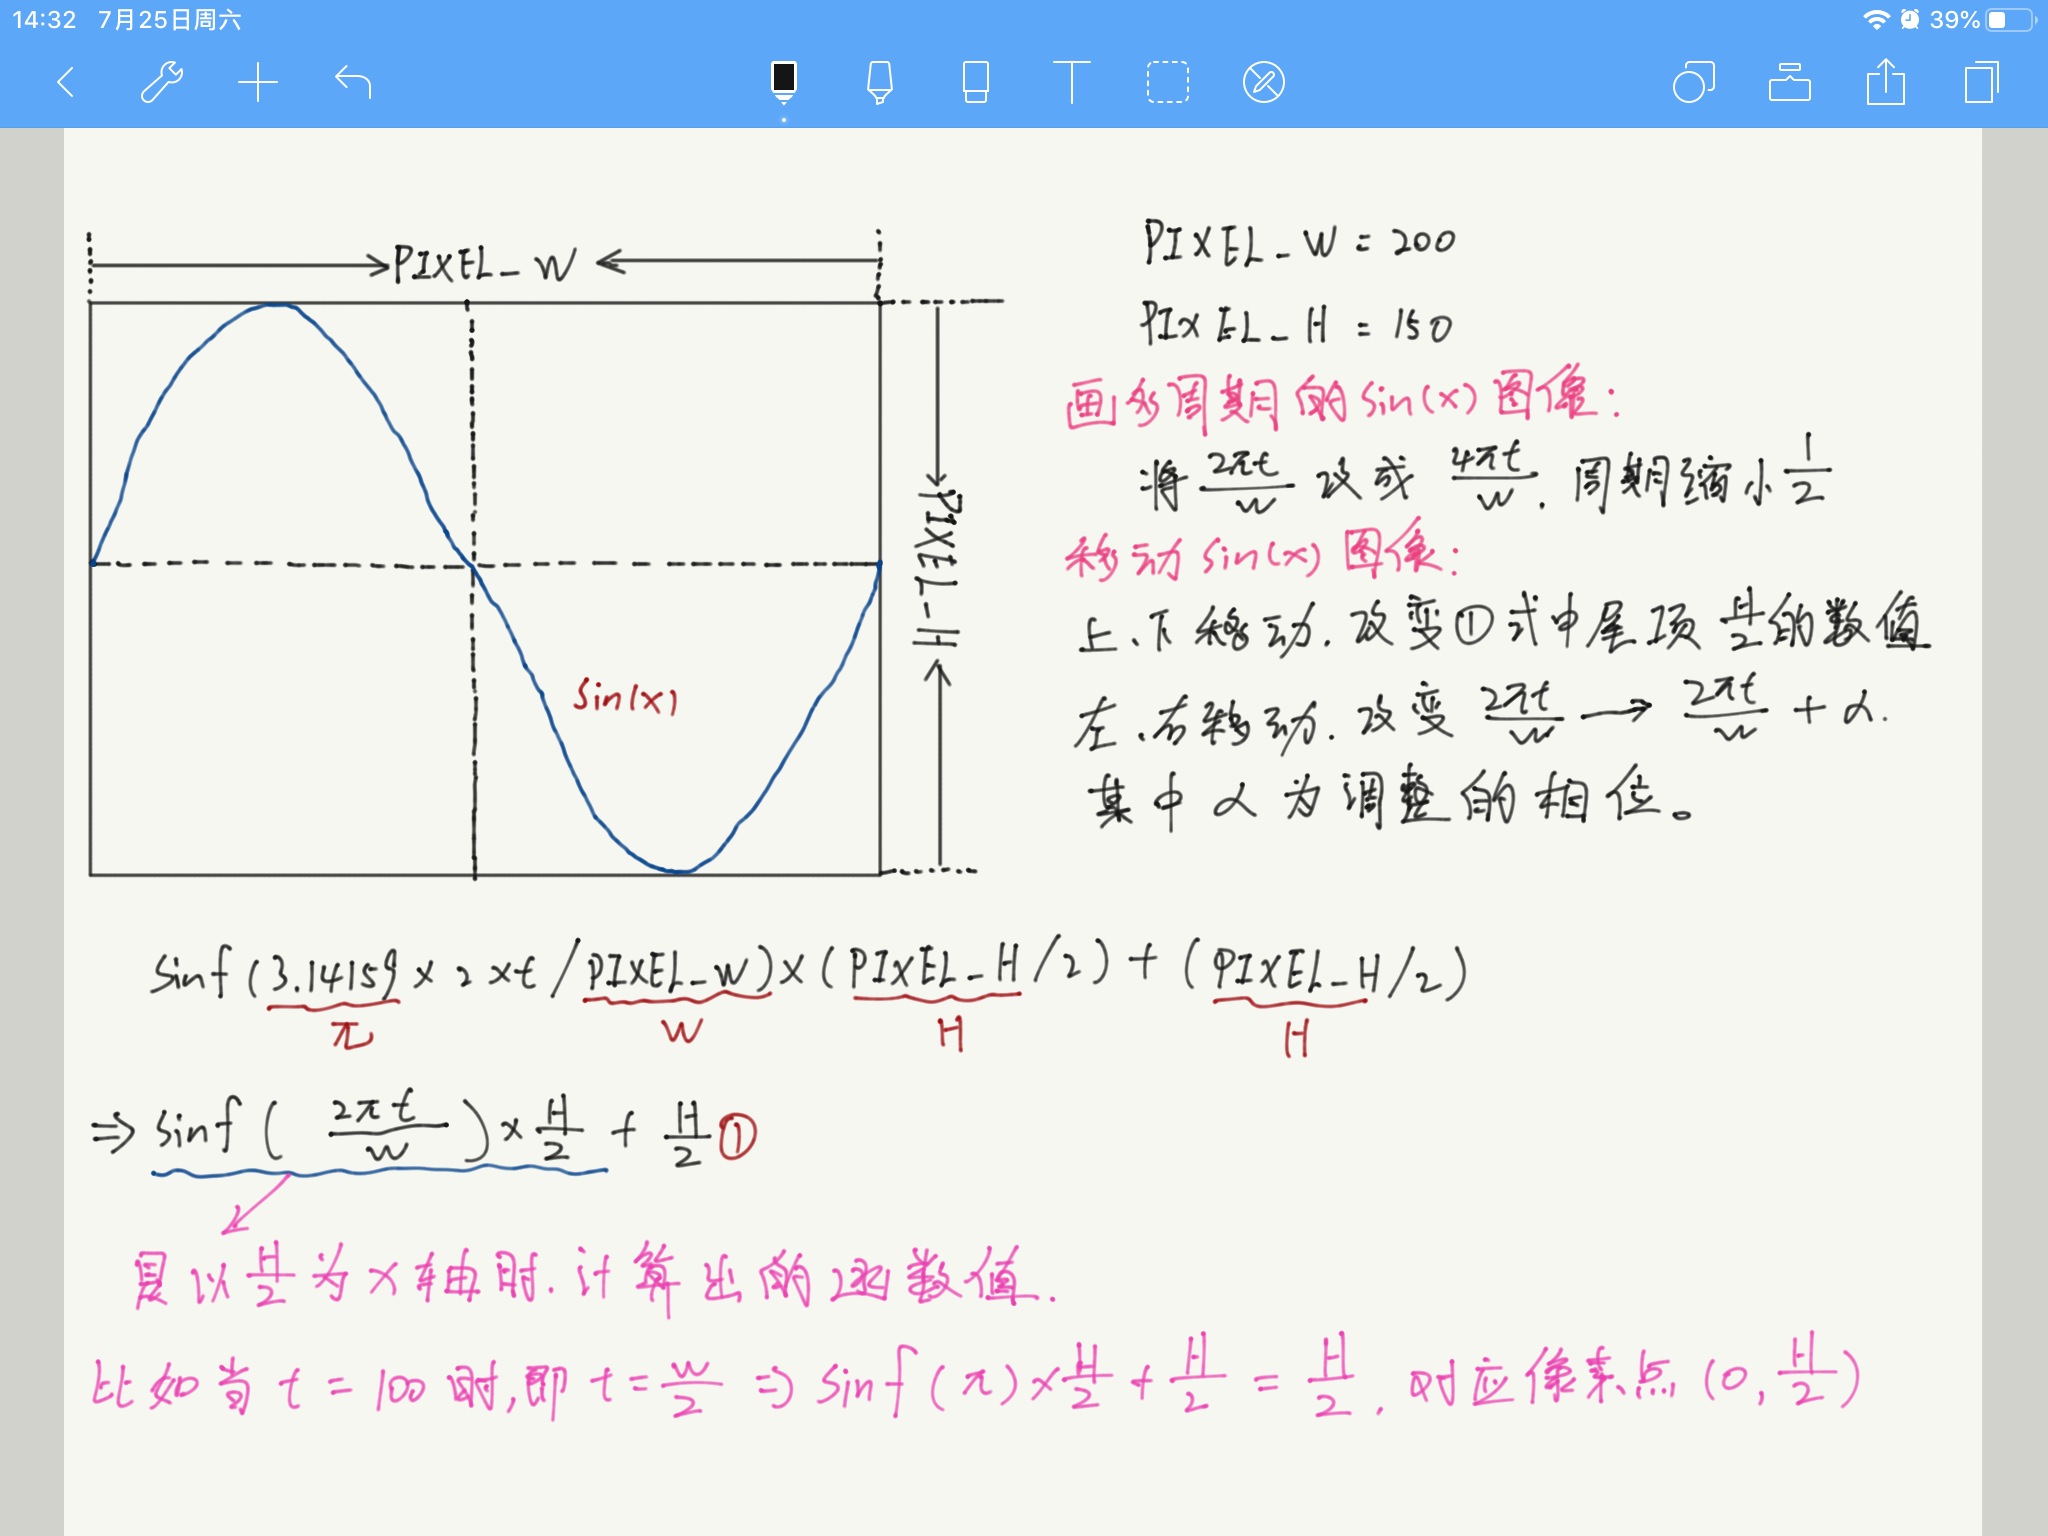
#define PIXEL_W 200 //bitmap的宽度
#define PIXEL_H 150 //bitmap的高度
unsigned char button_flag = 0;
unsigned char pixe_data[PIXEL_H * PIXEL_W * 4 + PIXEL_W * 4 + 3];
其中pixe_data数组是用来存放自己绘制的bitmap。然后将buttonCallback与回调函数进行绑定,如下图所示:

在Screen2ViewBase()中实例化PixelDataWidget对象,主要设置位置参数,位图大小,位图存储地址,以及位图格式等参数信息,具体配置入下图所示:

代码如下:
 pixelDataWidget.setPosition(100, 250, PIXEL_W, PIXEL_H);            //bitmap所放置的位置,以及大小
    pixelDataWidget.setPixelData(pixe_data);                            //像素数据矩阵存储地址
    pixelDataWidget.setBitmapFormat(Bitmap::ARGB8888);                  //位图格式
    pixelDataWidget.setAlpha(255);                                      //bitmap的透明度设置
    pixelDataWidget.setTouchable(true);                                 //bitmap是否可触摸
		/*****************************************************************
		利用数组存储每个像素点的RGB数据以及透明度数据,即用4个unsigned char 来表示一个像素点的信息;
		初始化像素矩阵,每个像素点设置为白色,透明度为0,所以在页面中看不到PixelDataWidget控件(若想
		看PixelDataWidget控件所创建PIXEL_W*PIXEL_H大小的bitmap,可将下面的像素点透明度设置为255)。
		*****************************************************************/
    for (int j = 0; j < PIXEL_H; j++)
        for (int i = 0; i < PIXEL_W; i++)
        {
            pixe_data[j * PIXEL_W * 4 + i * 4 + 0] = 255;                    //蓝色点像素控制
            pixe_data[j * PIXEL_W * 4 + i * 4 + 1] = 255;                    //绿色点像素控制
            pixe_data[j * PIXEL_W * 4 + i * 4 + 2] = 255;                    //红色点像素控制
            pixe_data[j * PIXEL_W * 4 + i * 4 + 3] = 0;                      //像素点透明度控制
        }
然后将pixelDataWidget控件添加到该页面:add(pixelDataWidget);
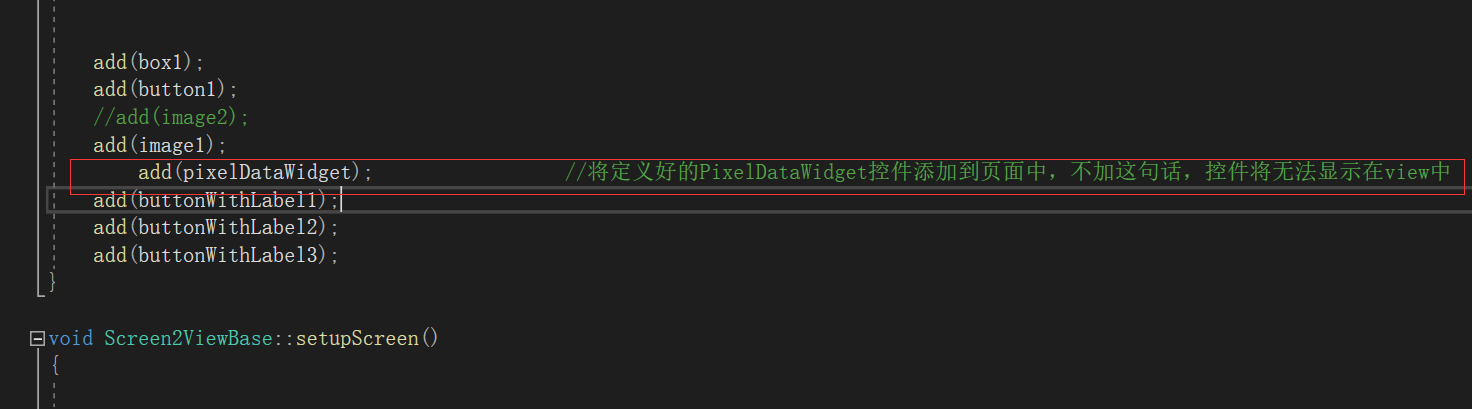
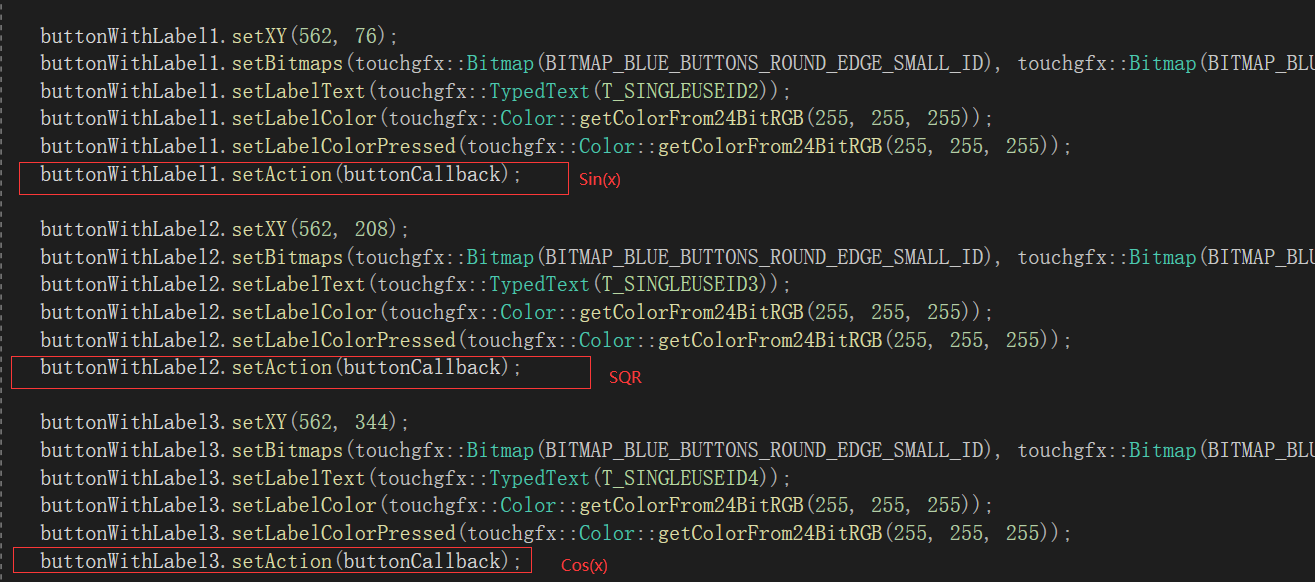
因为我没有在touchgfx中为按钮设置相应的点击事件,所以要手动为每个按钮设置Action属性,具体配置如下:
最后实现按钮事件响应的回调函数
void Screen2ViewBase::buttonCallbackHandler(const touchgfx::AbstractButton& src)
{
    unsigned int sindata[PIXEL_W] = { 0 };
		if (&src == &button1)                                   //用于切换到Screen1的按钮事件
    {
        //Interaction1
        //When button1 clicked change screen to Screen1
        //Go to Screen1 with screen transition towards East
        application().gotoScreen1ScreenSlideTransitionEast();
    }
    else if (&src == &buttonWithLabel1)                     //Sin(x)按钮被点击
    {
        for (int t = 0; t < PIXEL_W; t++)
            sindata[t] = (unsigned int)(sinf(3.14159f * 2 * t / PIXEL_W) * (PIXEL_H / 2) + (PIXEL_H / 2));   //将sin(x)函数的轨迹数据存储到数组中
    }
    else if (&src == &buttonWithLabel2)                     //SQR按钮被点击
    {
        //Interaction2
        //When buttonWithLabel_SQR clicked change color of boxWithBorder_WAV
        //Set RGB color R:115, G:108, B:108 on boxWithBorder_WAV
        for (int t = 0; t < PIXEL_W / 3; t++)
        {
            sindata[t] = 10;
            sindata[t + PIXEL_W / 3] = 140;
            sindata[t + PIXEL_W / 3 * 2] = 10;

        }
        button_flag = 2;
    }
    else if (&src == &buttonWithLabel3)                     //Cos(x)按钮被点击
    {
        for (int t = 0; t < PIXEL_W; t++)
            sindata[t] = (unsigned int)(cosf(3.14159f * 2 * t / PIXEL_W) * (PIXEL_H / 2) + (PIXEL_H / 2));  //将cos(x)函数的轨迹数据存储到数组中

			 button_flag = 3;
    }


    for (int j = 0; j < PIXEL_H; j++)
        for (int i = 0; i < PIXEL_W; i++)
        {

            if (sindata[i] == j)                                  //设定轨迹点像素的RGB以及透明度,这里将轨迹设置为红色,透明度为255
            {
                pixe_data[j * PIXEL_W * 4 + i * 4 + 0] = 0;
                pixe_data[j * PIXEL_W * 4 + i * 4 + 1] = 0;
                pixe_data[j * PIXEL_W * 4 + i * 4 + 2] = 255;
                pixe_data[j * PIXEL_W * 4 + i * 4 + 3] = 255;
            }
            else                                                  //将非轨迹点设定为白色,透明度为0
            {
                pixe_data[j * PIXEL_W * 4 + i * 4 + 0] = 255;
                pixe_data[j * PIXEL_W * 4 + i * 4 + 1] = 255;
                pixe_data[j * PIXEL_W * 4 + i * 4 + 2] = 255;
                pixe_data[j * PIXEL_W * 4 + i * 4 + 3] = 0;
            }
        }
    if (button_flag == 2)
    {
        for (int i = 0; i < 130; i++)
        {
            pixe_data[i * PIXEL_W * 4 + 67 * 4 + 0 + 10 * 200 * 4] = 0;
            pixe_data[i * PIXEL_W * 4 + 67 * 4 + 1 + 10 * 200 * 4] = 0;
            pixe_data[i * PIXEL_W * 4 + 67 * 4 + 2 + 10 * 200 * 4] = 255;
            pixe_data[i * PIXEL_W * 4 + 67 * 4 + 3 + 10 * 200 * 4] = 255;

            pixe_data[i * PIXEL_W * 4 + 133 * 4 + 0 + 10 * 200 * 4] = 0;
            pixe_data[i * PIXEL_W * 4 + 133 * 4 + 1 + 10 * 200 * 4] = 0;
            pixe_data[i * PIXEL_W * 4 + 133 * 4 + 2 + 10 * 200 * 4] = 255;
            pixe_data[i * PIXEL_W * 4 + 133 * 4 + 3 + 10 * 200 * 4] = 255;
        }
    }

    for (int i = 0; i < PIXEL_W; i++)                   //X轴显示为绿色
    {
        pixe_data[75 * PIXEL_W * 4 + i * 4 + 0] = 0;
        pixe_data[75 * PIXEL_W * 4 + i * 4 + 1] = 255;
        pixe_data[75 * PIXEL_W * 4 + i * 4 + 2] = 0;
        pixe_data[75 * PIXEL_W * 4 + i * 4 + 3] = 255;
    }

    for (int j = 0; j < PIXEL_W; j++)                    //Y轴像是为黑色
    {
        pixe_data[j * PIXEL_W * 4 + 100 * 4 + 0] = 0;
        pixe_data[j * PIXEL_W * 4 + 100 * 4 + 1] = 0;
        pixe_data[j * PIXEL_W * 4 + 100 * 4 + 2] = 0;
        pixe_data[j * PIXEL_W * 4 + 100 * 4 + 3] = 255;
    }
    button_flag = 1;
    pixelDataWidget.invalidate();                        //刷新PixelDataWidget控件
}
完成这一步就离成功很近啦,接下来就是软件仿真,或者下载到开发版上面看看效果吧!关于函数图像的移动,周期缩放等,我以Sin(x)为例,可能写的比较乱,大家凑合着看看吧!
最终实验效果:
touchgfx绘制函数曲线
多周期实验效果:
touchgfx生成多周期函数图像