前言
springboot 中有很多的starter 。我们用起来很爽不是吗,之所以这么爽难道不是因为我们少了很多配置吗,之前我们想要使用jdbcTemplete 是不是需要在xml 文件中配置bean 后才能使用。有被xml 一推配置支配的恐惧吗?

为了解救从多处于水深火热的程序猿们,springboot 横空出世,带着starter 的利刃来普度我们了。
我们在心怀感激的同时,是不是也得有一丝探秘之心。所以我们就手撸一个自定义的starter 吧。
预备知识
在之前我们还是说一下借个注解
@ConfigurationProperties
这个注解我们应该有了解过,我们需要在application.properties 中配置一个对象的时候怎么配置的?是不是类似下面这样的。
所以我们就需要在我们的实体类中加上这个注解,并prefix=“user” .
然后我们在创建一个实体类的实例时,就可以获取到从application.properties中配置的属性值。
所以这个注解的作用就是获取配置文件中配置的bean,作用在类上 。而 @Value 注解则是作用在类属性上。
我们再看下注解ConfigurationProperties源码:
@Target({ElementType.TYPE, ElementType.METHOD})
@Retention(RetentionPolicy.RUNTIME)
@Documented
public @interface ConfigurationProperties {
   @AliasFor("prefix")
   String value() default "";

   @AliasFor("value")
   String prefix() default "";

   boolean ignoreInvalidFields() default false;

   boolean ignoreUnknownFields() default true;
}
@AliasFor 注解是为属性起一个别名。表示使用prefix 和使用value 的效果是一样的。
@EnableConfigurationProperties
这个注解是干嘛的?
是使得 用了 @ConfigurationProperties 注解的类生效。如果一个配置类只配置@ConfigurationProperties注解,而没有使用@Component,那么在IOC中是获取不到properties 配置文件转化的bean。@EnableConfigurationProperties 相当于把使用 @ConfigurationProperties 的类进行了一次注入。
源码:
@ConditionalOnClass
这个注解我们相对陌生一些,但是这个注解却是springboot 中实现自动自动装配的关键。主要是判断被该注解标注的类是否在classoath 中存在,如果存在,就将bean 载入到ioc 中。
是不是觉得很简单,甚至有点索然无味?

不说废话了,动手动手,开撸开撸。
依赖
既然上面说了这些注解,后面当然是需要用到了的,既然需要用到这些注解,就需要引入依赖啦。
我们首先创建一个普通的maven 项目,然后引入依赖
<dependencies>
        <dependency>
            <groupId>org.springframework.boot</groupId>
            <artifactId>spring-boot-autoconfigure</artifactId>
            <version>2.2.6.RELEASE</version>
        </dependency>

        <dependency>
            <groupId>org.projectlombok</groupId>
            <artifactId>lombok</artifactId>
            <version>1.18.10</version>
            <scope>provided</scope>
        </dependency>
    </dependencies>
autoconfigure 的依赖是上面的注解需要用到的。lombok是我为了用来代替实体类的get 和set 方法的。
实体类
我们引入依赖后,创建一个实体类,方便我们在application.properties 中配置属性。
@Getter
@Setter
@ConfigurationProperties(prefix = "logo")
public class LogoProperties {


    public static final String NAME="程序员爱酸奶";
    public static final String URL="xyz.quellanan";
    public static final String CONTENT="welcome !";

    private String name;
    private String url;
    private String content;
}
再创建一个Logo 的实体类
 * @Version 1.0
 */
@Getter
@Setter
@ToString
public class Logo {

    private String name;
    private String url;
    private String time;
    private String content;

}
config
接下来就关键啦,我们已经创建好了实体类,那我们怎么将完成自动注入呢?

我们创建一config 类。内容如下:
@Configuration
@EnableConfigurationProperties(LogoProperties.class)
@ConditionalOnClass(Logo.class)
public class LogoConfig {

    @Autowired
    private LogoProperties logoProperties;

    @Bean
    Logo logo(){
        Logo logo=new Logo();
        logo.setName(logoProperties.getName()==null?LogoProperties.NAME:logoProperties.getName());
        logo.setUrl(logoProperties.getUrl()==null?LogoProperties.URL:logoProperties.getUrl());
        logo.setContent(logoProperties.getContent()==null?LogoProperties.CONTENT:logoProperties.getContent());
        logo.setTime(new SimpleDateFormat("yyyy-MM-dd HH:mm:ss").format(Calendar.getInstance().getTime()));
        System.out.println(logo.getName());
        return logo;
    }
}
使用了三个注解。
@Configuration 表示我们项目在启动完的时候,会自动执行的类。
@EnableConfigurationProperties(LogoProperties.class) 就是我们前面的说的,使得
LogoProperties.class的 @ConfigurationProperties 注解生效。
@ConditionalOnClass(Logo.class) 标记Logo.class 需要自动装载 bean 。
然后就会说@bean 注解,创建了一个logo的bean 并做了一些简单处理。
spring.factories
做完上面那些你以为就可以了吗?
其实并没有哈哈,还有关键一步。

前面这些并不能让项目启动的时候完成注入自定义的bean .
还得从我们springboot 项目启动类说起。我们启动类上是不是有@SpringBootApplication
我们看下源码
@Target({ElementType.TYPE})
@Retention(RetentionPolicy.RUNTIME)
@Documented
@Inherited
@SpringBootConfiguration
@EnableAutoConfiguration
@ComponentScan(
    excludeFilters = {@Filter(
    type = FilterType.CUSTOM,
    classes = {TypeExcludeFilter.class}
), @Filter(
    type = FilterType.CUSTOM,
    classes = {AutoConfigurationExcludeFilter.class}
)}
)
public @interface SpringBootApplication {
    @AliasFor(
        annotation = EnableAutoConfiguration.class
    )
    Class<?>[] exclude() default {};

    @AliasFor(
        annotation = EnableAutoConfiguration.class
    )
    String[] excludeName() default {};

    @AliasFor(
        annotation = ComponentScan.class,
        attribute = "basePackages"
    )
    String[] scanBasePackages() default {};

    @AliasFor(
        annotation = ComponentScan.class,
        attribute = "basePackageClasses"
    )
    Class<?>[] scanBasePackageClasses() default {};

    @AliasFor(
        annotation = Configuration.class
    )
    boolean proxyBeanMethods() default true;
}
主要就是@SpringBootConfiguration,@EnableAutoConfiguration,@ComponentScan
三个注解的组合。我们这里接着看下@EnableAutoConfiguration的注解。
@Target({ElementType.TYPE})
@Retention(RetentionPolicy.RUNTIME)
@Documented
@Inherited
@AutoConfigurationPackage
@Import({AutoConfigurationImportSelector.class})
public @interface EnableAutoConfiguration {
    String ENABLED_OVERRIDE_PROPERTY = "spring.boot.enableautoconfiguration";

    Class<?>[] exclude() default {};

    String[] excludeName() default {};
}
可以看到导入了 AutoConfigurationImportSelector.class 那这个类是干嘛的?
这个类自动加载相关配置的。我们看下getAutoConfigurationEntry方法。
protected AutoConfigurationImportSelector.AutoConfigurationEntry getAutoConfigurationEntry(AutoConfigurationMetadata autoConfigurationMetadata, AnnotationMetadata annotationMetadata) {
        if (!this.isEnabled(annotationMetadata)) {
            return EMPTY_ENTRY;
        } else {
            AnnotationAttributes attributes = this.getAttributes(annotationMetadata);
            List<String> configurations = this.getCandidateConfigurations(annotationMetadata, attributes);
            configurations = this.removeDuplicates(configurations);
            Set<String> exclusions = this.getExclusions(annotationMetadata, attributes);
            this.checkExcludedClasses(configurations, exclusions);
            configurations.removeAll(exclusions);
            configurations = this.filter(configurations, autoConfigurationMetadata);
            this.fireAutoConfigurationImportEvents(configurations, exclusions);
            return new AutoConfigurationImportSelector.AutoConfigurationEntry(configurations, exclusions);
        }
    }

    public Class<? extends Group> getImportGroup() {
        return AutoConfigurationImportSelector.AutoConfigurationGroup.class;
    }
getAutoConfigurationEntry方法获取了spring-boot项目中需要自动配置的项(bean),最看见的就是 getCandidateConfigurations方法了,它获取了所有可能参与到项目的候选配置bean,与之对应的,getExclusions获取了所有不需要加载的配置bean。进一步查看getCandidateConfigurations方法的源码。
protected List<String> getCandidateConfigurations(AnnotationMetadata metadata, AnnotationAttributes attributes) {
        List<String> configurations = SpringFactoriesLoader.loadFactoryNames(this.getSpringFactoriesLoaderFactoryClass(), this.getBeanClassLoader());
        Assert.notEmpty(configurations, "No auto configuration classes found in META-INF/spring.factories. If you are using a custom packaging, make sure that file is correct.");
        return configurations;
    }
发现就是加载 META-INF/spring.factories 文件的内容。如果 spring.factories 中没有配置,那么就无法找到对应的类,实现自动注入了。
上面说了一堆,反正明白一个道理就可以了,需要配置spring.factories。

所以我们在resources 目录下创建META-INF/spring.factories 文件。
内容如下:
org.springframework.boot.autoconfigure.EnableAutoConfiguration=\
  xyz.quellanan.config.LogoConfig
指向我们需要自动加载的类。
测试
到此,算是真正的万事俱备只欠东风了。

是骡子是马,拉出来溜溜就知道了,所以我们来试试。
新建一个springboot 项目,依赖中引入我们自定义的starter.
<dependency>
            <groupId>cn.quellanan</groupId>
            <artifactId>logo-starter</artifactId>
            <version>1.0.0</version>
        </dependency>
然后写一个测试接口
@RestController
public class HelloController {

    @Autowired
    Logo logo;

    @RequestMapping("/hello")
    public String hello(){
        System.out.println(logo.toString());
        return logo.toString();
    }
}
然后我们启动项目。发现打印了我们在自定义starter 中的logo 的name
System.out.println(logo.getName());

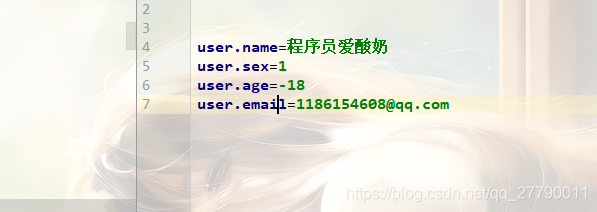
我们调接口看下
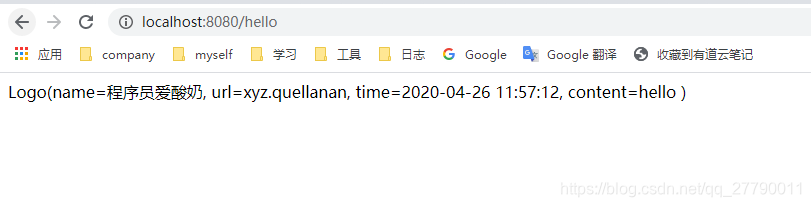
这是我们没有配置的时候,使用的默认属性。我们在application.properties 中配置自己的属性
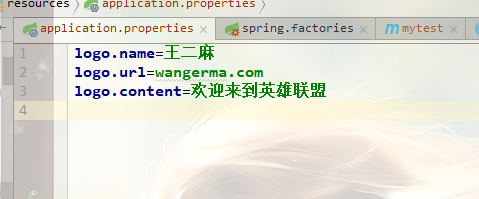
然后再重新启动看下。


变成我们自己注入的属性了不是吗。
番外
到此我们手撸一个starter 也很简单不是吗?那自己撸一个,不香吗?
兄弟们看到这了,不点赞无所谓(表面平静,内心期待的我)
