撸一个自定义view,先上想要做成的效果图,可以看到我们默认选则的就是第二个按钮,中间图片不可替换,居中。有选中和非选中时展示不同的图片的效果。并且给外部实现点击时的回调,让外部知道当前点击的是哪个的回调。
不想了解,只想要代码请直接下拉至底部,查看完整代码。
如果想了解Java、Kotlin代码实现点击右侧链接进入 Java、Kotlin代码实现...

首先,我们使用依赖布局文件的方式来完成,上布局代码
<?xml version="1.0" encoding="utf-8"?>
<RelativeLayout xmlns:android="http://schemas.android.com/apk/res/android"
    android:layout_width="match_parent"
    android:layout_height="67dp"
    android:background="@mipmap/layout_bottom_bar_background_with_shadow">

    <RadioGroup
        android:id="@+id/radio_group"
        android:layout_width="match_parent"
        android:layout_height="wrap_content"
        android:layout_alignParentBottom="true"
        android:layout_marginTop="7dp"
        android:layout_marginBottom="7dp"
        android:background="@color/white"
        android:orientation="horizontal">

        <RadioButton
            android:id="@+id/radio_home_page_selected_one"
            android:layout_width="0dp"
            android:layout_height="match_parent"
            android:layout_weight="1"
            android:button="@null"
            android:drawablePadding="4dp"
            android:gravity="center"
            android:text="kotlin1"
            android:textSize="12sp" />

        <RadioButton
            android:id="@+id/radio_home_page_selected_two"
            android:layout_width="0dp"
            android:layout_height="match_parent"
            android:layout_weight="1"
            android:button="@null"
            android:drawablePadding="4dp"
            android:gravity="center"
            android:text="kotlin2"
            android:textSize="12sp" />

        <android.support.v4.widget.Space
            android:layout_width="0dp"
            android:layout_height="match_parent"
            android:layout_weight="1" />

        <RadioButton
            android:id="@+id/radio_home_page_selected_three"
            android:layout_width="0dp"
            android:layout_height="match_parent"
            android:layout_weight="1"
            android:button="@null"
            android:drawablePadding="4dp"
            android:gravity="center"
            android:text="kotlin3"
            android:textSize="12sp" />

        <RadioButton
            android:id="@+id/radio_home_page_selected_four"
            android:layout_width="0dp"
            android:layout_height="match_parent"
            android:layout_weight="1"
            android:button="@null"
            android:drawablePadding="4dp"
            android:gravity="center"
            android:text="kotlin4"
            android:textSize="12sp" />

    </RadioGroup>

    <ImageView
        android:id="@+id/radio_home_page_selected_center"
        android:layout_width="wrap_content"
        android:layout_height="wrap_content"
        android:layout_alignParentBottom="true"
        android:layout_centerHorizontal="true"
        android:layout_gravity="center"
        android:layout_marginBottom="10dp"
        android:scaleType="fitCenter"
        android:src="@mipmap/ic_launcher" />

</RelativeLayout>
上图中的layout_bottom_bar_background_with_shadow.png是底部资源文件哦,这个需要你自己找一张透明的png图片呢,如果不想这么麻烦可以看我的 Java、Kotlin代码实现... 。可以看到我们用到的是RadioGroup嵌套RadioButton的方式,中间用一个space预留位置,再在外层使用imageView使其展示在中间,这样,我们的布局就已经完成了。先介绍一下布局内部使用的属性,一般具有基础的Android开发水平人员可以直接忽略一下内容,需则看
RadioGroup  单选按钮组
android:layout_alignParentBottom="true"  使布局置于父布局底部
android:layout_marginTop="7dp"           布局距离父布局顶部距离
android:layout_marginBottom="7dp"        布局距离父布局底部距离
android:background="@color/white"        当前布局背景颜色
android:orientation="horizontal"         当前布局的排列方式

RadioButton  单选按钮
android:button="@null"             设置默认的样式为空
android:gravity="center"           设置当前布局内部子控件居中
android:drawablePadding="4dp"      设置当前控件内部图片内边距为4dp
android:layout_weight="1"          设置当前控件权重为1,需配合width=0或者hight=0使用
android:text="kotlin1"             设置控件文字内容
android:textSize="12sp"            设置控件文字大小

Space        该控件在本文当做占位控件使用

ImageView 图片控件
android:layout_centerHorizontal="true"   设置控件相当于父布局水平居中
android:src="@mipmap/ic_launcher"        设置图片控件图片资源
接下来,我们新建一个类继承RelativeLayout 实现他的构造方法,我们在这选择两个
package com.goldze.mvvmhabit.app;

import android.content.Context;
import android.util.AttributeSet;
import android.widget.RelativeLayout;

/**
 * 费浩东
 * 2019/1/4
 * Created by fhd
 */
public class MainBottomBarTest extends RelativeLayout{

    public MainBottomBarTest(Context context) {
        super(context);
    }

    public MainBottomBarTest(Context context, AttributeSet attrs) {
        super(context, attrs);
    }
}
然后在构造方法中,依赖布局以及初始化控件
//第一个按钮
private RadioButton mRadioOne;
//第二个按钮
private RadioButton mRadioTwo;
//中间的按钮
private ImageView mCenter;
//第四个按钮
private RadioButton mRadioThree;
//第五个按钮
private RadioButton mRadioFour;

private void init(Context context) {
        //当前控件依赖布局
        LayoutInflater.from(context).inflate(R.layout.home_bottom_bar, this);
        //获取布局中的控件,实例化到当前对象中
        mRadioOne = findViewById(R.id.radio_home_page_selected_one);
        mRadioTwo = findViewById(R.id.radio_home_page_selected_two);
        mCenter = findViewById(R.id.radio_home_page_selected_center);
        mRadioThree = findViewById(R.id.radio_home_page_selected_three);
        mRadioFour = findViewById(R.id.radio_home_page_selected_four);
}
给每个radioButton设置图片,在init方法中调用setResourcePictures方法
    //默认的资源文件
    int[] defRes = {R.drawable.layout_bottom_bar_select,R.drawable.layout_bottom_bar_select,
            R.drawable.layout_bottom_bar_select,R.drawable.layout_bottom_bar_select};
    //设置资源图片
    public void setResourcePictures(int[] drawableTop) {
        if (drawableTop.length != 4) {
            Log.e("setResourcePictures", "MainBottomBar中所提供的图片资源必须为4个: ");
            return;
        }
        mRadioOne.setCompoundDrawablesRelativeWithIntrinsicBounds(null, this.getResources().getDrawable(drawableTop[0]), null, null);
        mRadioTwo.setCompoundDrawablesRelativeWithIntrinsicBounds(null, this.getResources().getDrawable(drawableTop[1]), null, null);
        mRadioThree.setCompoundDrawablesRelativeWithIntrinsicBounds(null, this.getResources().getDrawable(drawableTop[2]), null, null);
        mRadioFour.setCompoundDrawablesRelativeWithIntrinsicBounds(null, this.getResources().getDrawable(drawableTop[3]), null, null);
    }
以下为Resources中的布局代码,请勿一味的复制粘贴,其中两行item内分别代表选中和非选中状态情况显示的图片
<?xml version="1.0" encoding="utf-8"?>
<selector xmlns:android="http://schemas.android.com/apk/res/android">
    <item android:drawable="@mipmap/main_navigation_bar_my" android:state_checked="false"/>
    <item android:drawable="@mipmap/main_navigation_bar_my_checked" android:state_checked="true"/>
</selector>
我们来看看现在的效果,在你的主页加入你写好的自定义View
<com.goldze.mvvmhabit.app.MainBottomBarTest
    android:layout_marginTop="80dp"
    android:id="@+id/bottomBarTest"
    android:layout_width="match_parent"
    android:layout_height="wrap_content"/>
可以看到我们的效果,已经大致出来了,如果不是,请检测以上的操作以及代码是否正确
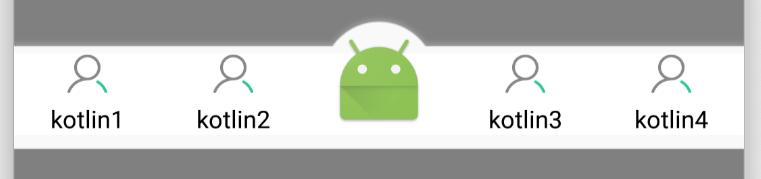
从上图中效果看来,视觉效果完成的差不多了,接下来我们需要实现已经选中和非选中事件显示,以及第一次进入默认选中的按钮
选中和非选中事件我们的RadioGroup已经帮我做了,显示我们用了<selector>标签实现了。
现在我们缺少一个默认选中按钮,我们知道RadioButton的setChecked方法可以设置RadioButton的选中与否,所以使用以下代码,考虑到外部使用时有可能会遇到随时需要转换页面显示,我们设置一个公开的设置方法对外提供,方便我们自己。
为了记录我们当前的页面,定义了一个mDefaultPage变量,让我们代码内知道当前显示的页面,在init方法中调用setDefaultPage方法
//不设置默认按钮,即为第一个按钮为默认按钮 记录当前选中按钮
private Integer mDefaultPage = 0;
//内部使用,默认使用的页面
private void setDefaultPage() {
setDefaultPage(mDefaultPage);
}
//设置默认打开的按钮
public void setDefaultPage(Integer page) {
mDefaultPage = page ;
switch (page) {
case 0:
mRadioOne.setChecked(true);
break;
case 1:
mRadioTwo.setChecked(true);
break;
case 2:
break;
case 3:
mRadioThree.setChecked(true);
break;
case 4:
mRadioFour.setChecked(true);
break;
}
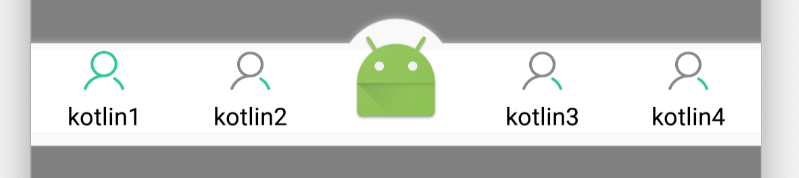
}接下来,运行看效果,很明显我们进入时默认选中了第一个。
接下来,我们需要给外部实现点击回调,并且设置重复点击时的过滤。首先定义一个interface接口,我们给他起名为onRadioClickListener。
    //按钮点击回调
    public interface onRadioClickListener {
        void onClick(int postion);
    }
实现各个按钮的点击方法,并实现implements View.OnClickListener
    //设置点击方法
    private void initListener() {
        mRadioOne.setOnClickListener(this);
        mRadioTwo.setOnClickListener(this);
        mCenter.setOnClickListener(this);
        mRadioThree.setOnClickListener(this);
        mRadioFour.setOnClickListener(this);
    }

    @Override
    public void onClick(View v) {
        switch (v.getId()) {
            case R.id.radio_home_page_selected_one:
                clickInterception(0);
                break;
            case R.id.radio_home_page_selected_two:
                clickInterception(1);
                break;
            case R.id.radio_home_page_selected_center:
                mRadioOne.setChecked(false);
                mRadioTwo.setChecked(false);
                mRadioThree.setChecked(false);
                mRadioFour.setChecked(false);
                clickInterception(2);
                break;
            case R.id.radio_home_page_selected_three:
                clickInterception(3);
                break;
            case R.id.radio_home_page_selected_four:
                clickInterception(4);
                break;
        }
    }

    //点击拦截,过滤重复点击
    private void clickInterception(int page) {
        if (mRepeated && page == mDefaultPage){
            return;
        }
        //记录新的页码.
        mDefaultPage = page;
        mListener.onClick(page);
    }
外部实现我们定义的onRadioClickListener即可监听到回调,至此完成了我们的半自定义view
下面附上完整的代码,如果对您有所帮助请动动手指点点赞,关注关注哦,谢谢~
package 你的App包名+项目名称+位置;

import android.content.Context;
import android.util.AttributeSet;
import android.util.Log;
import android.view.LayoutInflater;
import android.view.View;
import android.widget.ImageView;
import android.widget.RadioButton;
import android.widget.RadioGroup;
import android.widget.RelativeLayout;

import com.goldze.mvvmhabit.R;
import com.jakewharton.rxbinding2.view.RxView;

import java.util.concurrent.TimeUnit;

import io.reactivex.disposables.Disposable;
import io.reactivex.functions.Consumer;

import static me.goldze.mvvmhabit.binding.viewadapter.view.ViewAdapter.CLICK_INTERVAL;

/**
 * 费浩东
 * 2019/1/4
 * Created by fhd
 */
public class MainBottomBar extends RelativeLayout implements View.OnClickListener {

    //默认的资源文件
    int[] defRes = {R.drawable.layout_bottom_bar_select,R.drawable.layout_bottom_bar_select,
            R.drawable.layout_bottom_bar_select,R.drawable.layout_bottom_bar_select};

    //第一个按钮
    private RadioButton mRadioOne;
    //第二个按钮
    private RadioButton mRadioTwo;
    //中间的按钮
    private ImageView mCenter;
    //第四个按钮
    private RadioButton mRadioThree;
    //第五个按钮
    private RadioButton mRadioFour;

    //不设置默认按钮,即为第一个按钮为默认按钮 记录当前选中按钮
    private Integer mDefaultPage = 0;

    //避免重复点击 默认打开
    private Boolean mRepeated = true ;

    //点击回调
    private onRadioClickListener mListener;

    public MainBottomBar(Context context) {
        super(context);
    }

    public MainBottomBar(Context context, AttributeSet attrs) {
        super(context, attrs);
        init(context);
    }

    public MainBottomBar(Context context, AttributeSet attrs, int defStyleAttr) {
        super(context, attrs, defStyleAttr);
    }

    private void init(Context context) {
        LayoutInflater.from(context).inflate(R.layout.home_bottom_bar, this);

        mRadioOne = findViewById(R.id.radio_home_page_selected_one);
        mRadioTwo = findViewById(R.id.radio_home_page_selected_two);
        mCenter = findViewById(R.id.radio_home_page_selected_center);
        mRadioThree = findViewById(R.id.radio_home_page_selected_three);
        mRadioFour = findViewById(R.id.radio_home_page_selected_four);

        //设置点击方法
        initListener();

        //设置资源图片
        setResourcePictures(defRes);

        //默认页面
        setDefaultPage();
    }

    private void initListener() {
        mRadioOne.setOnClickListener(this);
        mRadioTwo.setOnClickListener(this);
        mCenter.setOnClickListener(this);
        mRadioThree.setOnClickListener(this);
        mRadioFour.setOnClickListener(this);
    }

    //设置点击回调
    public void setOnRadioClickListener(onRadioClickListener onRadioClickListener) {
        mListener = onRadioClickListener;
    }

    //设置资源图片
    public void setResourcePictures(int[] drawableTop) {
        if (drawableTop.length != 4) {
            Log.e("setResourcePictures", "MainBottomBar中所提供的图片资源必须为4个: ");
            return;
        }
        mRadioOne.setCompoundDrawablesRelativeWithIntrinsicBounds(null, this.getResources().getDrawable(drawableTop[0]), null, null);
        mRadioTwo.setCompoundDrawablesRelativeWithIntrinsicBounds(null, this.getResources().getDrawable(drawableTop[1]), null, null);
        mRadioThree.setCompoundDrawablesRelativeWithIntrinsicBounds(null, this.getResources().getDrawable(drawableTop[2]), null, null);
        mRadioFour.setCompoundDrawablesRelativeWithIntrinsicBounds(null, this.getResources().getDrawable(drawableTop[3]), null, null);
    }

    @Override
    public void onClick(View v) {
        switch (v.getId()) {
            case R.id.radio_home_page_selected_one:
                clickInterception(0);
                break;
            case R.id.radio_home_page_selected_two:
                clickInterception(1);
                break;
            case R.id.radio_home_page_selected_center:
                mRadioOne.setChecked(false);
                mRadioTwo.setChecked(false);
                mRadioThree.setChecked(false);
                mRadioFour.setChecked(false);
                clickInterception(2);
                break;
            case R.id.radio_home_page_selected_three:
                clickInterception(3);
                break;
            case R.id.radio_home_page_selected_four:
                clickInterception(4);
                break;
        }
    }

    //点击拦截,过滤重复点击
    private void clickInterception(int page) {
        if (mRepeated && page == mDefaultPage){
            return;
        }
        //记录新的页码.
        mDefaultPage = page;
        mListener.onClick(page);
    }

    //按钮点击回调
    public interface onRadioClickListener {
        void onClick(int postion);
    }

    //内部使用,默认使用的页面
    private void setDefaultPage() {
        setDefaultPage(mDefaultPage);
    }

    //设置是否过滤重复点击
    public void setRepeated(Boolean repeated) {
        this.mRepeated = repeated;
    }

    //设置默认打开的按钮
    public void setDefaultPage(Integer page) {
        mDefaultPage = page ;
        switch (page) {
            case 0:
                mRadioOne.setChecked(true);
                break;
            case 1:
                mRadioTwo.setChecked(true);
                break;
            case 2:
                break;
            case 3:
                mRadioThree.setChecked(true);
                break;
            case 4:
                mRadioFour.setChecked(true);
                break;
        }
    }

}