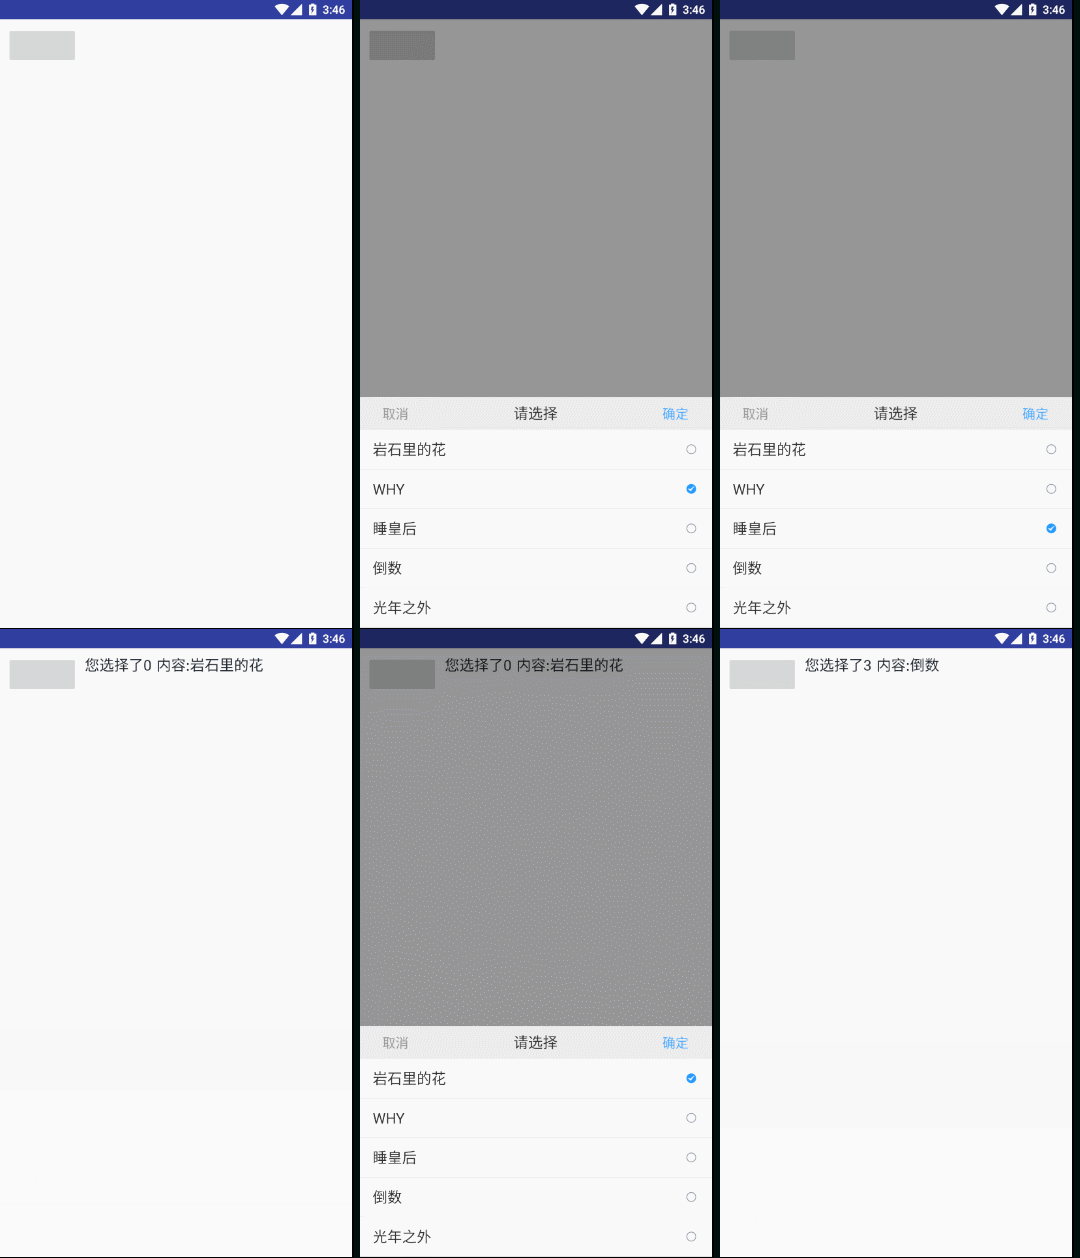
前言,最近需求有好多定制弹框,选择框,索性整合一个,查阅一番资料后写这篇文章,有错请指出。
PS:本文适合有基础的小白阅读。
CustomPopupWindow
效果图

准备工作
items的布局

如图,由一个TextView和一个ImageView或者CheckBox什么的随便都可以
但是,想了一下,只需要一个TextView足矣,用TextView的drawableEnd属性即可
item_custom_popup_window.xml
<?xml version="1.0" encoding="utf-8"?>
<TextView xmlns:android="http://schemas.android.com/apk/res/android"
    android:layout_width="match_parent"
    android:id="@+id/tv_item_content"
    android:layout_height="48dp"
    android:background="@color/white"
    android:drawableEnd="@drawable/select_car_type"
    android:gravity="center_vertical"
    android:paddingEnd="16dp"
    android:paddingStart="16dp"
    android:textColor="@color/general_font_color"
    android:textSize="18sp" />
注意TextView的drawableEnd属性,我给了一个选择器。看到这里有的小伙伴应该已经懂了。
item_custom_popup_window.xml
<?xml version="1.0" encoding="utf-8"?>
<selector xmlns:android="http://schemas.android.com/apk/res/android">
    <item android:drawable="@mipmap/选中状态的资源" android:state_selected="true"/>
    <item android:drawable="@mipmap/默认状态的资源" />
</selector>
android:state_selected="true"为选中状态时的样式
popupwindow的布局

popupwindow_mycustom.xml
<?xml version="1.0" encoding="utf-8"?>
<LinearLayout xmlns:android="http://schemas.android.com/apk/res/android"
    xmlns:tools="http://schemas.android.com/tools"
    android:layout_width="match_parent"
    android:layout_height="wrap_content"
    android:orientation="vertical">

    <RelativeLayout
        android:layout_width="match_parent"
        android:layout_height="40dp">

        <Button
            android:id="@+id/btn_cancel"
            android:layout_width="wrap_content"
            android:layout_height="wrap_content"
            android:text="取消"
            android:textSize="16sp" />

        <TextView
            android:id="@+id/tv_title"
            android:layout_width="wrap_content"
            android:layout_height="match_parent"
            android:layout_centerInParent="true"
            android:gravity="center"
            android:textSize="18sp" />

        <Button
            android:id="@+id/btn_save"
            android:layout_width="wrap_content"
            android:layout_height="wrap_content"
            android:layout_alignParentEnd="true"
            android:text="确定"
            android:textSize="16sp"/>

    </RelativeLayout>

    <android.support.v7.widget.RecyclerView
        android:id="@+id/rv_item_list"
        android:layout_width="match_parent"
        android:layout_height="wrap_content" />

</LinearLayout>
正式编写CustomPopupWindow
自定义的PopupWindow肯定得继承与PopupWindow。
MyCustomPopupWindow.java
public class MyCustomPopupWindow extends PopupWindow {
    private Context mContext;
    private int resultPositon = -1;//默认选中,-1表示不选中
    private String title;//设置的标题文字,对应效果图的“请选择”
    private List<String> itemStrings;//items的文字集合
	private OnMyCustomPopWindowSaveListener listener;//选中监听

}
构造
是个View就得有构造方法,然后在构造里进行初始化View。
    public MyCustomPopupWindow(Context context, String title, List<String> itemStrings, int positon) {
        super(context);
        this.title = title;
        mContext = context;
        this.itemStrings = itemStrings;
        if (positon > -1) this.resultPositon = positon;
        initVeiw();//初始化视图
    }
initView
initView()注释都有表明,就是View的加载,和绑定监听。
    private void initVeiw() {
        View view = View.inflate(mContext, R.layout.popupwindow_mycustom, null);//加载自定义view
        //因为是在view里面,所以直接调方法即可,不用this.xxx
        setTouchable(true);//启用触摸事件
        setFocusable(true);//设置window可以被点击
        setContentView(view);//这里设置视图,也可以在初始化pop的时候在构造里设置。
        setBackgroundDrawable(new ColorDrawable(Color.TRANSPARENT));//pop的背景色
        setAnimationStyle(R.style.PopupwindowAnimation);//进出动画
        setWidth(ViewGroup.LayoutParams.MATCH_PARENT);
        setHeight(ViewGroup.LayoutParams.WRAP_CONTENT);

        //取消
        view.findViewById(R.id.btn_cancel).setOnClickListener(new View.OnClickListener() {
            @Override
            public void onClick(View v) {
                dismiss();
            }
        });
        //保存
        view.findViewById(R.id.btn_save).setOnClickListener(new View.OnClickListener() {
            @Override
            public void onClick(View v) {
                Log.i("TAG-SAVE", "拿到的CODE为:" + resultPositon);
                if (resultPositon > -1) {
                    //listener.getItem(resultPositon);//这里的监听下面再说,先注释掉。等会讲到再说
                    dismiss();
                }
            }
        });
        //设置title
        TextView tvTitle = view.findViewById(R.id.tv_title);
        tvTitle.setText(title);
        RecyclerView rvItemList = view.findViewById(R.id.rv_item_list);
        rvItemList.addItemDecoration(new DividerItemDecoration(mContext, DividerItemDecoration.VERTICAL));//设置RV默认分割线
        rvItemList.setLayoutManager(new LinearLayoutManager(mContext));
        rvItemList.setAdapter(new MyCustomAdapter(itemStrings, resultPositon));//这里Adapter下面会说
    }
items的adapter
适配器Adapter。将数据适配到RV中。
    class MyCustomAdapter extends RecyclerView.Adapter<MyCustomAdapter.ViewHolder> {

        private List<String> itemStrings;

        private int selectedPosition;

        //ViewHolder
        class ViewHolder extends RecyclerView.ViewHolder {

            TextView textView;

            public ViewHolder(View itemView) {
                super(itemView);
                textView = itemView.findViewById(R.id.tv_item_content);
            }
        }

        public MyCustomAdapter(List<String> itemStrings, int positon) {
            this.itemStrings = itemStrings;
            this.selectedPosition = positon;
        }

        @Override
        public ViewHolder onCreateViewHolder(ViewGroup parent, int viewType) {
            View view = LayoutInflater.from(parent.getContext()).inflate(R.layout.item_custom_popup_window, parent, false);
            return new ViewHolder(view);
        }

        @Override
        public void onBindViewHolder(final ViewHolder holder, final int position) {
            holder.textView.setText(itemStrings.get(position));
            holder.itemView.setTag(position);
            holder.textView.setOnClickListener(new View.OnClickListener() {
                @Override
                public void onClick(View v) {
                    selectedPosition = holder.getLayoutPosition();
                    notifyDataSetChanged();
                    resultPositon = selectedPosition;
                }
            });
            //关键代码,判断TextView的选中,如果选中,将状态设置为true,在资源里的选择器会自动将样式改为选中状态。
            if (selectedPosition == position) {
                holder.textView.setSelected(true);
            } else {
                holder.textView.setSelected(false);
            }
        }
        @Override
        public int getItemCount() {
            return itemStrings.size();
        }
    }
这个时候已经可以实现弹出和选中效果了。
但是popupwindow和dialog不一样,它不能自动让背景变暗,所以需要我们代码手动让背景变暗。
需要重写show和dismiss方法。
dismiss
先是dismiss
    @Override
    public void dismiss() {
        super.dismiss();
        //消失的时候恢复透明度
        WindowManager.LayoutParams lp = ((Activity) mContext).getWindow().getAttributes();
        lp.alpha = 1f; //0.0-1.0
        ((Activity) mContext).getWindow().setAttributes(lp);
    }
show
接下来是showAtLocation
这里我自己写了一个show方法将showAtLocation放在里面并没有去重写showAtLocation
    public void show(View parent) {
        //显示在parent的最下面
        super.showAtLocation(parent, Gravity.BOTTOM, 0, 0);//显示popupwindow的方法
        //当前Activity透明度变为0.7,这里你随意调整,一般为0.6即可
        WindowManager.LayoutParams lp = ((Activity) mContext).getWindow().getAttributes();
        lp.alpha = 0.7f; //0.0-1.0
        ((Activity) mContext).getWindow().setAttributes(lp);
    }
这里的逻辑非常简单,在显示的时候背景变暗,消失的时候,背景恢复。
listener/callback
到这里已经基本大功告成了。但是,别忘了。
在initVeiw里有个
listener.getItem(resultPositon);//这里的监听下面再说,先注释掉。等会讲到再说
我没有说,就是要放到这里说的。
这个方法是给popupwindow的回调。也就是当用户点击确认后将结果回调给这个方法的。
这就需要一个接口了
    public interface OnMyCustomPopWindowSaveListener {

        void getItem(int i);//这里的i就是返回给上层的选中的item的下标

    }
至此,所有代码全部撸完。
如何使用
使用就很简单了
初始化数据
		List<String> items = new ArrayList<>();
        items.add("岩石里的花");
        items.add("WHY");
        items.add("睡皇后");
        items.add("倒数");
        items.add("光年之外");
初始化popupwindow
        popupWindow = new MyCustomPopupWindow(this, "请选择", items, 1);
        //和btn的onclick类似,监听popupwindow的确认按钮,当用户点击确认后,数据就返回到这里,然后在这里处理拿到的数据。
        popupWindow.setOnMyCustomPopWindowSaveListener(new MyCustomPopupWindow.OnMyCustomPopWindowSaveListener() {
            @Override
            public void getItem(int i) {
                textview.setText("您选择了" + i + "\t内容:" + items.get(i));
            }
        });
show
popupWindow.show(View);
所有代码已撸完,此致,共勉!
总结
总的来说,这个东西,让我打开了新世界的大门。最后的那个listener我用了3个小时,才写出来。一度要放弃。但是第二天要用。我还是加班搞出来了,写出来后一波成就感油然而生。只是说会用了。但是具体原理什么的还不懂。还得加油啊!希望看到这篇文章的可以一起努力,加油!加油!加油!