1、准备好需要生成starter的环境
Maven:
引入需要用的基本jar测试
    <dependencies>
        <dependency>
            <groupId>org.springframework.boot</groupId>
            <artifactId>spring-boot-starter-web</artifactId>
        </dependency>
        <dependency>
            <groupId>org.projectlombok</groupId>
            <artifactId>lombok</artifactId>
        </dependency>
    </dependencies>
命名方式
根据spring官网可知starter命名方式
| 官网命名方式 |
|---|
spring-boot-starter-模块名----- 例:spring-boot-starter-web |
| 自定义命名方式 |
模块-spring-boot-starter-----例:user-spring-boot-starter、a-b-spring-boot-starter |
首先创建一个SpringBoot基础工程
本次测试生成user-spring-boot-starter自定义启动starter

生成启动类pom坐标可以如图位置修改
<!-- 根据你想生成的starter自定义命名 -->
	<groupId>com.xjt</groupId>
    <artifactId>user-spring-boot-starter</artifactId>
    <version>0.0.1-SNAPSHOT</version>
2、开始创建自定义的starter
1、了解需要用到的注解
| 注解 | 详情 | 注意点 |
|---|---|---|
| @ConfigurationProperties (prefix=“user”) | 自动获取配置文件与字段相对应的信息赋值、prefix(配置文件必须已user开头) 使用的宽松的绑定属性规则 user.username 、user.userName、user.user_name、user.user-name、user.USER_NAME以上都可以完成映射绑定 |
1、配置必须已prefix中的值开头2、字段必须有setter方法、3、如果字段映射绑定失败类型不对,可以在注解后增加属性ignoreInvalidFields=true(默认为false) |
| @EnableConfigurationProperties(需要注入的类:如UserProperties.class) | 开启配置文件配置注入,让@ConfigurationProperties注解生效注解生效 | |
| @ConditionalOnClass | 某个class位于类路径上,才会实例化一个Bean | 单例设计模式 |
| @ConditionalOnMissingBean | 仅仅在当前上下文中不存在某个对象时,才会实例化一个Bean | 单例设计模式 |
2、创建一个配置映射类,获取对应的配置文件信息

该类会自动获取配置文件中的user下对应的信息装配
user:
  userName: xuajingtaoxxx
  hobby: swimmingssss
核心类
UserProperties
自动获取配置文件与字段相对应的信息赋值、prefix(配置文件必须已user开头)
package com.xjt.demo.conf;

import lombok.Data;
import org.springframework.boot.context.properties.ConfigurationProperties;
import org.springframework.context.annotation.Configuration;

@Configuration
@ConfigurationProperties(prefix = "user")
@Data
public class UserProperties {


	String userName;
	String hobby;
}
UserAutoConfiguration
注入userProperties,获取对应配置文件的具体值
注入需要注入的类,注入的类需加注解@Repository或@Component、@Service、@Controller
package com.xjt.demo.conf;

import org.springframework.beans.factory.annotation.Autowired;
import org.springframework.boot.autoconfigure.condition.ConditionalOnClass;
import org.springframework.boot.autoconfigure.condition.ConditionalOnMissingBean;
import org.springframework.boot.context.properties.EnableConfigurationProperties;
import org.springframework.context.annotation.Bean;
import org.springframework.context.annotation.Configuration;

@Configuration
@ConditionalOnClass(UserService.class)
@EnableConfigurationProperties(UserProperties.class)
public class UserAutoConfiguration {


	@Autowired
	UserProperties userProperties;


	@Bean
	@ConditionalOnMissingBean(UserService.class)
	public UserService userService(){


	//将userService的字段赋值并注入到ioc容器
		return new UserService(userProperties.getUserName(), userProperties.getHobby());
	}
}
UserService
测试类,从新项目导入注入UserService测试类方法
package com.xjt.demo.conf;

import lombok.AllArgsConstructor;
import lombok.Data;
import lombok.NoArgsConstructor;
import org.springframework.stereotype.Component;

@Data
@AllArgsConstructor
@NoArgsConstructor
public class UserService {


	String name;
	String hobby;

	public String test(){


		System.out.println("name"+name+"\t\thobby"+hobby);
		return "this is test method";
	}
}
目录接口如下

生成jar包前准备
在resources资源目录下创建
META-INF目录,并在下面创建spring.factories文件
在spring.factories文件编写
#第二行为你的自动注入配置类的全类名路径
org.springframework.boot.autoconfigure.EnableAutoConfiguration=\
com.xjt.demo.conf.UserAutoConfiguration
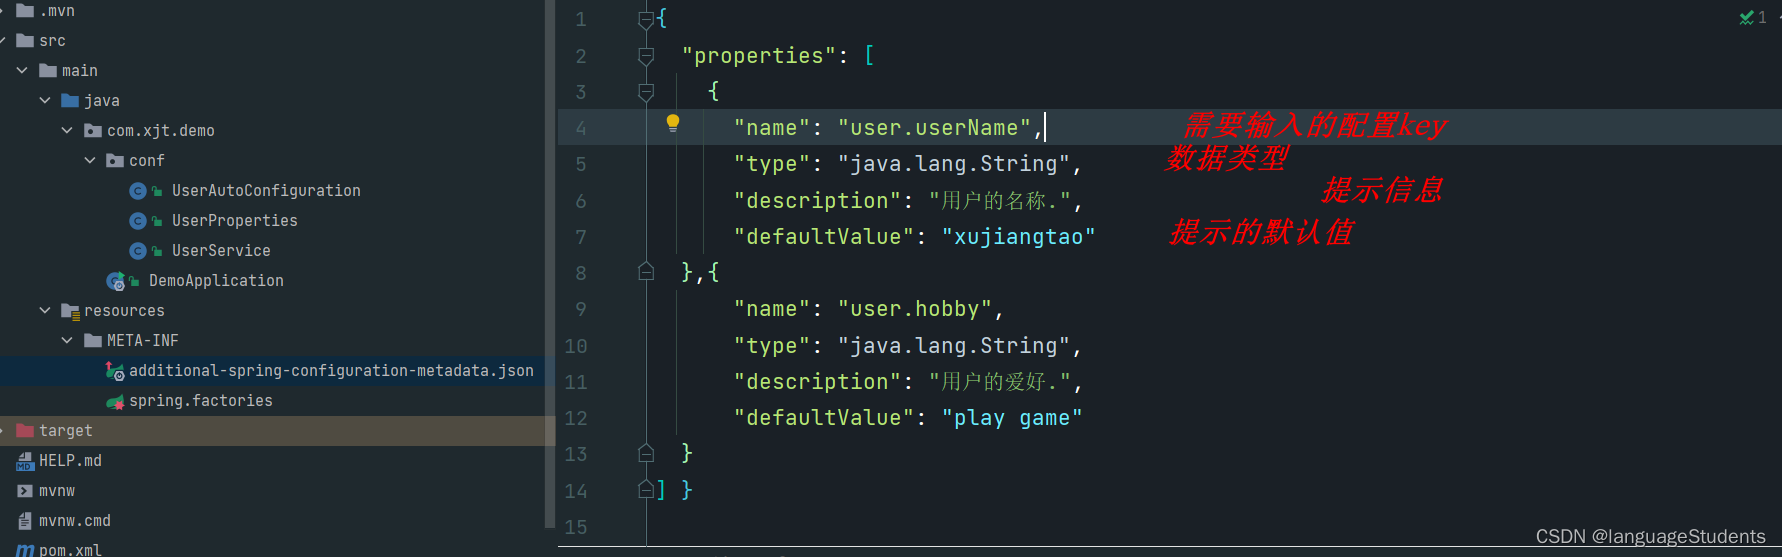
如果想要在输入配置信息的时候有提示信息。可以在spring.factories的统计目录创建
additional-spring-configuration-metadata.json文件,并编写提示信息。
{


  "properties": [
    {


      "name": "user.userName",
      "type": "java.lang.String",
      "description": "用户的名称.",
      "defaultValue": "xujiangtao"
  },{


      "name": "user.hobby",
      "type": "java.lang.String",
      "description": "用户的爱好.",
      "defaultValue": "play game"
  }
] }
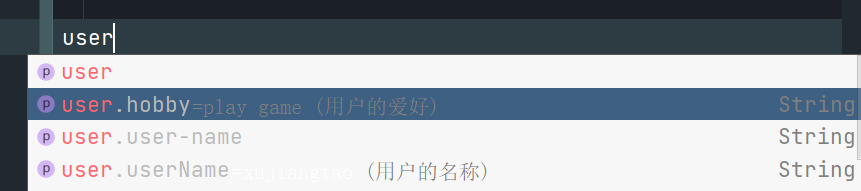
效果如下:
开始打包


出现以上标识打包完成,并将自定义jar包保存值maven本地仓库
本地maven仓库默认位置C:\用户\用户名\.m2\repository

创建新项目导入自定义starter包测试
        <dependency>
            <groupId>com.xjt</groupId>
            <artifactId>user-spring-boot-starter</artifactId>
            <version>0.0.1-SNAPSHOT</version>
        </dependency>
编写配置文件

新项目测试环境注入userService运行测试方法

测试成功。自定义Starter包完成!
如有疑问,欢迎大家评论交流❤️❤️❤️❤️