1.vue设置背景图片
如果直接给一个元素添加类 定义他的背景图片,编译打包后,配置到服务器上时,由于路径解析的问题,图片并不能够正确的显示出来,如下CSS样式:
background:url("../../assets/head.jpg");
最好使用动态绑定类的方法
   <div :style="login">
        <input class="login-name" type="text"><br/>
        <input class="login-password" type="password">
    </div>


data (){
  return {
  //图片铺满全屏
  login: {
        backgroundImage: "url(" + require("../../assets/img/login-back.png") + ")",
        backgroundSize: "cover",
         backgroundRepeat: "no-repeat",
          height: "100%",
         position: "fixed",
         width: "100%"
                }
            }
        }
2.设置多选框选中的样式
       /*设置多选框选中的样式 input标签选中同级兄弟的第一个span元素*/
              input:checked + span {
                  color: #2CB587
              }
3.vue-awesome-swiper的使用
//安装
npm install vue-awesome-swiper --save
//配置在main.js中
import VueAwesomeSwiper from  'vue-awesome-swiper'
import 'swiper/css/swiper.css'//根据版本不同引入路径会不同
Vue.use(VueAwesomeSwiper)
//使用
       <swiper :options="swiperOption" >
            <swiper-slide v-for="(item,index) in swiperList" :key="index">
                <img class="swiper-img" :src="item.imgUrl">
            </swiper-slide>
            <div class="swiper-pagination" slot="pagination"></div>
        </swiper>
   data() {
            return {
                swiperOption: {
                    /*定义轮播图的点*/
                    pagination : '.swiper-pagination',
                    /*实现轮播图循环播放*/
                    loop: true,
                     autoplay: {
                     //设置自动播放 用户操作swiper之后自动切换不会停止,每次都会重新启动autoplay。
                        disableOnInteraction: false,
                    }
                },
                swiperList: [
                    {id: 1, imgUrl: 'http://img.bimg.126.net/photo/CqFQz7tVpLbd7YhPWwJjiA==/2594073385382305165.jpg'}
                ]
            }
4.css图片背景虚化
img {
   filter: blur(5px);  //亲测可行
}
5.iconfont的使用
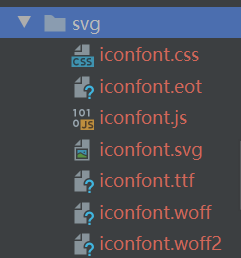
对于需要使用图标原始颜色的建议使用svg 将图标下载至本地 可以新建一个目录存放 只需要保存带有iconfont的文件

//使用方法 另外svg可以直接设置宽高 修改图片大小
  <svg class="icon-tixing" aria-hidden="true" width=".4rem" height=".4rem">
            <use xlink:href="#icon-tixing"></use>
            <!-- use是复制一个图标的意思 -->
        </svg>
如果是灰色的可以使用

复制进index.html中 引入方式
<link href="http://at.alicdn.com/t/font_1735969_yc063nb1pd.css" rel="stylesheet">
在项目中直接使用
<i class='iconfont 从iconfont复制的图标名'></i>
6.底部固定 各占四分之一的效果

 <div class="footIcons">
            <div class="icons"><i class="iconfont icon-shouye"></i><p>首页</p></div>
            <div><i class="iconfont icon-yingfengdongtai"></i><p>动态</p></div>
            <div><i class="iconfont icon-gouwuche"></i><p>购物车</p></div>
            <div><i class="iconfont icon-ren"></i><p>我的</p></div>
        </div>


<style lang="stylus" scoped>
.footIcons
    display flex
    position fixed
    bottom 0
    justify-content space-between
    text-align center
    width 100%
    .iconfont
       font-size .4rem
</style>
7.sockjs.js?9be2:1605 GET http://localhost/sockjs-node/info?t=问题
注释掉 node_modules\sockjs-client\dist\sockjs.js 1064行 这句代码self.xhr.send(payload); 亲测有效
  try {
    // self.xhr.send(payload);
  } catch (e) {
    self.emit('finish', 0, '');
    self._cleanup(false);
  }
8.div内字与字间距大小设置
//通过属性 letter-spacing
letter-spacing:.2rem
9.vue项目中某一页面不想引用公共组件app.vue解决办法
在这个项目中 我将底部写进了app.vue 里面 此时登录页也能看见
为了解决这个问题

      //只要当前路径的值不是login就显示
    <div class="footIcons" v-show="!($route.path==='/login')">
          <router-link tag="div" to="/" ><i class="iconfont icon-shouye"></i><p>首页</p></router-link>
          <router-link tag="div" to="/actions" ><i class="iconfont icon-yingfengdongtai"></i><p>动态</p></router-link>
          <router-link tag="div" to="/shopcar"><i class="iconfont icon-gouwuche"></i><p>购物车</p></router-link>
          <router-link tag="div" to="/my"><i class="iconfont icon-ren"></i><p>我的</p></router-link>
      </div>
10.vue通过axios.post提交数据到php文件中
其实在这个问题上我搞了好久 哭辽
//这个方法绑定在登陆按钮上 点击按钮触发事件
vue组件
           submit(){
                var params = new URLSearchParams();
                params.append('username', 'admin');
                params.append('password', '123456');
                this.$axios.post('/api/index.php',params )
                    .then(res => console.log(res.data))
                    .catch(function(error) {
                        console.log(error);
                     });
//此时可以在index.php里面 通过$_POST接受
index.php
$str = $_POST['username'];
print_r($str);
            }
URLSearchParams 接口定义了一些实用的方法来处理 URL 的查询字符串。
//传的是一个json对象,可以用file_get_contents(“php://input”)获取到json串,然后转化为object获取属性
vue组件
    this.$axios.post('/api/index.php',{ a : 1})
                    .then(res => console.log(res.data))
                    .catch(function(error) {
                        console.log(error);
                     });

index.php
$json_raw = file_get_contents("php://input");
print_r($json_raw);
另外 我的apache的端口号是8043 我的vue项目是在8082此时会涉及跨域
我用的是vue-cli4
需要单独配置vue.config.js
vue.config.js会被自动加载
module.exports = {
    /* 部署生产环境和开发环境下的URL:可对当前环境进行区分,baseUrl 从 Vue CLI 3.3 起已弃用,要使用publicPath */
    /* baseUrl: process.env.NODE_ENV === 'production' ? './' : '/' */
    publicPath: process.env.NODE_ENV === 'production' ? '/public/' : './',
    /* 输出文件目录:在npm run build时,生成文件的目录名称 */
    outputDir: 'dist',
    /* 放置生成的静态资源 (js、css、img、fonts) 的 (相对于 outputDir 的) 目录 */
    assetsDir: "assets",
    /* 是否在构建生产包时生成 sourceMap 文件,false将提高构建速度 */
    productionSourceMap: false,
    /* 默认情况下,生成的静态资源在它们的文件名中包含了 hash 以便更好的控制缓存,你可以通过将这个选项设为 false 来关闭文件名哈希。(false的时候就是让原来的文件名不改变) */
    filenameHashing: false,
    /* 代码保存时进行eslint检测 */
    lintOnSave: true,
    /* webpack-dev-server 相关配置 */
    devServer: {
        /* 自动打开浏览器 */
        open: true,
        /* 设置为0.0.0.0则所有的地址均能访问 */
        host: '0.0.0.0',
        port: 8082,
        https: false,
        hotOnly: false,
        /* 使用代理 */
        proxy: {
            '/api': {
                /* 目标代理服务器地址 */
                target: 'http://localhost:8043/xiaoyi',
                /* 允许跨域 */
                changeOrigin: true,
            },
        },
    },
}
axios发送的数据格式和jquery ajax发送的默认数据格式却不相同
ajax默认是以application/x-www-form-urlencoded方式提交。也就是常见的表单提交方式。在PHP中使用$_POST方式可以轻松获取。
如果conent-type为 application/json,那么你的 GLOBALS[‘HTTP_RAW_POST_DATA’]或者file_get_contents(‘php://input’)取出来,然后再json_decode就行了。


使用URLSearchParams来处理参数

通过使用URLSearchParams的处理,我们就能像jquery ajax发送的数据一样了!
Coentent-Type仅在取值为application/x-www-data-urlencoded和multipart/form-data两种情况下,PHP才会将http请求数据包中相应的数据填入全局变量$_POST
php://input 是个可以访问请求的原始数据的只读流
11.mint-ui中Toast的使用
我出不来是因为我的样式没引入
安装npm install mint-ui --save
引入 import ‘mint-ui/lib/style.css’ (必须引)
在组件中按需引入
import { Toast } from “mint-ui”;
Toast({
message: ‘登陆中…’,
duration: 1000
});
如果真的有人看到了这里 ~
感谢阅读!
