开发项目中遇到的一些问题
-
- 更换elementUI主题色
- 在vue中使用腾讯地图
- 组件<el-form>表单验证不通过
- Vue监听不到未在data中定义的对象属性或数组内部值的变化
- 第一个子元素设置margin-top,父元素跟着移动
- 定时器返回一个数字
- vue.use()和vue.prototype.xxx=xxx区别
- 将非数组对象转数组对象
- 在vue或uniapp-h5项目中批量引入全局组件
- elementUI全局loading动画
- css实现盒子内显示两行或三行,超出部分用省略号表示
- 高德地图添加控件
- 微信小程序分包
- uniapp,获取屏幕比例并转化rpx
- Vue安装Less
- input中绑定的值不更新
- uni.showToast内容两行显示
- 小程序隐藏滚动条
- 判断数据类型方法
- vue动态修改路由的query参数
- 动态引入本地图片,页面卡死问题
- uniapp h5反向代理
- 微信小程序自定义分享
- input去黑框
- vscode设置背景图片
更换elementUI主题色
创建自定义主题文件
-
打开官网->主题->复制官方主题->

-
编辑主题


-
下载主题

引入项目
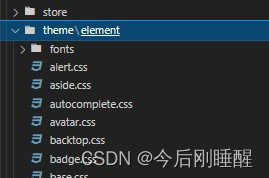
- 在src目录下新建theme文件夹,随后将下载的主题文件解压后放入
使用
- 在
main.js中,vue.use(Element)之前引入此文件
// Vue
import Vue from 'vue'
import App from './App'
import store from '@/store/index'
// 菜单和路由设置
import router from './router'

import '@/theme/element/index.css'// 自定义主题
import ElementUI from 'element-ui';
import 'element-ui/lib/theme-chalk/index.css';
Vue.use(ElementUI)
new Vue({


  router,
  store,
  render: h => h(App),
}).$mount('#app')
在vue中使用腾讯地图
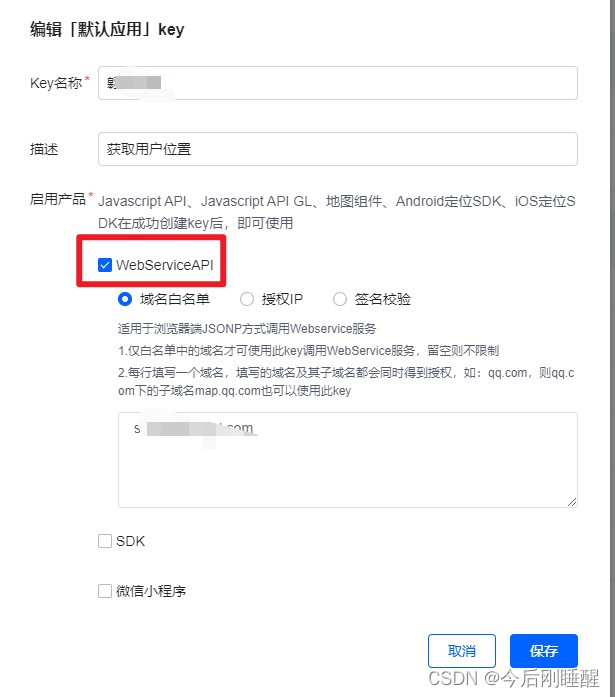
1、申请key 申请地址

2、创建地图组件
<template>
  <div id="map"></div>
</template>
<script>
export default {


  name: "meMap",
  props: {


    latLng: {


      type: String,
      default: "116.307503,39.984104",
    },
  },
  data() {


    return {

    };
  },
  mounted() {


    this.loadScript();
  },
  methods: {


    //动态创建的<script>标签用来引入cdn文件
    loadScript() {


      console.log(this.latLng, "map");
      var script = document.createElement("script");
      script.type = "text/javascript";
      script.src =
        "https://map.qq.com/api/gljs?v=1.exp&key=你自己的KEY&callback=init";
      script.onload = script.onreadystatechange = () => {


        if (
          !this.readyState ||
          this.readyState === "loaded" ||
          this.readyState === "complete"
        ) {


          this.initMap();
          script.onload = script.onreadystatechange = null;
        }
      };
      document.body.appendChild(script);
    },
    initMap() {


      console.log(this.latLng);
      let latLng = this.latLng.split(",");
      //定义地图中心点坐标
      var center = new TMap.LatLng(latLng[1], latLng[0]);
      //初始化地图
      var map = new TMap.Map("map", {


        zoom: 15,
        center: center,
      });
      var markerLayer = new TMap.MultiMarker({


        map: map, //指定地图容器
        styles: {


          myStyle: new TMap.MarkerStyle({


            width: 40, // 点标记样式宽度(像素)
            height: 48, // 点标记样式高度(像素)
            src: require("../../assets/image/conaddr.png"), //图片路径
            anchor: {

     x: 16, y: 32 },
          }),
        },
        //点标记数据数组
        geometries: [
          {


            id: "1", //点标记唯一标识,后续如果有删除、修改位置等操作,都需要此id
            styleId: "myStyle", //指定样式id
            position: new TMap.LatLng(latLng[1], latLng[0]), //点标记坐标位置
            // properties: {


            //自定义属性
            // title: "marker1",
            // },
          },
        ],
      });
    },
  },
};
</script>

<style>
</style>
组件表单验证不通过
- 标签绑定内容必须通过
:model='form'绑定,不能使用v-model='form' prop后面的属性值必须和标签中需要验证的值得参数名需一致- 需要验证的值必须是包含在标签:model绑定的值里面,比如form,input
Vue监听不到未在data中定义的对象属性或数组内部值的变化
-
解决1:
this.$set(对象,键名,值) -
解决2:
Object.assign()
第一个子元素设置margin-top,父元素跟着移动
- 原因
- 父元素的第一个子元素的上边距margin-top如果碰不到有效的border或者padding.就会不断一层一层的找自己“领导”(父元素,祖先元素)的麻烦。只要给领导设置个有效的 border或者padding就可以有效的管制这个目无领导的margin防止它越级,假传圣旨,把自己的margin当领导的margin执行。
- 解决
- 父元素设置
padding / border / overflow:hidden / 浮动 / 绝对定位,详解请看这篇文章
- 父元素设置
详解请看:https://blog.csdn.net/qq_51066068/article/details/123895931
定时器返回一个数字
- 可以把这个数字看做是定时器的id,每个timer在创建后都会返回一个唯一的id,作用在于清除该定时器时的标识
vue.use()和vue.prototype.xxx=xxx区别
- vue官方库插件支持vue.use,否则vue.prototype
- 每个vue组件都是vue的实例,所以组件内this可以拿到vue.prototype上添加属性和方法
将非数组对象转数组对象
Array.prototype.slice.call( htmlCollection )
在vue或uniapp-h5项目中批量引入全局组件
- 在components文件夹的index.js目录中引入全局组件
//目录components/index.js
import xx from './xx.vue'
export default {


    install(Vue){


        Vue.component('xx',xx)
    }
}
- 在main.js中
import mecompnents from './components/index'
Vue.use(mecompnents)
elementUI全局loading动画
import {

     Message, Loading } from 'element-ui';
let loading        //定义loading变量
function startLoading() {

        //使用Element loading-start 方法
    loading = Loading.service({


        lock: true,
        text: '加载中……',
        background: 'rgba(0, 0, 0, 0.7)'
    })
}
function endLoading() {

        //使用Element loading-close 方法
    loading.close()
}
//那么 showFullScreenLoading() tryHideFullScreenLoading() 要干的事儿就是将同一时刻的请求合并。
//声明一个变量 needLoadingRequestCount,每次调用showFullScreenLoading方法 needLoadingRequestCount + 1。
//调用tryHideFullScreenLoading()方法,needLoadingRequestCount - 1。needLoadingRequestCount为 0 时,结束 loading。
let needLoadingRequestCount = 0
//开始加载动画
export function showFullScreenLoading() {


    if (needLoadingRequestCount === 0) {


        startLoading()
    }
    needLoadingRequestCount++
}
//停止加载动画
export function tryHideFullScreenLoading() {


    if (needLoadingRequestCount <= 0) return
    needLoadingRequestCount--
    if (needLoadingRequestCount === 0) {


        endLoading()
    }
}
css实现盒子内显示两行或三行,超出部分用省略号表示
- div内显示一行,超出部分用省略号显示
  white-space: nowrap;
  overflow: hidden;
  text-overflow: ellipsis;
- div内显示多行,超出部分用省略号显示
  overflow: hidden;
  text-overflow: ellipsis;
  display: -webkit-box;
  -webkit-line-clamp: 2;(行数)
  -webkit-box-orient: vertical;
高德地图添加控件
var map = new AMap.Map('container',{


    zoom: 10,
    center: [116.39,39.9]
});

// 同时引入工具条插件,比例尺插件和鹰眼插件
AMap.plugin([
    'AMap.ToolBar',
    'AMap.Scale',
    'AMap.OverView',
    'AMap.MapType',
    'AMap.Geolocation',
], function(){


    // 在图面添加工具条控件,工具条控件集成了缩放、平移、定位等功能按钮在内的组合控件
    map.addControl(new AMap.ToolBar());

    // 在图面添加比例尺控件,展示地图在当前层级和纬度下的比例尺
    map.addControl(new AMap.Scale());

    // 在图面添加鹰眼控件,在地图右下角显示地图的缩略图
    map.addControl(new AMap.OverView({

    isOpen:true}));

    // 在图面添加类别切换控件,实现默认图层与卫星图、实施交通图层之间切换的控制
    map.addControl(new AMap.MapType());

    // 在图面添加定位控件,用来获取和展示用户主机所在的经纬度位置
    map.addControl(new AMap.Geolocation());
});
微信小程序分包
- 根据需求在根目录下创建对于文件夹
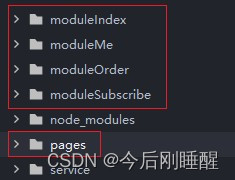
- 在pages.json中配置
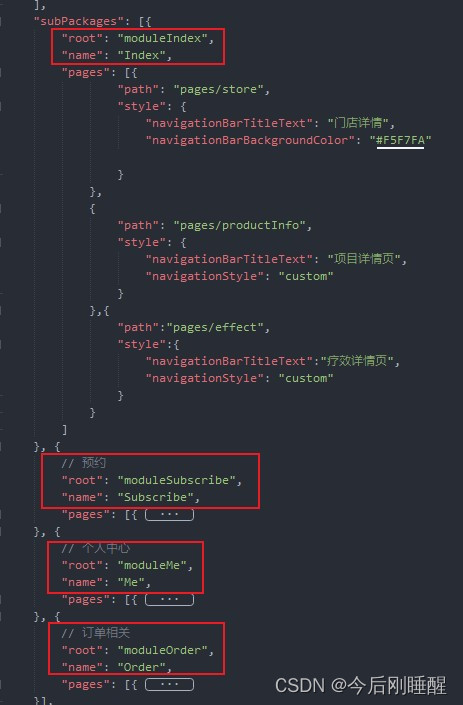
- 在使用时,需要将root前缀加上,如:
/moduleIndex/pages/store
uniapp,获取屏幕比例并转化rpx
uni.getSystemInfo({


	success: (res) => {


		// 屏幕尺寸比例
		let sizeProp = (750 / res.windowWidth).toFixed(2)
	}
})
Vue安装Less
- 下载依赖
npm install less less-loader --save-dev
- 在
build/webpack.base.conf.js中,找到module下的rules写入
{


    test: /\.less$/,
    loader: "style-loader!css-loader!less-loader"
}
- 如果没有module和rules就可以自己加上
module: {


        rules: [
            {


                test: /\.less$/,
                loader: "style-loader!css-loader!less-loader"
            }
        ]
    }
input中绑定的值不更新
- 分析:新值和旧值一样,无法监听到
- 解决:修改数据类型或值
uni.showToast内容两行显示
/r/n,仅小程序有效
小程序隐藏滚动条
::-webkit-scrollbar {


	display: none !important;
	width: 0 !important;
	height: 0 !important;
	-webkit-appearance: none !important;
	background: transparent !important;
}
注意:直接写无效,还需给page下的第一个盒子设置最大高度,并沿Y轴滚动。
page>view{


	max-height: 100vh;
	overflow-y: scroll;
}
判断数据类型方法
typeof(e)7种
返回7种: number、boolean、symbol、string、object、undefined、function
typeof null返回类型错误,返回object- 引用类型,除了function返回function类型外,其他均返回object
- 其中,null 有属于自己的数据类型 Null , 引用类型中的 数组、日期、正则 也都有属于自己的具体类型,而 typeof 对于这些类型的处理,只返回了处于其原型链最顶端的 Object 类型,没有错,但不是我们想要的结果。
toString(最完美)
-
toString()是 Object 的原型方法,调用该方法,默认返回当前对象的 [[Class]] 。这是一个内部属性,其格式为 [object Xxx] ,其中 Xxx 就是对象的类型。 -
对于 Object 对象,直接调用 toString() 就能返回 [object Object] 。而对于其他对象,则需要通过 call / apply 来调用才能返回正确的类型信息。
//判断类型举例:
Object.prototype.toString.call('') ;   // [object String]
Object.prototype.toString.call(1) ;    // [object Number]
Object.prototype.toString.call(true) ; // [object Boolean]
Object.prototype.toString.call(Symbol()); //[object Symbol]
Object.prototype.toString.call(undefined) ; // [object Undefined]
Object.prototype.toString.call(null) ; // [object Null]
Object.prototype.toString.call(new Function()) ; // [object Function]
Object.prototype.toString.call(new Date()) ; // [object Date]
Object.prototype.toString.call([]) ; // [object Array]
Object.prototype.toString.call(new RegExp()) ; // [object RegExp]
Object.prototype.toString.call(new Error()) ; // [object Error]
Object.prototype.toString.call(document) ; // [object HTMLDocument]
Object.prototype.toString.call(window) ; //[object global] window 是全局对象 global 的引用
instanceof
instanceof 是用来判断 A 是否为 B 的实例,表达式为:A instanceof B,如果 A 是 B 的实例,则返回 true,否则返回 false。 在这里需要特别注意的是:instanceof 检测的是原型,instanceof 只能用来判断两个对象是否属于实例关系, 而不能判断一个对象实例具体属于哪种类型。
vue动态修改路由的query参数
- 安装依赖
npm i webpack-merge
- 在需要使用的组件中引入
import merge from 'webpack-merge'
- 使用
//修改原有参数
this.$router.push({


    query:merge(this.$route.query,{

    'maxPrice':'630'})
})
//新增一个参数
this.$router.push({


    query:merge(this.$route.query,{

    'addParams':'我是新增的一个参数,哈哈哈哈'})
})
//替换所有参数
 this.$router.push({


    query:merge({

    },{

    'maxPrice':'630'})
})
动态引入本地图片,页面卡死问题
- 直接在html种使用 require(‘本地图片路径’)直接卡死
- 解决
-
在js种使用变量保存 require(‘本地图片路径’) ,再在html中使用该变量
- html

- js

- html
-
uniapp h5反向代理
//在manifest.json--源码视图--:
	"h5": {


		"devServer": {


			"port": 1111,//端口号
			"disableHostCheck": true,
			"proxy": {


				"/api": {

    //设置成功之后只需要将baseURL换成左侧的/api即可
					"target": "http://192.168.1.1:8083", //目标接口域名
					"changeOrigin": true,//是否跨域
					"secure": false,//设置https协议的代理
					"pathRewrite": {

     //使用代理; 告诉他你这个连接要用代理,将接口中的api去掉,和后台接口保持一致
						"^/api": "/"
					}
				}
			}
		}
	};

//在request中的接口地址直接为:'api'+接口地址,无需将域名添加在前面
微信小程序自定义分享
html
<button type="default" plain open-type='share'>分享</button>
js
onShareAppMessage() {


	return {


		title:标题,
		imageUrl: 分享图片, //自定义图片路径,可以是本地文件路径、代码包文件路径或者网络图片路径。支持PNG及JPG。显示图片长宽比是 5:4。
		path: 路径,
		success: function(res) {


			console.log(res,'分享');
		}
	};
}
input去黑框
input{outline:none}
vscode设置背景图片
- 安装插件background
- 文件–>首选项–>设置–>搜索:background–>在setting.json中编辑
"background.enabled": true,
"background.useDefault": false,
"background.customImages": [
"file:///D:/like.jpg"
],
"background.style": {


"content": "''",
"pointer-events": "none",
"position": "absolute",
"z-index": "99999",
"width": "100%",
"height": "100%",
"background-position": "center",
"background-repeat": "no-repeat",
"background-size": "100%,100%",
"opacity": 0.1
}