微信小程序常用代码块 —— 特别专题
Tips:这里整合微信小程序中常用的代码块
当前代码适用于 2.7.7版本的调试基本库
一、常见小功能
1.1 获取当前 10 位数字的时间戳
  var timestamps = Date.parse(new Date());
  var timestamp = parseInt(timestamps / 1000);
1.2 页面跳转自动刷新
将方法体放进 onShow() 中调用即可
二、wxss样式
1. 和顶部,左边,右边有间距
margin-top: xxrpx; /*外边距*/
padding-top: xrpx;/*内边距*/

margin-left: xx;
margin-right: xx;

/*如果是一列元素,把他变成横向的,可以使用如下*/
padding-top:20rpx;
2. 一顺着排列的元素,禁止换行
white-space:nowrap;
/* display 样式也要进行更换*/
display: inline-block;

/*flex 布局 允许换行*/
flex-wrap: warp;
3. 文字布局
/*文字位置*/
text-align: center; /* left,right*/

/*如果一行文字溢出,就要使多出去的文字变成省略号*/
  text-overflow: ellipsis;
  overflow: hidden;
4. 垂直布局
常常和两者一起使用
display:flex;
justify-content:flex-start;
align-items: center;
5. 设置内变距
padding : 1px solid #e4e4e4
/*设置上下左右内边距*/
padding : 30rpx 30rpx;
6.设置行高
line-heigth: 50rpx;
7.设置分割线
border-bottom: 1px solid #e4e4e4;
8. 居中布局的一种方式
margin: 0 auto;
9. 垂直居中
三、微信官方 API
3.1 普通接口
3.1.1 修改当前界面的标题
 wx.setNavigationBarTitle({
      title: "",
    })
3.1.2 加载响应,。。。

    wx.showLoading({
      title: '正在发表中。。。。',
    })


// 一般某个任务执行完之后,就要把加载隐藏
 wx.hideLoading();
3.1.3 界面跳转
//跳转到某一个页面
    wx.navigateTo({
      url: '',
    })
//回到上一页
   wx.navigateBack({});
3.1.4 自动跳转到页面的首行(在onShow中执行)
    wx.pageScrollTo({
      scrollTop: 0,
    })
3.1.5 自定义组件,数据渲染出现问题
observer(newVal, oldVal, changedPath) {
// 属性被改变时执行的函数(可选),也可以写成在methods段中定义的方法名字符串, 如:'_propertyChange'
// 通常 newVal 就是新设置的数据, oldVal 是旧数据
}
3.1.6 延时函数
延时 1000 ms,即1s
     setTimeout(()=>{
        //方法体
      },1000);
3.1.7 某一任务执行成功,即显示相对应的文字
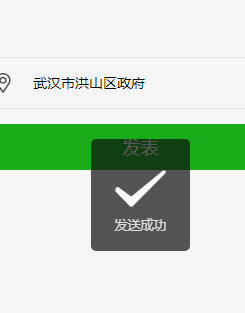
    wx.showToast({
            title: '发送成功',
          });
3.2 云开发接口
3.2.1 操作云函数数据库
在 index.js 中的 Page 之前加入全局变量
const db = wx.cloud.database();
Page({

 nonono : function()
{
	db.collection("云函数你创建集合的名称").bulabula
	//这里就是对云数据库的集合相关操作了
	},
})
3.2.2 完成微信授权的功能
在 app.js 中写好相对应的 授权功能函数,
eg:
//获取用户授权
  loadUserInfo:function(){
    const that = this;
    wx.getSetting({
      success: res =>{
        const isUserInfo = res.authSetting['scope.userInfo'];
        if(isUserInfo){
          wx.getUserInfo({
            success:res => {
              console.log(res);
              const userInfo = res.userInfo;
              that.globalData.userInfo = userInfo;
            }
          })
        }
      }
    })
  },
然后回到 index.js 中,还是和上面一样,在Page 前面
// 获取 app.js 中手机的相关信息
const app = getApp();

//然后后面就可以直接通过 app 调用 app.js中写下的方法,这是一个获取个人姓名的接口实现
const author = app.globalData.userInfo;
四、wx:key 解决方案
wx:key 是为了提高循环效率而出现了,给它的值,只要是循环元素中的唯一的标识符就可以了
1. 字符串类型的循环
wx:key="{{this}}"
五、常用代码块梳理
5.1 获取手机的设备信息
同步获取手机信息
在 index.js 下实现
  onLoad: function (options) {
    this.initImageSize()
  },
    initImageSize:function(){
      const windowWidth =  wx.getSystemInfoSync().windowWidth;//获取手机的宽度
      console.log(windowWidth)
    },
5.2 延时函数
延时 0.8 秒,以毫秒为单位
     setTimeout(function(){

          },800)
六、特殊组件的实现
6.1 在当前界面实现一个按钮组件
先看图
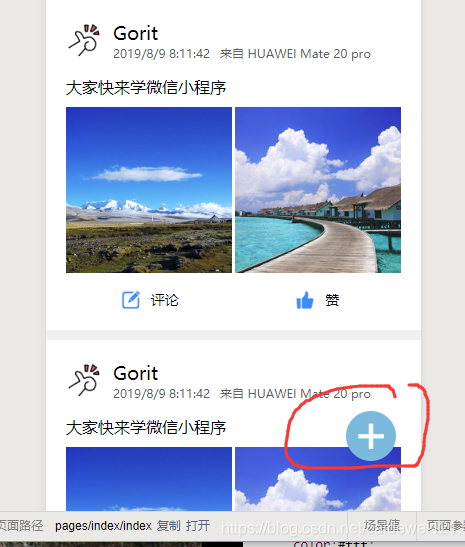
index.wxml
  <!-- 发布按钮布局-->

  <view class="write-weibo-btn" hover-class="none" hover-stop-propagation="false">
      <view>+</view>
  </view>
index.wxss
.write-weibo-btn{
    position:fixed;
    right:50rpx;
    bottom:100rpx;
    width:100rpx;
    height:100rpx;
    background:#74c1e0;
    border-radius:50%;
    display:flex;
    justify-content:center;
    align-items:center;
    font-size:100rpx;
    color:#fff;
    box-shadow: 0 0 5px #rgba(0,0,0,0,5);
}

.write-weibo-btn view{
    margin-top:-16rpx;
}
