微信小程序手把手教你实现带字母索引的城市选择列表
前言
在做Android和iOS应用开发的时候,我们经常在app中要用到带字母索引的城市选择功能,他们功能基本都大同小异,大概长下面的样子:
那么在微信小程序(文章后面统称小程序)中我们要怎么实现类似的功能了?今天就手把手教大家撸一遍代码。
友情提示:后面文章会用到一些布局技巧,我在之前的布局技巧系列文章中有提到,有兴趣的可以回头去看看:
需求分析
通过对界面的元素分析,我们需要实现的内容如下:
- 左边可滑动列表
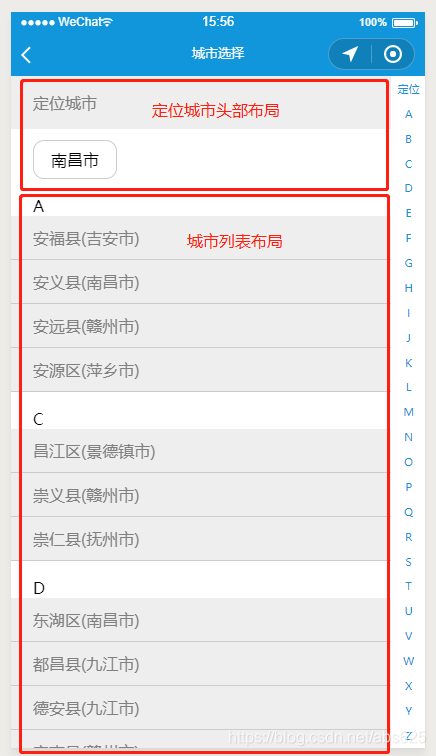
- 滑动列表UI实现(头部是定位城市,下面是城市列表,城市列表根据首字母进行分类展示)
- 点击item能得到对应item的信息(城市id和名字等)
- 右边带字母的索引条
- 索引条从上到下分别是定位和26个大写字母
- 索引条能响应触摸和点击事件,屏幕中心显示当前索引
- 触摸或者点击相应的区域能和滚动列表进行联动
分析完上面的需求,下面我们就拆分这两块,各个击破。
首先我们要做的就是先画出UI,通过观看上面的gif图片,我们很容易得出这样一个结论:整个界面是一个水平左右布局,滑动列表在左边,索引条在屏幕右边的一个竖向布局,然后通过遍历一个数组进行循环遍历。
左边可滑动列表
滑动列表UI实现
滑动列表我们这里使用scroll-view,然后设置为竖直方向滚动。至于为什么要用这个控件,是因为需要和右边索引条做联动,而scroll-view恰好提供了scroll-into-view这个属性让其滚动到指定位置。下面我们看实现代码:
// wxml布局文件
<view class='content'>
  <scroll-view scroll-y='true' class='city-scroll' scroll-with-animation='true'>
    <view class='city-content'>
      //左边滑动列表头部
      <view class='location-city-title'>定位城市</view>
      <view class='location-parent'>
        <view class='location-city'>南昌市</view>
      </view>
      //城市列表
      <view wx:for='{{citys}}' class='city-item'>
      	//这里通过条件控制来决定显示字母还是城市名字
        <text class='city-letter' wx:if='{{item.isshowletter}}'>{{item.simplepinyin}}</text>
        <text class='city-name'>{{item.name}}</text>
      </view>
    </view>
  </scroll-view>
  <view class='right'></view>
</view>
// wxss布局文件
//水平布局,子元素从右到左排列
.content {
  display: flex;
  flex-direction: row;
  justify-content: flex-end;
  height: 100%;
}
//scroll-view固定左边690rpx宽度
.city-scroll {
  left: 0;
  position: fixed;
  height: 100%;
  width: 690rpx;
}
//scroll-view子元素竖向布局
.city-content {
  display: flex;
  flex-direction: column;
}
.location-parent {
  display: flex;
  flex-direction: row;
}
.location-city-title {
  padding-left: 40rpx;
  padding-top: 30rpx;
  padding-bottom: 30rpx;
  background: rgba(223, 222, 222,0.5);
  color: gray;
  font-size: 30rpx;
}
.location-city {
  border: 1rpx solid #ccc;
  border-radius: 20rpx;
  margin-left: 40rpx;
  margin-top: 20rpx;
  padding-top: 15rpx;
  padding-bottom: 15rpx;
  font-size: 30rpx;
  width: 150rpx;
  text-align: center;
}
//城市列表item
.city-item {
  display: flex;
  flex-direction: column;
}
//字母
.city-letter {
  font-size: 30rpx;
  padding-top: 30rpx;
  padding-left: 40rpx;
}
//城市名字
.city-name {
  border-bottom: 1px solid #ccc;
  background: rgba(223, 222, 222,0.5);
  padding-top: 20rpx;
  padding-bottom: 20rpx;
  font-size: 30rpx;
  color: gray;
  padding-left: 40rpx;
}
//右侧索引条布局,先设置背景颜色占位
.right {
  position: fixed;
  display: flex;
  flex-direction: column;
  height: 100%;
  width: 60rpx;
  background: red;
}
// js文件
var items = require('../../data/citydata.js');//引入我们的城市列表资源
var that;
//增加属性
data: {
    letters: ['定位', 'A', 'B', 'C', 'D', 'E', 'F', 'G', 'H', 'I', 'J', 'K', 'L', 'M', 'N', 'O', 'P', 'Q', 'R', 'S', 'T', 'U', 'V', 'W', 'X', 'Y', 'Z'],
    citys: []//增加属性
  }
  //onload函数中赋值
  that = this,
  that.setData({
    citys: items.citys
  })
citydata.js这个文件是在和项目pages同级目录data下面,数据结构如下:
// js文件
const citys = [
  {
    "orgId": "360829",//城市id
    "name": "安福县(吉安市)",//城市名字
    "simplepinyin": "A",//首字母
    "isshowletter": true//是否显示首字母
  },
  ...//省略若干
  ]
  //暴露给外部使用
  module.exports = {
  citys: citys
  }
item点击事件
在xwml中增加bindtap事件,代码如下:
// wxml布局文件
<view class='content'>
  <scroll-view scroll-y='true' class='city-scroll' scroll-with-animation='true'>
    ...
      //城市列表,增加点击事件,把id和名字通过data-xxx形式传递到js
      <view wx:for='{{citys}}' class='city-item' bindtap='selectcity' data-orgid='{{item.orgId}}' data-orgname='{{item.name}}'>
      	//这里通过条件控制来决定显示字母还是城市名字
        <text class='city-letter' wx:if='{{item.isshowletter}}'>{{item.simplepinyin}}</text>
        <text class='city-name'>{{item.name}}</text>
      </view>
   ...
</view>
js中响应事件
// js文件
selectcity: function(e) {
    var orgid = e.currentTarget.dataset.orgid
    var orgname = e.currentTarget.dataset.orgname
    wx.showToast({
      title: 'orgid : ' + orgid + ' orgname : ' + orgname,
      icon: 'none'
    })
  }
代码看上去很多,其实也不难,对照界面布局和注释,我相信看到这里应该没有啥难度,接下来我们看下效果
到这里左边的滑动列表我们就实现了,城市列表数据来源读者大可以按照自己的需求替换,只要格式跟上面类似就可以
右边带字母的索引条
索引条从上到下分别是定位和26个大写字母
我们先看wxml布局
// wxml布局文件
<view class='content'>
  ...//左边滑动列表布局先省略
  <view class='right'>
    <view wx:for="{{letters}}" class='letter'>{{item}}</view>
  </view>
</view>
js文件
// js布局文件
data: {
    letters: ['定位', 'A', 'B', 'C', 'D', 'E', 'F', 'G', 'H', 'I', 'J', 'K', 'L', 'M', 'N', 'O', 'P', 'Q', 'R', 'S', 'T', 'U', 'V', 'W', 'X', 'Y', 'Z']
  }
wxss文件
// wxss文件,水平布局,子元素从右到左排列
.content {
  display: flex;
  flex-direction: row;
  justify-content: flex-end;
  height: 100%;
}
//右侧索引条采用fixed固定,并采用sace-around让索引条里的子元素间隔均匀分布
.right {
  position: fixed;
  display: flex;
  flex-direction: column;
  height: 100%;
  width: 60rpx;
  justify-content: space-around;
  align-items: center;
}
.letter {
  font-size: 20rpx;
  color: #1296DB;
  width: 60rpx;
  padding-top: 5rpx;
  padding-bottom: 5rpx;
  text-align: center;
}
上面代码和注释已经标注的很清楚了,我们去掉索引条原来占位的红色背景之后看下效果:

看上去效果还不错,已经达到了我们预期
索引条响应触摸和点击事件
接下来就是响应索引条的触摸和点击事件,这里应该就是整篇文章中稍微难点的地方了。那么我们怎么知道当前我们的手指触摸到了那个字母上面了呢?我们的思路是,将索引条从上到下等分为27份(里面26个字母和一个定位,总共27个元素),当手指触摸的时候记下y坐标,然后用这个y坐标除以索引条的高度再乘以27,最后转成整数,这个就是我们手指触摸在letters数组中的下标了。具体公式为:
index = parseInt(touchy / height * 27)
接下来代码实现:
// wxml布局文件
<view class='content'>
  ...//省略部分代码
  <view class='right' bindtouchstart='touchStart' bindtouchmove='touchMove' bindtouchend='touchEnd' id='right'>
    <view wx:for="{{letters}}" class='letter' bindtap='letterclick' data-letter="{{item}}">{{item}}</view>
  </view>
</view>
// js文件
var touchEndy = 0;//页面增加y坐标属性定义
var rightheight = 0;//索引条高度

//onshow中获取索引条高度
var query = wx.createSelectorQuery();//创建节点选择器
    query.select('#right').boundingClientRect()
    query.exec(function (res) {
      //res就是 所有标签为mjltest的元素的信息 的数组
      console.log(res);
      //取高度
      console.log("height : "+res[0].height);
      rightheight = res[0].height;
 })

//开始触摸事件
touchStart: function (e) {
  console.log('touchStart start ');
  touchEndy = e.touches[0].pageY;
  console.log('touchStart end ');
},
touchMove: function (e) {
  touchEndy = e.touches[0].pageY;
  var lindex = parseInt(touchEndy / rightheight * 27);//根据前面分析获取手指触摸位置在letters中的index值
  var value = this.data.letters[lindex];
  console.log(" touchMove value : " + value);
},
touchEnd: function (e) {
   var lindex = parseInt(touchEndy / rightheight * 27);
   var value = this.data.letters[lindex];
   console.log("touchEnd value: " + value);
 },
  //右侧索引表点击事件
  letterclick: function (e) {
    var letter = e.currentTarget.dataset.letter;

    if('定位' == letter){
      that.setData({
        toView: 'dw',
      })
    }else{
      this.showOrHideLetterDialog(isShow,letter,true);
      that.setData({
        toView: letter,
      })
    }
    console.log('letterclick letter : ' + letter);
  }
上面这段代码核心就是把触摸的坐标转换成letters中的下标,从而拿到letters中的内容,进而通过弹框显示,到这里,通过控制台打印,我们能正确的将触摸坐标映射成letters中的下标,我就不截图展示了。接下来就是把拿到的letters中内容通过弹框展示出来,主要是通过自定义组件来实现,组件在项目中和pages平级的componet目录中的letterDialog目录中(这个目录可以自己定义的),下面直接看组件实现:
// js文件
// component/commDialog/commDialog.js
Component({
  /**
   * 组件的属性列表
   */
  properties: {
  },

  /**
   * 组件的初始数据
   */
  data: {
    isShow: false,//是否显示
  },

  /**
   * 组件的方法列表
   */
  methods: {
    hideDialog: function () {
      this.setData({
        isShow: false
      });
    },
    showDialog: function () {
      this.setData({
        isShow: true
      });
    },
    setLetter: function (l){
      this.setData({
        letter: l
      });
    },
    getDialogState: function () {
      return this.data.isShow;
    }
  },
})
// json文件
{
  "component": true,
}
// wxml文件
<view class='letter-text' wx:if="{{isShow}}">{{letter}}</view>
// wxss文件
.letter-text {
  background: white;
  color: #1296DB;
  font-size: 100rpx;
  font-weight: bold;
  position: fixed;
  width: 150rpx;
  padding-top: 30rpx;
  padding-bottom: 30rpx;
  top: 40%;
  left: 300rpx;
  text-align: center;
  box-shadow:0px 2px 5px 5px gray;//增加阴影
}
然后我们在页面json文件中引用组件:
// 页面json文件,这里路径要注意
{
  "usingComponents": {
    "dialog": "../../component/letterDialog/letterDialog"
  },
  "navigationBarTitleText": "城市选择"
}
页面wxml增加dialog布局
// 页面wxml
<view class='content'>
  ...//隐藏布局
  <dialog id='dialog'/>
</view>
页面js获取dialog,并在touch事件和点击事件中弹出
// 页面js
onReady: function () {
    //获得dialog组件
    this.dialog = this.selectComponent("#dialog");
}

//右侧索引表点击事件
  letterclick: function (e) {
    var letter = e.currentTarget.dataset.letter;
    var isShow = that.dialog.getDialogState();
    if('定位' == letter){//点击定位不弹框
    }else{
      //不是点击定位,弹出触摸的字母
      this.showOrHideLetterDialog(isShow,letter,true);
    }
    console.log('letterclick letter : ' + letter);
  },
  startTime: function (autodimiss) {
    //1500毫秒之后弹框自动消失
    if (autodimiss){
      timer = setTimeout(function () {
        that.dialog.hideDialog();
      }, 1500)
    }
  },  //touch 事件有bug
  touchStart: function (e) {
    console.log('touchStart start ');
    touchEndy = e.touches[0].pageY;
    console.log('touchStart end ');
  },
  touchMove: function (e) {
    touchEndy = e.touches[0].pageY;
    var lindex = parseInt(touchEndy / rightheight * 27);
    var value = this.data.letters[lindex];
    var isShow = that.dialog.getDialogState();
    if('定位' != value){
      //不是点击定位,弹出触摸的字母
      this.showOrHideLetterDialog(isShow, value, false);
    }
    console.log(" touchMove touchEndy : " + touchEndy + " lindex : " + lindex + " value : " + value);
  },
  touchEnd: function (e) {
    var lindex = parseInt(touchEndy / rightheight * 27);
    var value = this.data.letters[lindex];
    var isShow = that.dialog.getDialogState();
    if ('定位' == value) {
    } else {
       //不是点击定位,弹出触摸的字母
      this.showOrHideLetterDialog(isShow, value, true);
    }
    console.log("touchEnd touchEndy : " + touchEndy + " lindex : " + lindex + " value : " + value);
  },
  showOrHideLetterDialog: function(isShow,letter,autodimss) {
    if (!isShow) {
      that.dialog.setLetter(letter);
      that.dialog.showDialog();
      this.startTime(autodimss);
    } else {
      clearTimeout(timer);
      this.startTime(autodimss);
      that.dialog.setLetter(letter);
    }
  }
上面的代码主要就是讲手指触摸的坐标转化成letters中的下标元素,然后通过类似dialog弹出来,虽然代码较多,但是认真看完,你会发现逻辑其实并不复杂,接下来看效果:
看到这里我们已经能正确的将手指触摸的坐标转换成对应字母弹出。
索引和列表联动
这个也比较简单,主要是通过scroll-view的scroll-into-view属性来定位。通过将letters中的元素映射成id,然后触摸和点击的时候动态改变scroll-view的scroll-into-view为触摸view的id就可以了。下面上代码:
完整wxml页面
// 完整页面wxml
<view class='content'>
  //增加scroll-into-view属性
  <scroll-view scroll-y='true' class='city-scroll' scroll-with-animation='true' scroll-into-view="{{toView}}">
    <view class='city-content'>
      //增加id用来做联动,定位特殊处理
      <view class='location-city-title' id='dw'>定位城市</view>
      <view class='location-parent'>
        <view class='location-city' bindtap='hotcity'>南昌市</view>
      </view>
      <view wx:for='{{citys}}' class='city-item' bindtap='selectcity' data-orgid='{{item.orgId}}' data-orgname='{{item.name}}'>
        //增加id用来做联动
        <text class='city-letter' wx:if='{{item.isshowletter}}' id='{{item.simplepinyin}}'>{{item.simplepinyin}}</text>
        <text class='city-name'>{{item.name}}</text>
      </view>
    </view>
  </scroll-view>
  <view class='right' bindtouchstart='touchStart' bindtouchmove='touchMove' bindtouchend='touchEnd' id='right'>
    <view wx:for="{{letters}}" class='letter' bindtap='letterclick' data-letter="{{item}}">{{item}}</view>
  </view>
  <dialog id='dialog'>
  </dialog>
</view>
完整js页面
// 完整js
// pages/citylist/citylist.js
var that;
var timer;
var items = require('../../data/citydata.js');
var rightheight = 0;
var touchEndy = 0;
Page({

  /**
   * 页面的初始数据
   */
  data: {
    letters: ['定位', 'A', 'B', 'C', 'D', 'E', 'F', 'G', 'H', 'I', 'J', 'K', 'L', 'M', 'N', 'O', 'P', 'Q', 'R', 'S', 'T', 'U', 'V', 'W', 'X', 'Y', 'Z'],
    citys: [],
    toView: '',//用来做定位联动
  },

  /**
   * 生命周期函数--监听页面加载
   */
  onLoad: function (options) {
    that = this,
    that.setData({
      citys: items.citys
    })
  },

  /**
   * 生命周期函数--监听页面初次渲染完成
   */
  onReady: function () {
    //获得dialog组件
    this.dialog = this.selectComponent("#dialog");
  },

  /**
   * 生命周期函数--监听页面显示
   */
  onShow: function () {
    //创建节点选择器
    var query = wx.createSelectorQuery();
    query.select('#right').boundingClientRect()
    query.exec(function (res) {
      //res就是 所有标签为mjltest的元素的信息 的数组
      console.log(res);
      //取高度
      console.log("height : "+res[0].height);
      rightheight = res[0].height;
    })
  },
  //右侧索引表点击事件
  letterclick: function (e) {
    var letter = e.currentTarget.dataset.letter;
    var isShow = that.dialog.getDialogState();
    if('定位' == letter){//点击定位滚动到顶部
      that.setData({
        toView: 'dw',
      })
    }else{
      this.showOrHideLetterDialog(isShow,letter,true);
      that.setData({//定位到字母所在城市item
        toView: letter,
      })
    }
    console.log('letterclick letter : ' + letter);
  },
  startTime: function (autodimiss) {
    if (autodimiss){
      timer = setTimeout(function () {
        that.dialog.hideDialog();
      }, 1500)
    }
  },  //touch 事件有bug
  touchStart: function (e) {
    console.log('touchStart start ');
    touchEndy = e.touches[0].pageY;
    console.log('touchStart end ');
  },
  touchMove: function (e) {
    touchEndy = e.touches[0].pageY;
    var lindex = parseInt(touchEndy / rightheight * 27);
    var value = this.data.letters[lindex];
    var isShow = that.dialog.getDialogState();
    if('定位' != value){
      this.showOrHideLetterDialog(isShow, value, false);
    }
    console.log(" touchMove touchEndy : " + touchEndy + " lindex : " + lindex + " value : " + value);
  },
  touchEnd: function (e) {
    var lindex = parseInt(touchEndy / rightheight * 27);
    var value = this.data.letters[lindex];
    var isShow = that.dialog.getDialogState();
    if ('定位' == value) {
      that.setData({
        toView: 'dw',
      })
    } else {
      this.showOrHideLetterDialog(isShow, value, true);
      that.setData({
        toView: value,
      })
    }
    console.log("touchEnd touchEndy : " + touchEndy + " lindex : " + lindex + " value : " + value);
  },
  showOrHideLetterDialog: function(isShow,letter,autodimss) {
    if (!isShow) {
      that.dialog.setLetter(letter);
      that.dialog.showDialog();
      this.startTime(autodimss);
    } else {
      clearTimeout(timer);
      this.startTime(autodimss);
      that.dialog.setLetter(letter);
    }
  },
  selectcity: function(e) {
    var orgid = e.currentTarget.dataset.orgid
    var orgname = e.currentTarget.dataset.orgname
    wx.showToast({
      title: 'orgid : ' + orgid + ' orgname : ' + orgname,
      icon: 'none'
    })
  }
})
// 完整wxss
.content {
  display: flex;
  flex-direction: row;
  justify-content: flex-end;
  height: 100%;
}

.right {
  position: fixed;
  display: flex;
  flex-direction: column;
  height: 100%;
  width: 60rpx;
  justify-content: space-around;
  align-items: center;
}

.letter {
  font-size: 20rpx;
  color: #1296DB;
  width: 60rpx;
  padding-top: 5rpx;
  padding-bottom: 5rpx;
  text-align: center;
}

.city-scroll {
  left: 0;
  position: fixed;
  height: 100%;
  width: 690rpx;
}

.city-content {
  display: flex;
  flex-direction: column;
}

.location-parent {
  display: flex;
  flex-direction: row;
}

.location-city-title {
  padding-left: 40rpx;
  padding-top: 30rpx;
  padding-bottom: 30rpx;
  background: rgba(223, 222, 222,0.5);
  color: gray;
  font-size: 30rpx;
}

.location-city {
  border: 1rpx solid #ccc;
  border-radius: 20rpx;
  margin-left: 40rpx;
  margin-top: 20rpx;
  padding-top: 15rpx;
  padding-bottom: 15rpx;
  font-size: 30rpx;
  width: 150rpx;
  text-align: center;
}

.city-item {
  display: flex;
  flex-direction: column;
}

.city-letter {
  font-size: 30rpx;
  padding-top: 30rpx;
  padding-left: 40rpx;
}

.city-name {
  border-bottom: 1px solid #ccc;
  background: rgba(223, 222, 222,0.5);
  padding-top: 20rpx;
  padding-bottom: 20rpx;
  font-size: 30rpx;
  color: gray;
  padding-left: 40rpx;
}
文章到这里,我们已经完整的实现了开始所展示的效果了。
尾巴
文章虽然有点长,但是逻辑并不是很复杂,关键地方都有加入注释,希望能对读者有所帮助。
如果文章中有错误的地方,欢迎大家留言指正。如果你喜欢我的文章,也欢迎给我点赞,评论,谢谢!
